Do-it-yourself modification of the stove on Niva 21213 is necessary if the car’s heating system malfunctions. There is no point in delaying this, because uneven thermal regulation leads to foggy windows or icing. In any of these cases, the view of what is happening on the road deteriorates. The malfunction causes wear of individual elements of the device or manufacturing defects.
Fault Diagnosis
The stove supplied as standard will need to be modified for preventive purposes. The procedure will not take much time, but it will prevent many problems in the future. Driving experience suggests that the first severe frosts will undermine the “health” of the device. The list of main weaknesses is as follows:
- the optimal operating temperature range for model 2121 is from -5 to +10°C;
- inability to warm up the air in the cabin if outside is -8°C or lower;
- when the blowing power increases, the temperature does not increase;
- When driving in 2nd gear, the noise from the Niva's stove becomes significant.
That is why it is better to take the necessary measures in advance. The driver has few alternatives. On the one hand, everything remains in its place. The heating device is used at minimum power. During mild winters this is still tolerable, but with the onset of real cold weather the conditions will become unbearable. On the other hand, it's easy to spend a few hours rectifying the situation.
Further developments proceed as follows. If the heating in the car is running at ½ power, you can limit yourself to minor repairs. The main thing is to make sure that there are no noises or extraneous knocks, otherwise the Niva 21213 should immediately go for a technical inspection.
The presence of an unpleasant sound indicates the need to replace the device. A specialized retail network offers ready-made options for heating mechanisms for Niva. If desired, it can be assembled independently.
The second option is considered more preferable. When you assemble it yourself, you have the opportunity to literally personalize the stove. To do the work yourself, you will need to visit a specialized store or market to buy spare parts.
When purchasing, original parts or analogues are selected. The main thing is that they have a quality certificate. Otherwise, they cannot be installed. It would be useful to rewrite the technical data of the vehicle so as not to exceed the parameters recommended by the manufacturer.
Self-installation of a VAZ 2108 stove on a Niva
Remaking the standard stove on the Niva will help you prevent many problems in the future when persistent frosts begin. The main problem of the heating system of this car is that in winter the interior is practically not heated. Self-installation of parts for the VAZ-2108 stove on the Niva will help to personalize this unit and make its operation more efficient. Experienced car enthusiasts recommend installing only some of the spare parts from the stove on the Niva 4x4, so as not to carry out more extensive work.
Technical details of the procedure
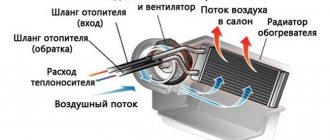
The efficiency of the new heating system on Niva will be determined not by the cost of the purchased parts, but by their quality. To operate, you will need the following elements: a car resistor, a figure-eight heater and a “snail”. It is a mistake to believe that only “original” spare parts are suitable for repairing a heating device. The main requirement is technical compatibility.
If in doubt, a drawing of the heating system will provide clarity. The further procedure is as follows:
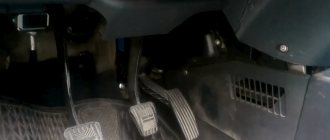
- Cut a new mounting hole. This is done carefully, because the reliability of the heating system’s operation depends on the quality of the preparatory process. It is recommended to place the engine as low as possible in the air duct, otherwise the device will rest against the hood. This should not be allowed to happen, otherwise the stove fan will not last long.
The heating system of a new model is checked by test switching on. It is recommended to switch modes smoothly. The device must remain on each of them for at least 5-7 minutes. The driver’s task is to make sure that the operation of the system is not accompanied by extraneous noise and vibration.
Modifying the stove: instructions
In order for the modified unit to work more efficiently, it is necessary to install high-quality spare parts on it. This is done as follows:
- A seat is cut out for a new heater from a VAZ-2108. Do this carefully so that it falls through or is higher than the air ducts. In this case, the engine should be positioned so that it does not rest against the hood, that is, as low as possible. Otherwise, its fan will fail very quickly.
- Smoothly remove power from the motor through the outlet hole in the air duct.
- Seal the heater mounting points with sealant. Do not miss any fasteners, otherwise power to the engine will be disrupted during engine operation due to vibration.
- Cut two stainless steel plates to fit the dimensions of the nozzle and the upper opening. Measure several times before cutting the steel.
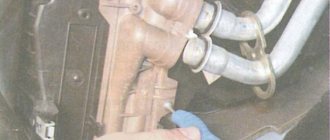
- Remove the valve (damper) using a wrench and a screwdriver. Do the job carefully so you don't have to buy a new stove.
- Finish the job by installing new ducts and assembling the system.
You should not install an additional heating unit on your Niva; it will not provide much heat, but will increase the load on the engine. After completing installation, it is recommended to check the part in several modes. If there is no vibration or noise, then you can use the updated stove without restrictions.
Original parts vs analogues: practical advice
As mentioned earlier, such a choice does not affect the quality of the heating system. At the same time, car mechanics make several reservations. For those who plan to use VAZ stoves, it would be useful to check the power system. It is different for some modifications. That is why all actions are consistent with the drawings.
It is permissible to use the VAZ 2108 heater, provided that two recommendations are followed. Firstly, the mounting socket is 1-2 cm larger than the size of the device. The additional area will reduce the vibration impact. Secondly, the switch is installed taking into account the specifics of the VAZ heating system. You will have to tinker less when minor modifications to the system are needed.
The ventilation system is updated in 1-2 hours, depending on the degree of wear of the engine.
If the factory-installed “snail” has no signs of physical wear, you only need to replace the heater “engine” itself.
It’s worse if the factory equipment of a Chevrolet model has manufacturing defects. A complete replacement of the device is recommended. This will save time.
The operation of the heating system determines the comfort and safety of driving. The driver constantly monitors the system's performance. If extraneous noise appears, it is necessary to urgently carry out a technical inspection.
Modernization of the Niva stove
Before installing the fan, I asked myself some questions, some were answered by this site and many others. The rest was figured out during repairs and visits to auto stores of different models. To upgrade the air intake, you will need all the remaining material that you cut, so don’t throw away the plastic and use a ruler and calipers before work.
What was and what has become.
The partition crashed from part photo number 1
Shown here is the location of the drainage system in case of rain.
Sealing rubber from VAZ 2104
Inside, before foaming, I sealed the edges with foil tape (does not corrode).
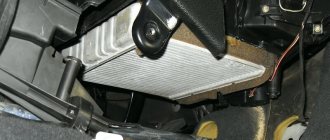
Let's start installing the fan control resistor at four speeds. We make a hole in the bottom cover (so that the resistor fits and does not touch the fan)
We make a lid from plastic leftovers to cover the resistance.
Cut a hole for the resistor itself (resistance)
And the final photos.
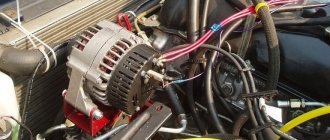
Installing the engine from the VAZ 08 stove on the Niva VAZ 21213
Tired of the shrill singing of the classic stove and the frozen windows of my Cube. I set out to correct the mistake of my native auto industry. And now the time has come for my old dream! Having found the topic I needed on the Internet and comments from folk craftsmen, I got down to business. At the same time, don’t forget to buy a snail, a switch and a resistor, all from 08. That’s what happened!
Stove modernization
To upgrade the stove on your Niva, we suggest that you borrow, first of all, a VAZ-2108 stove fan. We do not recommend installing it instead of what is already installed on your Niva; by the way, you are unlikely to succeed, since it is located inside the car. It will be problematic to introduce a fan from 2108 into the cabin, so they find a more suitable space for it in the engine compartment. Upgrading the stove involves installing an additional fan, which is what we suggest you do.
We also recommend that you immediately decide whether you only want to install an additional fan or additionally borrow its speed switch and heater resistor from the G8.
Fan replacement algorithm
Initially, we suggest that you remove the air intake box, which in the driver’s environment also has another popular name: “boot”. It is not very convenient to remove it yourself, so we recommend that you involve your friend in performing this procedure. The inconvenience is that the nuts need to be unscrewed while in the cabin, and the bolts themselves must be held from the engine compartment. Your free hand will certainly not reach the engine compartment. After all the nuts are unscrewed, remove the air intake.
Now you have to perform some manipulations to remake the removed air intake, and then install a figure-of-eight fan into it. Otherwise, you will not be able to close the hood because the fan will interfere with the lock.
So, you need to cut off the plastic on the side of the air intake, and on the fan itself - the fastening parts protruding to the sides. Once the fan is perfectly located in the internal space of the air intake, secure it with sealant. Place suitable material around the fan nozzle. This will allow you to eliminate loss of air outflow. Now install your upgraded fan shroud and try closing the hood.
Motor replacement algorithm
It would be useful to consider the issue of installing a stove motor borrowed from the G8. In this case, it will also be possible to significantly improve the operation of the stove. The removed figure-eight motor also needs to be initially tried on in the air collector, and if necessary, cut out additional space with a grinder so that it can successfully fit in it. After you make sure that it fits properly, we recommend fixing the motor with sealant to eliminate possible vibration while driving the car. Of course, the original engine should be thrown away and all the wires should be connected to the mechanism you just installed.
After you have upgraded the heater, we suggest that you also install an additional “figure-of-eight” resistor, which will allow you to increase the number of speeds to three. You need to install the resistor next to the fan you installed earlier. These actions allow you to perfectly regulate the rate of supply of warm air, providing quick or gradual heating of the interior.
So, if you carefully study in advance the connection diagram for the fan, resistor, and motor borrowed from the domestic G8, you will be satisfied with the result of your own work. You simply won’t recognize your car, since the interior will instantly warm up, increasing the level of comfort for the driver and passengers.
Conversion of the Lada 4×4 stove (installation of a fan from a VAZ 2108)
December 18, 2015 Lada.Online 149 954
The stove on the VAZ 2121, 2131 has a number of advantages and disadvantages. One of them is associated with an electric fan, which not only blows weakly, but also makes a lot of noise and whistles during operation. Replacing it with a new type fan will solve only part of the problems. As practice shows, it is better to install an additional fan from the figure eight “snail” type.
The point of the modernization is to install on the Lada 4×4 an additional electric fan from the VAZ 2108, which will be located in the engine compartment inside the air intake, where it is normally positioned at figure eight. Let us remind you that the standard Lada 4×4 fan is located inside a plastic box in the cabin.
You will need: a figure-eight stove fan with a casing (catalog number: 2108-8101091).
The fan control can be left as standard, then there will be the least amount of modifications. Or use additional parts from the VAZ 2108:
- an additional heater resistor (article: 2108-8101081), which will need to be placed in the air intake next to the fan;
- fan speed switch (2108-3709608), which is mounted on a panel in the SUV interior.
Revision instructions
Remove the air intake box (popularly called “boot”):
- In the interior, unscrew 4 nuts using a 10mm wrench;
- In the engine compartment, an assistant holds the bolts with the same key;
- Remove the air intake.
Remake the “boot” and install a fan in it:
- Cut off part of the plastic a little from the side so that the fan housing does not interfere with the hood lock;
- We cut off all the protruding parts of the fan mount and place it inside the “boot”;
- Secure the fan, securing its housing with sealant.
- We close the space around the fan nozzle with suitable material to prevent air outflow;
- We install the casing with the fan in place, laying the wires;
- We check that the hood closes without problems.
- The result should be a design as shown in the video:
- The damper can be left in place, but if it is removed, there will be no additional obstruction to the air flow into the cabin.
Connection diagram
The easiest way is when the fan speed adjustment remains standard, but two speeds may not be enough. If you change the standard Lada 4×4 switch to a figure-of-eight one and install an additional resistor from it, then there will be three speeds! Scheme of such a connection:
What did you improve?
The modernized stove has a number of advantages:
- Quiet, and at 1st speed silent.
- Productive, at speed 1 it blows at the level of speed 2 of the old fan. At maximum speed, dust will fly out of the air ducts.
Such tuning of the heating system is mandatory for drivers of northern cities. Have you improved the Lada 4×4 stove in this way? Write reviews and additions on this modernization, take part in the survey. Let us remind you that other modifications to the SUV are published in this category.
Source: https://xn--80aal0a.xn--80asehdb/do-my-self/tuning/tuning-lada-4×4/884-peredelka-pechki-nivy-4h4-ustanovka-ventilyatora-ot-vaz- 2108.html