Non-separable method
The essence of this technology is that a hole is drilled in the body of the ball joint removed from the car, through which the internal space is filled under pressure with a heated polymer composition.
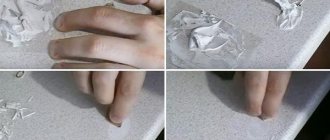
Before such a procedure, it is important to blow out the hinge with compressed air to get rid of dust.
After the part has cooled, it is cleaned of any remaining substances and the rubber boot is installed in place. For this purpose, ready-made rods are used, which are filled with repair compounds. They can be purchased at specialized automotive stores.
To inject the repair compound with pneumatic force, you will need an extruder.
You can heat the polymer composition using a blowtorch or burner.
A hinge restored in this way can operate for at least 50,000 kilometers. In addition, this technology can be used several times. An important condition for its use is the integrity of the hinge structure.
This method has the following advantages:
- high-quality dry lubrication of the finger is ensured;
- the polymer composition qualitatively fills all voids;
- high strength of the restored part;
- preservation of the factory design and integrity of the part being repaired;
- When the plastic hardens, a solid liner is formed, which is denser than the factory version.
Thus, worn ball joints can be restored on your own. This is not too difficult to do if you adhere to certain rules and sequence. On the other hand, after such procedures one cannot count on a long service life of the restored parts. If it is possible to install a new part, then it is better to give preference to this option.
Successful design is the key to success
So, it’s time to find out what the secret of the ball joint is, and to do this, let’s look at its design. Let's be honest - there is nothing supernatural in it, and on the contrary, it is an extremely simple mechanism.
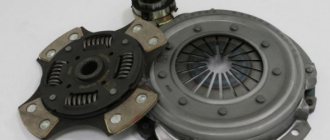
The average ball joint of a modern car consists of the following elements:
- a rod with a spherical tip on one side and an element for fastening to the suspension arm on the other;
- cylindrical metal body;
- polymer liner;
- a pressure washer that secures the previous part in the body;
- boot - a rubber shell that ensures its tightness.
As we can see, there is nothing complicated, and the attached illustration quite clearly lets us understand how everything works.
Modern ball joints are consumables, that is, they are maintenance-free and, in the event of failure, can only be replaced.
Previously, designers took a more rational approach to these parts, and provided them with special holes through which lubricant could be pressed inside, but nowadays this is irrelevant, because thanks to the high-strength plastics used for the liners, these suspension elements can travel up to 150 thousand kilometers without any problems .
About the device
Do-it-yourself ball joint remover drawings
If you didn’t click on the link above and didn’t read it, here I’ll remind you a little about the structure. You need to understand that the ball joint serves for a movable joint that can rotate, that is, movement in several planes at once. In cars it is mainly used in the front suspension to turn the front wheels.
- There is a cylindrical body.
- A polymer liner that is immersed in it.
- Metal finger or “ball” or rod, there are many names. On one side it has a spherical element, on the other side there is a threaded rod.
- The boot protects the structure from the penetration of dust and dirt.
- Pressure spring or even the bottom. By the way, sometimes it is not there if the support is not collapsible.
Just like that, but we need this in order to understand how to restore.
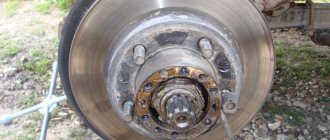
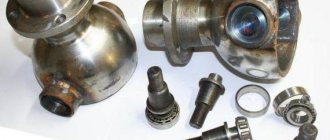
The ball joint is designed for reliable movable fastening of the wheel hub to the suspension arm. The ball joint consists of a ball pin, a housing and a plastic insert. The body of the ball joint is either spot welded from two halves with stamped, spherical recesses with a hole for a finger in one of them, or it is a thick-walled metal cup into which an insert with a finger is inserted, after which the bottom is placed, and the edge is rolled so that the structure does not disassemble.
As long as the boot is intact, the ball joint practically does not wear out. Intensive wear of the ball begins after the boot becomes unusable, with dirt getting inside. Therefore, keep an eye on the boots, since timely replacement of an unusable boot will extend the life of the unit.
Read further: Description and replacement of Hyundai Accent Solaris and Getz sensors, idle crankshaft and others
True, the joint of the welded body is not airtight, so water gets into the body through it, even with a whole boot. Therefore, if the assembly body consists of two parts, it is advisable to fill it with lithol through a grease fitting.
The ball joint allows for a reliable movable connection between the wheel hub and the suspension arm. The assembly includes a housing, a ball pin, and an insert made of plastic. The body most often has a welded structure - two parts with a stamped spherical recess for the finger are connected using spot welding.
Essentially, this element is a thick-walled glass made of metal into which an insert with a finger is then inserted. To make the housing structure non-separable, its edges are flared. Often the liner is not manufactured separately, but the area between the walls of the housing and the ball surface of the finger is filled with a special polymer material. To protect the unit from dirt and water, a boot is placed on top.
It should be noted that active wear of the ball joint begins after the boot is damaged. Until this happens, the unit is practically not subject to wear. Thus, if you monitor the condition of this element and replace it in a timely manner, you can significantly increase the life of the unit.
Equipment for restoring ball joints
Replacing ball joints on Renault Logan with removal without removing the lever
The quality of our roads does not need any additional description and is well known not only to all drivers, but also to passengers. The first thing that suffers from its low level is the ball joints, which experience destructive influences from all sides while the vehicle is moving. The diagram shows in red the zones of maximum load exerted on the node connection:
The node itself consists of two elements:
- Clips;
- Rotating ball.
Between them there is a special polymer, which:
- Softens the force of the ball hitting the cage;
- Minimizes the effect of friction of metal parts against each other.
All problems, including turning the wheel on its side, are possible if the polymer liner wears out, which is inevitable over time. Well, on the CIS routes this time comes too quickly.
SJR technology allows you to avoid such a catastrophic outcome and, subject to timely intervention, maintain the performance of the ball joint almost indefinitely. What is it? Let's figure it out.
Signs of element failure
So, we answered the question: “Car ball joint: what is it?” Now it is necessary to determine when this element becomes unusable. Among the main symptoms here are:
- noise from the suspension at low speed when overcoming various road obstacles (depressions, speed bumps, etc.). In this case, the sounds come from the front of the car. As a rule, this is caused by mechanical failures and reduced lubrication levels. In addition, the sound often appears in winter even under normal operating conditions of the unit;
- the wheels swing to the sides during straight-line movement. This indicates the presence of play in the support. This type of problem is very serious, since a strong tilt can lead to a complete twisting of the wheel;
- uneven wear of car tires. It is worth noting that such a symptom in itself can lead to the supports failing;
- When you turn the steering wheel you hear squeaks.
Having discovered such a malfunction, you should begin repair work as quickly as possible.
Self-diagnosis
How to replace a CV joint on a VAZ 2110 with your own hands
The best option to find a fault is always a diagnostic stand at a service station. But it is also possible to find the breakdown yourself. To determine the malfunction of the ball joint by ear, you will need an assistant who will rock the car from side to side, while the owner himself carefully listens to all the creaks and knocks that the suspension makes.
Checking the condition of the ball joints visually is much more effective, but you will need an inspection hole or a lift. The assistant holds the brake pedal, and the owner rocks the wheel. If there is play, then the ball joint must be changed or, in order to save money, try to restore it.
Node diagnostics
You can find out about the need for restoration work on ball joints through diagnostics. As soon as you hear a creaking and knocking sound from the suspension while driving on an uneven road, the unit is worn out and needs to be restored. To accurately determine the source of these sounds, it is better to carry out diagnostics together - one person enters the inspection hole and puts his hand on the ball joint, and the second begins to rock the car.
Read also: How to cut a circle in metal with a grinder video
If the sound is felt by hand, then the support must be removed and checked for play in the hinge joint, securing it in a vice. It should be remembered that the finger should not move under the influence of light forces, but at the same time it should not bite. It is also recommended to carry out a similar check in the following situations:
- A squeaking sound is heard when turning the steering wheel.
- When driving in a straight line, the car spontaneously wobbles.
- To turn the steering wheel you have to apply quite a lot of force.
When is ball restoration justified?
Typically, the ball joint is pressed into the body of the suspension arm and steering rod, being one with them. Therefore, complete replacement of hinges is an expensive procedure due to the replacement of an entire structure.
To save money, you can try to restore the ball joint, although this part is considered unrepairable:
- To repair this unit, you can dismantle it, disassemble it and replace worn polymer inserts and anther. In this case, a grinder is used for disassembly, and welding is used for restoration.
- Another option would be a method where a special polymer composition is poured into the part under pressure. With its help, gaps between parts resulting from wear are leveled.
Many experienced repairmen recommend disassembling this element in any case to grind the ball of the pin axis. This approach will ensure the durability of the repaired part. In addition, in this case, you can evaluate the condition of the finger itself and replace it if necessary.
What is a ball joint in a car?
The front wheels of the car must have a large degree of freedom when turning. Among other things, the steering knuckle with the hub must also be movable. This design reduces shock loads on the suspension elements and ensures constant contact of the vehicle's wheels with the road surface.
Inside the body of the part there is a polymer composition, thanks to which the ball can move in different planes. This movement is “backlash-free”, which ensures a constant wheel alignment angle
The thread is necessary to secure the ball joint to other parts. It connects to the lever and forms movable suspension elements. The ball design also includes a special boot made of rubber material.
DIY ball joint remover: instructions and materials
When repairing the chassis of any car, it becomes necessary to remove steering rods or ball joints.
In both cases, their tip has a conical shape, which ensures optimal fit of the products in the socket.
During operation, they become very compact, and if moisture gets between them, then corrosion forms at their joints. It makes it even more difficult to separate these parts.
To make repair work easier, a do-it-yourself ball joint remover would be an excellent option, which will greatly simplify the repair and help remove the tip with little effort.
Why do you need a ball joint remover?
Without it, it is difficult to dismantle and carry out repair work on the chassis of the car; a puller may also be needed to disassemble the steering joints. It can be used for ball joints of different diameters. When choosing its design, they rely on the technical characteristics of a particular car.
Theoretically, the dismantling of ball joints can be carried out with any available tool, using a sledgehammer or hammer, but such repairs are classified as “stressful”.
If a car service center offers just such services, then you should think carefully before agreeing to them. After all, after such a repair, the impact goes to the suspension elements, which can quickly fail.
What does a puller look like?
There are three types of pullers:
- lever;
- ball;
- wedge (fork together with hammer).
They differ in appearance, but their operating principle is the same. The finger is twisted out of its seat using a hammer or by turning the nut.
The puller is designed in such a way that it fills the space between the connected parts and after turning it you can hear a click, indicating that the connection has loosened and you can remove the ball joint from its seat.
The puller helps even a novice in auto repair work to dismantle it.
Which puller is better?
In the video you can see several options for ball pullers, among them the screw one is considered the best, but only it must be made with high quality.
Its analogue in the form of a fork is universal, since it can be used not only for ball joints, it also helps when removing steering ends. However, its work can negatively affect the anthers.
There are difficult cases when you have to work with a puller and a hammer in pairs: first, the supports are pushed apart with a screw, and then you need to strike with a sledgehammer.
Diagram of a homemade ball joint remover
The main components of a screw puller are:
- steering knuckle (2);
- hinge pin (1), which is set to position 2;
- puller bracket (3), it fits directly onto the fist;
- When turning, the screw stop (4) creates the necessary pressure on position 1.
This design is superior to the fork and lever model in that it can not only be made with your own hands. Also, during its operation, uniform pressure is created on the entire area of the ball joint, which eliminates damage to components and their distortions.
The only drawback may be the lack of free space above the fastening nut, which is why such a puller may not fit.
Materials needed for production
The tools and materials available in the workshop will do; you will need to find:
- a hammer and a vice to bend the rod in the desired direction;
- die used for carving;
- a long steel rod (15-17 cm), its diameter can be from 10 to 12 mm, it can be replaced with a suitable bolt;
- drill;
- nut, its size is selected according to the bolt used;
- a plate about 50 mm thick, made of metal, measuring 2x8 cm;
- welding machine;
- Bulgarian.
Step-by-step manufacturing instructions
The device for removing ball joints is quite complicated, but if you follow the step-by-step instructions, you can do it yourself:
- using a vice and a hammer, you need to bend the rod or bolt so that one arm is about half as long as the other (one side is 5 cm, the other 10-12 cm);
- cut a thread on the long part of the rod using a die;
- cut a hole on the metal plate that will be specifically for the support pin;
- bend the part into a wedge so that it can be put on it;
- Place the finished wedge on the rod and tighten the nut on top, but so that it can move along the bolt.
The finished device is suitable for emergency and planned replacement of ball joints on Zhiguli and Lanos, as well as some brands of foreign manufacturers.
The manufactured puller is not universal and cannot be used for different components, but if you succeeded in doing it the first time, then subsequent versions will be much easier.
Making a serviceable cover
The blind part of the support body is made removable. At the same time, you can change the plastic inserts many times, each time restoring the functionality of the support. The removable bottom allows for routine inspection without removing the ball joint from the suspension.
Plug: do it yourself
- A hole the size of a finger ball is drilled in the bottom (with a small gap, of course). It is drilled out - it is said conditionally. A milling machine is required. Don’t be afraid to damage the plastic liner when boring, you will still need to change it. The thread is cut inside. This is a rather complicated procedure due to the large diameter. But in any tool shop they will do this kind of work for a nominal fee.
Entrust the work to professionals if you are not one yourself
Tip: To make the plug accurately, use two ball joints. Cut the bottom off one using a grinder and use it as a template for the shape.
Replace on a clean surface, otherwise the meaning of the work is lost.
Important! It is necessary to ensure that the thread is locked, otherwise the bottom may unscrew during operation.
Repair glass: everything ingenious is simple
The principle is the same as in the first case - to make a replacement bottom. Only the execution is different. If the bottom of the support is too thin to make a full threaded connection, it is necessary to make a repair cup. It is turned on a lathe from a steel circle of suitable diameter. The same hole is made in the bottom of the glass and a thread is cut. And finally, the support replacement bottom is made.
Then the bottom of the cylinder is cut off from the ball joint using a grinder or a hacksaw. A repair glass is welded in its place. The method is more labor-intensive, but it does not allow the finger to heat up during the dismantling process.
Scheme for manufacturing a product variant
Further operation follows the same scheme: when play appears, unscrew the repair plug, remove the pin, change the plastic inserts.
It is worth noting that spare parts manufacturers produce many options for repair ball joints. Replacement inserts and new pins are sold for these collapsible housings. However, in our article we are considering self-production.
Welding as an alternative to replacement
The fastest option for restoring a ball joint. The rear (supporting) part of the cylinder is simply cut off. The method doesn’t matter - you can use a hacksaw, or you can use a grinder, but there will still be a temperature effect afterwards.
Having gained access to the cylinder cavity, you can change the polymer liners.
Important! Before installing new liners, be sure to remove any burrs formed during cutting. Torn metal edges will quickly split the liners during use.
After installing the new liners, the bottom is carefully welded. In this case, it is necessary to compensate for the production of metal formed during cutting with the thickness of the seam. Usually it is 1.5–2 mm.
Welding is one of the most painstaking options
Important! Use a welding method that minimizes temperature effects. The polymer liner inside may reach the melting point. Therefore, until it cools completely, do not apply any loads to the finger to avoid deformation of the liner.
Flaring as a repair method
This technology requires professional equipment, so it is impossible to flare a ball in a garage. A crimp ring is cut to fit the diameter of the finger ball.
Turning work will find its place here too
The seat and ball are cleaned of dirt and polished. New liners and a crimp ring are selected or machined from caprolon.
It happens that caprolon is not available, but replacing it with steel is not recommended. It’s better to spend money on this material once than to replace it more often than it could be
Read also: Rules for tinning and soldering
After assembly, the crimp ring is pressed in and rolled on a press. When crimping, special inserts-clips are used according to the diameter of the ring.
Inserts can also be found in car dealerships.
How to lubricate ball joints
Various extraneous noises that irritate the driver when driving often have the same cause - insufficiently lubricated ball joints (BJ). Should we treat this as an unfortunate inevitability, or is it better to lubricate the supports? Each driver decides for himself, but there are proven recommendations based on practical experience
It is preferable to follow them if you do not want to spend extra money due to problems with such an important car part as ball joints
To lubricate or not?
Do ball joints need to be lubricated before installation and during operation? To give the correct answer, it is worth understanding the principle of construction of any of these supports. It can be designed in different ways, but it must have a ball joint, as well as a pin. The base serves to support the hinge; the boot covers the support on top.
During operation, the hinge constantly shifts, which contributes to its rapid wear. In addition, dirt often accumulates in the empty space between the base and the boot, which interferes with the operation of the part. An alarming sign in this case is the appearance of knocks and creaks. To prevent this from happening, the space under the boot must be completely filled with auto-lubricant.
It is very important to know what is the best way to lubricate ball joints for the most durable operation.
How to lubricate ball joints
How to lubricate the ball joint before installation? The most common options are:
- lithium based;
- calcium based.
Among lithium auto lubricants, Litol-24 and CIATIM-201 are popular. They contain oil and lithium soap in different proportions, and they also differ in the composition of additional additives.
The stabilizing substances present in Litol-24 ensure good preservation of the hinge and low lubricant consumption during its operation. However, this auto lubricant does not tolerate low temperatures well. CIATIM-201 stabilizes SHO to a lesser extent, but it better protects them from frost, and is cheaper.
Polymer restoration using SJR technology
Did the diagnostics reveal a dangerous gap between the ball and the support liner? A dilemma arises: change or restore. Let us briefly describe the structure of the ball joint.
In the areas marked in red, wear is maximum
The unit consists of two parts, a cage and a rotating ball. Between them is a polymer that dampens hard impacts and reduces friction between metal parts. The system works on the principle of a joint capsule in the human legs. It is this polymer that wears out over time, and dangerous play appears.
Since it is impossible to disassemble the ball joint to replace the liner, there is only one thing left to do - melt the polymer and pour it inside. This is the essence of the sjr method.
Pouring polymers can be of different types
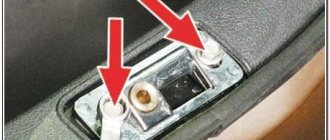
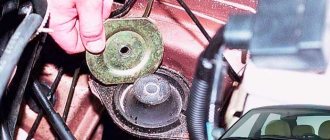
- A hole is made in the outer casing (clip) of the ball joint. You can use a ready-made grease fitting, if available.
- Using a gas burner, the ball joint is heated to the melting point of the polyamide.
- At the same time, blanks (cartridges) made of polyamide, similar to the standard one, are heated in a special extruder.
- Using an extruder under high pressure, the melt is injected into the cavity between the holder and the moving ball. Moreover, all the cracks, crevices and hollows of the standard liner are filled.
- The polymer hardens, taking the shape of the gap. The play has been eliminated, the ball joint has been restored.
Advantages of this method:
- Versatility and affordability.
- Compactness and mobility of equipment.
- Can be used both in a small service station and in your own garage.
- Available consumables.
There are also methods using stationary equipment. The repair technology is close to the factory one used in the manufacture of new ball joints. The cost of repair is approaching the price of a new unit, which makes the process unprofitable.
Causes of ball joint wear?
Since this element is located in the main part of the vehicle, it is subject to serious loads. Part malfunction can occur for a number of reasons. But, in most cases, the support ceases to cope with its functional responsibilities due to the increased gap between the finger and the polymer composition. Other negative factors affecting its condition and service life include:
- Natural wear of the pin or the body itself
- Careless driving on broken roads
- The rubber boot may rupture at any time, which will negatively affect the operation and service life of the ball joint.
- Also, if the boot breaks, the ball loses lubrication.
Low-quality parts, as a rule, last much less than their intended life. To avoid premature failure of the chassis system, you need to adhere to a careful, measured driving style. When approaching uneven or broken roads, it is best to slow down the vehicle speed to a minimum. Experienced auto mechanics also strongly recommend regularly inspecting the condition of the boot.
When is ball restoration justified?
Typically, the ball joint is pressed into the body of the suspension arm and steering rod, being one with them. Therefore, complete replacement of hinges is an expensive procedure due to the replacement of an entire structure.
To save money, you can try to restore the ball joint, although this part is considered unrepairable:
- To repair this unit, you can dismantle it, disassemble it and replace worn polymer inserts and anther. In this case, a grinder is used for disassembly, and welding is used for restoration.
- Another option would be a method where a special polymer composition is poured into the part under pressure. With its help, gaps between parts resulting from wear are leveled.
Many experienced repairmen recommend disassembling this element in any case to grind the ball of the pin axis. This approach will ensure the durability of the repaired part. In addition, in this case, you can evaluate the condition of the finger itself and replace it if necessary.
Collapsible method
Before starting work, it is necessary to dismantle the ball joint.
To do this, follow these steps:
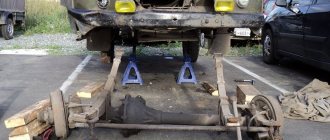
- raise the car using a jack;
- unscrew the wheel;
- turn the steering wheel all the way;
- pull out the cotter pin from the nut using pliers;
- unscrew the nut, press out the axle with a puller;
- unscrew the hinge fastening;
- Use a pry bar to press down the lower arm and remove the support.
After this, you can proceed to disassembling this element. The technology of this process depends on its design.
In the case when the body consists of two cups connected to each other by spot welding, the sequence of actions will be as follows:
- drill the joints;
- separate the two halves using a chisel;
- change the finger and liners;
- boil the cups together.
During welding work, it is important to ensure that the internal parts do not overheat. If the bottom is inserted inside the ball joint housing, then proceed as follows:
If the bottom is inserted inside the ball joint housing, then proceed as follows:
- the rolled edges of the body can be cut off using a grinder or emery;
- knock out the bottom with a hammer;
- a steel ring 10 mm high with a plug and thread is cut to size;
- weld it to the body so that it presses the inserted pin, liner.
At the end, the ball joint is installed in the opposite order of removal. This will be much easier to do.
Liquid polymer application method
Ready-made rods filled with liquid polymer are available for sale to restore ball joints with your own hands. The polymer composition is specially designed for components with increased load. It withstands pressure over 1000 kg/cm 2 and dampens friction. Not affected by lubricants. Ensures the restoration of the ball joint and its operation for another 100,000 km. This repair method can be used several times.
The technology of this method is quite simple. Using an extruder with pneumatic force, the polymer is injected through a special hole into the assembly body. It fills the voids inside, completely follows the contour of the support pin and takes on all the loads.
Repair work
It should be immediately noted that after the repair is completed, the ball joint will not be completely restored and its service life will be shorter. However, if everything was done correctly, then you don’t have to worry about the safety of the unit’s operation. There are several ways to restore the ball's functionality. At home, two technologies are most often used:
- Repair of ball joints with polymer using SJR technology.
- Collapsible - the body is converted from a non-separable one into a collapsible one, after which the ball surface of the pin is polished and the liners are changed.
Using polymer
The essence of this method is to inject heated polymer material into the housing. In this case, the support does not need to be disassembled, but an extruder must be manufactured. It is worth noting the main advantages of this method:
- Since the housing structure is not destroyed, high reliability of the factory connection is ensured.
- The polymer fills all the voids and wear-out areas that caused the support to fail.
- When the material hardens, it forms a solid liner, the characteristics of which are at least as good as the factory part, and sometimes even superior.
- The polymer contains special ingredients that provide high-quality dry lubrication of the finger.
- High strength under impact loads is achieved.
To use this technology, a hole must be drilled in the lower part of the body, the diameter of which is selected in accordance with the extruder used. It is necessary to thoroughly clean the gap between the liners and the ball surface of the pin from dirt, and also blow the assembly with air to remove chips and grains of sand.
The polymer is injected into the housing using an extruder through a pre-drilled hole. Once the plastic composition has hardened, the repair work can be considered complete. The only drawback of this technology is the inability to check the geometry of the spherical surface of the finger.
Collapsible method
After the support is removed, it is necessary to disassemble the housing. To do this, you will need to drill out all the welding points in one half, then divide the part into two parts using a hammer and chisel. Then the flared edges are ground down and a blow is applied to the end of the pin to separate the bottom of the body. After measuring the inner and outer diameters of the body, a ring with similar dimensions and internal threads is made, as well as a plug that is screwed into this part. The height of the ring should be about 10 cm.
After this, a new liner and the restored finger are placed in the body. Having connected the two parts of the body, they should be secured by welding
Care must be taken to avoid overheating the liner.
How can I restore functionality?
It is important to know! After repair, the ball is not restored to the condition of a new part. The service life will be shorter. But you don’t have to worry about operational safety.
There are many recovery methods. A fairly popular repair method is the SJR technology, when molten polymer is pumped into the cavity between the holder and the ball.
Read also: Rewinding the armature of an angle grinder with your own hands video
We will consider repairs with disassembly of this unit.
To understand the mechanism of operation of the support, look at the diagram:
Often the problem occurs due to damage to the boot, and not to the metal itself
Only the polymer liner is subject to wear. It is when it is abraded that backlash appears. If you continue to drive with a loose ball joint, the top of the cylinder will also break, and then the pin may fly out of the race.
Inserts are sold in car dealerships as consumables. If your ball joint is collapsible, you can easily pull out the bottom and replace the polymer inside the product.
Consumables can be sold in a store at a more reasonable price than buying a new spare part
Sequence for replacing tie rod ends
To do this, you need a minimum set of tools, a jack, and a special device for removing the steering pins. But, you can do without a puller by using a hammer and a small pry bar, although you will have to suffer a little. There is also a risk of damage to nearby steering components. The main thing is to do everything carefully and slowly.
Replacement of tips is carried out as follows:
- it is necessary to jack up the front of the car and remove the wheel;
- The junction between the steering knuckle and the tie rod end should be cleaned of dirt. To facilitate the dismantling process, the threaded connection can be treated with WD-40;
- remove the cotter pin that secures the nut. To do this you will need pliers;
- Unscrew the nut, then use a puller to remove the pin securing the rod end. If such a device is missing, the finger can be knocked out with a hammer. True, this requires a swing, which is not always possible. You will have to adapt, spend a lot of effort and time to release the rod with the tip;
- the tip is screwed to the steering rod with a bolt that needs to be unscrewed;
- Before dismantling the worn tip, you should measure the distance between it and the squeegee. This will help you install the new part correctly;
- the new tip is installed in the reverse order;
- after replacing the part, install the wheel in place and remove the jack;
- The tie rod end on the opposite side is changed in the same way.
Important! After replacing the tie rod ends, it is necessary to visit the nearest service station and carry out a wheel alignment procedure, since any repair work on the steering system will certainly disrupt these settings. The cost of parts depends solely on the manufacturer
It is impossible to say with certainty which of the parts will last longer: the original or its analogue? In any case, you should not neglect annual maintenance and promptly change consumables and parts whose service life is approaching completion.
Steering arms are an integral part of the front suspension and steering of any modern car. The steering tips, together with other steering elements, are responsible for turning the front wheels of the car to the required angle.
Is it possible to cope on your own?
Repairing ball joints on your own is quite difficult. This is due to several factors. First, it is necessary to make an extruder to restore the ball joints. Secondly, the process is quite labor-intensive.
An extruder can be made if you have an old brake master cylinder (MBC). A special lever is inserted into it, which presses on the piston. The design is quite simple and reliable, and most importantly, it is effective. The recovery process is as follows. A small diameter hole is drilled in the body of the ball joint seat. Compressed air cleans the space between the finger and the body. Next, the plastic is placed using an extruder. Do-it-yourself restoration of ball joints has several clear advantages:
- solving problems with backlash;
- low cost of repairs.
But there are also disadvantages:
- the state of the ball remains unknown;
- corrosion is not removed.
In general, this is a rather interesting method that allows you to repair a unit without extra costs. But sometimes it needs to be replaced. For example, if the ball does not stay in the seat due to wear on the hinge. Here restoration will not help, a replacement is needed.
Removal & installation
Puller
Necessary equipment:
- Ball joint remover.
- Jack.
- Car stand.
- A set of keys.
- Pliers.
- Mount.
The ball puller is usually not universal. If you do not find a suitable puller, it can be successfully replaced with a hammer. You just need to know where to hit. There is no need to knock your finger out of its seat. The blow should be perpendicular to the finger, and it should be hit on the eye (since the conical finger, a slight landing pressure will squeeze it out of the eye). Hammer is a universal puller. It should not be too heavy or too light; 600 grams will be just right.
Removal: Loosen the wheel. Raise the car on a jack. Remove the wheel. Turn the steering wheel so that it is convenient to work. If the pin nut becomes cotter, remove the cotter pin using pliers. Unscrew the nut. Take a puller and squeeze your finger out with it. Unscrew the ball housing fastening. Using a pry bar, press down the lower arm and remove the ball joint. Removing and repairing tie rod ends and ball joints is no different, you just need to use another puller. The recovery methods are identical.
Installation: Attach the hinge body to the lower arm, tighten the fasteners, use a pry bar to press the lower arm, insert the pin into the seat. Screw the nut onto the pin and tighten it. If the finger rotates, pull the lever upward (the pin with the seat is conical, so when the finger is pressed in, it stops turning in the seat). Don't forget to tighten the nut. No puller is needed for installation. The next replacement of supports will not force you to fiddle with cotter pins if you change the nuts to self-locking ones.
Diagnostic methods
There are also two ways that will help you more accurately determine the presence or absence of a breakdown:
- aurally. Ask a friend to rock your car with the engine off. If the supports begin to knock, they need to be removed and repaired;
- by rocking the wheels. We lift the car on a jack, after which we ask the assistant to squeeze the brake all the way. Rock the wheels a little with your hands. If there is play, the supports need to be replaced.
About the device
If you didn’t click on the link above and didn’t read it, here I’ll remind you a little about the structure. You need to understand that the ball joint serves for a movable joint that can rotate, that is, movement in several planes at once. In cars it is mainly used in the front suspension to turn the front wheels.
SO:
- There is a cylindrical body.
- A polymer liner that is immersed in it.
- Metal finger or “ball” or rod, there are many names. On one side it has a spherical element, on the other side there is a threaded rod.
- The boot protects the structure from the penetration of dust and dirt.
- Pressure spring or even the bottom. By the way, sometimes it is not there if the support is not collapsible.
Just like that, but we need this in order to understand how to restore.
Malfunctions and their symptoms
Of course, ball joints do not always please their owners with impeccable performance over hundreds of thousands of kilometers. Sometimes they feel bad much earlier. What could be the reason? As a rule, there are three of them:
- increased shock loads - quite logically, the ball and many other parts of the chassis will become uncomfortable if you desperately jump the car over bumps, dive into holes or otherwise test its strength;
- drying out of the lubricant - this is why these parts used to be serviceable, but nowadays this reason is not very common;
- destruction of the anther and, as a result, loss of tightness. In turn, dust and dirt get inside the unit, destroying it.
Certain symptoms may indicate that you are waiting for a ball joint replacement, which simply cannot be ignored. Among them are:
- knocking when driving over uneven surfaces at low speed;
- squeaks when turning the steering wheel;
- unstable behavior of the car when driving straight;
- increased tire wear.
Of course, these signs do not always indicate problematic ball joints, but, in any case, when they appear, you need to immediately go to a service station, where experienced technicians will be able to make a final and correct diagnosis.
That's all, friends. Enjoy your trips, healthy and obedient cars! Don't miss new publications!
Restoration of support
The extruder, which already contains the polymer, is screwed onto the thread of the pneumatic cylinder. A threaded hole is drilled in the support body. Using this thread, a nozzle is screwed on, which is attached to the extruder through a nozzle.
As soon as the polymer becomes soft, it is necessary to start the pneumatic cylinder, squeezing the material through the plunger into the nozzle and then into the support cavity. The soft polymer fills all the potholes, gaps and cracks, creating a ball liner with increased resistance to impact. Even if the polymer is not poured quite correctly, the new liner can withstand about 30 thousand kilometers.
It is quite possible to assemble such equipment for restoration with your own hands. The extruder can be ordered from a turner. A brake chamber from a ZIL or an old cylinder from a clamshell excavator can be used as a pneumatic cylinder. All other spare parts are sold at any hardware store.
Removal and installation
If after carrying out diagnostic measures it becomes clear that the unit is worn out, it must be repaired. Many novice car owners cope with all the work and restore the ball joints with their own hands. To remove and install the support after repair, you will need several tools:
- Special puller for supports.
- Car stand.
- Jack.
- Mount.
- Pliers.
- A set of keys.
Most often, ball joint pullers are not universal. If you cannot find the required tool, you can solve the problem using a hammer. Moreover, its weight should be about 600 grams. In addition, you need to know the place where you should strike so as not to damage the node.
If the nut on the pin has a cotter pin, it should be removed using pliers. This will allow you to unscrew the nut and use a puller or hammer to squeeze out the pin. After this, you should unscrew the housing mount and, using a pry bar, press the lower lever to remove the support.
To install the unit after repair, you first need to attach the housing to the lower arm. After tightening the fasteners, use a pry bar to release the lever and return the pin to the socket. Then the nut is screwed onto it and tightened. If after this the finger rotates, then the lower lever must be pulled up. The last step will be to install the cotter pin on the nut or replace the old one with a self-locking one.
https://youtube.com/watch?v=8CjVcRs508g
What's the result?
Taking into account the above information, it becomes clear that replacing ball joints on many cars can be done with your own hands in a garage. With regard to the restoration of suspension and steering parts, certain methods discussed above are used in some cases.
However, it is important to understand that you cannot count on high reliability and long service life of parts after repair. It turns out that any restoration of ball joints is done at your own peril and risk, and no one gives clear guarantees
As a result, we note that taking into account the reduced, but not the most affordable cost of repair, it is often more economically feasible to immediately install new ball joints, tie rod ends, etc.
If the owner does not have the opportunity to immediately buy new parts, then it should be remembered that during operation of a car with restored ball joints, loads must be minimized. Otherwise, the risk of rapid re-breakage of the unit increases significantly.
What causes system failure
As a rule, system replacement is required in the following cases:
- boot rupture;
- driving on poor road surfaces;
- lack of the required amount of high-quality lubricant;
- grinding of the finger, which occurs along with an increase in the gap and loosening of the element.
On average, the service life of a support reaches 30-100 thousand km, so it is difficult to call the element durable.