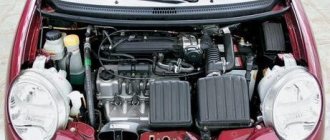
Causes
There are several most common reasons why a car owner has to remove the engine from his car.
Cause
Peculiarities
In the event of a serious accident or as a result of wear of key engine elements, it will not be possible to restore its functionality without a removal procedure. Therefore, they resort to dismantling the engine
It’s not uncommon for VAZ 2109 owners to think about replacing the standard factory engine with a more efficient, powerful power unit. This is a serious step, where dismantling is one of the initial stages
If there is no opportunity or desire to change the engine, some simply modify the existing one. Tuning can be quite complex, involving the need to completely remove the engine from the engine compartment
Regardless of the reasons, you need to remove the engine carefully, following a clear sequence of your actions. Decide in advance whether you will dismantle the engine together with the gearbox or without removing it.
Removal from gearbox
Follow the instructions clearly, be sure to watch the video tutorials. Plus, don't forget to check the condition of all engine mounts, since you'll probably be reassembling it again. All damaged elements will have to be replaced without fail.
Top extraction process
Homemade support for dismantling
Accuracy is the main requirement when independently dismantling the power unit from a VAZ 2109 or any other car. Be sure to enlist the support of a partner, since it is quite difficult to complete all stages with two hands.
Take your time, don't try to get the job done in a few hours. It may take several days to remove the motor. The main thing here is not speed, but the quality and care of each manipulation.
Source
Extraction from the top
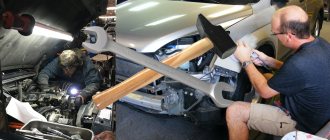
If you have a good winch or 3-4 reliable assistants, then there is no better solution on how to remove the engine from the VAZ 2114 through the top. This method differs from removal through the bottom in that it eliminates the possibility of damaging the engine itself or the car. The most important factor in the success of this operation will be your accuracy.
Jpg" alt="Removing the engine through the top" width="600″ height="404″ class="lazy lazy-hidden size-full wp-image-4747″ srcset="" data-srcset="https://vazremont .com/wp-content/uploads/2018/01/foto-15..jpg 300w" sizes="(max-width: 600px) 100vw, 600px">
The procedure for removing the engine from the top must be carried out as carefully as possible. It is important to take into account everything that can affect the engine falling off its mounts. Moreover, if you do everything correctly, this method will be the least labor-intensive. At its core, this procedure is no different except for removal from removing an engine without a gearbox.
Removal and installation of the VAZ 2110 engine
Tips and step-by-step procedure with photo support for removing the engine on a VAZ 2110 car.
Following the recommendations of the manufacturer, for the necessary technical repairs, the power unit, that is, the engine with the clutch and gearbox, should be removed downwards, but in a garage it is more convenient to carry out the same process upwards with the obligatory use of a lifting device, having first removed the gearbox. All work must be performed only in the presence of an assistant.
Removing a VAZ 2110 engine, step by step procedure:
1. First, you need to remove the battery from the car.
2. The next step is to remove the hood.
3. After this, remove the oil from the engine crankcase by unscrewing the drain plug, and remove the coolant from the cooling system by unscrewing the drain plugs of the cylinder block and radiator with the expansion tank cap removed.
4. Now you need to remove the air filter with the intake pipe hose, not forgetting to then close the carburetor on top with the technological cover.
5. Then we take and disconnect the exhaust pipe with the bracket from the engine, lower it slightly down so that the flange can come off the intake valve studs.
6. The next movement is enough to turn the throttle valve drive sector to the stop torque.
7. After this, you need to unscrew the two bolts securing the throttle valve drive rod bracket and move it to the side without disconnecting the rods from it, but so that it does not interfere with further work.
8. Next, having unscrewed the fastening nut, carefully remove the tip of the engine “mass” wire from the stud.
9. Finally, loosen the next two fastening nuts and remove the tips of the “mass” wires from the studs securing the rear cover of the cylinder head.
10. Carefully disconnect the block with wires from the coolant temperature sensor by slightly releasing the clamp.
11. Then gradually loosen the clamps and remove the radiator outlet hose from the thermostat and the radiator inlet hose from the cooling jacket pipe.
12. Now disconnect the wire from the coolant temperature indicator sensor.
13. Slightly loosen the clamp and remove the heater supply hose from the water cooling jacket pipe.
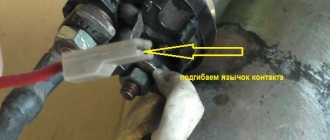
14. The next effort is to disconnect the block (No. 1 in the figure above) with the wires from the detonation sensor (No. 2 in the figure) (or remove the sensor, but to do this, unscrew the nut of its fastening and remove the sensor from the stud, but be sure to leave it on wiring harness).
15. Now it is important to disconnect the block with wires from the low-voltage terminal of the ignition module by pressing the latch holding it.
16. Then carefully disconnect the block with wires from terminal “D” of the generator, carefully move the rubber boot and unscrew the nut in order to then disconnect the wires from the contact bolt (terminal “B+”) of the generator.
How to remove a gasoline engine
Removing a gasoline engine, for example VAZ or ZMZ models, is quite simple. The first recommendation is that this process should be carried out with 4 hands, since it will be difficult for one person to do it. So, let's consider the sequence of actions for removing a VAZ-type unit:
- For more comfortable operations and less time, it is recommended to carry out the process on a lift, pit or overpass. Also, it is necessary to collect tools, namely: a set of keys, screwdrivers and sockets, a hoist or winch, and containers for draining liquid.
- The first thing you need to do is remove the battery and also unscrew its shelf. At the same time, you can remove the air filter housing, as well as the air ducts.
- The second stage is draining all liquids. To do this, you need to remove the motor protection (if any), and, placing containers under the drain necks, unscrew the plugs. For a standard engine, coolant (10 liter container) and engine oil (up to 6 liter container) are drained.
- After the liquids have been removed, it is worth starting to disassemble the unit to dismantle it.
- In the first stage, it is necessary to remove the generator, starter, all drive belts, and battery wiring.
- Now we begin to remove the elements of the cooling system: thermostat, water pump, expansion tank, coolant system pipes.
- Next, we dismantle the ignition system - spark plugs, wires, distributor, injector.
- After this, we disassemble the fuel system, namely, remove the carburetor or fuel rail with injectors, power supply pipes, and intake manifold.
- Another important step is dismantling the cylinder head. First you need to remove the camshaft pulley. After unscrewing the bolts, remove the valve cover, and then the cylinder head itself.
- We hook the motor to the winch and firmly fix it.
- Unscrew the gearbox from the engine. In this case, the clutch should remain on the power unit.
- We unscrew the nuts securing the pillows and lift the engine, carefully removing it from the engine compartment.
- Reinstalling the motor is carried out in the reverse order.
This is how, at first glance, it is easy and simple to dismantle the motor, but as practice shows, not everything is so easy. In the case of engines where there are many wires, you have to disconnect them from the sensors. Well, when the motor has too much wiring, then you should turn to professionals.
How to remove the engine from a car in the garage without resorting to the help of a car service
In fact, this is not such a complicated procedure as it might seem at first glance. The main task is to select tools for removing the motor.
Important! The engine weighs several hundred kilograms. Falling it can not only cause property damage, but also lead to serious injuries. Before lifting the engine from the engine compartment, the following procedures must be carried out:
Before lifting the engine from the engine compartment, it is necessary to carry out the following procedures:
If you plan to remove the engine without the transmission, you need to unscrew all the tightening bolts and make sure that after removal the gearbox will not fall under the car. That is, you need to take care of temporarily securing the unit.
How to remove a diesel engine
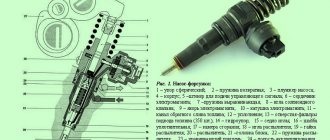
Dismantling the diesel heart of the car is carried out by analogy with the gasoline one. The difference is that diesel power units are often equipped with a turbine, which must be removed before dismantling the fuel system.
Another difference is the injection system itself. So, instead of an injector, a diesel engine has a high-pressure fuel pump, which is usually located on the cylinder block itself. It's not that difficult to remove, but you shouldn't forget about it because it weighs down the engine.
Often, especially on older diesel products, the body also houses the oil and gasoline fine filters. They must be removed after draining the lubricant.
Many auto repairmen recommend removing the exhaust manifolds from the power unit, which get in the way when the engine is removed from the engine compartment. If we talk about diesel engines installed on trucks, this is done to reduce the weight of the product.
Removing an injection engine from a car without disassembling
To remove the injection engine from the car, you need a lifting device with a lifting capacity of at least 300 kg and slings (chain).
Installing the injection engine on the car
Install the engine and all removed parts in the reverse order
On these machines, VAZ 2101 to 2107, the principle of engine removal is the same. If you decide to remove the engine yourself at home, without any equipment, and don’t know how to do it correctly, then this article is for you.
The engine has to be removed to overhaul it, or to replace it with another engine.
You look at the engine and the first feeling is that it is difficult to remove the engine from the car, but in fact everything is very simple, two men can easily remove the engine themselves at home and also put it in place. I will give an example of removing an engine from a VAZ 2106, although this principle is suitable for VAZ2101 to 2107.
The engine can be removed entirely, but this is much more difficult, or you can remove it without the head, this is much easier. If you decide to repair the engine yourself, then the second option is preferable, since you have to disassemble the engine anyway and why drag out the extra weight. I will describe the removal of the engine with its partial disassembly, in the engine compartment of the car.
Conclusion
How to remove the engine from a car? Removing a power unit from a car with your own hands can be simple and at the same time difficult, since it all depends on the type of power unit, as well as the presence of heavy electronics.
In the case of VAZ, GAZ, UAZ engines, they can be easily removed, but with foreign-made engines, everything is much more complicated. Therefore, most manufacturers recommend contacting specialists who can help remove the motor and repair it.
· 28.08.2017 ·
Basic maintenance of the motor is possible without dismantling it. Replacement of spark plugs, maintenance of intake and exhaust manifolds, and even replacement of the timing belt (chain) is carried out directly in the engine compartment of the car. However, work with valves, crankshaft, piston group, etc. is carried out only with the engine removed. Not to mention the overhaul procedure.
From our article you will learn how to remove the engine from a car in the garage, how you can remove the engine yourself and how to do it correctly.
The material was prepared by the site Auto-science.ru - whose specialists will help you check the mileage of your car efficiently and without errors.
Removing the engine, VOLGA AVTOMOTIV-TOMIX
The engine is removed from the car upwards. To remove the engine, a lifting device with a lifting capacity of at least 300 kg is required. The car must be installed on a lift, inspection ditch or overpass. Before removing the engine, it is necessary to prepare a reliable stand on which the engine must stand steadily. It is easier to remove the engine if you remove the hood.
Before disconnecting hoses and electrical wires, we recommend that you mark them so as not to mix them up during assembly.
1. Disconnect the fuel supply and drain lines.
2. Remove the battery.
4. Remove the engine splash guard.
5. Drain the engine cooling system.
6. Drain the oil from the engine crankcase.
7. Remove the radiator of the cooling system with the electric fan and fan shroud.
8. Disconnect the wire terminals from the ignition coils. Remove the ignition coils.
9. Disconnect the phase sensor connector from the wiring harness.
10. Remove the screws and disconnect the wires from the oil pressure indicator 1 and emergency oil pressure 2 sensors. Loosen the clamp and remove hose 3 to the expansion tank from the thermostat fitting.
11. Disconnect the connectors from the engine temperature sensors 3, coolant temperature indicator 2, coolant overheat indicator 1.
12. Loosen the tightening of clamp 1 and remove hose 2 from the fitting to the check valve of the vacuum brake booster. Disconnect connector 3 from the throttle position sensor. Loosen the clamp and disconnect pipe 4 of the air supply from the throttle assembly. Move the pipe along with the mass air flow sensor to the side.
13. Unscrew the nut and remove the blue ground wire 2 from the stud at the front end of the receiver. Unscrew nut 1 and remove accelerator cable 3 from sector 4 of the air throttle valve drive.
14. Slide the cable gland 3 from the threaded end 2 of the cable shell, unscrew the nut 1 securing the cable end and remove the end 2 from the bracket fixed to the engine intake pipe, sliding it back. Then lift the accelerator cable upwards from the bracket.
15. Bend the accelerator cable holder and remove the cable from it. Move the accelerator cable away from the engine.
16. Disconnect the plug block, speed sensor and crankshaft synchronization sensor located between the engine intake pipes from the wiring harness.
17. Disconnect the wires from the generator...
19. Disconnect connector 1 from the idle speed control. Unscrew nut 2 and remove the ground wires from the stud at the rear end of the receiver.
20. Disconnect plug 1 from the air temperature sensor. Loosen clamp 2 and remove the coolant supply hose from the heater tap fitting.
21. Unscrew the nut and disconnect the oil supply hose to the oil cooler from the tap.
22. Loosen the clamp and remove the heater outlet hose from the heater radiator fitting.
23. Unscrew nut 1, remove knock sensor 2 and move it along with the wire away from the engine.
24. Disconnect the connectors from the injectors. Unbend the wire harness holders and remove the harness from the holders. Route the wiring harness away from the engine.
25. Remove the accessory drive belt.
26. Unscrew the fastening bolt and disconnect the “mass” wire.
27. Remove the two bolts securing the power steering pump and remove the pump from the engine without disconnecting the hoses.
28. Attach the lifting hooks to the lugs on the exhaust manifold and generator bracket.
29. Unscrew the nut and disconnect the oil drain hose from the oil cooler from the fitting on the crankcase.
30. Remove the exhaust system.
31. Remove the gearbox.
32. Remove two bolts on each side securing the clutch housing amplifier to the cylinder block, unscrew the two nuts from the bolts securing the clutch housing to the amplifier and remove the bolts. Then lift the rear of the engine and remove the booster from behind the center linkage linkage.
33. Remove the clutch housing.
34. Remove the bolt securing the engine mount bracket to the mount on each side.
35. Check that all hoses and electrical wiring are disconnected from the engine.
Carefully lift the engine up
37. Install the engine in reverse order. When installing the engine on the mounts, make sure that the mounting pins on the mounts fit into the holes on the engine brackets, and the bolt holes on the brackets and mounts should line up.
General information
When repairing an engine, a number of operations can be performed without removing it from the car. As a rule, the following operations can be performed without removing the engine:
- removal and installation of the cylinder head;
- removal and installation of the camshaft (after removing the cylinder head);
- removal and installation of toothed drive belt and sprockets;
- removal and installation of the oil pan and oil pump;
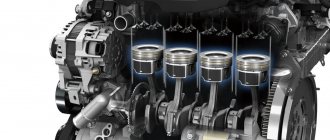
- removal and installation of pistons, connecting rods and connecting rod bearings;
- replacing engine mounts;
- replacing crankshaft seals;
- removal and installation of the auxiliary shaft;
- Removing and installing the flywheel.
Removing the engine from the car is necessary to perform the following operations:
- replacing the crankshaft main bearings;
- removal and installation of the crankshaft;
- replacing cylinder liners (when installing them).
Before starting repairs, it is necessary to drain the liquid from the cooling system and the oil from the engine crankcase and gearbox. The liquid is drained through three drain valves. When disassembling the engine, it is recommended to place small parts in separate containers, and when disconnecting wires from electrical equipment, return the screws and nuts to their previous position and tighten them by hand.
Before disassembling, the engine must be cleaned of dirt and oil, washed with kerosene or a degreasing solution, and then blown with compressed air. It is advisable to remove instruments and assemblies from the engine on a stationary rotary stand. Parts removed from the engine should be placed in specially prepared containers in which they are sent for washing, testing and troubleshooting operations.
Causes
There are several most common reasons why a car owner has to remove the engine from his car.
In the event of a serious accident or as a result of wear of key engine elements, it will not be possible to restore its functionality without a removal procedure. Therefore, they resort to dismantling the engine
It’s not uncommon for VAZ 2109 owners to think about replacing the standard factory engine with a more efficient, powerful power unit. This is a serious step, where dismantling is one of the initial stages
If there is no opportunity or desire to change the engine, some simply modify the existing one. Tuning can be quite complex, involving the need to completely remove the engine from the engine compartment
Regardless of the reasons, you need to remove the engine carefully, following a clear sequence of your actions. Decide in advance whether you will dismantle the engine together with the gearbox or without removing it.
Compression test, troubleshooting
One of the main reasons for engine repair is decompression. Actually, the troubleshooting itself must be done every 30 thousand km, combining it with valve adjustment.
Signs of the need for early technical inspection of the engine are:
- power surges;
- increase in fuel consumption;
- engine tripping.
Data-lazy-type=”image” data-src=”https://vazremont.com/wp-content/uploads/2018/01/foto-16.jpg” alt=”Compression measurement” width=”480″ height =»457″ class=»lazy lazy-hidden size-full wp-image-4748″ srcset=»» data-srcset=»https://vazremont.com/wp-content/uploads/2018/01/foto-16 ..jpg 300w" sizes="(max-width: 480px) 100vw, 480px">
If you experience similar symptoms, you need to do the following:
- Check the starter and charge the battery.
- Find a compression gauge and warm up the car.
- Remove the spark plugs and fuel supply hose.
- Insert the compression gauge into the spark plug socket of the first cylinder and depress the accelerator.
- We turn the key in the ignition and turn the starter for 10 seconds, watching the device, it must be interpreted as follows: a. if the pressure stops at 0.8 mPa and then stops growing or does so slowly, then the cylinder head is broken or there is a leak in the valve; b. if it just grows slowly, it means that the rings have exhausted their service life (by the way, this fact can be checked by adding oil and measuring again, if the pressure returns to normal - the rings are 100% to blame).
IMPORTANT!
The normal pressure in the VAZ 2114 engine is 1.0 MPa in the standard configuration and 1.4 MPa on an eight-valve engine.
After the procedure is repeated for all cylinders, it is necessary to analyze the records. So, in a working engine, compression should not fall below 1 MPa and should not have a spread between the cylinders of more than 0.2 MPa. Otherwise, you will have to repair the engine.
Removal from gearbox
Follow the instructions clearly, be sure to watch the video tutorials. Plus, don't forget to check the condition of all engine mounts, since you'll probably be reassembling it again. All damaged elements will have to be replaced without fail.
Removal process through the top Homemade support for dismantling
Accuracy is the main requirement when independently dismantling the power unit from a VAZ 2109 or any other car. Be sure to enlist the support of a partner, since it is quite difficult to complete all stages with two hands.
How to remove an engine from a car
At home, there is usually no professional lifting equipment, so you will have to rent it or make it yourself.
Do-it-yourself goose for removing the engine
This is a simple mechanism that resembles a gooseneck. It makes it possible to move the engine away from the engine compartment. It may have a rotating design that allows you to remove the engine without moving the machine.
The heavy internal combustion engine is simply transferred to a workbench located next to the car. In fact, it is a universal garage crane. The rack rests on long “legs” located under the engine compartment to prevent it from tipping over. A cable and a winch are used for lifting.
The gander is used both in garage conditions and in small services.
DIY engine removal lift
As a rule, this is a rolling crane, the lower part of which is placed under the front bumper. A smooth platform is required; on uneven ground, removing the engine using such a device is problematic. The lift operates using hydraulics or a tensioning mechanism like a winch. The device is simple: a stand with rolling supports, and a movable boom on which the motor is suspended. You can make a lift with your own hands from a channel or a square professional. pipes.
If there are strong wheels on supporting legs, you can quickly roll out the lift with the motor and move it to the repair area.
Do-it-yourself winch for removing the engine
Applicable if the car is being repaired in a solid stone garage. The most inexpensive tool that can be used to remove an engine. A chain or cable is used to pull it out.
There are two design options:
Features of removing various motor designs
Longitudinal arrangement.
As a rule, such internal combustion engines are removed without a gearbox, although exceptions are possible. The radiator needs to be removed.
Transverse arrangement.
The motors are compact and easy to lift vertically. The gearbox remains on the engine.
Hybrid systems and electric vehicles.
Internal combustion engines in such machines take up little space or are absent altogether. Electric motors can be built into the wheel drive or integrated into the transmission. Due to their small size, their dismantling is not difficult.
All types of internal combustion engines are installed on supports. In frame structures, the attachment points are located on the frame; in cars with a monocoque body, there is usually a subframe.