Noise in the gearbox is usually a consequence of bearing wear, chipping of the working surface of gear teeth, and even their breakage. Requires disassembly of the gearbox and replacement of damaged parts.
Another reason why even a new gearbox can make noise is a low oil level in the crankcase. This malfunction is a consequence of an oil leak from the gearbox.
It is also possible that the crankshaft and clutch housing are misaligned. Using an indicator mounted on a stand attached to the rear end of the engine crankshaft (gearbox and clutch removed), rotating the shaft, check the runout of the mounting hole for the gearbox in the clutch housing (d.b. 0.3 max) and the non-perpendicularity of the rear end clutch housing (d.b. 0.15 max).
How to remove the gearbox can be found in many printed and electronic publications, such as repair and maintenance manuals, so this operation will not be described in this article.
Reasons for a howling sound in a gearbox
Sooner or later, any car owner has to face a situation when the gearbox in his car begins to howl.
The hum may be moderate, but if no action is taken, it will inevitably increase, which can lead to serious damage and expensive repairs. What are the main signs of this and how to eliminate them?
Causes of howling in a manual transmission. Many manual transmissions, even when at rest, are not very quiet. Sometimes when using a new car, the transmission can make certain sounds, this is especially common on vehicles in the budget segment. For example, the whine of a gearbox on a VAZ is the norm for many cars. Every car owner knows what the normal noise level is in the cabin and will immediately notice changes. If the hum of the box begins to change tone, competes in volume with the sound of the engine, or occurs under some special conditions, then you need to think about visiting a car service center.
Many drivers may make the mistake of confusing the howling gearbox with malfunctions of other elements. Often, a howling sound can be made by a release bearing with a certain degree of wear. The volume and tone of the noise produced are directly dependent on the speed of movement, which leads to the erroneous diagnosis of “box howling”. The same problem can be caused by a clutch that requires replacement. Without diagnostics, it is not easy to find out what exactly is causing this behavior, so the best option would be to contact a repair shop.
If the hum is produced by the manual transmission itself, then the reasons may be as follows:
If the howling does appear, it is worth paying attention to when it occurs, whether there is a change in its tone and volume in different modes.
The reasons for the howling of an automatic transmission, robot or variator. Automatic transmissions in normal condition are much quieter than manual ones. The occurrence of extraneous sounds from the automatic transmission should make the owner wary. Diagnosing the reason for this is not so easy, but many simply do not contact a car service, drowning out extraneous sounds with loud music.
The main reasons for howling in automatic transmissions are:
Compared to mechanics, automatic transmission is a much more complex mechanism, so identifying the cause is more expensive. But it is better to disassemble and troubleshoot than to suffer a critical breakdown on the way.
The transmission is in good condition and does not make any extraneous sounds.
Conclusion. Transmission whining is a problem that should not be ignored. A transmission in good condition does not make any extraneous sounds, so you should go to a car service center immediately to avoid serious damage.
Source
Do-it-yourself overhaul of the Gazelle gearbox
Any difficulties with shifting gears, noise, or spontaneous activation of speed require urgent repair of the gearbox. Long-term operation of the Gazelle sooner or later leads to one or more characteristic malfunctions:
- destruction of bearings;
- loosening the fixing bolts;
- wear of synchronizer rings;
- gear damage;
- formation of burrs and other malfunctions.
Repairing the Gazelle gearbox involves dismantling and disassembling. First you need to prepare a number of necessary tools. In addition to standard tools, you need a beard, pullers, a needle file, and fine-grained sandpaper. After the car is driven onto the overpass, the crankcase is freed of oil. Then the cardan is removed and the lever with the cap is taken out. The wiring for the reverse light and the speedometer cable are disconnected from the box. The gearbox is dismantled by unscrewing the exhaust pipes and bracket. The box is also fixed with the clutch housing - there are 4 nuts. When removing it, you need to be very careful not to damage the cylinder head - the Gazelle gearbox weighs 32 kg. For this reason, the cylinder head should be covered with a wooden block in advance.
Disassembling the gearbox
Step-by-step disassembly of the unit will prevent you from making mistakes, and the procedure will be much simpler. It is better to place the removed box on a flat table in the garage to make it more convenient to work. Further reassembly steps are given with simultaneous troubleshooting. Before this, it is advisable to study the Gazelle checkpoint diagram .
- Pull out the lever with the bracket, if it was not removed at the dismantling stage. Check the spring-loaded cups that are responsible for stabilizing the switch. There should be no significant play in the lower part of the rod, both springs should be in place and in good condition. Check that both fixing pins are firmly seated on the sides of the upper part of the housing, where the speed selector directly fits. Test the lower part of the handle and its seat in the gearbox for wear - the metal should not be severely corroded.
- Check the condition of the end of the input shaft onto which the flywheel support bearing fits. Grooves, steps, and other signs of wear on the metal surface will indicate a specific problem. This will be the cause of strong play, causing tremors, noise and other problems of the box. Remove the flange covering the inside of the box on the input shaft side. Pull out both retaining rings - a bit, a flathead screwdriver and a hammer to help. Check the drive shaft bearing for play. During assembly, replace the worn-out part with a new one.
- Halve the box. The Gazelle-Business model has an additional locking bracket, which also needs to be unscrewed. Both parts of the old-style gearbox are simply bolted together. Unscrew the speedometer drive gear and the reverse drive gear of the intermediate shaft.
- Remove the front housing cover and pay attention to the condition of the drain plug with the magnet. As a rule, a lot of dust, shavings and other wear elements collect in this place. Test the outer race of the roller bearing - it should fit tightly, not play, and also the track - ideal without cavities or bulges. Clean and sand all uneven surfaces with fine sandpaper.
- Check the condition of the input shaft bearing - note that there is not only axial, but also radial displacement. Replace if during operation it moves to the 4th gear gear - this is easily determined by the damaged parts of the gear.
- Check synchronizers of all gears. There should be no close contact with the gear rings, no gap, in other words, there should not be much thinning. Otherwise, the problematic synchronizer must be replaced. Experts also recommend replacing elements whose teeth have ground cones. The synchronizers have a special boss that serves as a limiter. If it is also worn out (the factory thickness of the ebb is at least 6 mm), the speed on the box may turn on spontaneously or difficulties with turning on will be observed.
- Check the gears for shells and signs of wear.
- Check the condition of the forks and synchronizer clutch rings. The thickness of the seat for the fork with replaceable crackers in normal condition should be about 9 mm. If it is more, then this already indicates wear and play. The problem is solved by replacing elements - crackers, rings.
- Check the condition of the vent. It should not cling to the main gear synchronizer rings, otherwise this will indicate its displacement. Traces of contact are clearly visible on the surfaces of the teeth. The problem can be solved by proper shaft adjustment.
- Remove the input shaft. Measure the diameters of the end of the secondary shaft and the hole of the main shaft. Subtract the smaller number from the larger number and divide the resulting amount by two. Measure the circumference of one of the rollers located at the junction of the shafts. Compare the indicators - if they are very different, you can judge there is a large backlash.
- Loosen and pull out the rear part of the box housing - the secondary shaft is located in it. Do it carefully, remove the rods carefully!
- Carefully inspect the inside of the rear housing. Clean off dirt, check the bearing seats and bearings. In the extended area of the casing or shank, it is recommended to check the bushing - it must be installed normally, do not cover the drain hole, otherwise the box parts will not be well lubricated.
- Check the secondary shaft parts. Replace those that have strong production. The 5th gear gear especially suffers. This happens to drivers who constantly overload their Gazelle.
Attention! If the secondary shaft bearing is destroyed, this is always fraught with serious consequences. The back of the box may fail completely. In case of damage to the input shaft bearing, the situation is not so critical.
It remains to check the condition of the vent. There is nothing complicated here - visually inspect the helical gears in the light. There should be no traces of wear on them. To remove the bearings from this shaft, you need to arm yourself with two large screwdrivers or short pry bars. The tools are placed on both sides of the bearing, the shaft is placed vertically. Then gently press on both screwdrivers. The clip will easily pop up with effort.
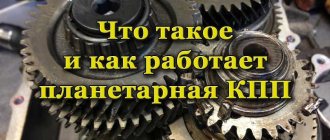
Rumble and howl in the gearbox: manual and automatic
In a car, the gearbox is a complex and important unit, which is designed to convert torque from the internal combustion engine before transmitting it to the drive wheels. Regardless of the type of transmission (manual or automatic), any malfunction of the gearbox can lead to breakdown of the unit and other equally important components of the car.
Since repairing a gearbox is a complex and expensive procedure, it is necessary to constantly monitor the technical condition of the gearbox, following the rules of operation and maintenance. Any signs that appear that indicate problems with the vehicle’s transmission must be recorded and diagnosed, and then the problems must be corrected.
Delays in solving problems can lead to other problems, even more serious ones. At the same time, there may be several reasons for problems associated with the operation of the gearbox, and the main symptoms are extraneous noise. Next, we will look at why a manual or automatic transmission howls, what a howl or hum in the gearbox indicates, and how to eliminate the hum in the gearbox.
How to repair a Gazelle gearbox
The comparative cheapness, coupled with the spaciousness of this car, classified as a commercial vehicle, made it a real “workhorse”. It is in demand and is used throughout the CIS. Another sign of a classic work machine is the ease of finding spare parts. When you need to repair a Gazelle gearbox, and the gearbox is the worst of the components of this Russian light-duty car, you can safely go through everything, from bearings to synchronizers. These parts are available for sale at any auto store.
Howling or humming in the gearbox: causes of malfunctions, diagnosis and elimination
So, before diagnosing a gearbox, it is necessary to consider the main causes of hum and howling in manual and automatic transmissions, common faults and methods for eliminating them. Often, owners of cars with a manual or automatic transmission during operation are faced with such a sign of problems or malfunctions, which are accompanied by a hum or howling in the box.
Another cause of noise may be not the gearbox, but other components and elements associated with it (clutch, wear of the release bearing, wear of transmission elements, etc.). In any case, it is necessary to identify the problem through diagnosis and fix it as soon as possible.
To understand why the manual transmission howls, you need to pay attention to the following points. Although a manual transmission is simpler than an automatic transmission, this unit is still structurally complex. This means that extraneous sound (howling or hum) in the box can appear for various reasons.
The main causes of noise in manual transmissions:
After diagnostics, it is often necessary to dismantle the box for subsequent disassembly and troubleshooting. Only after this can we talk about an integrated approach to high-quality troubleshooting.
The main causes of noise in automatic transmissions:
Checkpoint performance test on site.
Raise the rear wheels of the car (jack up and place the rear axle of the car on supports), start the engine and slowly engage the gears one by one (create an imitation of the car’s movement). Test the performance of each transmission for about one minute. WHAT WILL IT GIVE!? Firstly because the gearbox parts have been thoroughly washed, then the initial operation of the gearbox will be dry, despite the fact that the oil has already been filled (oil will not get into all the gaps at once, if you pay attention, only the intermediate shaft is in an oil bath, and it is the oil distributor in the gearbox, in As a result, the operation of the primary and secondary shafts is dry, although where gears and bearings were available, they were lubricated during the assembly process), and when the vehicle is operating without load, it will allow the oil to be painlessly distributed inside the gearbox system, and secondly, in case of unforeseen circumstances (sudden output failure of any element, breakdown, etc.) the operation of components and assemblies will be without load, which will avoid more serious breakdowns.
How to eliminate noise in a gearbox
Extraneous sounds in the form of a hum or howl can occur in both manual and automatic transmissions. Moreover, the noise can appear either gradually or suddenly. The main reason, regardless of the type of transmission, may be a leak or lack of lubricating transmission fluid in the box.
The problem in this case is solved by checking the oil in the manual transmission or automatic transmission. If necessary, the fluid is added to the level or the fluid is changed partially or completely. Changing the oil in the automatic transmission is also combined with replacing or cleaning the automatic transmission filters.
]If the problem is not the oil, the unit needs diagnostics and repair. In any case, gearbox noise is eliminated by identifying and eliminating the breakdown. As part of the repair, the dismantling of the boxes is often also required.
By the way, in some cases, when the gearbox howls or the gearbox hums, the noise can be reduced with additives. It is important to understand that serious problems cannot be solved in this way. As a maximum, it is possible to delay repairs.
What's the result?
As you can see, the occurrence of extraneous noise in the form of a howling or hum during operation of the gearbox should not be ignored, as this can signal serious damage to the unit and other components of the car. In such a situation, it is important to find out as quickly as possible which part of the box or vehicle assembly is causing the hum or howl.
We also recommend reading the article about why a crunching noise occurs when shifting gears with a manual transmission. From this article you will learn about the reasons for the crunching of the box at the moment of switching, as well as what to do in such a situation.
Source
The gearbox started singing: troubleshooting
Like all other brands of cars, VAZs are equipped with gearboxes. This is one of the most unpretentious mechanisms that can serve for decades, but subject to careful treatment on the part of the driver. If this rule is not followed, then you can soon hear how the gearbox on a VAZ 2107 howls. You will learn from the material what precedes this result, and what methods are known to eliminate the unpleasant sound.
Oil: maybe this is the reason?
There are several reasons why a transmission starts to howl. The first, most common, is the oil level in the box. Many motorists do not attach importance to the need to monitor the oil level in the gearbox. This leads to oil starvation mainly in the fifth gear, which is higher than the rest. Due to the lack of oil, the bearings begin to overheat and fail. This is accompanied by a high-pitched howl that occurs when driving in fifth gear. This disease is treated by overfilling 100 - 200 grams of gear oil above the level with constant monitoring.
Some may say that overfilling the oil will cause it to leak through the seal joints. To prevent this from happening, you must first clean the breather, and secondly, pour oil in parts, gradually. For example, at first 100 grams, and after a while, if there is no leakage, so much more. You can also add a second oil seal to the gearbox rocker.
What can cause a box to howl?
Initially, it is worth noting that VAZ 2107 cars are equipped with five-speed manual transmissions. Structurally, this is a separate unit that is connected to the car engine. The gearbox consists of two main parts - the drive and driven shafts. Gears of different diameters are placed on the shafts, with the help of which the shafts are connected. In addition, the box design contains bearings, gears, synchronizers, and a clutch. The failure of any part contributes to the appearance of characteristic noise, crackling, or hum, when it occurs it is extremely undesirable to operate the machine.
A specialist who has spent half his life in a garage will be able to determine by the sound why the box on a VAZ 2107 howls. It will be more difficult for a beginner to cope with this task, but it is quite possible. To do this, you need to find out what could be the reason that the gearbox is humming on the seven. The reasons for this phenomenon are as follows:
Design and principle of operation
As with any car, the Gazelle’s gearbox performs the most important transmission functions. It converts and transmits torque to the wheels from the engine. Therefore, a lot depends on the quality of operation of this unit. For example, the comfort and safety of people, because any malfunction of the gearbox carries the risk of accidents.
The small Russian car is equipped with a manual 5-speed gearbox. Despite the manufacturer's assurances that it is durable and unpretentious, most owners claim the opposite. The reliability of the unit is poor primarily due to constant excessive loads, since commercial vehicles can be operated for 24 hours straight.
Structurally, the Gazelle gearbox is not complicated: in most parts it is unified with the GAZ-3110 Volga gearbox. All Gazelle modification boxes are identical, except for the Gazelle-Business and Next manual transmissions. A 5-speed three-shaft gearbox is also used here, but it has different gear ratios. Some versions may also have a longer lower end of the lever and a taller lever housing.
The main elements of the checkpoint are:
- double crankcase;
- gears;
- main shafts and intermediate;
- synchronizers, balls, springs;
- gear shift mechanism.
The crankcase is made of aluminum alloy for lightweight purposes. It consists of two parts: front and rear with extension. They are securely connected with 10 bolts through a 0.33 mm paronite gasket. To ensure alignment of the shaft ends and rod holes of the switching mechanisms, they are centered with special bushings pressed into the crankcase.
There are quite a lot of gears in the box. The input shaft has its own gear, and so do the gearbox transmissions, including the rear one. Structurally complex helical sprockets, rotating on needle bearings, are protected by plastic separators. The reverse idler gear rotates on roller bearings.
The shafts are equipped with other unique parts. For example, the secondary shaft is limited from axial movements by retaining rings and special thrust half-rings. A collar is also provided. The input shaft is equipped with a drive gear for the speedometer drive. All shafts, including the intermediate one, have gears, and at the ends there are roller or ball bearings and retaining rings/half rings. A special place is occupied by bushings, fixing pins, spring washers and 0.2 mm shims. The drive and driven shafts are connected at their ends to the engine crankshaft and crankcase. The intermediate shaft is located inside the box body.
Inertial synchronizers are equipped with toothed rims that mesh with gears due to small splines. Since 2003, the 1st and 2nd gear synchronizer has been replaced on Gazelles 3302 and 2705. A double-acting double-cone version is now used. This was done in order to improve the clarity of gear shifting. This synchronizer has increased braking torque.
The gear shift mechanism, in addition to the lever, is equipped with springs, a seat, seals, a thrust cone, and bushings. There are a lot of washers, plugs, and dowel pins. Speeds are switched using forks - there is a separate one for fifth gear and reverse gear. The locking device or fuse consists of two plungers and a locking pin. To prevent accidental engagement of reverse gear, a separate bushing with a spring is provided.
Why does the box howl and make noise?
The main source of noise of varying tones in the VAZ 2109 gearbox is worn out or unadjusted components. Typically, such malfunctions occur on cars with high mileage.
Based on additional signs, you can roughly understand which nodes have failed. If the owner is unable to accurately identify the cause of the hum, it is better for him to contact a specialized car service center.
The main reasons why the gearbox on a VAZ 2109 rattles or makes noise are:
Gearbox noise
The causes of noise in the gearbox depend on the type of transmission. So, in manual transmissions, a hum may appear, for example, due to wear of bearings, shaft gears, springs on the rocker, or differential. As for the automatic transmission, most often it hums due to low oil level, due to problems with the torque converter and the lever linkage.
To eliminate noise in the area of the box, it first makes sense to check the oil level in it. If it is not enough, then you need to top it up or replace it. As a temporary solution, an anti-noise additive is sometimes used in the box (it will not completely remove it, but at least reduce the operating noise). To effectively eliminate hum, the box should be dismantled, checked and fully repaired. Read about all the causes of noise in the gearbox in the article, and for brief information on why various types of noise appear in the gearbox, see the table.
Malfunctions of the Gazelle Next gearbox and ways to eliminate them.
Gears are difficult to shift
Cause of difficult gear shifting:
- The clutch does not disengage completely, due to the highness of the clutch drive or insufficient fluid level in the reservoir.
- The shift head or fork bolts are loose.
- Seizures on the teeth of the gear clutches.
- The pins in the shift lever housing have become loose.
Troubleshooting method:
- Bleed the clutch drive, add fluid to the reservoir to the normal level.
- Unscrew and replace worn bolts, seat the bolts with sealant and tighten.
- Clean out any burrs.
- Replace the gear shift lever housing
Gears shift with a bang
Cause of crackling noise when shifting gears:
- Cracking in 3rd, 4th, 5th gears, as well as in reverse gear - the gap between the synchronizer blocking ring and the ring gear has decreased due to wear on their surfaces.
- Cracking in 1st and 2nd gears - the gap between the synchronizer rings and the removable ring gear has decreased due to wear on the surfaces of the blocking rings.
- The locking ring is deformed and does not lock when pressed.
Method for eliminating crackling noise when shifting gears:
- If the gap is less than 0.5 mm, it is necessary to install new gears of the input shaft with a ring gear and a locking ring or install a new ring and grind it along the cone of the gear or input shaft.
- If the gap is less than 0.2 mm, it is necessary to install a new set of locking rings.
- For reverse gear and 3rd, 4th, 5th gears, you need to install a new set of gears and input shaft with a ring gear and a locking ring, or install a new ring and grind it into the cone of the gear or input shaft. For first and second gears, you need to install a set of new locking rings or a new gear.
Transmissions turn off spontaneously
- The nuts securing the gearbox to the crankcase have become loose or the bolts that secure the gearbox housing have become loose.
- The ends of the gear clutch teeth are worn out or the teeth of the spline rims on the reverse gears, as well as on the 1st, 2nd, 3rd, 5th gears and possibly on the input shaft are worn out.
- The clamp springs have weakened
Troubleshooting methods:
- Tighten the bolts and nuts.
- Replace worn parts
- Replace worn parts
The gearbox is noisy (various noises in the gearbox)
Possible causes of box noise:
- Bearings are worn out
- The working surface of the teeth is worn or the teeth are broken.
- Low oil level in gearbox.
Ways to eliminate gearbox noise:
- Replace bearings.
- Replace worn or broken gears.
- Add oil to the required level
Oil is leaking from the gearbox.
Causes of oil leakage from the gearbox:
- Cuffs are worn.
- The breather is clogged or malfunctioning.
- Loosen the oil fill and drain plug.
- The crankcase plugs are not sealed.
- The bolts securing the front and rear crankcase covers to the shift lever plate have become loose.
- There are nicks on the mating surfaces or damaged gaskets.
Ways to eliminate oil leaks from the box:
- Replace the cuffs.
- Replace the breather with a new one or clean it.
- Tighten the plugs until the leak stops.
- Replace the plugs with new ones.
- Tighten the crankcase mounting bolts. Unscrew the lever housing cover bolts and place them on the sealant.
- Clean out the nick and replace the gaskets
In all gears there is no transmission of torque to the driveshaft.
- The fit of the intermediate shaft gear drive on the shaft has become loose.
Troubleshooting method:
- It is necessary to replace the intermediate shaft assembly.
Only in 3rd gear there is no transmission of torque to the driveshaft.
- The fit of the 3rd gear gear on the intermediate shaft is loose
Troubleshooting method:
- It is necessary to replace the intermediate shaft assembly.
There are no readings from the pulse sensor (speedometer).
- Metal particles are stuck to the magnetic head of the sensor.
Troubleshooting method:
- Clean the head from metal particles.
Source
Why is the gearbox noisy?
Most often, noise in the gearbox, both manual and automatic, occurs when the oil level has become lower or the gear lubricant is no longer suitable for use. The nature of the sound resembles a metallic clang, which intensifies as the vehicle speed increases. So, noise in a gearbox with a low oil level occurs:
ATF level dipstick
The reason for the hum from the gearbox when the engine is running cold may lie in the thickness of the transmission oil and its contamination.
What kind of noise could there be in the gearbox?
The noise from the box can come from a different nature; depending on the damage, it not only operates with increased noise, but also howls or hums. Let us briefly describe the reasons why the above components lead to the gearbox howling and humming. So that you understand what to do about it and how to fix the problem.
Gearbox howls
The most common reason for noise in the gearbox resembling a howl is old, contaminated or incorrectly selected gear oil . If its level is insufficient, then as a result, the bearings and other moving parts of the box will run dry, producing significant noise. This is not only uncomfortable when driving, but also harmful to parts. Therefore, you should always monitor the oil level in the gearbox and its viscosity.
The second reason why a gearbox howls is because its bearings are worn out . They can howl due to natural wear, poor quality, a small amount of lubricant in them, or dirt that has gotten inside.
If the gearbox is noisy at idle when the clutch is released, in neutral gear and when the car is stationary, then most likely the bearing on the input shaft is noisy. If the box hums more in first or second gear, then a greater load is placed on the front bearings . Accordingly, it is necessary to diagnose the input shaft bearing.
Likewise, the input shaft bearing can make noise when the car is coasting or simply after starting the engine, and it doesn’t matter at what speed. Often the noise disappears in this case when the clutch is depressed. The reason for this is that when the clutch is depressed, the primary does not rotate, the bearing also does not rotate, and, accordingly, does not make noise.
Worn gearbox gear
If the box is noisy in 4th or 5th gear, then in this case a large load goes to the rear bearings , that is, the secondary shaft. These bearings can also make noise not only in high gears, but in any gear, including reverse. Moreover, the hum intensifies in this case with increasing gears (in the fifth gear the hum will be maximum).
Gear wear is the third reason why the gearbox howls. This noise occurs in two cases: teeth slipping and improper contact patch between them. This sound is different from noise, it is more like a metallic screeching sound. This squeal also occurs under load or during acceleration.
Often the cause of noise is the gear itself if the sound occurs in one specific gear. The gearbox makes noise when driving at speed due to banal wear of the corresponding gear on the secondary shaft. This is especially typical for gearboxes with high mileage (from 300 thousand kilometers or more) as a result of significant metal production and/or low oil level in the box.
Automatic transmission howls
In an automatic transmission, the “culprit” of the howl can be the torque converter . This knot is colloquially referred to as a "doughnut" because of its corresponding shape. The torque converter hums when changing gears and at low speeds. As driving speed increases, the noise disappears (after approximately 60 km/h). Additional signs that the donut is broken include:
In turn, torque converter malfunctions occur for the following reasons:
Torque converter with automatic transmission
You can check the torque converter yourself, without even removing it from the automatic transmission. But it’s better not to carry out repairs yourself, but instead delegate the diagnosis and restoration of the “donut” to qualified craftsmen.
Gearbox hums
Wear of the synchronizer clutch is the main cause of gearbox hum at speed. In this case, it will be difficult to engage any gear, and often the box will hum in this particular gear. If the wear is significant, the transmission may “fly out” when the car is moving. During diagnostics, you need to pay attention to the condition of the splined connection of the couplings!
If the springs in the clutch weaken or break, this can also cause noise in the gearbox. Similarly, this happens in a certain gear, the springs of which have weakened or broken.
Gearbox is noisy
The transmission of front-wheel drive cars has a differential that distributes torque between the drive wheels. Its gears also wear out over time, and accordingly, they begin to make a metallic noise. It usually appears smoothly and drivers do not notice it. But it manifests itself most of all when the car is slipping. In this case, the drive wheels rotate unevenly, but with high torque. This puts significant stress on the differential, and it will fail faster.
You can indirectly check the wear of the differential by the sign when the car starts to twitch after moving off (rocking back and forth). If we rule out that the engine is to blame, then you need to check the condition of the differential in the gearbox.
It happens that over time the threaded fastening of the gearbox itself weakens. As a result, it begins to vibrate during operation. Vibration, which turns into continuous noise, occurs when the car is moving and intensifies as the engine speed and the speed of the car as a whole increase. For diagnostics, the car must be driven into an inspection hole to provide access to the gearbox. If the fasteners are really loose, they need to be tightened.
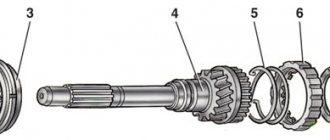
Disassembling the Gazelle Next gearbox
The gearbox must be disassembled in the following order:
— remove the clutch with the release bearing from the input shaft bearing cover;
— fix the flange at the secondary shaft, loosen nut 50 and loosen (see figure below) the fastening of the flange at the secondary shaft, but do not remove the flange;
— remove the reverse switch 69 together with the gasket; remove plunger 67 (L=l 5 mm);
— Unscrew speed sensor 51; For ease of disassembly, you can install the box in a device for disassembling and assembling it (see figure below) and secure the box to the plate, placing the input shaft towards the top;
— Unscrew the bolts of cover 1 (see Fig. 3.31 above) at the input shaft bearing and remove it;
— remove retaining ring 81 from the input shaft bearing;
— unscrew the 4 bolts holding the front and rear parts of the plate box together;
— remove the front part of the gearbox housing (see figure below), holding the plate and the rear part of the crankcase. When separating parts of the housing, do not strike the end of the input shaft, this will lead to damage to the synchronizer;
— knock out the cage 71 (see Fig. 3.31 above) of the intermediate shaft bearing from the socket in the front part of the housing and remove the adjusting ring 72;
— unscrew the filling plug and breather from the front part of the housing;
— Unscrew the bolts that secure the gear shift forks 94;
— Unscrew the bolts and remove the housing 43 of the lever.
Unnecessarily, do not remove the pins in the neck of the lever housing and in the left wall, as well as fuses and springs. If the fuses jam and are difficult to rotate under the action of the springs, then it is necessary to knock out the plugs, remove the springs and fuses from the housing.
— place the box in a horizontal position;
— Unscrew the fastening bolts and disconnect plate 20 (see Fig. 3.31 above) of the clamps and the gasket;
— remove three fingers 22, three balls 24 and three springs 23 of the gear shift rod clamp;
— remove the 1st and 2nd gear shift rod 82 in place with the head;
- remove the fork with breadcrumbs;
— Unscrew the locking bolt and remove the 1st-2nd gear switch head from the rod;
— pull out the 3rd and 4th gear shift rod 90 together with the locking pin;
- remove the fork with breadcrumbs;
— remove the locking pin of the rod 89 for engaging 3rd and 4th gears;
— Unscrew the bolt 53 securing the reverse gear axis on the left side of the rear part of the housing;
— Unscrew the bolt and remove the head 83, the locking sleeve 86, and the locking sleeve spring 87 from the reverse and 5th gear engagement rod 85;
— unscrew the nut and remove flange 48 in place of the washer;
— holding plate 65, remove the rear part of the housing;
— knock out the outer race of bearing 37 from the socket in the rear part of the housing and remove the adjusting ring 55. Unscrew the drain plug from the back of the housing and (remove cuff 47;
— Unscrew the bolt securing the reverse and fifth gear shift fork;
— pull out the reverse gear and fifth gear engagement rod, remove the fork with crackers;
— remove the locking plungers 88 from the plates;
— remove rotor 45 from the secondary shaft of the speed sensor and ring 44;
— install a stop to support the input shaft and intermediate shaft in the assembly device (see figure below).
— place the gearbox in a vertical position with the input shaft looking down;
— remove the retaining ring 56 (see Fig. 3.31) of the intermediate shaft bearing 57;
— install the synchronizer clutch 33 of the fifth gear and reverse gear into engagement with the ring gear of the fifth gear synchronizer; fifth gear should be engaged, install the puller on the secondary shaft, secure the puller legs to the grooves of the synchro clutch. fifth gear and reverse gear of the secondary shaft;
— install another puller on the intermediate shaft, while securing its claws to the end of the ring gear of the fifth gear of the intermediate shaft;
— by turning the puller screws one by one, pull out the fifth gear with synchronizer coupling 33, with ring 8, washer 36 and inner ring of bearing 37 and fifth gear gear 58 with intermediate shaft bearing 57;
— remove the needle bearing 35 from the secondary shaft and replace it, install its place during assembly;
— remove two spacer bushings 7 from the secondary shaft;
— remove the locking ring 8 from the fifth gear gear, put a mark on the locking ring to put it in place during assembly;
— remove the retaining ring 32 of the secondary shaft of the synchronizing hub of the fifth gear and reverse gear;
— remove axle 60 assembled with the reverse gear;
— remove the reverse gear 59 from the intermediate shaft;
— remove the hub and clutch 33 of the 5th gear and reverse gear with nuts and springs from the secondary shaft;
— check the alignment of the marks on the engagement clutch and the hub; if they are missing, apply them to install correctly in place of the part during assembly;
— remove the fifth gear and reverse gear clutch from the hub;
— remove three synchronizer locks;
— remove the two synchronizer springs from the hub;
— remove the reverse gear with the locking ring from the secondary shaft;
— remove the locking ring from the reverse gear, put a mark on the locking ring in order to install it in its original place during assembly;
- pull out the needle bearing and put a mark on it so that it is installed in its original place during reassembly;
— the box must be installed in a horizontal position;
— secure the stop (see figure below) to fix the secondary shaft in the assembly fixture;
— install the gearbox in a vertical position so that the input shaft faces upward;
— remove the stop (Fig. 3.34) that holds the input shaft and intermediate shaft;
— turning the intermediate shaft to the side, remove the input shaft together with the blocking ring and rollers 78 from the secondary shaft;
Disassemble the secondary shaft, if necessary, tilting the intermediate shaft to the side;
— remove ring 77 from the third and fourth gear hub;
— remove the hub together with the 3rd and 4th gear clutch assemblies, synchronizer springs and cotters from the secondary shaft;
Noise additives in the box
Transmission noise reduction additives can temporarily reduce the noise during operation. However, the cause of the hum will not be eliminated. Therefore, it makes sense to use additives only for preventive purposes or during pre-sale preparation of a car in order to get rid of it as quickly as possible.
Different types of additives are suitable for different problems, so when choosing one it is important to determine exactly what is humming in the box. The most popular attachments for reducing noise in manual transmissions are:
There are similar additives in automatic transmissions. Examples for automatic transmissions include:
The additive market is constantly being replenished with new compounds to replace old ones. Therefore, the lists in this case are far from complete.
Conclusion
Most often, a manual transmission is noisy because the oil level in it is low, or the oil is of the wrong viscosity or is old. In second place is bearing wear. Less commonly, wear of gears and couplings. As for automatic transmissions, similarly, most often the cause of the hum is low oil level, wear of gears and bearings, and malfunctions of hydraulic system elements. Therefore, the first thing to do when a howling or noise of a different nature appears is to check the oil level, and then look at the situation, under what conditions it occurs, how big the noise is, and so on.
In any case, it is not recommended to operate any transmission that makes a hum or shows other signs of malfunction. In this case, the box will wear out even more and its repair will cost more. The exact cause can only be found out by disassembling and troubleshooting the unit.
Source
The most common symptoms and troubleshooting methods
Despite the structural simplicity of the unit, repairing a Gazelle gearbox with your own hands involves serious work. Without the proper knowledge and skills, it is better not to touch the unit, so as not to make it worse. To replace damaged parts, the box must be dismantled and disassembled.
There is a noise in the box
Most often, a sign of a mechanical malfunction is a dull hum or crunch, indicating weak fixation or destruction of the bearings. An unpleasant cracking sound is also possible, indicating damage to the synchronizer rings. Often the box howls, and in completely different ways. The strength of the sound and its character depend on the speed of movement, the specific gear, and the duration of driving.
It is noteworthy that the characteristic noise does not always indicate a gearbox malfunction. Especially if the elements of the box have recently been replaced. In this case, the howling will only be a sign that the parts have not yet gotten used to it. Often, the crunching of the gearbox is confused with malfunctions of the clutch or other related units. And any experienced Gazelle driver will confirm that until you disassemble the box, the specific cause of the noise can only be determined with a 50 percent probability. But a competent bulkhead will help you immediately find the problem area. Before this, of course, you need to check the oil level. If it's ok, you need to disassemble the gearbox. Anything can turn up during the troubleshooting process. For example, there may be a mismatch in bearing markings, missing washers, or incorrect sizes.
Thus, noise in the Gazelle gearbox is caused by wear of bearings, gears, synchronizers or their destruction, breakdown, as well as a low level of MTF or its poor quality. The alignment of the crankshaft and crankcase is rarely disturbed, but it doesn’t hurt to check the runout of the mounting hole for the box.
Difficulty shifting gears
If it becomes difficult to change gears, this indicates one of the problems:
- synchronizers or gears of a certain gear are worn out;
- the lever or other switching mechanisms are damaged - most often the fork;
- problem with the clutch - it does not engage completely, the pedal drive cable is loose, the driven disc is damaged.
Often, poor gear engagement is due to design flaws in synchronizers. When the clutch plate is pressed against the flywheel or pressure plate, the bearing in the crankshaft creates resistance. This is enough to block the inclusion of speeds.
It also happens that it is difficult to change gears on a warm engine, but when it is cold everything goes like clockwork. The point here is that initially there is a thick layer of lubricant between the synchronizer thrust ring and the gear. After the temperature rises, the oil liquefies, the ring and gear are rubbed almost dry, and the coupling rests against the teeth of the ring. Either a high-quality grip, such as HOLA, or another MTF compound will help.