Advantages and disadvantages of a tablet instead of a radio
First of all, it is necessary for everyone to evaluate for themselves the feasibility of installing a tablet in a car.
Therefore, below I have provided a list of the advantages and disadvantages of this replacement.
List of benefits:
- Playing music is much more convenient.
- You can watch videos (movies, TV series, clips, etc.).
- More flexible sound settings in the car are possible (adding effects, equalizers, compressors, using different players).
- You can surf the Internet, use social networks, instant messengers, and communicate via video conference.
- You can take pictures with the front camera.
- You can use any navigator and GPS.
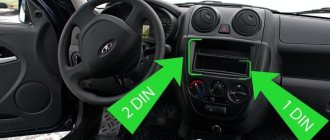
- The 2 DIN socket is great for a mid-sized tablet. In the worst case, you will have to slightly enlarge the 2 DIN frame.
- The device will not have to be constantly charged, since it will be directly connected to a power source, without using a lithium-ion battery.
List of disadvantages:
- To fully make a radio from a tablet, you need to work hard on the installation and connection. Moreover, you will need at least basic knowledge of how to connect such devices. If you blindly follow installation and connection instructions, in most cases nothing will work. This is due to the fact that absolutely identical situations are impossible. On some cars the connector will be too large, and on some tablets the voltage will be non-standard.
- During installation, you may accidentally damage other parts of the vehicle.
- Connecting a tablet to a car with your own hands does not imply any guarantees or returns, so you will have to correct your own mistakes yourself. But before that, they still need to be found!
- Some features of the device will become inconvenient to use, since the gadget is attached to the car interior. For example, playing games will be inconvenient, as will typing text messages. For games you will have to connect external peripherals, and replace text messages with voice messages.
- The main camera will become completely useless.
Installing a tablet in a car is not an easy task. So first decide if you need it! Otherwise, there is a chance of ruining both the car and the gadget.
The best tablets for truck drivers
Drivers of heavy-duty vehicles need reliable vehicles more than anyone else. The navigator will help you find your way in an unfamiliar area, and the video recorder will help you resolve controversial situations on the road.
Garmin DRIVE ASSIST 51 RUS LMT
Quite expensive, but the gadget justifies its price. This is a classic navigator without a camera or other multimedia functions. The main advantage of the model is the high accuracy of cartographic data , free updates simultaneously with the release on the official website.
The device is equipped with a TMC receiver, thanks to which the system takes into account the presence of traffic jams and obstacles on the road and rebuilds the route. In addition, this is a full-fledged assistant on the road - it will warn about radars, speed cameras, traffic police posts, and help you choose a lane on the highway.
Basic characteristics:
- display – 5 inches, touch;
- resolution – 480×272 pixels;
- external memory - up to 64 GB;
- Software – Garmin;
- OS – Windows CE;
- antenna - internal.
Battery – 1250 mAh, battery life up to 1 hour, it is possible to connect to an external power source.
Additional functions of the tablet navigator: sending trip data to contacts, weather forecast and traffic conditions in real time, navigation tips, working with a wireless rear view camera.
Advantages:
- voice control;
- fast system response;
- data accuracy;
- free update;
- auxiliary systems.
Flaws:
- short battery life;
- no other multimedia functions.
Despite the high cost, many truckers prefer this particular navigator model. The reason is the high detail of maps of large cities, reliable operation, and many assistant applications.
Overview and daytime shooting:
Shooting at night:
Bellfort GVR709 Spider HD
Combined device – GPS tablet with a large high-resolution screen, video recorder, phone (two SIM cards). The built-in 3G module allows the tablet to display information about traffic jams, accidents, and update city maps in real time. At the same time, the owner can use the gadget for personal purposes - view mail, videos, search for information.
Main characteristics:
- screen – 7 inches, touch;
- OS – Android 4.1.2;
- antenna - built-in;
- receiver type – MTK6577A9-2;
- resolution of the built-in video recorder – 1280x720 pixels;
- viewing angle – 140;
- sound recording - yes;
- memory – 1 GB (RAM), 8 GB (built-in);
- battery capacity – 2600 mAh;
- additional options - FM transmitter, MP3 player, digital camera, video player, traffic loading, voice navigation prompts, route calculation function.
Handsfree module allows you to conduct conversations in a safe mode.
Bellfort GVR709 Spider HD is sold at prices ranging from 14,000 to 21,000 rubles.
The owner of the gadget can connect a rear view camera to the model (Wi-Fi, wired method). The built-in G-sensor will block and protect a piece of video from being re-recorded if a strong impact is recorded.
Advantages:
- presence of MTK receiver;
- shooting resolution of the built-in recorder;
- accuracy of cartographic information;
- additional assistants.
Minuses:
- small battery capacity – autonomous operation up to 4 hours;
Bellfort GVR709 Spider HD is often used by drivers of heavy-duty vehicles due to its good navigation system, multimedia functions and stable operation of the gadget.
Daytime shooting:
Night:
Digma CITI 1508 4G
A car tablet with a navigator and a video recorder has impressive characteristics for its price - 64 GB of internal memory, a large diagonal (10 inches), a wide-angle matrix and a powerful battery (6000 mAh). The device will quickly complete all assigned tasks - download maps, process all road changes, shoot and play back good quality video.
Main characteristics:
- memory - RAM 3 GB;
- storage expansion – microSD up to 64 GB;
- camera – 5 MP (main), 2 MP (front);
- OS - Android 7.0;
- processor – MediaTek MT8735w;
- navigation – GPS;
- data transmission – Wi-Fi, Bluetooth, 3G and 4G.
In electronics stores, a tablet costs from 7 to 12 thousand rubles.
The model has slots for two SIM cards - the ability to make calls, receive up-to-date information about traffic jams, accidents, repair work, the location of gas stations and other points.
Advantages:
- large amount of built-in memory, the possibility of doubling it;
- large screen with a wide viewing angle;
- performance;
- ability to download additional applications.
Flaws:
- weak camera;
- frequent glitches in the work of Navitel.
Many users report problems with the Navitel navigation system. It is not clear what causes the failures on this particular model of car tablet. However, it can be recommended for purchase due to its speed, fairly modern OS and reliability. Users recommend updating navigation maps more often to avoid glitches.
Which tablet is right for you?
Choosing the device to use is an important step before installing the tablet in the car.
There are several criteria:
- There is no need to pick up an expensive flagship. Instead of a radio in a car, a mid-priced tablet, and not necessarily from leading brands, is quite suitable. But you shouldn’t buy a very cheap gadget from an unknown Chinese manufacturer.
- The display diagonal should be small, approximately 7-8 inches. This is the size that fits the 2 DIN socket standard. You can get a device with a larger screen, but it’s definitely not worth buying less.
- The display resolution must be at least FullHD. If the resolution is low, then the driver sitting next to the device will easily notice the pixels on the screen.
- Technical specifications may not be the best. Typically, a powerful processor, video chip and large amount of RAM are needed only in games and certain applications. Playing on a gadget built into the car interior is not very convenient, but almost any device is suitable for playing music, videos and surfing the Internet.
- It is imperative to have a slot for a SIM card, otherwise there will be no connection to the Internet. The only exception is the situation when the car has a portable Wi-Fi modem that distributes the Internet.
- It is desirable that the device has a GPS module and GLONASS technology. Both are useful for navigator applications. Otherwise, GPS satellite reception is poor, as it only works via the Internet.
- For radio lovers, I advise you to buy devices with a radio module. But this is not necessary, since if you wish, you can listen to radio stations via the Internet.
A good tablet from Lenovo, the Tab 3 TB3-850M, meets all of the above requirements.
This is an inexpensive gadget with a display diagonal of 8 inches. The gadget supports 4G, GLONASS, GPS.
The amount of RAM is 6 GB, and the permanent memory is 16 GB. The current cost is approximately 10 thousand rubles.
The easiest way to use your tablet
To avoid the hassle of connecting a gadget instead of the factory radio, many simply install the device on top of it. On the market you can find a huge number of suction cup holders, which make it easy to make such “tuning”. All that remains is to connect the tablet to the cigarette lighter and enjoy the modern device.
However, the holders are unreliable, as the tablet can easily fall off and break if the car hits a bump. That's why many people decide to install it instead of a radio.
Installing and connecting the tablet to the car
To make it clearer how to connect a tablet to a radio, I divided this process into two stages: direct connection of the amplifier/speakers, and physical installation of the device.
Before starting work, you should prepare the following tools and equipment:
- soldering iron with a fine tip;
- screwdrivers;
- keys;
- drill with suitable drill bits;
- cutting tool;
- tablet;
- amplifier;
- audio adapter (if the player will be used as an amplifier, a cassette recorder adapter will do);
- car adapter for powering the device;
- prepared wires for connecting to the battery and for audio output;
- thermal tubes;
- mini RCA cables.
Having all of the above and having at least basic knowledge in connecting such devices, you can safely get down to business!
Connecting speakers and amplifier
Detailed instructions for connecting the device through an amplifier:
- Remove the original radio. To do this carefully, use the instructions for your player model.
- Stretch the wires from the amplifier to the battery, while the cable on the positive should have a fuse located as close as possible to the battery. The fuse housing must be waterproof!
- Make a small hole in the wall between the passenger compartment and the engine compartment to route the cable. Be sure to use a standard rubber coupling to prevent the cable from chafing on the metal surface.
- To ensure high-quality signal output to the amplifier, use an adapter adapter, thanks to which you will not need to bundle and solder each cable to each other.
- Route 2 wires from the amplifier to the audio adapter.
- Connect your tablet using two RCA wires.
- Identify the connector on the fuse that only receives voltage when the ignition key is turned on. This connector should be indicated on the fuse box or documentation. The plus is connected through a fuse, the minus to ground. Here we connect the cigarette lighter socket into which the charging adapter is connected. The adapter itself is connected to the gadget.
This completes the connection to the amplifier.
Installing the tablet
Now you need to install the device. Installation instructions:
- Insert the device into the place of the radio; if the frame is not large enough, you can file it down in the right places.
- Before installation, make fasteners to hold the gadget on the back side so that it does not fall inside.
- After inserting the device, secure it with epoxy glue.
- It is best to connect the device to an amplifier via a headphone jack. Then the signal quality will be good, without noise and delays.
That's it, now you have installed the device! Check if everything works and use the new, improved radio.
The process of installing the tablet in place of the standard car radio
First of all, it should be said that there are 2 methods of such installation: installation with the connection of a third-party amplifier, or installation in which the native radio serves as the amplifier. The first option will be described below as the simplest.
Let's list what is needed for this.
Consumables and tools
- Household soldering iron.
- Phillips screwdriver (medium size).
- Electric drill with a set of drills.
- Plastic sheet 300X300 mm and 5 mm thick.
- Tablet PC.
- Car audio amplifier, external.
- 12 volt plug (for cigarette lighter).
- A piece of thick-walled wire with a fuse (for an amplifier).
- Set of audio cables (for speakers).
- Set of mini RCA cables for tablet.
- Insulating tape.
- Epoxy resin.
- Set of rubber couplings for wires.
- Adapter for connecting speakers.
The process of connecting a tablet to a car with your own hands
- So, 2 devices are connected to the car: an amplifier and the tablet itself. They are connected directly to the battery using the above thick-walled cable ( and there must be a fuse on this cable, and it should be located as close to the battery as possible ).
The power cable is connected to one of the terminals and must be equipped with a fuse
It is placed in the hole for the power cable so that its insulation does not fray.
Currently, it is easier to purchase a ready-made adapter than to solder connectors
It is glued with epoxy resin in at least 6 points
It is painted and there are cable holes visible in the center.
The device is held on a mount made of plastic corners supported by epoxy resin
Connecting to a car radio via Bluetooth
The main requirement is that the phone and head unit have Bluetooth support. It is necessary that both devices have the same set of protocols (including A2DP). Support for this technology is available in most modern radios. But older smartphones often do not have the ability to provide streaming playback. Check the documentation to see if A2DP is supported .
This is what searching for a phone or similar device via Bluetooth looks like on most radios
If your tape recorder does not support Bluetooth, this is also not a problem. You need to buy a Bluetooth dongle (“dongle”, adapter), which connects to the car radio via a Mini Jack or other connector. By the way, via Bluetooth you can connect not only a smartphone or tablet to the head unit, but also almost any other equipment - for example, a laptop or player.
There are two ways to make a connection.
- Using the phone. Go to the Bluetooth settings on your phone and start scanning. The technology will automatically detect all possible connections within a certain radius. Usually the name of the connection you need is the brand of the radio or “dongle”. Click on it and confirm the connection. A request to confirm the request will also appear on the tape recorder screen. Do it. That's it, the job is finished!
- Using a tape recorder. This option is somewhat more complicated. First, enable visibility for other devices in your mobile phone settings. Then you need to go into the settings of the head unit and find the Bluetooth item there. Go to its settings and select the “Search” or “Scan” function (the name may vary for different models). The car radio will find the gadget and offer to send a request. Confirm it on both fixtures. Ready! Communication has been established.
Video: Bluetooth connection
Pairing your phone and radio via USB
Universal method. Suitable for almost all phones and radios, except the oldest ones. You need to find the USB port on the head unit (in new models it is located on the front panel). You will also need a USB cable. It is easy to recognize: on one side there is a plug for connecting via USB, on the other - for connecting to a phone.
Classic USB cable. On one side there is a port for connecting to the radio, on the other - for connecting to a smartphone
Connect the cable to both devices. After that, go to the phone settings, find the “USB connection” item there (the name may change depending on the model of equipment) and select the “Data transfer” sub-item. Ready! Now the radio can use the built-in memory and the phone's memory card as storage media. In this case, the head unit itself is used for control.
In new car radios, you can control playback from both devices. For example, you can play music directly on your smartphone, and the head unit will be used as an amplifier. Often this option is more convenient, since you don’t have to switch songs, but can immediately select the one you need.
Connecting via a USB cable has the advantage that the phone will charge during the process (though not as quickly as from a regular outlet) . The disadvantage of this method is the presence of the cord itself, which takes up space and can get caught on something.
What problems may arise
Most machines are equipped with a digital CAN bus. Therefore, simply installing a tablet does not always work. You'll have to find a way to “make friends” with the gadget and the standard amplifier. The easiest option is to purchase a small AZ-FM adapter. It helps to “deceive” the standard system, which begins to see the tablet as a standard radio. But in this case the volume will not be enough. Then you will still have to install an additional “amplifier”. The easiest way is to use any old radio for this. It connects to AUX, then goes to AZ-FM and then to the stock amplifier. But this is too long a chain. In addition, the adapter is not so cheap, about 900-1000 rubles.
Then you can buy an additional amplifier at a radio store. It will certainly work, but the background will appear while listening to music.
Therefore, the easiest way is to disassemble the AZ-FM and resolder the resistance on it. But the background may remain. You can try to unsolder the wires from the tablet and take the mass to different places. But still, additional noise may remain, even if you connect directly to the battery. Then we buy a filter (for the car radio) and the noise disappears.
However, a tablet running on its own OS will not independently integrate with the car system. Therefore, you need to think about how to configure it.