Repair manual for Daewoo Matiz / Deo Matiz
- Repair manuals
- Repair manual for Daewoo Matiz 1997
General information about the car.
DAEWOO Matiz, a mini-car model with a transverse engine and front-wheel drive.
The model was first presented in 1998 in Geneva. Since the summer of 1999, it has been available with an automatic transmission, including a continuously variable CVT and an automatic clutch. At the Paris Motor Show in October 2000, an updated version of the Daewoo Matiz was presented.
Daewoo Matiz is almost 10 cm taller and wider than its predecessor Daewoo Tico. The model's body has smooth shapes: a large rounded windshield, smoothly flowing into the continuation of the hood, oval headlights, extended wheel arches.
Depending on the modification, there are several configuration options, including with power steering, air conditioning and radio. The latest version is equipped with full power accessories and a CD-changer for 6 discs.
Passive safety is ensured by a specially designed body: the roof is additionally strengthened, power beams built into the doors prevent jamming and provide passengers with protection in the event of a side impact. The high-tech plastic fuel tank prevents fuel leakage and subsequent fire in the event of a vehicle rollover.
Active safety elements include: brakes equipped with powerful 7-inch vacuum boosters, four-channel ABS, two airbags.
Daewoo Matiz is equipped with a 0.8 SOHC MPI three-cylinder petrol engine with a distributed fuel injection system, providing high power and fuel economy. The cars are also equipped with an exhaust gas recirculation system, which reduces fuel losses and contributes to less emission of harmful nitrogen oxide gas, as well as an EMS system controlled by the on-board computer.
↓ Comments ↓
1. General information
1.0 General information 1.1. Identification numbers 1.2 Basic repair instructions 1.3. Technical characteristics of vehicles with manual transmission
2. Maintenance
2.0 Maintenance 2.1. Maintenance 2.2. Replacing engine oil and oil filter 2.3 Replacing spark plugs 2.4. Checking fuel lines 2.5. Checking and adjusting the ignition timing 2.6. Checking the cooling system for leaks 2.7. Checking the oil level in the gearbox 2.8 Checking the ball joint of the front suspension 2.9. Checking the axial play of the rear wheel 2.10. Bleeding the power steering system 2.11. Removing air from the brake system 2.12. Anti-corrosion materials
3. Engine
3.0 Engine 3.1. Mechanical part of the engine 3.2. Cooling system 3.3. Electrical equipment 3.4. Engine management system 3.5. Exhaust system
4. Transmission
4.0 Transmission 4.1. Clutch 4.2. Gearbox and differential 4.3. Drive shafts
5. Chassis
5.0 Chassis 5.1 Possible malfunctions of the chassis and methods for eliminating them 5.2. Front suspension 5.3. Rear suspension 5.4. Tires and wheels 5.5. Wheel alignment adjustment
6. Steering
6.0 Steering 6.1. Power steering system 6.2. Power steering pump 6.3. Steering mechanism with hydraulic booster 6.4. Steering column
7. Brake system
7.0 Brake system 7.1. Description of design 7.2. Diagnostics of the brake system 7.3. Removal and installation of brake system components 7.4. Replacing brake pads 7.5. Repair of brake system components
8. Heating, ventilation and air conditioning systems
8.0 Heating, ventilation and air conditioning systems 8.1. Heating and ventilation system 8.2. Air conditioning system
9. Electrical equipment of the body
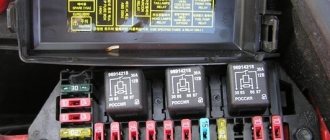
9.0 Body electrical equipment 9.1 General information 9.2 Fuses, relays and wiring harnesses 9.3. Lighting system and sound signal 9.4. Windshield wiper and washer 9.5. Control panel 9.6. Audio system
10. Body
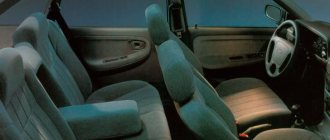
10.0 Body 10.1. Interior 10.2. Seats 10.3. Glass and mirrors 10.4. Elements of exterior body trim 10.5. Bumpers 10.6. Doors 10.7. Roof 10.8. Seat belts 10.9. Front part of the body 10.10. Rear part of the body 10.11. Frame and body frame 10.12. Restoring tightness and eliminating body squeaks
11. Electrical diagrams
11.0 Electrical diagrams
Daewoo Matiz repair
Daewoo Matiz repair
Daewoo Matiz is another Korean with Uzbek registration. This small, maneuverable and economical car was extremely popular with domestic consumers.
What are the capabilities of this baby, how does it feel on our roads, how often does it need repairs?
Daewoo Matiz, according to the technical maintenance regulations introduced by GM Uzbekistan, requires scheduled maintenance every 10 thousand kilometers. According to the requirements of the same regulations, after the car has driven 2 thousand kilometers, it is required to undergo the first technical maintenance.
Matiz, equipped with a liter engine or a 0.8 liter engine, as a rule, does not cause much trouble. The spark plugs and timing belt require regular replacement. For the latter, the standard is set at 40 thousand kilometers - here the company hedged its bets, since lengthening this interval often leads to belt breakage, which entails expensive repairs.
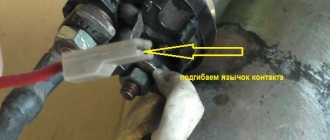
Daewoo Matiz is equipped with a rather capricious ignition distributor, especially for models produced before 2008. After active washing, this mechanism malfunctions. In this case, Matiz service is provided to you. In later models this problem was eliminated.
The Matiz gearbox does not cause any complaints - most of its parts can withstand a very long mileage. This applies to both automatic transmissions and manual transmissions. The grip is also reliable. Unless the cable can pump up and fray in the first fifty thousand kilometers.
Taking into account local conditions, the Daewoo Matiz body is unlikely to last more than two years in pristine condition - rust will make itself felt very soon. To prevent this from happening, after one year of operation it is worth remembering our car service. A Matiz whose body is regularly coated with protective compounds will delight you with its radiant appearance for a long time.
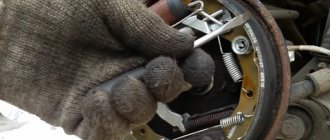
Chassis - and again we cannot help but remember our climatic conditions and the reagents used on roads in winter. It is worth accepting that the elements of the chassis of any car are consumables. Our baby was no exception here. Fortunately, replacing the chassis is not the most difficult Matiz repair.
Matiz is notable for the fact that it is constantly improving. Therefore, it is possible that soon many of its inherent shortcomings will be forgotten. In any case, this is a worthy representative in its class.
What in Matiz needs to be improved first?
Almost every car can have some flaws, and the mini city car Daewoo Matiz is no exception. This car has as many disadvantages as advantages. This article presents simple and useful improvements with which you can start transforming your car. Moreover, all of them can be completed independently - such modernization will not require any special skills or significant costs.
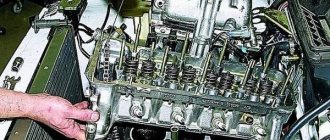
Crankcase gas removal
Many Matiz owners have probably encountered the problem of the ventilation valve freezing in winter. Its consequences include, at best, knocking out the dipstick, and at worst, squeezing out the seals.
There are several ways to prevent this problem. One of them is to install a special ball in the tube going to the air filter. This is done in order to limit the supply of cold air to the valve in winter.
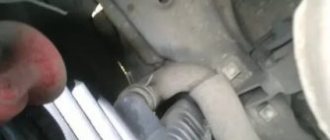
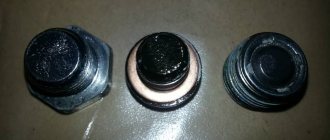
Some car owners make their own adjustments to this process, since many simply do not understand how to remove the inserted ball from the tube if necessary. That is why particularly inventive car enthusiasts cut the channel closer to the valve, insert a small piece of copper tube, thus connecting the ends of the cut hose, and in winter they screw a bolt into one end of the tube.
Connection example
Judging by the reviews, even such a modernization really helps: the dipstick does not knock out, and the valve does not freeze.
However, after a certain period of time the problem may appear again. In this case, most people wonder whether to remove the ventilation valve altogether, especially since there is plenty of information on how to do this on the Internet. The most common method includes the following steps:
- purchasing a hose with a length of 300–400 mm and an internal diameter of 10 mm;
- attaching one end of the hose to the valve cover, and the other to the air filter housing with a pre-drilled hole;
- hose plug at both ends (for this you can use a dispenser ball made of any elite alcohol);
- making a hole in the air filter (directly under the tube) to drain condensate;
- eliminating the resonator to take in warmer air and minimize the chances of the outlet tube freezing.
With this minor improvement, you no longer have to worry about the valve freezing. In addition, another advantage of this design is the protection of the throttle assembly from clogging. True, in this case you will have to replace the filter more often, but this is much easier than changing the seals.
Deflectors
For Daewoo Matiz, it would be useful to install deflectors on the doors - plastic products that provide reliable protection from the powerful air flow that is formed when driving. Such devices are attached in two ways:
- using tape;
- using special latches.
In both cases, before installing the deflector, it is necessary to prepare the surface of a certain area of the car. To do this, wash it with soapy water and wait until it dries completely. If you choose a product that is fixed with tape, then you will also have to degrease the surface with a solution containing a high percentage of alcohol.
Next, you should determine the mounting locations: attach the deflector to the door frame and trace the outline with chalk or a pencil.
The pencil core must be soft so as not to damage the car's paint.
Experts recommend installing these products in the center of the frame located above the glass, as this position will create optimal air flow.
The next step is to remove the protective film from the tape, after which you can apply glue to it for a stronger fixation. The final stage is the installation itself: the deflector will need to be attached to the door, guided by the previously applied marks, and held for several minutes. If you used glue, it will take approximately 12 hours for it to dry completely.
https://www.youtube.com/watch?v=vTQphdxfAkw\u0026list=PL26135BDA33A7970D
As for the insertion device, it is mounted into a groove on the top of the door. It should be slightly compressed in the center and inserted into the place intended for it. After you open your fingers, the clamps that will firmly hold the deflector will automatically open.
Insertion device
Cabin ventilation valve
Ventilation valves provide fresh air flow into the cabin and help reduce window fogging. They also contribute to better door closing, so installing them will allow Matiz owners to make their car more comfortable.
The sequence of this upgrade is:
- removing the panel located under the lamp;
- removing excess plastic from the valve, since it will be installed outside the car;
- creating a template corresponding to the dimensions of the device being installed;
- removing the flashlight. After the lamp is removed, you can photograph the wires so that later it will be easier to return everything to its place;
- preparing the surface for the valve: covering with masking tape and drawing the outline using a template;
- making a hole using a grinder and metal scissors;
- valve installation;
- applying sealant along the edges of the valve both from the outside and from the inside;
- installation of the lantern and installation of the panel.Installation of the lantern and installation of the panel