Comments are closed.
Using pliers, squeeze the tendrils on the clamp installed on the pipe at the bottom of the radiator and move it towards the floor.
DAEWOO MATIZ antifreeze replacement with system flushing
I was very surprised that the hoses that were not clamped with clamps when working on water did not leak.
Daewoo Matiz - My Matvey › Logbook › We change the coolant ourselves. Including…
The system will de-air itself, so you will have to periodically add water to the expansion tank. But in Matiz there is no such thing.
I’m taking the radiator to the nearest Zhiguli car wash for cleaning:
After selecting a suitable coolant for replacement, purchase the required amount of antifreeze.
For a Daewoo Matiz with a 0.8 liter engine, you will need 3. Replacement process To successfully drain the antifreeze and fill the system with new coolant, prepare a tool. You will need screwdrivers and a set of wrenches, pliers and a 5-liter empty container.
Daewoo Matiz where to fill antifreeze
In addition, prepare clean rags, ten liters of distillate, and two liters of coolant concentrate. Draining the antifreeze and flushing the radiator To replace the antifreeze, do the following: Place the machine on a level surface. It is most convenient to work on a pit or overpass.
If this is not possible, find a flat area. After completing the work, return the terminal to its place. Remove the air filter and housing. To perform this task, loosen the bolt that tightens the clamp on the pipe.
It's so simple that it brings only pleasure. The brackets are different in shape, but it is written on them which is right and which is left.
Daewoo Matiz & Ravon R2 Club
So it’s impossible to confuse them. I remove all the hoses, while draining the old fluid. There is also a small hose on the side of the radiator that goes to the expansion tank. I’m taking the radiator for washing to the nearest car wash in a Zhiguli: By inserting a washing gun into one of the holes, thanks to the pressure, all the dirt and deposits come out of the second. I also rinse the honeycombs a little while holding the gun at a distance so as not to damage them.
Only the air conditioner radiator remained in place.
Comments and reviews
We carry out the work on a level area. We don't need a hole or an overpass! First, remove the air filter housing, three 10mm bolts, an air duct clamp and a sensor connector. Then we squeeze it with pliers and move the clamp on the lower radiator pipe down. Carefully remove the pipe itself; a little liquid will flow out. Next, unscrew the cap of the expansion tank and completely drain the liquid.
Of course, it is advisable to place some kind of container of at least 4 liters under the machine, but I did not do this because the crankcase protection gets in the way. And the liquid drained directly onto the grass.
Next, remove the radiator along with the cooling fan, two bolts on top and two more pipes on top, too. And with a 10mm wrench, unscrew the two mounting bolts of the cooling fan diffuser from the radiator (photos 6 and 7).
Remove the electric fan with housing photo 8.
We place a container under the right side of the cooling radiator to drain the liquid, find the steam outlet pipe, squeeze the clamp with pliers and lower it down. Remove the pipe from the radiator and drain the liquid (photo 9) and unscrew the expansion tank cap.
There, on the right side, we find the steam outlet pipe and take a photo of it. After that, go to the left side of the cooling radiator and remove the supply pipe. Photo. Next, all that remains is to unscrew the fastening bolts of the holders of the upper cooling radiator cushions, on the left and right sides of the photo 13 and All that remains is remove the cooling radiator and drain it, shake out the remaining liquid from it, do not lose the rubber pads of the guide legs of the cooling radiator - two at the top and two at the bottom.
And assemble everything in the reverse order, first pour 2 liters of antifreeze concentrate through the filler neck of the expansion tank and then add distilled water to the “MAX” mark on the expansion tank.
Start the engine and warm it up until the fan turns on. While the engine is running, monitor the fluid level in the expansion tank.
The system will de-air itself, so you will have to periodically add water to the expansion tank. After the cooling fan has started, you can turn off the engine and let it cool. When “cold,” the antifreeze level in the expansion tank should be slightly below the “MAX” mark between the mark and the weld.
We can say that replacing antifreeze on the faithful Matiz was successful.
We carry out the replacement ourselves
All work on changing the coolant should be carried out only when the engine has completely cooled down. Otherwise, you risk getting burned. Before starting work, the car must be placed on a horizontal, flat surface.
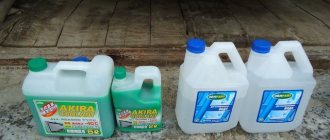
What antifreeze should I use?
Concentrated Liqui Moly KFS 2000
At specialized service stations, Liqui Moly KFS 2000 is poured to cool the engines of Daewoo Matiz cars. It is a blue liquid based on ethylene glycol and a set of additives that successfully prevent the appearance of corrosion, foam and other negative processes. You can also use a domestic product, for example, from Lukoil.
Coolant replacement kit: Lukoil antifreeze, distilled water, flushing
To cool the Daewoo Matiz engine, you can only fill it with ethylene glycol-based coolant!
Tools
- ten liters of distillate;
- a set of keys;
- screwdrivers;
- two liters of concentrated antifreeze.
- pliers;
- capacity of five liters;
- rags.
Replacement instructions
- First you need to remove the air filter along with the housing. To do this, slightly unscrew the bolt that tightens the clamp on the pipe, then unscrew the bolts securing the housing and remove the sensor connector. Remove the air filter together with the housing
- Using pliers, we squeeze the antennae of the clamp of the lower radiator pipe and move it down. We place a previously prepared container under the pipe and remove the hose. The antennae of the clamp need to be compressed
- To depressurize the cooling system, you need to remove the filler cap from the expansion tank. Unscrew the tank cap
- Unscrew the top bolts securing the radiator. Remove the pipes located at the top of the radiator. We directly remove the radiator itself and rinse it with distillate. We remove the heat exchanger
- Using pliers, we squeeze the three clamps on the hoses that go to the tank in turn. Having disconnected the hoses and fastening, remove and rinse the tank with distillate. Remove the tank
- We return it clean to its place. We connect the hoses. We return them to their place.
- We install the radiator in its place and connect the pipe to it. Then we put back the air filter with the housing. We connect the sensor and air duct.
- We fill the distillate; when pouring, we hold the canister with one hand, and with the other, to prevent air plugs from forming, we squeeze the pipe.
- We start the engine for about fifteen minutes, in the meantime we dilute the concentrated antifreeze with distillate in equal proportions and, after tightening the cap, mix thoroughly. Dilution kit
- We turn off the engine and wait for it to cool down. Drain the distillate from the system. We connect the pipes to the tank and radiator.
- Pour the resulting coolant into the reservoir. Be sure to squeeze the lower radiator hose. You need to pour to the maximum level, and then tighten the cap on the tank tightly. Fill in the coolant
- We start the engine and let it run for fifteen minutes. Checking the level in the tank. Filled with liquid
You are changing the coolant
Survey
- On one's own
- A friend helps
- AT STO
Loading …
How to change antifreeze on Daewoo Matiz
The compact car Daewoo Matiz is a representative of the budget segment. Therefore, car enthusiasts prefer to do many maintenance jobs with their own hands. Replacing antifreeze is also a simple operation if you follow the instructions.
Stages of replacing Daewoo Matiz coolant
In the cooling system of the Daewoo Matiz, sediment and plaque often form. Therefore, when replacing antifreeze, it is recommended to flush the entire system. This will clear deposits and restore normal heat exchange.
The cars on the market are equipped with 0.8 liter and 1.0 liter petrol engines. This also applies to older models, as well as those that have undergone restyling. Therefore, the replacement process in them will be similar.
Coolant drain
Any flat surface is suitable for draining antifreeze from the Daewoo Matiz; you can combine the replacement with a trip to the country. Therefore, we place the car on a suitable flat area, wait until the engine cools down a little and proceed to action:
- Open the hood and remove the air filter along with the housing (Fig. 1). To do this, unscrew the 3 10mm head bolts. Loosen the air duct corrugation clamp and disconnect the mass air flow sensor connector. Fig. 1 Air filter housing
- At the bottom of the radiator on the passenger side we find a pipe, place a container under it to collect the old coolant. We compress the clamp on the pipe and move it down, after which the hose can be removed (Fig. 2). Fig. 2 Lower radiator pipe
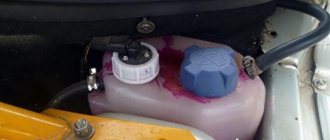
- To speed up the draining process, unscrew the cap on the filler neck of the expansion tank (Fig. 3). Fig. 3 Tank cap
- The liquid will not completely drain from the radiator, so we will have to remove it. To do this, you need to unscrew the 2 10mm head bolts from above. Remove the fan power supply, as well as the 2 hoses on top. Thick for circulation and thin for steam removal going to the expansion tank. After this, we take out the radiator together with the fan and drain the remaining liquid (Fig. 4). Fig. 4 Radiator with fan
Antifreeze replacement interval
Antifreeze in Daewoo Matiz is replaced every 4 years or after a mileage of 80 thousand km. The values are basic and imply the absence of other factors affecting the efficiency of the coolant.
If the antifreeze has become discolored or has acquired a brown, reddish or black tint, it should be replaced as soon as possible. A change in color indicates poor quality of the product, lack of necessary additives and the negative impact of the coolant on the entire system.
To avoid failure of more expensive components, antifreeze should be purchased from trusted official dealers. Experts pay attention to the following brands suitable for Daewoo Matiz:
- 1998-2002 year of manufacture - antifreeze category G12, MOTUL Ultra, Castrol LF, GlasElf, AWM, Lukoil Ultra are suitable;
- 2003-09 - G12+, Lukoil Ultra, G-Energy, Havoline, AWM, Freecor are suitable;
- Daewoo Matiz cars since 2010 require category G12++; antifreeze Glysantin G 40, Freecor DSC, VAG, Frostschutzmittel A is suitable.
The amount of coolant depends on the engine size: 0.8 liters will require 3.8 liters of antifreeze, and a one-liter engine will require 4.2 liters. If a concentrate is purchased, the volume is calculated taking into account the addition of distilled water.
3.2. Cooling system
3.2.1 Cooling system
3.2. Cooling system Design description Possible malfunctions of the cooling system and methods for eliminating them Replacing the coolant Expansion tank Radiator fan Radiator Thermostat Thermostat/ignition distributor housing Cooling system temperature sensor Coolant temperature sensor Water pump…
3.2.2 Design description
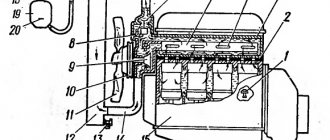
3.2.1. Design descriptionGeneral informationFig. 3.77. Location of the main elements of the cooling system: a - radiator; b — radiator fan; c - water pump; d — expansion tank; e — heater radiator; g — throttle assembly; f — ignition distributor housing; h - thermostat The cooling system maintains the engine temperature at an optimal level throughout the entire duration of engine operation. When the engine is cold, the cooling system cools the engine slowly, which...
3.2.3 Possible malfunctions of the cooling system and methods for eliminating them
3.2.2. Possible malfunctions of the cooling system and methods for their elimination Possible cause Elimination method Engine overheating Coolant leakage Add coolant Low concentration of coolant Bring the solution of ethylene glycol and water to a ratio of 50/50 Contamination, clogging of the front part of the radiator with leaves or insects Clean the front part of the radiator Coolant leakage through ...
3.2.4 Replacing coolant
3.2.3. Replacing the coolant Warning When opening the expansion tank cap on a hot engine, be careful. Emitted vapors can cause severe burns. To do this, cover the expansion tank cap with a thick layer of cloth and slowly unscrew the cap until a hissing sound appears. After the hissing stops, slowly unscrew and remove the cap from the expansion tank. Install a collection pan under the engine to collect coolant. Drain the coolant into …
3.2.5 Expansion tank
3.2.4. Expansion tankRemovalFig. 3.81. Expansion tank, hoses and components of the cooling system: 1 - coolant return hose to the radiator; 2 — upper radiator hose; 3 - clamp; 4 — radiator assembly; 5 — lower radiator hose; 6 — throttle assembly; 7 — expansion tank hose; 8 — expansion tank; 9 — cooling system temperature sensor; 10 — coolant temperature sensor; 11 — return hose to the expansion tank; 12 — adapter; 13 — hose to the heater; ...
3.2.6 Radiator fan
3.2.5. Radiator fan RemovalFig. 3.83. Radiator fan and radiator components: 1 - radiator assembly; 2 - radiator fan assemblyThe components of the radiator fan and radiator are shown in Fig. 3.83. Disconnect the ground wire from the battery. Fig. 3.84. Location of the electrical connector (1) and bolts (2) for mounting the radiator fan (3) Disconnect the electrical connector 1 (Fig. 3.84) from the radiator fan. Unscrew the bolts 2 and remove the fan…
3.2.7 Radiator
3.2.6. Radiator Removal Disconnect the ground wire from the battery. Disconnect the lower radiator hose and drain the coolant from the cooling system. Fig. 3.85. Attachment points for the upper radiator hose (1) and the expansion tank hose (2) Loosen the clamp of the upper radiator hose 1 (Fig. 3.85) and disconnect it. Loosen the clamp of the expansion tank hose 2 and disconnect it. Remove the radiator fan. Remove the radiator in the following order: Rice. 3.86. Location …
3.2.8 Thermostat
3.2.7. Thermostat Removal Warning When opening the expansion tank cap on a hot engine, be careful. Emitted vapors can cause severe burns. To do this, cover the expansion tank cap with a thick layer of cloth and slowly unscrew the cap until a hissing sound appears. After the hissing stops, slowly unscrew and remove the cap from the expansion tank. Remove the air filter housing assembly. Disconnect the lower radiator hose and drain the coolant. Drain…
3.2.9 Thermostat/ignition distributor housing
3.2.8. Thermostat/ignition distributor housing Removal Remove the ignition distributor. Remove the expansion tank cap. Disconnect the lower radiator hose and drain the coolant. Disconnect the electrical connectors in the following order: Fig. 3.89. Location of electrical connectors: 1 - temperature sensor for turning on the radiator fan; 2 — high voltage wire clamps; 3 — coolant temperature sensor connector; 4 — idle speed control valve connector; 5 - sensor connector...
3.2.10 Cooling system temperature sensor
3.2.9. Cooling system temperature sensor Removal Disconnect the ground wire from the battery. Disconnect the lower radiator hose and drain the coolant. Fig. 3.94. Location of the electrical connector (1) of the cooling system temperature sensor (2) Disconnect the electrical connector 1 (Fig. 3.94) and remove the cooling system temperature sensor 2. Installation Install the cooling system temperature sensor into the threaded hole in the intake manifold. Tighten the temperature sensor...
3.2.11 Coolant temperature sensor
3.2.10. Coolant temperature sensor Removal Disconnect the ground wire from the battery. Disconnect the lower radiator hose and drain the coolant. Fig. 3.95. Location of the electrical connector (1) of the coolant temperature sensor (2) Disconnect the electrical connector 1 (Fig. 3.95) and remove the coolant temperature sensor 2. Installation Install the coolant temperature sensor. Tighten the sensor to a torque of 20 Nm. Connect the electrical connector...
3.2.12 Water pump
3.2.11. Water pump Removal Disconnect the ground wire from the battery. Disconnect the lower radiator hose and drain the coolant. Remove the toothed belt. Unscrew the bolts and remove the rear toothed belt cover. Remove the water pump in the following order: Fig. 3.96. Location of nuts (1) and bolts (2) securing the water pump (3) and direction (a) of removing the pump - unscrew nuts 1 (Fig. 3.96); – unscrew bolts 2; – remove the water pump 3; – remove the gasket. Remove in...
How to make a replacement?
Replacing antifreeze in Daewoo Matiz is carried out taking into account three main stages of the process - draining the old coolant, flushing the system and filling in a new solution.
Pay special attention to the need for washing. After draining, a certain amount of old coolant remains in the system. If it turns out to be of poor quality or the car owner purchased a different brand of antifreeze, the residue should be thoroughly rinsed.
When flushing the Daewoo Matiz cooling system, it is not recommended to use special flushing fluids. In the absence of drain taps, such mixtures will also settle in the system, which will require additional cleaning procedures. Taking this factor into account, the old antifreeze is washed out with distilled water.
Preparation
To replace antifreeze in Daewoo Matiz you will need the following equipment :
- pliers, wrenches and screwdrivers for removing fasteners, pliers;
- gloves, a clean rag, a funnel for pouring;
- a container for draining waste liquid and rinsing water; usually a basin and additional containers with a volume of 5 liters or more are used;
- consumables - new antifreeze, distilled water from 10 liters for mixing with concentrate and flushing the system.
The car is parked on level ground. The presence of a pit is not necessary, especially if a basin is intended to be used. When preparing, take into account the toxicity of antifreeze and take measures to ensure that there are no animals or children nearby, and to ensure that the liquid does not get into the soil when drained.
The question of how to drain antifreeze from a Daewoo Matiz is resolved by a general procedure. However, the specifics of the assembly of this model require additional operations.
Step-by-step instruction
The step-by-step process of replacing antifreeze with a Daewoo Matiz involves the following procedure:
- the engine is allowed to cool, as an additional precaution, the minus is removed from the battery, and then it is returned when warmed up and when work is completed;
- dismantle the air filter and housing - to do this, loosen the clamp on the pipe and unscrew the bolts holding the housing, and also remove the connector from the sensor;
- on the pipe at the bottom of the radiator, compress the tendrils of the clamp, place a container for drainage and remove the hose;
- at the outlet of the expansion tank, unscrew the plug, which ensures depressurization and faster drainage;
- remove the radiator - to do this, unscrew the fasteners holding it and remove the pipe from the top;
- replacing antifreeze on a Daewoo Matiz without removing the radiator is allowed, however, given the lack of drain valves, it requires additional flushing procedures and does not guarantee complete release of the system from waste coolant;
- the removed radiator is washed with distilled water;
- remove the expansion tank, which is also washed separately;
- the expansion tank and radiator are returned to their place, connecting and tightly fitting all existing connections;
- the air filter is returned to its place, the system is restored to its original form, after which distilled water is poured into the filler neck;
- start the engine and let it run for 15-20 minutes, then turn it off and let it cool;
- the air filter is removed again, distilled water is drained from the system, after washing the radiator and expansion tank it should be relatively clean;
- Having restored the system again, new antifreeze is poured into the expansion tank, periodically squeezing the lower radiator hose to avoid the formation of air locks;
- Coolant is poured to the MAX level, the plug is tightened, and the engine is warmed up for 15 minutes.
If after running the engine the antifreeze level has dropped, add it to the upper limit. A few days after replacement, the level and color of the fluid are checked, if necessary, it is topped up or replaced with a new one. A constant drop in the coolant level indicates leaks - the connections are loose or there are components that require replacement.
How to properly check the level in Daewoo Matiz?
The coolant level is checked in the expansion tank under the hood of the car. The MAX mark is tinted black, the MIN mark is the weld seam of the expansion tank itself.
To check the antifreeze level, no additional manipulations are required; the translucent body allows you to estimate the volume without unscrewing the cap. However, in addition to the amount of coolant, its color is also monitored, as well as the presence of sediment, foam, dirt and other factors indicating the need to replace antifreeze with Daewoo Matiz.
To properly check the level and condition of antifreeze, turn off the car engine and allow it to cool. Experts note that the coolant, especially when the engine has recently been running, is under pressure. Opening the lid suddenly may cause toxic liquid to splash and get on your hands and face.
Open the cover carefully, only when the engine is cool and, if possible, wearing gloves. Some experts also recommend removing the negative lead from the battery as an additional precaution.
The most vulnerable points of the engine cooling system
- Cover on the expansion tank . If the container itself or one of the pipes bursts, then along with eliminating the main fault, experienced craftsmen will also replace the old cap of the Daewoo Matiz expansion tank.
- Expansion tank . It often happens that when the engine is stopped, the container with antifreeze is sealed, and when the engine warms up, a leak occurs. This is one of the most tricky cases of depressurization of the circulation circuit, in parallel with a non-functioning valve on the lid.
- Radiator . The culprit of radiator depressurization is corrosion. After all, radiators are made, at best, from galvanized metal. Advanced versions of radiators, made of brass or copper, are not used on the Daewoo Matiz car, since this car belongs to the budget class.
- Pipes . The hoses of the circulation circuit break quite rarely. As a rule, factory pipes are sufficient for the entire warranty period of the car. Experts recommend replacing engine cooling system hoses during engine overhaul.
- Stove pipes . They almost never break, but in theory they can.
- Cylinder head gasket . Coolant can also break through the cylinder head gasket. In this case, antifreeze will penetrate directly into the combustion chambers. Cylinder head gasket wear is fairly easy to diagnose. When antifreeze burns, the exhaust system begins to produce thick white smoke. Additionally, antifreeze can be mixed with engine oil. But it also happens the other way around: motor oil is mixed with antifreeze. It is enough to unscrew the cap on the coolant expansion tank; if an oil film is visible in the liquid, it means that the cylinder head gasket has lost its seal and requires replacement.
Leaks and problems
With a normal level of maintenance, global problems do not arise in the cooling system of this vehicle. Of course, over time, the thermostat and pump wear out, but this concerns more of their service life.
But leaks most often occur due to failure to follow recommendations. For example, it is recommended to change the expansion tank cap when replacing the coolant. Since the valve located in it may become sour.
Most often, this leads to an increase in pressure in the system and, as a result, a leak. Moreover, a leak can occur in any weak spot. Therefore, it is better to follow the recommendations to avoid problems in the future.
Source
1.8. Adjustment data, filling containers and fluids
Valve clearances (mm)
| For engines model 2E* | |
| – intake valves | 0,20 |
| – exhaust valves | 0,20 |
| For engines model 4E-FE** | |
| – intake valves | 0,15 – 0,25 |
| – exhaust valves | 0,31 – 0,41 |
| For engines models 4A-FE and 7A-FE** | |
| – intake valves | 0,15 – 0,25 |
| – exhaust valves | 0,25 – 0,35 |
| For diesel** | |
| – intake valves | 0,25 |
| – exhaust valves | 0,30 |
* on a hot engine ** on a cold engine
Candles
| Nippondenso | NGK | |
| For engines model 2E | W16EXR-U11 | BPR5EY11 |
| For engines model 4E-FE | K16R-U | BKR5EYA |
| For engines models 4A-FE and 7A-FE | K20R-U | BKR6EYA |
Gap between spark plug electrodes (mm)
| Model 2E engine | 1,1 |
| Engine 4E-FE, 4A-FE and 7A-FE | 0,8 |
Belt deflection (used) at a force of 10 kgf
For engines model 2E and 4E-FE
| A. Generator B. Crankshaft C. Air conditioning drive D. Power steering pump E. Coolant pump A. Generator B. Crankshaft C. Air conditioning drive D. Tensioner pulley E. Coolant pump A. Generator B. Crankshaft C. Power steering pump D. Coolant pump |
| 1 | 11,0 – 12,5 |
| 2. | 5,0 – 6,5 |
| 3 | 7,0 – 8,5 |
| 4 | 11,0 – 13,0 |
For engines models 4A-FE and 7A-FE
| A. Power steering pump B. Coolant pump C. Crankshaft D. Air conditioning drive E. Generator |
| 1 | 11,5 – 13,5 |
| 2 | 8,5 – 9,5 |
| 3 | 6,0 – 8,0 |
For diesel engine
| A. Generator B. Crankshaft C. Power steering pump A. Generator B. Crankshaft C. Power steering pump A. Generator B. Crankshaft C. Air conditioning drive |
| 1 | 12,0 – 14,0 |
| 2 | 15,0 – 17,0 |
| 3 | 15,0 – 18,0 |
Engine lubrication
Oil volume, l
| For engines model 2E | |
| – with filter | 2,8 |
| - without a filter | 2,6 |
| For engines model 4E-FE | |
| – with filter | 3,0 |
| - without a filter | 2,8 |
| For engines model 7A-FE | |
| – with filter | 3,7 |
| - without a filter | 3,5 |
| For diesel | |
| – with filter | 4,3 |
| - without a filter | 3,6 |
Oil brand
For gasoline engines: multigrade oil of API grade (SG or SH), or ILSAC.
For diesel engines: oil grades no worse than API CD.
Cooling system
| Total capacity, l | |
| For 2E engines | 4,6 |
| For 4E-FE engines | |
| – with manual transmission without air conditioning | 4,9 |
| – with air conditioning | 4,6 |
| – with automatic transmission | 4,7 |
| For engines 4A-FE | |
| – with manual transmission without air conditioning | 5,4 |
| – with air conditioning | 5,0 |
| – with automatic transmission | 5,2 |
| For engines 7A-FE | 5,6 |
| For diesels | 7,0 |
Coolant type
Fluid with antifreeze (ethylene glycol based) or anti-corrosion additives (Toyota Radiator Conditioner fluid or equivalent).
Do not use alcohol-based antifreeze.
Battery
| Serviceable batteries | |
| Electrolyte density at 20° C | |
| On gasoline engines: | |
| – on a fully charged battery | 1,260 |
| – on a partially discharged battery | 1,160 |
| – on a completely discharged battery | 1,060 |
| On diesels: | |
| – on a fully charged battery | 1,280 |
| – on a partially discharged battery | 1,180 |
| – on a completely discharged battery | 1,080 |
Charge current
| Maintenance free batteries | no more than 5A |
| Batteries serviced: | |
| – accelerated charge | no more than 15A |
| – slow charge | no more than 5A |
Clutch
| Pedal free play (mm) | 5 – 15 |
| Liquid type | SAE J1703 or FMVSS N116 DOT 3 |
Manual transmission
| On gasoline engines | |
| Oil volume, l: | |
| – for engines 2E, 4E-FE and 4A-FE | 1,9 |
| – for engines 7A-FE | |
| with anti-lock system | 4,5 |
| without anti-lock braking system | 5,0 |
Oil brand
| For engines 2E, 4E-FE and 4A-FE | universal gear oil API GL-4 or GL-5 |
| For engines 7A-FE | universal gear oil API GL-5 |
| Recommended viscosity | SAE 75W-90 |
| On diesels: | |
| Oil volume, l | 2,6 |
| Oil brand | |
| – universal gear oil API GL-4 or GL-5 | |
| Recommended viscosity | SAE 75W-90 |
Automatic transmission
3-speed transmission
| Transmission fluid volume (filling rate) | up to 2.5 l |
| Liquid brand | Transmission fluid DII or DEXRON III (DEXRON II) |
Differential
| Liquid volume | 1.4 l |
| Liquid brand | Transmission fluid DII or DEXRON III (DEXRON II) |
| 4-speed transmission | |
| – volume of liquid | up to 3.1 l |
| – brand of liquid | Transmission fluid DII or DEXRON III (DEXRON II) |
Rear axle differential
| Oil volume, l | 0,9 |
| Oil brand | hypoid gear oil API GL-5 |
| Recommended viscosity | above -18°С SAE 90, below -18°С SAE 80W or 80W-90 |
Brakes
| Minimum travel of a fully depressed pedal with the engine running (at a force of 50 kgf) | |
| – with rear drum brakes | 55 mm |
| – with rear disc brakes | 60 mm |
| Free pedal travel | 1 – 6 mm |
| Number of clicks of the handbrake lever (when adjusted) at a force of 20 kgf | 4 – 7 |
| Brake fluid brand | SAE J1703 or FMVSS N116 DOT 3 |
Steering
| Steering wheel play | no more than 30 mm |
| Hydraulic fluid grade | Transmission fluid DEXRON II or DEXRON III |
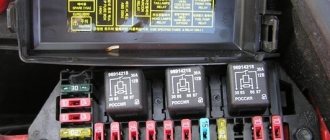
Fuse box on driver's side mudguard for left-hand drive vehicles
Passenger side mudguard fuse box
Location of fuses in the engine compartment (2E engines)
Location of fuses in the engine compartment (engines 4E-FE, 4A-FE, 7A-FE and 2C) with the exception of cars from Norway, Iceland, Denmark, Sweden and Finland
Location of fuses in the engine compartment (engines 4E-FE, 4A-FE, 7A-FE and 2C) for cars from Norway, Iceland, Denmark, Sweden and Finland
Type A fuses
| 1.FOG 15A | no chain |
| 2. CIG&RADIO 20 A | cigarette lighter, digital clock display, air conditioning system, receiver, player, electric rear view mirrors, airbag |
| 3. TAIL 15 A | tail lights, parking lights, instrument lighting, interior lighting, rear fog lights, daytime running lights |
| 4. IGN 10 A | multi-channel direct fuel injection system/sequential injection system, cooling system fans, airbag |
| 5. ECU-B 10 A | rear fog lights, daytime running lights |
| 6. DEF-I/UP 7.5 A | multi-channel direct fuel injection system/sequential injection system |
| 7. STOP 15 A | brake signals, anti-lock braking system |
| 8.TURN 7.5 A | direction indicators |
| 9.TURN 10 A | turn indicators, emergency stop signals |
| 10. ECU-IG 15 A | engine starting system, anti-lock braking system |
| 11. SEAT HTR 20A | heated seats |
| 12. DEF 30 A | rear window defroster |
| 13. GAUGE 10 A | indicators and meters, warning indicator lamps (except low battery indicator and open door alarm), reverse lamps, air conditioning system, battery charging system, daytime running lights |
| 14. WIP 20 A | windshield and rear window cleaner and washer, headlight cleaner |
| 15.A/C 15A | air conditioning system |
| 16. DOME 20 A | interior lighting, cargo compartment lighting, trunk lighting, clock, door open light, radio, player, anti-lock braking system |
| 17. HAZ-HORN 20 A | emergency stop signals, horn |
| 18. FAN-I/UP 7.5 A | multi-channel direct fuel injection system/sequential injection system |
| 19. SPARE 7.5 A | spare |
| 20. SPARE 10 A | spare |
| 21. SPARE 20 A | spare |
| 22. HEAD (RH) 15 A | right headlight |
| 23. HEAD (LH) 15 A | left headlight |
| 24. DRL 7.5 A | Daytime Running Lights |
| 25. ALT-S 7.5 A | battery charging system |
| 26. EFI.-HTR 15 A | multi-channel direct fuel injection system/sequential injection system |
| 27.EFI 15A | multi-channel direct fuel injection system/sequential injection system |
| 28. HEAD (RH-UPR) 10 A | high beam right headlight |
| 29. HEAD (LH-UPR) 10 A | left high beam |
| 30. HEAD (RH-LWR) 10 A | low beam right headlight |
| 31. HEAD (LH-LWR) 10 A | low beam left headlight |
Type B fuses
| 32. POWER 30 A | electric window lift, electric door locking system, electric sunroof |
| 33. DEF 30 A | rear window defroster |
| 34. HEATER 40 A | air conditioning system |
| 35. AM2 30 A | engine starting system |
| 36. FAN 30 A | engine cooling fan |
| 37. CDS 30 A | engine cooling fan |
Type C fuses
| 38. AM1 40 A (petrol engines) | engine starting system |
| GLOW 80 A (diesel engines) | engine starting system |
| 39. ALT 80 A (2E engines) | engine starting system, tail lights, STOP fuses, ECU-B |
| AM1 100 A (2C engines) | engine starting system, rear lights, STOP fuses, ECU-B and ABS |
| ALT 100A | (engines 4E-FE, 4A-FE and 7A-FE) |
| 40. ABS 50 A | anti-lock braking system |