Methods for soundproofing arches
Noise insulation (some call it “Shumka”, some call it “Besshumka”) is a special applied material that reduces noise transmission, applied to surfaces that transmit noise. There are different options for how to soundproof arches. Let's look at them in detail.
The best 100% sound insulation effect can be achieved using vibration damping soundproofing material. This material prevents external sound from penetrating through it.
In order to make soundproofing of arches with your own hands, you need to choose one of the methods. Can be treated with a liquid substance, or a hard coating can be applied.
If you use a vibration-damping sound-absorbing material, then simply applying it is not enough. After this, it must be covered with a sound insulator.
There are 2 ways to soundproof wheel arches:
- interior;
- external.
Why do you need soundproofing for wheel arches?
Silence in the cabin is considered an attribute of car prestige. If you drive for a long time, a person will quickly get tired of frequent vibrations and noise. This leads to high levels of nervousness and can distract from driving, which is why many are looking to reduce these disadvantages. In inexpensive cars, sound insulation is completely absent in order to reduce the price of transport.
In other machines, it is provided, but the equipment from the factory is far from ideal. The fact that there are no disturbing sounds in the car speaks of the luxurious quality of the car, thereby increasing its price. In the automotive markets, they provide many different devices and materials that can create perfect noise absorption.
We recommend:
How to properly remove the speedometer drive on a car?
Noise insulation
Internal method
This option is done less often, so it is more difficult to do. Done from the engine side.
If there is access from the inside, such as in a UAZ loaf, then it’s even more convenient to make a Shumka from the inside.
The operating procedure is as follows:
- Wash, clean.
- Degrease.
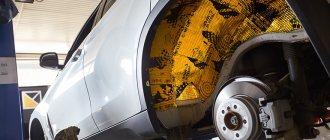
- Apply vibration damper. The entire 100% of the wing area must be covered with vibration damping material; there is no need to leave 10-20% without sound insulation.
- Now you need to glue a sound-absorbing layer onto the vibration-damping material.
Sound insulation with plastic fender liners: work procedure
It is believed that the only purpose of plastic fender liners is to protect the arches from dirt or water. But we cannot fail to note one more function - the ability to use the product in the form of a sound shield.
Proceed as follows:
The disadvantage of the considered option is that when temperatures fluctuate, Splen can move away from the surface. To avoid this, use another option:
- Attach rubber plates to the inside of the lockers; these can be “Comfort” sound insulators based on foam rubber (alternatively, they can be cut from car mats).
- Fix the product with waterproof glue.
The difficulty of the rubber mat method is that the rubber material is hard and difficult to cut.
In addition, it is important to use the glue correctly - it must have waterproof qualities. Otherwise, the layer will not last long.
The peculiarity of the “Comfort” sound insulator is that it has a fleecy surface, does not rot and is able to soften shocks, while it is self-adhesive.
External method
External sound insulation is the most common option because it is simple and does not require special tools.
The work order is as follows:
- Jack up. Remove the wheel.
- Remove the locker, if present. A locker is a fender liner, usually made of plastic, less often of metal. It is used to protect the metal arch from salt, acid, reagents, and pebbles.
- Remove factory installed sound insulation.
- Remove the anti-corrosion coating, also factory-made.
- The surface of the arch is cleaned and degreased, for example with white spirit.
- Stick the vibration damper over the entire area.
- Glue the foil splen. This is at your discretion, if desired. This is a plastic self-adhesive soundproofing material.
If you want to additionally stick a self-adhesive sticker made of splen foil, then it is better to buy it with a thickness of at least 8 mm.
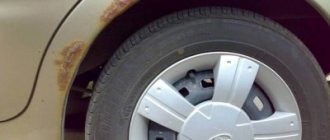
To prevent the appearance of corrosion on the wing arch, it is necessary to treat noise-free surfaces with an anticorrosive agent. I usually use rubber-based mastic for this purpose.
How to store tires? It turns out that there are rules here too, if you follow them, the quality of the rubber will remain close to the factory one.
Required Tools
Once you have decided on the material, make sure you have the right tools on hand. You will need:
- For external insulation - mastic based on rubber bitumen.
- A small roller - it is necessary that it spins perfectly when it is pressed firmly against the surface.
- Brush for applying mastic.
- Solvent for degreasing the surface before pasting.
- A special construction hair dryer for complete heating of soundproofing sheets, as well as the arched panel.
- Construction hair dryer for heating soundproofing sheets and arched panels.
- Gloves, because if you don’t wear them, your hands may bleed or bitumen will get into your skin.
We recommend:
GDI engine - description, features, motor malfunctions
Is soundproofing car fender arches effective?
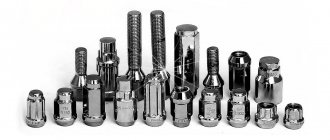
Self-applied soundproofing of the wing arches will fly off over time if this soundproofing cake is not protected. That is, you need to re-attach the fender liners on top of this insulation, if not, buy them. Standard fastening of fender liner pistons. Some people don't trust them because the caps may not withstand different vibrations. Additionally, it can be reinforced with galvanized or stainless steel screws. Self-tapping screws can also be dipped in anticorrosive.
Helpful advice: if there are special holes on the fender liners, then there is no need to seal them with noise. At the end of the article there is a video comparing the effect before installing Shumka and after.
Correct sound insulation of car wheel arches with your own hands
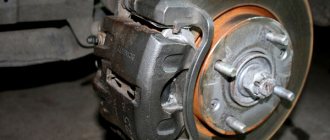
Wheel arches are one of the strongest sources of noise in a car, as through them the noise from the road (rubber and studs) penetrates into the cabin. This time we’ll figure out how to make sound insulation of car arches from the outside with your own hands, as well as what material is best to choose for this.
Cars Lada Granta, Priora, Kalina, Largus, Niva 4x4, Vesta or XRAY have similar instructions for installing noise vibration insulation (SHVI). Differences can only occur at the stage of removing the fender liners (lockers).
Alternative way
In addition to special soundproofing self-adhesive materials, there is another alternative option - liquid fender liners. Based on the principle of creating liquid fender liners, they protect the body along the perimeter at the base and sills with a special substance - gravitex. These are liquid substances, for example, rubber-based mastic, which fills all the unevenness, holes if there are any, and quite effectively protects against noise.
Liquid fender liners are also a very popular option because they are simple and lightweight. They are used to treat wheel arches, the bottom of the car, and the bottom of the trunk.
To apply mastic you need a brush and a sprayer. The sequence of work is the same as in the case of all painting work: wash, clean, degrease and apply mastic in several layers.
SOUND INSULATION OF CAR ARCHES.
SOUND INSULATION TECHNOLOGY FOR WHEEL ARCHES IN ANTI-NOISE STUDIOS
PRICE:
6,000 rub. for 2 wheel arches and 2 fender liners
TIME:
3 hours
NUMBER OF LAYERS: 2 layers
WEIGHT: 1.0 kg for each arch and 0.5-0.8 kg for each fender liner
WHY DO YOU NEED SOUND INSULATION FOR ARCHES AND WHAT DOES IT GIVE YOU?
Noise insulation of wheel arches is carried out to reduce the noise level of water, sand, stones, snow flying from under the wheels of the car when driving, rustling tires and road noise. The technology for noise insulation of wheel arches, carried out in the ANTI-NOISE studios, consists of applying vibration-insulating material to the plastic wheel arch liners, as well as applying a special vibration-damping mastic STP NoiseLiquidator to the metal of the wheel arch.
HOW DO WE SOUND INSULATE ARCHES?
The technology for soundproofing wheel arches is almost the same on any car. It consists in processing the fender liner and the metal of the wheel arch. First of all, the plastic fender liner (locker) is removed, which is washed, degreased and prepared for sound insulation. The locker before vibration isolation looks like this.
Or so...
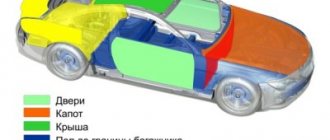
The larger the area of the wheel lockers, the more noticeable the effect of their treatment will be. Ideally, the plastic fender liner should cover the entire inner surface of the wheel arch. Such fender liners, for example, are installed on second-generation Kia Soul, Chevrolet Cruze and Captiva cars, as well as Renault Fluence and Duster.
We apply vibration-insulating material STP Silver to most of the plastic fender liner. The only exceptions will be the places where fasteners are installed, as well as a small indentation from the edges of the fender liner for normal installation in place.
Or so...
Now you can move on to the wheel arch. We need to wash it, degrease and dry it. After this, we apply vibration-damping mastic STP Noiseliquidator to the metal of the arch. Typically, the mastic is applied in a layer of 2-4 mm so that it does not interfere with the subsequent installation of the plastic fender liner. At the same time, on the front arches we usually apply mastic only from the interior side in order to protect the interior of your car as much as possible from vibrations and noise of the front wheels. Mastic is not applied to the metal arch of the side of the front bumper, since its use in this place is impractical and is limited by the design of the car (window washer reservoir, air intakes, pipelines and hoses, etc. are often located here). The process of applying mastic to the arch is described in detail in our videos.
After the mastic has dried on the car arches, you can install the plastic fender liners in place. Complete drying and crystallization of the mastic takes up to 48 hours, so according to customer reviews, the effect of soundproofing arches increases and is fully felt in a day or two.
The effect of soundproofing car arches manifests itself in the form of a significant reduction in the noise of water, sand, stones or snow flying into the arches from the car's wheels. Tire rustling and wheel noise are also reduced. However, the effect of sound insulation of car arches is most pronounced against the background of sound insulation of the car interior.
The price of soundproofing a pair of fender liners and arches (front/rear) is 6,000 rubles.
Work time: 3-4 hours
As a result, the best solution would be to buy sound insulation for car wheel arches in Moscow at a low price!
Conclusion
Well-made sound insulation of car fender arches effectively protects against noise penetration while driving on crushed stone and on asphalt on hard rubber. Some are limited to installing liquid or plastic fender liners only, some do it only on the outside, some on the inside, and some on both. You decide. If the car is driven a little, for example, only around the city, then at low speeds there is no noise while driving. According to reviews, the Bimast Bomb soundproofing has the greatest effect; I haven’t used it myself.
Step-by-step instruction
To increase the maximum effect, insulation is done both from the inside and from the outside. This process is not difficult, but it requires a lot of patience and time. We'll have to disassemble half of the car and cut out the materials. It is necessary to glue according to all the rules, efficiently, without leaving any air holes or gaps.
Sound insulation from the inside
The inside of the wheel arches may have factory sound insulation. If it is attached well, then the foil vibration insulation is glued to it, but if it is bad, then remove it. The whole process goes like this:
- The surface is cleaned of dust and treated with degreasing solutions.
- The vibration absorber is divided into small plates or a pattern can be made from a whole sheet.
- Use a hairdryer to heat the surface to a certain temperature of 50 – 70°C.
- In order for the insulated plates to be elastic and take the required shape, they also need to be heated.
- Remove the protective film and press the sheet firmly to the surface.
- Use a roller to roll out the foil so that there are no exposed surfaces. This is the most important moment of the whole process. The work must be done perfectly and only then will it be of any use.
When you finish gluing the first layer, check whether the holes are closed after assembly. If everything is as it should be, then just free them. Then you need to prepare an insulated layer from noise.
Also check the quality of the adhesives. The protective film is very difficult to remove. The main thing is to see how easily it comes off or not.
We recommend:
How to properly replace the fuel filter on a car?
sound insulation inside
Sound insulation from the outside
Noise insulation on the front side depends on the presence of fender liners. If they are present:
- First of all, we need to demonstrate them.
- Then you need to clean them of accumulated dust and dirt, and then treat them with a degreaser.
- Then cover the first layer with vibroplast. This method gives massiveness to the fender liners.
- The second layer is splen. Noise insulation is doubled.