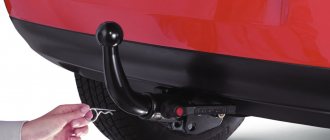
A towbar is a simple but mandatory device in a car, designed to tow it if it is impossible to continue driving “under its own power.” It can also be used in passenger cars to transport small trailers.
If you choose the right tow bar for your car, it can not only increase the car’s ability to transport heavy loads, but also help pull your vehicle out of the mud or a deep ravine, deliver it to a repair shop, or provide the same assistance to your fellow car enthusiast.
The purpose of a towbar is to securely connect your car to a trailer or another vehicle, depending on the circumstances. But at the same time, the car must maintain sufficient maneuverability. That is why the tow bar has a rounded shape - it allows the attached trolley to turn.
There are several types of towbars:
- different in width (European and American standard);
- stationary and removable;
- flanged;
- small, medium, large (divided according to load parameters, designed for trailers of different carrying capacity);
- towbars with conditionally detachable fastening.
European and American towbars differ in the size of the ball. For products from Europe it does not exceed 50 millimeters. These devices are the most compatible with Russian-made cars.
As for stationary and removable towing devices, there are also varieties among them. Since a towbar for a passenger car is far from obligatory (few people carry any cargo other than what fits in the trunk), it can be attached either permanently or temporarily. A permanently mounted tow hook is usually screwed or welded to elements of the frame or body of the car, and after that it can no longer be removed. But recently, many quick-release devices for towing trailers have appeared on sale, which are not inferior in reliability to stationary ones. What could a twenty-first century towbar be like? Take a look at this photo.
Towbars of different types
Important selection features
Nissan Terrano or Renault Duster: which is better
Renault Duster comes in all-wheel drive 4×4 and mono-wheel drive (the drive goes to the front wheels). Because of this, when buying a car from 2013, 2014, or maybe 2021 or our current 2021, not forgetting about 2015, be prepared to face some problems.
Most trailer hitches are compatible with all-wheel drive and single-wheel drive versions of the crossover. But installation will require some adjustments. For example, you often have to file a tongue on a bumper. There are versions of the trailer hitch that fit under the crossover bumper, but here you have to choose - leave the bumper intact or be able to carry a spare tire.
If this is an all-wheel drive version, then everything is somewhat simpler at first glance. You mount the brackets (in common parlance, cheeks), and then install them on the beam. But there is a nuance here. You will have to dismantle the protective screen, but you won’t be able to put it back. Although car owners claim that there is nothing wrong with this.
Manufacturers
After reading the thematic forum, hearing the opinions of people from different cities, such as Moscow, Ufa, St. Petersburg, and visiting Astana, where Duster is very popular, I made several conclusions regarding the towbar models themselves.
There are several leaders on the market:
- Bosal VFM;
- Trailer;
- Leader-Plus.
But before you buy a towbar and figure out how to install it on the car and connect the electrical system, I would like to discuss several countries that produce good towbars. All of them are available on the Russian market.
- Slovakia (Galia company). The price is quite high, up to 11-12 thousand rubles, but the bumper does not have to be removed during installation, it can withstand high loads and serves flawlessly;
- Belgium (Bosal). Excellent quality at a lower cost. But you can’t do without dismantling the bumper;
- Spain (Enganches Aragon). You will have to pay about 10 thousand rubles for them, but their horizontal loads of 2 tons will not leave you indifferent. Excellent quality;
- Poland (Imiola Hakpol). The most expensive models cost 9 thousand with a load capacity of 1.5 tons. The price corresponds to the quality;
- Russia (Leader-Plus). Designed for operation with loads up to 1.2 tons. They are cheap, so they are in great demand;
- Sweden (Thule). Excellent characteristics, but the minimum price is 11 thousand rubles per trailer hitch.
Frankly, I strongly advise you not to save money. Installing a low-quality tow bar can have dire consequences.
Knowing how much a particular towbar costs, how well it fits your Duster and wallet, you can choose a decent option.
what is it for, how to connect
The content of the article:
Hello, dear friends! Since we are actively discussing towbars and trailers with you, it would be a real crime not to talk about the towbar coordination unit. This element is necessary for modern cars. Otherwise, a number of problems will arise with the operation of the tow hitch.
But let's talk about everything according to the established order. I will tell you what this block is for, whether it is needed at all and how to connect the device. There is nothing complicated about this, so you can easily handle the installation yourself.
When to use BSF
Having bought yourself a trailer and previously installed a tow bar (or you already had one from the factory), you need to connect them together. Simply using the hitch is not enough. The trailer needs to be controlled somehow - turn on the lights, brake lights, etc.
Connecting the wiring directly will not work, since your on-board computer will not accept such a connection. This will result in constant errors on the screen.
Now do you understand why this block is needed? Without it, the car and the trailer will not be able to interact. So, on a car with an on-board computer, you will need to buy a Smart Connect or a car towbar coordination unit, whichever is more convenient for you.
There are several situations when the electrics of a car with a caravan require a Smart Connect device:
- There is a possibility of a short circuit. By installing additional electrical equipment, which includes trailer dimensions and turn signals, the load on the electrical circuit increases. The result may be burnt fuses and an extremely unwanted short circuit;
- The car is often operated without a towed vehicle (trailer). This can cause damage to the wiring and failure of fuses;
- If there is a history of electrical problems with the car, the fuse will burn out immediately. This may result in damage to the dimensions, brake and hazard warning lamps;
- If you connect a trailer with a different pinout to the car, the fuses will burn out and the light will go out completely.
It doesn't matter what kind of car you have. This could be Renault Duster, Chevrolet Cruze, Ford Kuga 2013 or Kia Sportage 3rd generation. All these cars, as well as Renault Captur, Nissan Terrano, Volkswagen Tiguan, Prado 2011 150 body, and even the domestic Vesta are equipped with on-board computers.
Consequently, without a matching block, the circuit will work with errors and cause various troubles.
What does installing the block give?
By installing BSF, you will receive:
- coordinated operation of the electronic control unit of the car and trailer;
- the ability to control trailer turn signals;
- fog lights control
pricep-vlg.ru
The right choice of trailer hitch for Renault Duster
Renault Logan fuel filter: where is it located, replacement
Firstly, the motorist needs to decide whether he needs a permanent towing device, or whether he plans to periodically install/remove the towbar. Then it is advisable to determine the purposes for which the device is intended to be used. It is not recommended to ignore the lifting characteristics of the equipment declared by the manufacturer, since this often provokes emergency situations along the way.
If the car owner does not plan to use the trailer frequently, then you should not buy stationary equipment. It is advisable to give preference to a removable type device and, if necessary, install it. However, if the trailer is used constantly, for example, in work that involves transporting goods, then a stationary towing device with a strong fastening is necessary.
Connecting a towbar to the car’s electronics with your own hands • Auto electrician himself
Installation and connection of fog lights on viburnum
Many motorists know for certain that a towbar can make life much easier if there is a need to transport their own cargo. Hiring a cargo taxi is usually not worth it, which is why installing a tow bar can be a great solution.
This device has a common function regardless of the make and model of the car
How is a tow bar useful as a device?
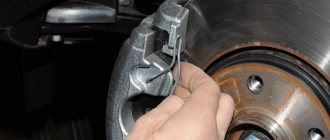
A towbar is also called a towing device. It is used to connect a car to a trailer for towing. Some people buy it ready-made, while others prefer to make it themselves.
Before moving on to the electrical part of attaching the tow bar, we will need to install it on the bumper. Usually it is attached to one of the towing eyes or a hole provided, which is intended for coupling, but is closed with a plug.
If you want to secure such a device with your own hands, you may need additional holes in the bottom of the machine and its side member. A welding machine and the services of an electric and gas welder may be required. Additionally, stock up on sandpaper and a grinder on which you can attach a grinding wheel.
Purchased products must correspond to a specific car model
Basic procedure
First, remove the bumper and cut off the lugs. Drill holes if necessary and weld the fasteners.
Here's how to connect a trailer towbar to a car:
- We will need an inspection hole on the overpass or in the garage into which we drive our vehicle.
- Now we turn off the power from the mains by disconnecting the negative terminal from the battery.
- Installing towbars will require removing everything from the trunk and removing its upholstery.
- The device itself must be attached to the place where it is planned to be attached and the necessary markings must be made.
- At the attachment point, holes are drilled on both sides with a drill, which are best treated with an anti-corrosion agent to extend service life;
- As the photo for this article suggests, we can tighten the hitch using nuts, washers and bolts, as well as a suitable size wrench.
- Now you need to remove the load from the car frame and provide a more reliable fastening. To do this, we make a couple of holes at the bottom of the side member and from the inside of the luggage compartment with the installation of reinforcing linings.
- Tighten all the necessary bolts with wrenches.
Fastening to the car frame
Using the connection diagram
A ready-made towbar, as a rule, already has all the necessary holes for fastening, which is taken care of by the towbar manufacturers. Now we can start connecting the hitch.
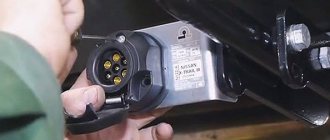
We cannot do without an outlet that connects the electrical wiring of the car and the trailer. The towbar socket diagram is usually included in the kit. As for the electrical equipment of the coupling device, it consists of a plug socket with a set of wires.
The color of the wiring may not match the color of the wires in the photo.
Bolted to the bracket, the socket is connected to the main wiring. When connecting, you need to look at the colors of the wires according to the diagram. You need to connect it to a standard connector, which can be 7-wire or 13-wire (only on foreign cars).
Car installation
Below are instructions with which we can connect the towbar to the electronics of the car:
- We will need a hole located in the bottom of the trunk to connect the socket to the rest of the wiring. In the case where the coupling device is made independently, you will have to drill the holes yourself. Consider the location of your future location;
- After the socket is installed on the towbar, we will stretch the wire through the hole in the trunk and connect it to the socket.
The connection diagram for Largus can be of some help if you are the owner of this particular model
- During connection, the wiring must be connected in such a way as not to confuse the order. If the number of wires does not match, purchase an adapter for the socket. A special tube into which you need to pass the assembled wiring kit will help protect the electrical package from external damage and short circuits;
- Secure the wires to the trunk walls and carefully cover them with upholstery.
- You can connect the trailer, check how high it is from the ground, and whether its brake lights, turn lights, and running lights are working.
The towbar can be installed on any car. Installation points are indicated in the product instructions
Towbar installation process
In Renault Duster, for the convenience of installing the tow bar by users themselves, the developers have provided:
- mounting holes that are closed with special plugs;
- a rubber plug for sealing the electrical connections in the trunk compartment.
To correctly and quickly assemble the entire towbar structure and connect its headlights to the car, carefully study the drawing and instructions.
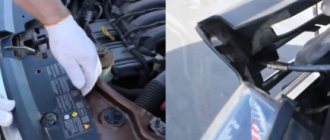
Observe safety precautions by wearing rubber gloves and not touching bare wiring. The order of work is as follows:
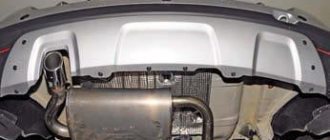
- empty the car trunk, remove the spare tire, the muffler located on the rubber suspension;
- prepare a working tool - a screwdriver and 4 keys (a pair - 17, a pair - 19);
- install the Duster on an overpass or inspection hole. Use a jack if necessary;
- disconnect the battery (this can be done by disconnecting the minus terminal).
Disconnect the battery
After the preparation of the machine has finished, separate the towbar into its component elements. Open the luggage compartment to remove the factory plugs. They are located under the car trim, 1 each on the left and right. Lifting the casing, open access to them, pry them off with a screwdriver and remove. Next, take the bolts from the towbar kit for the Duster and insert them into the holes located under the plug. To protect the bolts, install bushings inside the side members. You can see the end of the fastener by looking under the car.
Take the towbar brackets that attach to the side and place them on the ends of the bolts. After this, attach the washers to them and tighten the nuts, tightening them with a 19mm wrench. Start installing the main part - the beam, but first try it on to find out the correspondence between the trailer hitch plates.
Installing a towbar on a Renault Duster
To check that the holes of the part and the car match, insert the bolt from the wheel side and tighten it with a nut. Perform a similar action on the other side. After this, correct the position of the beam and tighten the nuts on it (before this, lubricate the threads on them).
The process of installing the towbar ends with the installation of the towing hook, which also needs to be secured using nuts and bolts of the “self-stop” type, which are included in the kit, using a 17mm wrench.
Possible problems when installing a towbar
The peculiarities of attaching the towbar to the Duster car are such that it is easy to both install and dismantle. It is necessary to maintain the centering of the towbar, which must be located strictly in the center of the body. Otherwise, when driving with a trailer, you will feel the trailer swaying from side to side.
When installing a tow bar, problems may arise due to lack of weight during operation. This is a little trick that few people know. After bolting the towbar and installing the connecting socket, you need to remove the right lamp from the car.
Under the lantern you should find an M10 pin. You need to put the round terminal of the trailer ground from the socket on it and screw on the nut. Install the right rear light in its original place. Before tightening the towbar mounting bolts, you must pull the towbar back, then tighten the bolts.
This technology will create a preload of the device. When transporting a heavy trailer, this will protect the mounting bolts from shearing and reduce the load on the tow bar and the rear of the vehicle. When tightening the bolts, it is best to lubricate them with Litol or CIATIM greases. Then it will be easier to unscrew. After tightening, the bolts must be painted over with black paint.
Another common problem can arise after installing a tow hitch and using it regularly. Traffic police and traffic police often require installation documents for the tow bar. To do this, you should contact the MREO and arrange for the vehicle to be re-equipped.
In the process of preparing the application, it will be necessary to make sketches of the work performed, photographs of the finished product, and describe the process of re-equipping the car. After an official request, some time later a letter will be sent with a response, where the owner of the vehicle is allowed to operate it with a tow hitch.
List of vehicles that require a matching block:
For most car models, smart connect is a mandatory device when installing a tow bar. These include Audi, Fiat, Peugeot, Skoda, Volkswagen, Ford, BMW and many others.
List of cars that need a smart connector:
Do you have an ordinary car without a “computer brain”? Then it's time to find out that the electrical circuits are under double load, ensuring that additional lights are turned on. The result is premature wear of electrical wiring, burnt fuses and relays. Purchasing a matching unit for a towbar will prevent costly repairs to the electrical system.
In conclusion, any modern trailer is equipped with turn/marker lights and brake lights. It's convenient, it complies with traffic regulations. It is, after all, beautiful! To ensure reliability, take care of the correct connection of the trailer systems to the vehicle’s electrical system. And may the power of Russian roads be with you!
Installing the tow bar
Before installing the towbar, you need to consider several nuances:
- If you bought a ready-made kit, it will most likely contain self-locking nuts. This means that they can only be screwed once.
- M10 nuts must be finally tightened last, applying a force of about 45-50 N*m.
- If you purchased a ready-made 4WD version of the trailer hitch set, then in the process of tightening the fastening nuts, the tow bar itself will need to be pulled back.
- M10 screws must be lubricated with lithol or cyatim.
This is interesting: How to paint rims on a car yourself. Video lesson
Knowing these subtleties, you can begin the preparatory process. To do this, empty the luggage compartment of the SUV, remove the muffler and spare tire. After this, install the car over the inspection hole or use a jack. Prepare a screwdriver, 2 keys for 17 and 2 for 19. You will also need to disconnect the battery; to do this, just disconnect the negative terminal.
After this, it is necessary to divide the trailer hitch into its component parts and begin installation, which will require:
- Remove the factory plugs located under the trim on the right and left. To do this, carefully lift the trim and pry them off with a screwdriver.
- Insert the mounting bolts into the vacated holes. To protect them, use bushings that are installed inside the side members.
- Make sure the fasteners are installed correctly. Look under the car and make sure you can see the ends of the fasteners.
- Place the side brackets on the ends of the bolts, secure them with washers and tighten the nuts using a 19 mm wrench (give yourself the opportunity to adjust them, so do not over-tighten).
- Install the cross beam.
- Align the holes on one side of the beam and the side and attach a nut in this place. Repeat similar manipulations on the other side.
- Adjust the position of the beam and tighten all nuts.
- Install the tow hook.
After this, all that remains is to install the wiring in the towbar socket so that when connecting it to the trailer, the lights on the latter will work.
What is included in the trailer hitch kit
Since Duster is produced on the same platform as Logan, the procedure for installing the trailer hitch on both of these cars will be similar . The manufacturer has already taken steps to make the task of self-installation as easy as possible, and you don’t have to spend a lot of money by contacting official dealers, but you can purchase parts yourself from a car disassembly center at competitive prices!
The trailer hitch is accompanied by a description of the components and parts
Structurally, the Duster towbar includes the following main elements:
- transverse beam;
- side plates;
- trailer hook and its ball head;
- electrical outlet;
- connecting wires;
- fastening elements (nuts and bolts).
Important Additions
It is better to study them before you begin the installation process yourself. These tips can help you avoid common mistakes.
And here are the recommendations:
If you took a ready-made factory trailer hitch kit, then self-locking nuts should be included with it. Their peculiarity is that once tightened, it is almost impossible to unscrew them. It needs to be broken. They only twist once. So don’t rush to tighten it tightly right away, otherwise the hitch will fit unevenly, and you won’t be able to fix it;
- The M10 type nuts used in the work are tightened last. Take a torque wrench and use a torque of about 45-50 Nm;
- If you have a factory kit for an all-wheel drive Renault Duster, be sure to pull the towbar back when tightening the nuts. This way it will stand perfectly straight;
- All bolted connections with M10 must be lubricated with substances such as lithol.
Based on these nuances and instructions, there should be no problems with installing the trailer hitch on the Duster.
Good luck with your work!
Watch this video on YouTube
Be sure to subscribe, leave comments, ask relevant questions and invite your friends to discuss!
Types of towbars
Renault Duster 4x4 or a modification with one drive drive is equipped with different types of trailer hitches:
- Flanged. Requires a special platform for mounting.
- Standard. It can simply be welded to the car body.
- Removable with frame for installation. It can be easily removed if necessary.
The required towbar in 2018-2019. produced by manufacturers in different countries:
- Bosal from Holland;
- Enganches Aragon from Spain;
- Leader-Plus from Russia.
In industrial production, laser cutting with computer technology and thick sheet steel are used. Materials and finished products are tested under different operating conditions.
At Bosal, hooks in versions A and F are attached to the beam with 2 bolts, and varieties such as G and N 4 are fastened with bolts of different shapes.
The car owner can choose the appropriate design form:
- Bracket.
- Trailed ball.
- Towing hook.
Motorhomes and most other modern trailers are equipped with a towbar or hitch ball.
Wiring diagram
The left and right terminals are different in wiring. On the left, the contacts go in a simple order:
- Free
- Fog
- Mass (black)
- Turn signal
- Stop signal
- Dimensions
Almost the same will happen on the right:
- Free
- Reverse
- Mass (black)
- Turn signal
- Stop signal
- Dimensions
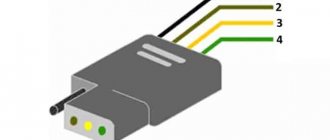
There is no point in running a cord from each terminal to the outlet. On the left side, you can generally take only two signals. And then the diagram looks simple (Fig. 1).
Option for 7 contacts
Simplified version for 7 contacts
The circuit will look even simpler if you connect pins 5 and 7 (Fig. 2). The cord from terminal 6L is then not used.
On Renault Duster, it is better to connect the towbar socket according to diagram 1. Otherwise, three lamps will “hang” on one cord (6P). Ask yourself where this will lead.
The right harness, which is pulled from the coupling to the “square,” will have nowhere to hide. Well, all the cords on the left are perfectly hidden under the plastic.
Left-hand side
It turns out to be a paradox - where there are a lot of wires, they go “openly”. But the scheme can be reworked.
Be aware that pin 2 can be connected to a “licence light”. And then do the following: in the socket, connect terminals 2 and 7 or 2 and 5. This does not lead to negative consequences.
About connecting the “ground”
If the ground, that is, pin 3, is connected according to all the rules, you need to remove the right lamp. Underneath there will be a “pin” (not shown in the photo) onto which the nut is screwed.
Hairpin – slightly higher
The pin itself is located on top, that is, above the lantern.
Make a “petal” that fits over the stud and is pressed with a nut. The ground cord is soldered to the petal.
Those who do not want to remove the flashlight solder the cord to the connector pin. The terminal number in the connector is number 3, both on the left and on the right. There is an even simpler way - the “petal” can be soldered to the body. Use just one thing.
When connecting ground to the socket, use a cord with a larger cross-section than you use for the other contacts. Standard calculation method: per 1 sq. mm accounts for 10 Amperes.
About technology
To connect to any of the terminals, do the following:
- Disconnect the connector, open the lid on it;
- The terminal is removed from the connector by pressing it with a screwdriver;
- Another one is soldered to the “standard wire”, and “heat shrink” is put on top;
- Assembly is carried out.
The result of all efforts is shown in the photo.
This is where the turn signal was connected
If any trace remains on the standard wiring, the warranty for the “electrician” will end! You can buy male-female connectors to make extension cords. Bends are made from extension cords, and standard units are not affected. Connector code: 0988211060, 0988251060.
Installing a tow bar on a Renault Duster also includes installing a socket. Take care of the following:
- Let two harnesses be connected to the outlet. Then use a corrugated splitter. If there is no suitable part, use two corrugations (see photo);
A couple of corrugations won't hurt anyone
- If only one harness is supplied, still cover it with corrugation. The material may be plastic.
Any discrepancy can be solved with electrical tape.
Be aware of the durability of plastic sockets: one such socket, judging by reviews, is “enough” for one season. It is better if the body is made of carbolite, silumin or aluminum. Well, prices for high-quality equipment are not budget-friendly.
Wiring connection
Connecting the electrics is the final step towards installing the Duster tow bar.
Connecting wiring to the Duster trailer hitch
Before performing this work, study the diagram for the trailer hitch, which shows where the wires of a certain color are attached. The order of work is as follows:
- install the plug socket on the trailer hitch platform. It is attached there with screws;
- release the plug for the wires, which is located in the floor of the luggage compartment;
- insert the wires into the vacated holes;
- secure their ends to the terminal block;
- connect the wire to the standard connector.
Standard Duster trailer hitch connector
When installing electrics, you should know that the terminal block fits the standard one, and the trailer hitch kit includes detailed instructions for connecting the components together. This Renault model has an on-board computer, so installing the socket yourself can lead to voltage surges, which will cause equipment failure. To avoid this problem, use a matching unit or a special electrical kit.
Branded towbar wiring and its installation
The Renault company produces two wiring options: 241577864R and 8201443155. The second option is more difficult to connect - you have to pull the cord from the battery. And kit 241577864R is designed for simple connection - only lamp connectors are used.
Everything looks just as simple if you buy wiring suitable for Duster and produced by any of the well-known companies (photo on the right). One option is shown here.
No authorized dealer is required to work with kits other than kit 241577864R or 8201443155.
Connecting the wiring to a Renault Duster, if we talk about the proprietary version, is not complicated: the harness is passed into the coupling and connected to the terminals. But there is only one clutch used here - the one installed in the right corner. The petal of the “mass” is placed on the pin, and this petal is included in the kit. This means that you will have to remove the right lamp. Draw conclusions.
source
Options, types of prices, recommendations
There are 3 types of towbars:
- Standard is the “golden mean” in terms of functional qualities and cost. It is either welded to the car or screwed. But it doesn’t look good on small cars, it’s more suitable for SUVs.
- Removable (with a removable hook) - will not spoil the appearance of the car. Although it costs approximately 2 times more, it can be removed from the car at any time, and in reliability it is in no way inferior to a standard tow bar. And one more positive nuance: the frame with the mounting hole is invisible, installation is easy and quick.
- Flange - has 2 or 4 mounting holes. Remember that installation is only possible with a special platform located on the car.
In modern cars, attention is paid to such an important issue as electrical connections. Remember: special attention must be paid to ensure that the wiring in the car is insulated. Recommendations and tips when installing a tow bar on a car:
Recommendations and tips when installing a tow bar on a car:
- it is necessary to treat the holes with anti-corrosion agents;
- connect the towbar socket to the car wiring, solder it and carefully insulate it;
- upon completion of installation, lubricate the coupling ball;
- then close it with the cap.
The price starts from 5,000 and up to 20,000 rubles for Renault Duster 4×4, without bumper cutout. The optimal price/quality ratio is a towbar trailer for Duster, including all-wheel drive.
You will be interested to read about roof racks, daytime running lights and grille mesh.
How to install a towbar on a Renault Duster with your own hands
Before installing the unit, it is necessary to prepare the machine. The muffler and spare tire will have to be removed. Remove everything unnecessary from the trunk.
Required Tools
Most towbar designs are installed using the following set of tools and materials:
- hammer;
- knife;
- pliers;
- screwdriver;
- mount;
- set of wrenches;
- torque wrench;
- litol (for lubrication of bolted joints).
If the kit includes self-locking nuts, they must be handled with care. Tighten in stages, aligning the coupling device
This type of fastener is tightened only once. If there is a fixation error, the nuts will have to be broken.
Fastening the beam
In the Duster 4WD version, you can fix the beam without removing the standard components. In a 2WD car, it is more convenient to remove the bumper for modification. Drawings of the changes made are attached to the purchased trailer hitch. The selected hitch should not interfere with the spare tire.
On a 4x4 vehicle, the exhaust muffler shield will need to be removed. It will not be possible to put it in place. According to the owners, this has little effect on the further operation of the machine.
The order of installation of brackets:
- There are plugs on the holes in the side members. They can be removed through the luggage compartment. To remove the covering film on the right side, you need to open the hatch, after which you can get to the holes.
- Bushings and screws are inserted into the holes.
- The outside needs to be lubricated.
- Attach the bracket and do not tighten it completely.
After installing the beams, they begin to tighten the nuts. In order for the structure to be correct, it is recommended to pull the beam back - to simulate a traction force, and tighten the nuts with a force of 50 N*m.
Electrical connection
You must connect the vehicle's electrical wiring to the trailer yourself. Any electrical installation work is carried out with the battery terminals removed.
From the car you need to remove from the on-board network on the left and right sides:
- dimensions;
- reversing light;
- turns;
- fog lights;
- brake lights;
- mass (body).
The socket is secured to the towbar using screws. The wires are led into the car through a coupling in the body.
In order not to affect the standard wiring and not to violate the warranty on the car, it is better to make extension cords yourself. To do this, you need to purchase connectors with article numbers 0988251060 and 0988211060. Heat shrink is used as insulation. Before connecting, the terminals are tightened with a screwdriver for more reliable contact. On a car after restyling with LED lights, you will need a Smart Connect matching unit for connection.
Its characteristics:
- the unit includes connectors for quick installation;
- it is adapted for cars with LED lamps;
- wires for the automotive industry are used - PVAM;
- intelligent control is used;
- high quality contact crimping;
- protection from moisture and dust;
- soldering of parts;
The module is universal and suitable for different car models. There are connection options without a block. But the turn signals will have to be output through a separate relay for each side. In this case, the design cannot be quickly altered for another brand of trailer.
How it works
The smart connector receives a control signal from the “central nervous system” and connects a dosed load to the desired wire. The protection system built into the matching unit protects the electrical circuits and electronic “brains” of the car from overloads. The on-board computer “does not notice” the additional connection. And now we are moving on.
Smart connector options come in standard or extended configurations. Basic capabilities of matching blocks:
- control of direction indicators on a trailer;
- fog lamp control;
- recharging the trailer battery;
- disabling parking sensors while connecting to a trailer.
Advanced options:
- “TPP” - checking the connection of the electrical circuits of the trailer;
- side light control on the left;
- adjustment of the fog lamp on the left;
- anti-theft option ALARM-info.
There are never too many reasons to buy
Do you have a modern car? Then the manufacturer simply left you no choice. You will not be able to use the trailer without the approval unit.
To prevent incorrect operation of the towbar lamps and prevent malfunctions in the car's electrical system, you need Smart Connect - a coordination unit that prevents an increase in the load on the on-board network. Thanks to the 15 A fuse, Smart Connect does not react to power surges.
If ABS, TSP, ESP, SFL, etc. programs are installed on the car, then without installing the matching unit, the operation of the car will be disrupted.
The matching module is multitasking. It is responsible for switching the fog lamp on the trailer, controls the direction indicators on the trailer, and turns off the parking sensors when connected to the trailer.
There are coordination blocks with a large number of functions (PARK SENSOR, ALARM INFO, etc.).
A couple more nuances
Universal and original module-coordination blocks for towbars. The Uni system has standard connectors. The original ones are suitable only for one car model, each brand has its own:
- universal;
Universal electrics set UniKit
Unikit switching blocks are an intermediate link between the electrical kit of the towbar and the vehicle electronics. They relieve the electrical circuit, monitor the connection of the towbar and protect the system from overload and failures. If necessary, replace only the Unikit fuse. The short circuit does not damage the wiring or fuse.
The Unikit module ensures the correct operation of lighting devices and is indispensable for cars with single-filament lamps, in which different signals pass through one cable, and not through different ones.
- original.
Advantages: “smart” device with an expanded range of capabilities.
The original matching block comes complete with the original tow bar. When connected, the unit automatically registers itself in the system, tests the trailer, checks the functionality of the lamps, and turns off the parking electronics and rear view cameras.
We select it for your car
However, there are exceptions. In some cases, when installing American towbars with your own hands, due to the larger diameter of the ball, incompatibility with Russian trailers occurs. Roughly speaking, it is not always possible to connect such a hook to a domestic trailer, and sometimes you have to resolder the wiring.
The American towbar consists of four parts, the main one of which is the bracket for attaching the tow hook to the rear bumper of the car. Usually it is located on a special rigid frame, which is attached to the car body. Only after taking these features into account can you begin to select a tow hitch for the Renault Duster.
Renault Duster is a mid-size car, endowed with the features of a passenger car and an SUV, that is, it belongs to the crossover class. The most preferable for this car are towbars with a type A ball, for example, Bosal or some products from Enganches Aragon. This type of ball has a conditionally removable design and is secured to the hook with two bolts.
You can also turn your choice towards the best-selling devices on the Russian market:
- Galia (Slovakia).
- Bosal (Belgium).
- Enganches Aragon (Spain).
- "Leader-Plus" (Russia).
- Thule (Sweden).
- Imiola Hakpol (Poland).
As we have already said, it is necessary to take into account the differences in the towing parameters of towbars from different manufacturers. Most Russian devices for trailers do not allow you to tow loads weighing more than 1200 kg, while some foreign analogues can pull 1800 without any problems. The main thing is to never take a towbar that has been used. It is already worn out and may break at the most inopportune moment.
Feedback on installing a tow bar on Duster
Review: Installing a tow bar on a Renault Duster from Nikolay.
Any business person who lives in his own home or just an avid summer resident probably wants to have a towbar on his car. This simple device allows you to attach a trailer to your car, but it is not installed from the factory, and the dealership always charges a lot of money for installation.
In this article you will learn how to install a towbar on a Renault Duster with your own hands and save a lot of money.
Installation process
The first thing you need to do is drive the Renault Duster onto a viewing hole, overpass or lift. Without this it will be quite problematic. Open the trunk, take out the carpet, the floor covering the spare tire, and take note of the side member on both sides. There are four plastic plugs on each side that need to be pulled out with a screwdriver. It is on these holes that the product will be attached.
The next step is to drill a hole for the wiring. There is also an oval-shaped plastic plug under the machine on the left. A hole is drilled in it, and other plugs are torn off from below on the side members so that the hole becomes through.
From the trunk side, bolts with washers and bushings are inserted into them, on which the tow bar will be attached. In advance, the wiring leading to the trailer light connector is inserted into the hole.
We leave the wiring alone for now, and attach fasteners and nuts to the protruding bolts from below. We are not delaying them for now. Try on the towbar itself and you will notice that you need to cut a small gap in the middle of the bumper so that the hitch can fit there. Cut it to size and install the tow bar. Tighten all the nuts in advance, install the coupling device and the mount under the connectors.
In accordance with the diagram, connect the wires to the connector and mount it on the tow bar. The cable must be laid along the towbar using clamps so that it does not dangle or cling to anything when moving.
Tips for use
In order for the trailer hitch to serve for a long time and safely, the following rules should be followed:
- The ball must always be clean. You can use a removable version with a permissible load of 1.5 tons.
- If the lock is not made for dry friction, use graphite lubricant.
- There are special protective caps for stationary clutch devices.
- You should not drive on surfaces without asphalt faster than 25-35 km/h.
- To avoid accidents, you cannot operate a ball with a worn surface of more than 1 mm.
- It is necessary to tighten the connections with a torque wrench every 1 thousand kilometers.
When centering and strengthening the position of the towbar on the vehicle, do not make additional holes that weaken the strength of the structure.
Installation
On Renault Duster SUVs, installation of the towbar is carried out in several stages:
- The first thing you need to do before starting work is to check the equipment. The standard set includes a side strip, bolts, nuts, and electrical wiring for connecting the dimensions on the trailer.
- Remove the plug that is located inside the trunk and, being under the car, screw in the bolts that will secure the tow bar
- It is necessary to put the side plates on the installed bolts using washers and nuts; there is no need to tighten the nuts too much, since they will still need to be adjusted
- At the coupling device, use screws to fix the transverse beam so that it is completely covered by the bumper
- We make an electrical connection through special holes in the trunk, into a standard connector, and install a socket using screws. The process of connecting electrical wiring is quite responsible, so this part of the installation should be taken seriously; the included instructions with drawings can help with this.
Main stages of the process
In today’s material, with the help of photos and technical materials, we will figure out how to install it yourself. You can also look at the installation of a towbar and the nuances of its installation in other sections of our website. We start by installing the towbar beam, which is attached to the rear of your Duster’s body. It is installed on the side members in special holes, which are prudently closed with plugs. We will need to arm ourselves with a screwdriver, a pair of keys with heads 17 and 19, a towbar and accessories for connecting it. The side brackets of the towbar are connected to the side members with bolts and nuts. There is no need to tighten the fasteners ahead of time.
A towbar is...
The purpose of a towbar is to securely connect your car to a trailer or another vehicle, depending on the circumstances. But at the same time, the car must maintain sufficient maneuverability. That is why the tow bar has a rounded shape - it allows the attached trolley to turn.
There are several types of towbars:
- different in width (European and American standard);
- stationary and removable;
- flanged;
- small, medium, large (divided according to load parameters, designed for trailers of different carrying capacity);
- towbars with conditionally detachable fastening.
As for stationary and removable towing devices, there are also varieties among them. Since a towbar for a passenger car is far from obligatory (few people carry any cargo other than what fits in the trunk), it can be attached either permanently or temporarily. A permanently mounted tow hook is usually screwed or welded to elements of the frame or body of the car, and after that it can no longer be removed. But recently, many quick-release devices for towing trailers have appeared on sale, which are not inferior in reliability to stationary ones. What could a twenty-first century towbar be like? Take a look at this photo.
Towbars of different types
Have you chosen? Now we put
First of all, carefully read the instructions, remove everything from the trunk and prepare your tools.
Tools
To work you will need:
- Bolts and nuts for fastenings
- Keys for 17 and 19
- Screwdrivers
- A trailer hitch with a full set of parts, that is, the tow bar itself.
Instructions
- Start by checking the hitch configuration. A standard towbar must have side bars, the necessary hardware and wiring to connect the warning lights to the trailer. Almost like in the photo. Disassembled trailer hitch
- After checking that everything is in place, you can begin installation. Open the trunk, which has been previously cleared of excess items, and use a screwdriver to remove the plastic plugs located on the sides inside. Insert the towbar bracket mounting bolts into the vacated holes. It is the fact that car designers left the necessary holes that greatly simplifies the work. The same plugs that need to be removed. We insert the bolts in place of the removed plugs.
- This must be done while under the bottom of the car.
- Now you need to put the side plates on the inserted bolts. The reliability of your entire towbar system will depend on them. These elements should be securely fixed with the nuts and washers included in the kit. Don't over-tighten them the first time, as adjustments may be necessary. This is what a correctly installed towbar plate looks like
- When you are done with the plates, proceed to fixing the cross bar of the towbar. Special screws are used for this purpose. Make sure that the hitch bar is correctly positioned relative to the bumper, that is, it is completely covered by it and does not stick out. At this point, the installation of the main parts of the towbar is completed, only the most difficult part remains - the electrical wiring. The last main part of the towbar is installed
How to install and connect the electrical yourself
Make sure that all mechanical parts of the hitch are installed correctly and are secure. Only then can you install the platform with the towing hook and socket, and then finally screw in all the nuts holding the device.
With electrics, everything is not as scary as it seems at first glance. In general terms, it is enough to lead the wires from the socket into the trunk through the corresponding holes, fix their ends in the terminal block provided by the manufacturer and located in the luggage compartment, and then just connect them to the standard connector, as shown in the instructions.
Here is a diagram of the socket of one of the Russian towbars. Many others are made on exactly the same principle.
This is how the towbar socket contacts are located
The socket is placed on the towbar platform and attached to it with screws. Then you need to find another plug in the trunk in the floor itself, which closes the hole intended for the wires. We run the wiring harness there. It is necessary to strictly follow the instructions so that the on-board network of the machine does not fail. In general, you only need to perform three steps:
- Place the wires from the outlet into the trunk.
- Fix their ends in the terminal block
- Connect to the standard connector.
Let's examine the body
Rubber couplings are located at the corners of the luggage compartment. If they are, good, remove the plugs from them. Instead of couplings, there may be “ovals” (see photo). And then there is freedom of choice: you can drill an “oval” or drill a body (by the way, it’s galvanized).
Preparing the car for wiring installation
To connect the towbar wiring to a Renault Duster, one coupling would be enough. But then it would be necessary to lead the cord through the entire niche - from one side to the other. Usually they try to bring the wiring out. And therefore the number of couplings is two.
The wire or harness will go to the socket from the left lamp and from the right. There is a window on each side for these purposes - it is located near the connector.
The connector itself can be pulled out through the window by disconnecting it from the flashlight module. And so, you need to be able to solder a cord to almost each of the terminals of each connector.
Before any actions affecting electrics, do not be lazy to disconnect the battery. Only disconnect the “minus” connector (you need a “10” key).