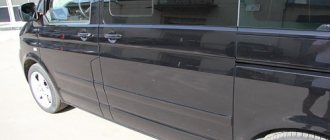
The primer application stage is included in the list of preparatory work immediately before painting the car. There is nothing complicated in the primer application technology itself, since this is a rough layer; many defects, including smudges and craters, can be solved by grinding and additional application of finishing putty. Having studied the theory and strictly followed the step-by-step instructions, you can easily prime your car before painting with your own hands, using only the tools at hand and purchasing consumables.
How to properly dilute primer for car painting
Applying a primer is a necessary step before painting a car.
The special composition not only levels the surface, filling all the unevenness, but also ensures reliable adhesion of the paint to the car body, and in some cases extends the life of the finishing layer and prevents the formation of chips and corrosion. You can prepare your car for painting yourself without going to a repair shop. To do this, it is important to carefully familiarize yourself with all the stages of applying the composition, and also find out how to properly dilute the primer for painting your car yourself.
Secondary soils
These include standard protective, passivating and other types of primers. They also protect the car body from moisture and corrosion, but their main purpose is to smooth out various irregularities, roughness and pores in the metal surface. After processing, the latter becomes absolutely smooth and uniform, which allows for high-quality painting.
Epoxy primers and insulating primers (sealers) can be placed in a separate category. The former are a good alternative to acid-containing primary primers, and the latter serve to isolate old coating layers, eliminating possible problems with their swelling and peeling.
Types of soils for cars
There are the following types of primers that are used to prepare a car for painting:
- Acrylic. A universal option that is used most often. Suitable for bodies that do not have significant defects, such as large chips or deep scratches. Bonds paint to metal well.
- Epoxy. Made from natural materials and provides the best protection for your car. Creates a durable film on its surface that prevents mechanical damage.
- Acidic. Refers to rough types of coating, protects the body from corrosion, paint cannot be applied to it.
Which primer to choose for the job depends on the condition of the car body and the presence of deep, noticeable damage on its surface.
Phosphating primer
These formulations contain phosphoric acid. When it interacts with steel, the result is the formation of sparingly soluble phosphates. The primer lays on the coating in a dense layer and has good adhesion. Moreover, its thickness is the smallest of all existing ones. These include VL-02, VL-08, VL-023, VL-025. The mixture penetrates the metal to a depth of 0.05 microns. This increases adhesion to the metal of the body. It is recommended to apply the composition in two layers. Price – 245 rubles per 0.8 kg (Vika).
Preparing the car
The work must be carried out in a clean and dry garage; there should be no dust or other dirt in it. It is important that the room has good lighting and ventilation.
Once the room is ready, you can begin preparing the machine:
- it is thoroughly washed, removing all, even hard-to-reach, contaminants;
- remove old paintwork;
- those areas where corrosion has appeared must be thoroughly sanded;
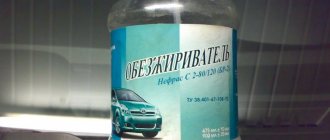
- After this, the working surface is degreased using anti-silicone.
You should take care of doors and windows. All areas of the machine that are not primed must be covered with thick polyethylene or paper, securing them with masking tape to prevent the composition from getting on the rubber gaskets.
When the car is ready, you need to take care of the correct preparation of the equipment and composition for the primer.
Features of do-it-yourself priming
If you plan to prime the car exclusively with your own hands, then first of all you need to take care of your own protection, using a special suit. Mask and safety glasses.
The primer is carried out in several stages. The first time it is applied in a very thin layer and allowed to dry completely. The secondary layer is laid at least 2 times, each time waiting until the previous layer has completely dried.
Whether all layers have dried or not must be checked according to the instructions; it indicates how long it will take for the composition to completely harden. After this you can start sanding. It is performed either with regular sandpaper or with a special machine. After each pass, you need to remove the resulting dust, and check the result by touch - the surface of the car must be absolutely smooth, without scratches or unevenness. Only in this case will the paint lie flat and have good adhesion to the body.
What is automotive primer?
Primer is a special substance that is intended for application to a metal surface (hereinafter we mean auto primer) that has previously undergone special preparation.
Soils are classified by type, type and composition. If we talk about the first ones, then there are 3 of them:
- Epoxy primer for metal;
- Leveling, also known as primer;
- Primer-sealant.
The first type has good resistance to moisture due to its dense structure. As a rule, after drying such a primer does not need to be sanded, limiting itself to only eliminating drips with fine sandpaper. Often used as a primary primer.
The primer also has good anti-corrosion properties, and it also perfectly smooths out small pits due to its thick consistency, which is what it is mainly used for. Needs sanding.
The sealant is a finishing primer. It promotes uniformity of previous layers and prevents paint from penetrating into the soil and corroding it.
Main stages of work
Briefly, the main stages of applying primer to a car will look like this:
- Prepare the car and garage for repair work.
- Stock up on the necessary tools and select a primer.
- Clean the surface from paint and rust residues, wash thoroughly and dry.
- Apply the selected primer in several layers and let them all dry thoroughly.
- Sand the body so that no scratches or irregularities are felt when touched.
- The car is ready for painting.
Immediately before you start painting the car, its surface will have to be degreased again for better adhesion to the metal.
Epoxy look
Epoxy products are used before the body painting process. Such products are intended for primary metal coating. Most often, such products are sold in cans for spraying (using a spray gun), less often in cans for subsequent dilution.
The composition is applied in a thin layer to the surface and in a short period of time forms a layer on the metal that perfectly protects against corrosion and improves adhesion by an order of magnitude. Such products are used in combination with a regular or anti-corrosion primer.
When using such a primer before painting in combination with several products, the effect of painting and subsequent use is more pronounced. A well-known manufacturer of such a primer is Spectral and its Under series of primers. These primers are sold in spray cans. Before use, the composition must be diluted with a solvent.
The cost depends on the series and the area covered, but on average it ranges from 1000-2000 rubles.
In terms of its effectiveness individually, an epoxy primer cannot fully compete with other compounds, so it is advisable to use it in combination.
Video on how to choose a primer for a car:
Application to car
Application of the material to the surface occurs in several stages:
- The surface to be coated must be thoroughly washed to remove all traces of corrosion. Then treat the surface with a degreaser;
- After this, apply the epoxy composition in thin layers using a spray gun or brush, after diluting it with a hardener;
- Then the main primer composition (one-component or two-component) is applied to the dried surface in several thin layers. If any roughness or unevenness is detected, level it using a spatula or other tool and level the surface. Allow the surface to dry for several hours and regain its normal characteristics.
Primer application methods
Depending on the area of the surface to be treated, you can use either an aerosol primer or a spray gun. In the first case, we are talking about quick repair of minor damage, since the composition is one-component and quite liquid, it will have to be applied at least three times.
If a large area of the body is to be treated, then it is worth using a spray gun, with which two-component compounds are used, which harden quite quickly.
Priming a car yourself is not as difficult as it might seem at first glance. For the job to be successful, it is important to prepare the car and garage, stock up on the required amount of primer, prepare the tools and act slowly.
What is the difference between acid primer and epoxy primer?
Epoxy primer is a substance that includes epoxy resin, fillers, polymers, and some alcohol derivatives. The primer, after application, creates a film that does not allow oxygen to pass through. After hardening, the soil does not allow water to penetrate at all, since it does not form pores. Epoxy primer is available in a can or in jars.
Epoxy primer in cansSource sevparitet.ru
Epoxy Primer Differences
Epoxy primer should be applied, according to experts, directly to clean metal, and then putty
This is especially important if the metal is being restored over several weeks, i.e.
for a long time.
For example, if a car sits in a garage for a long time, then, since there is humidity in the room, the areas of the body that have been stripped down to metal will begin to oxidize. In this case, you can choose the option of puttying with an epoxy primer. Then the putty should be applied before the primer has completely hardened.
Differences in acid soil
When it comes to acidic soil, you can hear the following names: phosphating, etching, reactive. The primer in this embodiment is a compound of zinc and phosphoric acid. More precisely, it consists of:
- polyvinyl butyral, which is a synthetic material and serves to form good adhesion and film;
- zinc phosphates and chromates;
- water;
- phosphoric acid, which is an excellent rust converter;
- alcohol.
Composition of acid soilSource strport.ru
The principle of operation is approximately this: phosphoric acid acts on the metal and, at the same time, zinc is precipitated. The film is formed by polyvinyl butyral - the acrylic layer will already adhere tightly to it. After applying the primer to the metal surface, a thin coating is obtained. It is an anti-corrosion and adhesive layer. The primer does not completely destroy the rust that is already there, but it also does not allow it to spread.
Acid primer for cars is divided into four main types:
One-component.
If you purchase a two-component primer, you must prepare a primer. To do this, it is mixed with an activator, and the consistency can be different - hard or soft.
Two-component primer Source autocosmetica.by
Professionals prefer to work with a solid form, as it gives the strongest film. Depending on the recommendations in the instructions, the two-component composition can be applied in 1, 2, 3 layers. During treatment, maintain an interval of approximately 5 minutes between applications.
Reactive.
This option is used for clean surfaces. The reactive substance forms a very small layer (8-13 microns). This is the base on which the following layers should be applied.
Self-Etching primer.
This substance is a soil with the addition of zinc. Used to eliminate unevenness and improve the quality of adhesion. The substance acts on the metal, resulting in the creation of a layer of frozen polymer elements.
Self-Etching primerSource alicdn.com
You can choose a one- or two-component primer, but most craftsmen use a material that has two ingredients. The greatest wear resistance is achieved through filler primer - this is a necessary stage of coating.
Primer for car
In order to protect the car from corrosion, it needs to be primed. This means that simply painting the car will not be enough; special compounds are needed to achieve protection. It is also important to note that depending on the chemical composition of the primer, it can provide very different protection.
There is a barrier protection against corrosion, which is designed to keep the metal surface from water penetration. The main thing is that the paint adheres to the surface as best as possible. She, in turn, needs to be prepared as best as possible. This will determine whether microcracks appear on the coating and whether the adhesion will be strong.
If there is a small gap, it can also lead to corrosion. This process can begin to develop even in the smallest scratch. Especially if you get caught in the rain after this crack appears. There is also under-film corrosion, which penetrates under the coating, and this is how metal damage develops. And all because of one small crack.
Main types of auto primers and tips for use
Every car owner wants to protect the paintwork of their car from corrosion. Automotive primer is a reliable base, foundation for paint and protection of metal. The modern automotive market offers a large variety of products: from cheap to expensive, well-known and little-known brands. This means that choosing an auto primer is not an easy task, but it is a responsible one. Let's figure out what you need to know about this product and how to properly use its wonderful qualities?
We prime the car
Each primer differs from the other in that they all have different degrees of corrosion protection.
Also, each primer has its own area of application. First, let's find out what to do when we decide to prime the car. It all depends on what kind of solvent the primer has. Therefore, depending on this, two special types of primer are distinguished. Firstly, we are talking about organosoluble, and, secondly, about one that dissolves using ordinary water.
Let's consider another classification of soil:
- We prime an ordinary surface. In this case, there is no problem with roughness at all, so there is no difficulty in finding the ground to adhere to the surface.
- Now let's talk about problem areas. There is no roughness on them. We are talking about zinc, aluminum or copper coatings. This adhesion problem is due to the fact that a variety of chemical reactions take place on the metal surface.
The main thing is that you do not save on buying soil. After all, if it is anti-corrosion, then you should think about purchasing a quality product, then there will be no problems with the coating. It will be reliable, which means your car will be protected. Often they use a primer in a can. It is easy to apply and costs very little. But often you come across a fake. If the product is from an excellent manufacturer, then you can buy it. It will be able to protect the car from corrosion. Unverified manufacturers usually sell counterfeits.
What is the best soil for a car?
I decided to do a little research on auto soils for our model needs. I found 5 cans of auto primer from different companies, such as: ABRO (the seller said it was auto primer, not paint), Crafts spray, Maxi color, Prestige and KUDO.
Soil testing was carried out on pieces of plastic cut from the lid of a doshirak. The cover is made of polystyrene plastic, like all models.
After checking all the soils, I decided for myself that they are all suitable for modeling, some of them are better, some are worse.
1. ABRO – acrylic primer. I must say when purchasing, the seller said: “This is a primer, not paint, just a primer.” although it says paint on the can. What can I say, the plastic covers it very well. good, it won't come off with a fingernail. Covers the plastic with a thin layer. The ate grain was noticeable. Dries quickly. Solvent is acetone (thin plastic was damaged due to this).
2. CraftS spray – acrylic primer. I liked this one perhaps the most. It tears the plastic very much. thin even layer. It is possible to fill the model, but it is difficult. I had a case: I overdid it in one place (stupidly flooded it) and after drying the soil became smooth and not noticeable. There is no grain, smooth before painting and after. Doesn't come off with a fingernail. True, there are people complaining about it “Does not sand”, which is what they meant if this primer is applied in the thinnest layer of all the ones I have tested. Dries quickly.
3. Maxi color – this primer is not acrylic, but I also like it very much. I liked it. Covered the plastic evenly. thin layer. After scraping with a fingernail, a shiny mark remained, but the primer did not come off (this happened with all the primers except CraftS spray and Prestige). The grain is not noticeable. Dries quickly. Solvent solvent.
4. Prestige. Despite the fact that my colleague praised this soil, I cannot say that it is better than those tested above. In addition, the sprayer left splashes on the plastic in the form of small tubercles. When I saw this, I tried it on another plastic and it was the same. Maybe it's a spray gun that spits paint. I don’t know, but the two samples had the same spitting. The coating layer was a bit thick. The soil shines after drying. Filling the model is easy. An attempt to remove the soil with a fingernail was unsuccessful; one could say: “There’s not even a trace left.” It takes a long time to dry. The mixture is an organic solvent - the manufacturer did not specifically specify, but the plastic did not lead.
5. KUDO - domestic alkyd primer. Covers with a relatively thick layer. Graininess is noticeable on the surface. The surface is matte. When I tried to tear off the soil with my fingernail, I pulled down the path, but the soil did not come off. Only the surface matte layer has peeled off. Due to its dullness, this primer has the best paint coverage. It practically absorbs water-based acrylic like paper. Dries average. Solvent methyl acetate.
We apply an anti-corrosion primer to the metal
When wondering how to prime a car, let’s say that this can be done in the two most common ways.
Firstly, it is done independently. But without skills you won't succeed. Because the result is important, and for this you need the ability to prime. Secondly, the opportunity to contact a service station. A specialist will prime your car there. What is the purpose of using a primer? This way you can protect any metal from rust. And this is possible especially for iron, which is most susceptible to this problem. Since the soil is placed on top of the metal, access to the latter is interrupted. This means there is no corrosion.
What contributes to protection against corrosion? This is a special additive, which is represented by iron oxide. Also, chemical elements can be added to the primer, which also stop corrosion, and they also decompose and remove existing rust themselves. In other words, it is transformed.
If this is the case, then this primer has special instructions stating that the solution can be applied directly to the rust. Otherwise it must be cleaned first.
There is no need for the primer to be protected from atmospheric influences, temperature changes, in other words, from rain and snow, hail and icing. Since the surface will still be painted later, which will protect it and the material from the adverse effects of the environment.
You can choose a special material, we are talking about enamel and paint. They contain some kind of anti-corrosion elements. When the car is painted with them, you won’t have to worry about the vehicle.
But it is important to know whether you have primed your vehicle correctly. Then you can use your car for as long as possible. After all, the factory coating can be preserved for many years. True, it is important to perform the primer using the correct technology. Otherwise, it will be impossible to achieve the desired result.
Advantages and disadvantages
The advantages of sprays include:
- convenience and ease of use;
- smooth application;
- long storage;
- richness of color palette;
- brightness of colors;
- resistance to sun rays (do not fade or fade).
This paint will not dry out, even if you have already used the can several times. In addition, these enamels do not require the purchase of brushes or rollers for application. The consumption is quite economical - one cylinder will last for a long time.
The disadvantages include the impossibility of self-colouring. Of course, a painter in a store can create any complex color for you upon request, but this will require additional costs.
It is also quite difficult for beginners to work with aerosols: the paint can form streaks and be applied unevenly.
What kind of primer is there?
There are several types of primer.
We are talking about the priming method, the chemical composition, and other characteristics. First, let's pay attention to the types of primer, which differ in the principle of their effect:
- We are talking, firstly, about passivation. It oxidizes the surface where it was applied. Red lead is used. True, it is very toxic, so it is not currently used. When the bottom and wings of the car have been processed, a passive state occurs.
- Secondly, we are talking about phosphating. Phosphoric acid is used. This creates a film that protects against adverse weather conditions. Its thickness reaches up to twelve micrometers. True, the layer has very high adhesive properties. The next layer is easily applied on top of it.
- Thirdly, we are talking about protective primers. The composition consists of zinc powder, it is distinguished by the fact that it is able to restore the affected area of the metal. In this case, the zinc is destroyed, but the metal of the body remains intact.
- We are talking, fourthly, about modifying. It is applied to the area that has been affected by rust. There is no need to clean it up. In this case, the primer has a transformative property. It also has a protective function. It is only important to follow the technological processes so that the work goes smoothly. The ambient temperature should not exceed fifteen degrees Celsius. For high-quality priming, the primer is sprayed onto the metal.
- Fifthly, we are talking about an insulating primer. This can form a protective layer that protects against moisture. The composition of the primer has very good adhesion, so it sticks to the metal perfectly.
How to choose and apply primer correctly
The first thing you need to pay attention to is the date of manufacture of the composition; it is strictly not recommended to purchase and use expired products. It is advisable to buy putty, primer and paint material from the same manufacturer so that the active substances are well compatible with each other, so that the work will not be spoiled. It is better to purchase primers from well-known manufacturers with a good reputation. It is advisable that an experienced, qualified technician select the soil, taking into account various nuances that the car owner may not even be aware of.
To understand which soil is best for a car, a specialist must analyze many nuances and factors, taking into account the condition of the metal and the protection that needs to be provided to the car body. In order for the primed layer to be reliable and durable, the specialist must apply the primer at the optimal temperature, from 10 to 25 degrees. You can prime using a spray bottle, brush or any other tools. It is important to take care of personal protective equipment so that the product does not cause harm to health.
Good specialists apply not one, but several different types of primers to the car body. First of all, a phosphating or acid primer is used to ensure the best adhesion. Only a cleaned and degreased surface can be primed. When working with acidic and phosphating agents, it is important to take care of high-quality ventilation so as not to be poisoned by chemical fumes.
After the first layer of primer has dried, a secondary primer is applied, preferably a two-component composition, soft in structure, to eliminate minor surface defects. It is advisable to use primers that do not require further sanding. When the metal surface is perfectly smooth and even, it is possible to apply a glossy composition, but it does not need to be sanded. After all primed layers have dried, paint and varnish material is applied.
Epoxy primer
This type of primer is classified as a paint and varnish material that helps protect the car from rust.
This primer has two important features. Firstly, corrosion cannot damage the surface, and secondly, it is an excellent base for enamel, which will be applied over the primer. Let's look at the basic rules for working with epoxy primer:
- The coating must dry very well, but this takes time. Dry only correctly, as indicated in the instructions.
- The thickness of the layer should not exceed twenty-three micrometers.
- If the soil is too viscous, it is diluted with water to obtain a more liquid consistency.
Spray primer is often used. It is sold in all specialty auto stores. Used as a preparation before painting, as well as for local repair of body parts.
Only epoxy primer will remove only small scratches.
If you have a large dent on your car, then use putty. Unlike other types of primer, epoxy dries faster and can easily withstand any temperature changes.
How is the primer applied? First, the surface is prepared. It must be clean, free of dust, free of moisture.
It is important to remember that epoxy is not applied to rust. It must first be cleaned using a grinder or sandpaper. Apply the primer in one layer, this is how you can protect the car from rust, and also keep the paintwork intact.
Properties of primer for cars
The characteristics of all types of primers must be taken into account by craftsmen at the initial stage of application. It is important for the master to master all painting skills to prevent delamination of the product.
There are primers on the market that combine the characteristics of a primer and filler. Naturally, it is more rational to use different materials for applying to metal and plastic.
Guaranteeing perfect adhesion is only 50 percent of the success, which is decided by the soil. It is important to take into account anti-corrosion features. An attempt to apply an anti-corrosion primer for a car with a massive ball will cause a decrease in its strength and lead to cracks. This is exactly the case when a lot does not mean good. The autoprimer is applied with a thin ball, which must be dry before applying subsequent ones.
Features of the priming process
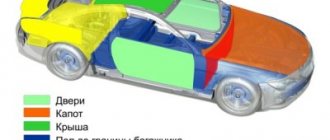
Priming a car is a mandatory step in preparing the body before painting it completely or when performing local repairs on individual elements, parts and parts. The primer is an intermediate layer between the final car enamel and the surface of the body.
The process of priming a car involves performing a number of works:
- preparation of the room/painting booth;
- preparation of tools and consumables, vehicle;
- mixing the primer composition (when using a two-component primer);
- spraying the first layer of primer;
- drying and sanding the first layer;
- applying finishing automotive primer;
- drying, final polishing.
The primer is used not only to increase the adhesion of car enamel to metal or plastic body elements, but also protects them from adverse external factors (the appearance of damage due to mechanical impact, the formation of foci of metal corrosion during prolonged contact with moisture).
Before painting a car, different primers can be used - acid, acrylic, epoxy. The choice of the type of primer depends on the purpose and objectives of use. For example, protective and passivating primers are designed to protect metal from rust. Modifying primer compositions are used when there are pockets of corrosion on the body without first cleaning them; in this case, the primer prevents their further spread.
Soil selection
When choosing which primer is best for a car, you need to give preference to trusted manufacturers. Here, more than anywhere else, the rule that the miser pays twice is true. Repairing a car once, but with high quality, is much cheaper than saving money and then having to redo the whole job.
High-quality primers for cars at competitive prices can be found in the TopDetal.ru online store in the corresponding Primers section. The electronic catalog contains a huge range of primers and other materials. In addition, we have all related products for car repair and painting. Along with the primer, you can buy abrasives, auto enamels, putties, varnishes and all the tools necessary for the job.
Preparing the room and vehicle before starting work
Priming a car affects the quality and appearance of the paintwork of the vehicle body, so it is important to pay close attention to the process of its implementation and preliminary preparation. Turning to professionals will help you avoid many troubles when painting later.
It is recommended to apply the primer to the car body indoors, which avoids the settling of dust, small contaminants and other foreign inclusions on a fresh layer of auto primer. Professionals perform priming in a sterile chamber (painting preparation station) with constant air humidification.
Note! When evaporating, automotive primer releases toxic substances that are harmful to human health. All work must be carried out in a room with good supply and exhaust ventilation. At the same time, you should avoid drafts, which can negatively affect the result.
During the priming process, before painting the vehicle, it is necessary to use special protective equipment for exposed areas of the body, respiratory and vision organs, including a mask with a carbon filter, safety glasses, and gloves.
Bright lighting in the chamber for preparing a car for painting allows you to get a high-quality result - the most even layer of primer with a minimum amount of defects and minor defects.
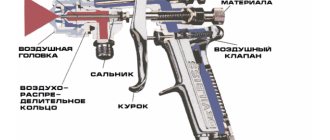
Applying a primer to a vehicle body requires the use of a special set of tools and consumables:
- Spray gun. Provides uniform and perfectly smooth application of the primer composition on metal and plastic body elements.
- Electric grinder. Guarantees fast and high-quality results (manual grinding methods are more labor-intensive and time-consuming).
- Automotive primer. It is selected taking into account the goals and objectives (local repairs or painting the car completely), the shade of the final car enamel and other factors.
- Alcohol. Designed for cleaning and degreasing the car body before starting work.
- Sandpaper with grit from P800 to P1200 - for cleaning defects.
The modern range of automotive primers allows you to choose the best option in accordance with your goals and objectives.
The soil is selected according to its purpose and shade. Depending on the composition, primers are divided into one-component and two-component. A one-component primer does not require preliminary preparation before use. It is sold in aerosol cans and metal cans. Two-component analogues require combination with a hardener and thinner, as well as thorough mixing until a homogeneous elastic consistency is obtained.
Note! Before painting, it is recommended to strain the soil through a special filter, which will allow you to cut off small particles and large inclusions, and also help avoid clogging the spray gun. For these purposes, ordinary gauze folded in several layers can be used.
Preparing the car before applying the primer involves covering the headlights, windows, metal radiator grille and other body elements with tape or special materials. When performing local repairs on one part, it is first removed, isolated from the body and processed separately.
Before priming the car, all metal and plastic surfaces to be treated are thoroughly cleaned and degreased. For this task you need to buy a solvent (non-aggressive) or alcohol. If there are traces of corrosion or old paintwork, sanding is carried out using coarse and medium-grained sandpaper.
Moisture prevents the adhesion of the primer to the surface being treated, so before starting work, all parts and elements of the car body must be thoroughly dried.
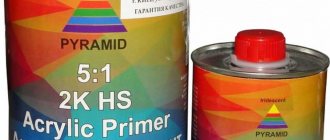
Acrylic primer (filler)
Automotive two-component acrylic primer 2K, the most common and mainly used in work. This is not an anti-corrosion primer. The main purpose of acrylic primer is to fill pores and small scratches on the body panel after sanding. That's why they are called "Fillers" or fillers and universal ones. Also, its task is to create a substrate for applying paint and varnish, since the paint must be applied to a primed surface or to an old paint layer. When applied, the layer thickness can reach 50-100 microns or more. Acrylic filler can be universal and can be used both as an adhesive and as a filler. It all depends on the proportion in which it will be diluted with thinner and how many layers you apply. Acrylic primers come in a variety of colors. It's mostly grey, black and white. They are used to reduce paint consumption and to avoid differences in coating shades. Reoflex primer
acrylic is a universal quick-drying leveler. Reoflex is used as a primer, thick-layer filler and insulator against old paintwork and putties. Reoflex is applicable in the “wet on wet” version. It comes in grey, white, black and red. Reoflex dries in 4 hours at 20 degrees. Application wet on wet, possible after 30 minutes.
Thinning, applying and treating primer
How to dilute the soil? Acrylic primer can be diluted with any branded acrylic solvent. Just don't use 650, 646, 647, etc. Basically, fillers are diluted 4:1 and 10-20% thinner. Less common are 3:1 and 5:1 in ratio to the hardener. The viability of acrylic-based filler is from 30 to 60 minutes. The secondary primer is applied to the primary primer and to putty and sanded areas in 2-3 layers. Do not apply more than necessary. For large surface repairs, primer is applied to the entire part. For minor repairs, the filler should cover the putty layer. Apply with a spray gun with a nozzle size of 1.6-1.8mm. For small spot areas to be repaired, the filler layer in these places should be thicker than in the border areas. Each subsequent layer must overlap the previous one! So that there is no “Pie”. After drying, which is 3-8 hours at 20 degrees, you can start sanding. Be sure to check the instructions on the product can. The filler layer must be sanded well. Poor sanding will result in paint defects. Start working when completely dry.
Pay special attention to layers of increased thickness. Sanding wet soil leads to the formation of scratches and clogging of the sandpaper.
Let's divide the work with soil into two stages:
Coarse sanding – evens out the filler layer. Use finer grain skins
They mainly use a hand sanding block with P320 abrasive, with caution P240. Finish sanding – achieving the required surface for good paint adhesion and covering the marks of rough sanding. Use abrasive P500-P600 on an eccentric machine when dry or P800-P1000 when wet.
Proper processing is step grinding. They start with coarse sand and end with fine sandpaper. Avoid using coarse abrasive as it is more difficult to grind into finer abrasives. The filler, unlike putty, can be processed both dry and wet. With dry sanding, a high-quality surface is achieved faster than with wet sanding. When wet sanding, you can use a finer abrasive, benefiting from the presence of water.