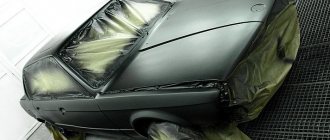
How to set up a spray gun is the main thing that a master needs to know before starting to work with the tool. And this general task includes four separate conditions.
A competent approach to solving all the points determines the final result of the process of applying the coloring composition to the surface.
There are a number of main factors that influence the quality of paint spraying. In order for the application process to be as effective as possible, it is necessary to perform a number of mandatory operations before starting work. Namely:
- prepare the paint for work;
- set the optimal torch size;
- select the required air pressure;
- adjust the paint supply.
If all settings are made correctly, the paint will lay down in a perfectly even layer without drips or sagging.
Information! If the parameters are incorrectly set, the coating will be unsightly and take a long time to dry. The process of working with a spray gun will be labor-intensive and will take more time.
Preparing paint for work
To properly prepare the paint for application, you will need a separate plastic container or measuring ruler. Typically, manufacturers indicate on the packaging the proportions in which the mixture is mixed with the activator. For example, the 2x1 marking indicates the need to mix two parts of the paint volume with one part of the activator volume.
For accurate proportional mixing you need a measuring ruler. If it is missing, you can use a plastic container. Uniform graduations should be applied to it, which will help to accurately measure the proportional parts of the hardener and the painting material itself.
For effective spraying and obtaining an aesthetically attractive gloss, such a factor as the viscosity level of the composition is important. To achieve the required performance, a solvent is added to the activated paint. Difficulties may arise here, since not all manufacturers indicate in the instructions the recommended ratio of coloring agent to solvent.
Experienced specialists prepare the mixture by eye, adding the second component in small portions and observing the consistency.
Expert opinion
Ilya Vyacheslavovich
Consultant for body repair at krasymavto.ru
Ask a question For beginners, it is best to select a painting material with detailed mixing instructions when purchasing paint. If the can says, for example, 2x1+10%, this means that 10% of the total solvent is added to the paint, activated in a two-to-one ratio.
When you plan to paint a surface with a metallic effect or with additional protection from external factors, a two-layer coating is done. In this case, the base paint is applied first, and then the acrylic varnish.
Acrylic varnish is prepared in accordance with the manufacturer's instructions. The components are mixed in the proportions indicated on the specific packaging. With a two-layer coating there is no need to activate the paint. Its drying is ensured by the evaporating solvent.
Test Spray
Having adjusted your spray gun and selected the optimal nozzle, do not rush to start painting the required object. To make sure the settings are correct, do a few test sprays on paper, cardboard, or other vertical surface that you don't mind getting dirty. It is necessary to carry out this procedure to assess the shape of the torch, the uniformity of application and distribution of the material over its area. The most important test is considered to be the form check, and we will look at it first.
Imprint shape
The spray gun torch, ideally, is an elongated oval with slightly blurred edges. The width can vary between 200-400 mm. The paint transfer must be uniform over the entire spray area and form an even print, without depressions or bevels.
When spraying, the spray gun must be held at a certain distance: 10-15 cm for HVLP, a little further (15-20 cm) for LVLP, and as far as possible (20-25 cm) for conventional sprayers (HP). It takes no more than a second to open the paint supply.
If the torch of your spray gun has the above distortions, you should know that they are caused by unregulated air pressure, clogged or defective nozzle. The dumbbell-shaped figure eight indicates increased air supply, which is corrected by lowering the inlet pressure. Too much paint accumulation in the center can be reduced by tightening the appropriate adjustment screw. If one of the air cap holes is clogged or defective, the torch spot takes the shape of a banana, which can be eliminated by cleaning or replacing the element.
Paint distribution
the area of the sprayed spot affects the uniformity of the layer and is checked quite simply. To do this, turn the air cap 90° (for horizontal spraying), and press the trigger for 2-3 seconds until smudges begin to appear. If the drops are evenly spaced and have the same length, then the dispersion of paint molecules is correct and does not require additional calibration. If smudges predominate in the center or on the sides, the air or material supply should be adjusted.
Spray quality
is a subjective indicator of the effectiveness of a pneumatic spray gun and is determined based on the size of the droplets transferred to the object. The size of the mixture particles can vary, increasing from bottom to top. Increasing the inlet pressure increases paint dispersion and reduces the layer size, making it rough and “dry”. To ensure that the spray gun layer does not cause any complaints, use the optimal operating pressure.
Source
Design of a paint sprayer and stages of preparation for work
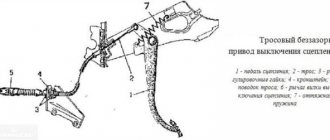
A modern spray gun is designed in such a way that all parameters necessary for operation can be optimally adjusted. The design of the tool includes the following parts:
- paint tank with filter (can have a capacity of 100 or 250 ml);
- nozzle with holes for breaking paint;
- paint supply regulator;
- handle with comfortable grip;
- spray pattern regulator (flat and round layout);
- nozzle with steel needle and pneumatic double diffuser;
- air supply regulator.
So, the three regulators provided by the design will allow you to properly prepare and configure the instrument. How to adjust the spray gun?
Useful! First of all, paint is poured into the tank. After this, the setup process itself begins. To do this, you need to have some kind of vertical test surface on hand for samples. Most often they use a wall on which a sheet of whatman paper is attached.
Technical features of the spray gun
The spray gun is designed in such a way that all important parameters of its operation can be adjusted.
Spray gun design
The device consists of the following elements:
- a tank with filtration for paint and varnish composition (volume from 100 to 250 milliliters);
- nozzle adapted for grinding paint;
- starter supply controller;
- handles;
- spray pattern controller (round or flat layout is used);
- nozzles with a metal needle and a double pneumatic diffuser;
- air flow controller.
Setting the torch size when painting
The setup begins with setting the optimal torch width. In this case, you should be guided by the size of the surface to be painted. If a narrow color transition is being made or a small area is being updated, choose a small torch width, trying to spray the jet on whatman paper to a suitable setting.
When painting a complete car or a single part, the maximum spray width is preferable. This will ensure uniform application and optimal process speed. It is important to know that simultaneously with reducing the width of the torch, it is necessary to reduce the air supply.
Conclusion
As you can see, the instructions for setting up the spray gun do not seem particularly complicated. Having a technically sound tool, paint diluted to the required consistency, and a little patience, you will certainly achieve optimal quality paintwork (see also the article “Spray gun for painting a house”).
If after all the above recommendations you still have questions, watch the video in this article.
• Preparing the premises. It should be kept dry, clean and well ventilated. Make sure that the surface to be painted is protected from the effects of strong air currents. The optimal temperature for painting is +10 0 C + 30 0 C with a maximum humidity of 85%.
• Compressor for painting
and the paint sprayer will work productively if there is homogeneous and completely liquid paint. Therefore, before painting, the coloring material needs to be thoroughly stirred and filtered.
• Compressor
assembled and turned on, checking its performance at idle.
At this time, the joints of the hoses are checked for complete air tightness. • The compressor
is installed in a position that allows for the least amount of movement from place to place, both indoors and outdoors.
• To determine the optimal distance and desired angle of inclination, it is necessary to do a test painting of any surface. Typically, the maximum distance from the air gun with paint to the area to be painted is 30 cm.
Stage 2. Painting
• When the compressor is for painting
works, you need to monitor the indicators on its pressure gauges. In addition, the paint sprayer is equipped with a reducer for regulating the air pressure at the outlet, which is also monitored. It depends on how viscous the consistency of the coloring material is.
• Compressor
must be adjusted so that when the compressor unit is first started, air comes out of the pneumatic spray gun first and only then paint. It is imperative to adjust the volume of air supply and paint mass directly on the spray gun. To adjust, turn the screws on the spray gun itself. When a large amount of paint and a small volume of air enters its head during the painting process, the surface is covered with a thick layer of paint, which is fraught with the formation of drips. If air is supplied in excess, then excessive spraying of the paint mass occurs with the formation of fog and, as a consequence, its unjustified excessive consumption.
• Compressor for painting
designed to obtain a uniform painted layer on the surface, which eliminates circular and oscillatory actions with a pneumatic gun. It moves strictly horizontally or vertically. To ensure uniformity of the paint layer, the paint is applied with a slight overlap of one color stripe by another.
• Compressor
it is necessary to install it so that the pneumatic sprayer is held in a strictly vertical position, with its maximum approach to the painting area being 15 cm, and its distance being 30 cm. If it is displaced from the vertical line, the painting will be uneven.
• During operations with a paint sprayer, you should constantly monitor the level of the spray material to ensure its timely replenishment. The compressor
should not supply air to an empty spray gun, otherwise paint may be released.
Step 3: Cleaning the spray gun after finishing painting
• A 1/3 empty paint can must be filled with solvent and the inside must be completely cleaned, using a hair brush 0.3-0.4 cm wide. Then, by pressing the trigger of the gun, the solvent is passed through the nozzle. Take a clean rag to wipe the internal surfaces of the container, after which it is refilled with solvent (about 1/4) for the same passage through the nozzle.
• Compressor
and the spray gun are disconnected from each other. The removed head and nozzle are placed in a small vessel with solvent. The shut-off needle is removed for thorough rinsing and wiping. The connection between the nozzle and the gun is washed with a brush and solvent. The spray head along with the nozzle is thoroughly washed with solvent using a hair brush. After washing, all parts are wiped dry with a clean, lint-free cloth, then the pneumatic sprayer is assembled. You need to pour about 50 g of solvent into a paint can and pass it through the nozzle.
• Fill the bottle again with 50-70 g of solvent, close the lid and put away until you need to use the compressor again for painting.
. The spray gun should be left with solvent, which ensures its working condition for the next painting.
Source
Adjusting the required pressure in the spray gun when painting
Selecting the optimal air pressure is a more complex setup step. The fact is that this parameter is individual for each case. The choice depends on the specific model of the tool, the type of paintwork material used, and the viscosity index.
Important! Therefore, several short test injections are made on a sheet of whatman paper with a gradual addition of air pressure.
The first print, obtained from a short (second) injection, is carefully examined for the location and size of the droplets, shape, protrusions and depressions, spattering in the upper and lower parts of the pattern.
- flowing drops, large dense spots of paint on the sheet are the result of insufficient pressure;
- the figure eight formed on the sheet is an indicator of excess pressure;
- an imprint resembling a banana, a thick crescent, or a pear is a sign of a malfunction or contamination of the air cap, nozzle or nozzle.
During the testing process, you need to achieve a beautiful stretched shape of the torch without compactions, drips or inclusions. Test sprays of paint onto a sheet are best done from a distance of 25-30 cm. When finishing painting, the device is kept at the distance from the surface recommended by the paint manufacturer in the instructions. To check the quality of spraying, the spray gun or its head must be held horizontally.
The air regulator in different spray gun models can be removable or built into the handle. If the operator is working with a removable device, the regulator should be opened completely at the junction of the receiver and the hose.
When working with the built-in type, you need to change the pressure while pressing the trigger. Otherwise, when the trigger is pressed, a sharp drop in pressure will occur. Due to lack of air, the spray gun will break the paintwork unevenly.
Spray gun system
Depending on the amount of compressed air pressure at the inlet to the spray gun and at the air cap (outlet), all paint guns can be divided into three main groups:
- conventional (high blood pressure);
- HVLP (High Volume Low Pressure - large volume of air and low pressure);
- LVLP (Low Volume Low Pressure - low air volume and low pressure).
Different types of paint guns look almost the same in appearance.
The “highlight” is hidden inside the design. Today, the last two types of sprayers are the most progressive, economical and meet environmental standards. As the name suggests, they are characterized by low operating pressure: if conventional conventional guns spray the material at high pressure (approximately 3-4 bar), then guns of the HVLP and LVLP systems spray at low pressure (approximately 0.7-1.2 bar).
What does this give? The main advantage is the high paint transfer coefficient. At low pressure, less paint turns into useless mist around the part (the so-called overspray, “overspray”), and more is transferred to the surface being painted. For low-pressure spray guns, the transfer coefficient reaches 65-70% (compared to 30-45% for conventional sprayers). Considering that metallic and pearlescent paints are not cheap, you can calculate how much money such a spray gun will save you.
The most accurate way to measure outlet pressure is to use a special air test cap with two pressure gauges.
To set and control the pressure of the HVLP gun, SATA produces a test head with two pressure gauges
Unfortunately, such attachments do not come with the gun, so this value is controlled indirectly, by the pressure parameter at the inlet to the spray gun. We will begin adjusting the spray gun by adjusting this parameter.
How to set up a gun for feeding paint and varnish?
After setting the torch size and selecting the optimal pressure, the paint supply is regulated. To do this, the adjusting screw is tightened until it stops, and then released two turns.
Expert opinion
Ilya Vyacheslavovich
Consultant for body repair at krasymavto.ru
Ask a Question
It is not recommended to try a larger feed at once when making adjustments. An inexperienced craftsman can spoil the surface even in the first sprays and waste material in vain.
In addition, the spray booth will be heavily contaminated. Too much paint will be sprayed in one second, and minor delays and too close to the surface will lead to unsightly drips. In this regard, a small feed is more profitable: it is more effective to increase the feed in the process than to decrease it.
The operating principle of the feed adjustment mechanism is that the adjustment screw acts as a limiter for the movement of the stainless steel needle. Due to this design, it cannot completely open the paint outlet. Thus, the operator has the opportunity to improvise and adapt by opening the propeller fully and manually operating the trigger force.
Supply of finishing material
The application of various finishing materials, including paints and varnishes, is carried out at their maximum supply. This indicates that the material feed control is opening fully. The screw turns 3-4 turns. The nozzle will open when the trigger is depressed.
Nozzle diameter
Before adjusting the spray gun, the nozzle diameter is selected. The consistency of the finishing mass is taken into account. To work with different materials, different nozzle diameters are required.
| Finishing compounds | Nozzle size |
| Enamel materials | from 1.3 to 1.4 mm; light colors – 1.3 mm |
| Enamel acrylic, colorless varnish | from 1.4 to 1.5 mm |
| Primary soils in liquid state | from 1.3 to 1.5 mm |
| Fillers-soils | from 1.7 to 1.8 mm |
| Liquid putty compounds | from 2.0 to 3.0 mm |
| Coatings with anti-gravel properties | 6.0 mm for anti-gravity spray nozzle. materials |
Tips for using and caring for your paint sprayer
- To avoid problems during operation and setup, the instrument must be washed after each painting.
- The tank vent must be cleaned immediately after finishing work. A small amount of contamination is enough to cause the paint supply to become intermittent and uneven.
- The spray gun should be stored in a dry place. Before storing for long-term storage, you need to disassemble the device, wash and clean all individual parts.
- The gun must not be cleaned with metal utensils. This may damage the air head or nozzle.
- The gun should not be completely immersed in solvent.
Regulators and their purpose
To successfully calibrate any device, you should know which elements of its design are responsible for changing performance indicators. The effectiveness of setting up the tool configuration directly depends on a clear understanding of the purpose and operating principle of these elements. Fortunately, adjusting the spray gun is not very difficult and boils down to rotating 2-3 valves (depending on the model), which we will discuss later.
Torch size regulator
A screw element that changes the position of a rod with a cone-shaped tip, reminiscent of a thick awl. Regulates the air pressure going to the head of the instrument by moving the rod closer or further from the through hole. The further the tip is located from the nozzle, the stronger the air pressure enters the head, creating a larger torch. The approach of the rod, on the contrary, limits the flow, reducing its influence on the formation of the torch. The maximum size of the torch is an elongated oval, and the minimum size turns it into a point.
Material supply
The flow of paint from the tank to the nozzle is blocked by a special needle, whose cone-shaped tip fits tightly to the inner walls of the nozzle. When the trigger is fully pressed, the needle moves back slightly, allowing the material to fall on the head of the spray gun and break into millions of tiny droplets under the pressure of the air flow. The feed screw adjusts the distance the needle will retract. Minimum paint supply means that the gap between the cone and the walls of the nozzle is very small and is not capable of passing a large amount of mixture. The maximum adjustment value, on the contrary, indicates that the needle moves a long distance, completely opening the exit to the air head.
Air supply
Fundamental setting of the optimal value of the input pressure required for the correct operation of the tool. Despite its importance, not all models are equipped with a built-in screw, forcing owners to resort to using third-party gearboxes (pressure gauges with regulators). Fortunately, more and more modern spray guns have the ability to change the air supply, without the need to connect third-party devices. Unlike the settings of the torch or material supply, which can be adjusted based on your needs, the volume of supplied air must have a single value specified by the manufacturer in the technical documentation. Reducing or exceeding the optimal threshold will distort the shape of the torch, making it unsuitable for professional work.
What to do if problems are encountered during setup
- You notice damage to the center hole of the air cap. You can replace the entire assembly (paint head), clean its central hole or head nozzle, replace the needle and head.
- You have found defects in the side hole of the air cap. Try cleaning them carefully.
- You saw that the needle guide nut was overtightened. Try cleaning the air valve stem, moving the flame location, loosening the nut, cleaning the needle and paint head, replacing the air valve needle and stem, and cleaning the stem.
- The tight movement of the lever interferes with your work. Clean the air valve stem. If this does not help, loosen the nut, replace the valve stem, clean the needle, or replace the paint head.
- When adjusting, the torch is shifted to the side relative to the axis of the gun. In this case, there is a suspicion that the air cap or side holes are clogged. You can replace the air head or clean its side holes.
- When setting up, you notice that air is entering the paint tank. This means that the paint head is not tightened or is damaged. You need to replace the needle and paint head, or tighten the head.
- Have you noticed that when the lever is released, air is released. This is evidence of a clogged valve. You can replace it or clean it and also clean the guides.
- The torch produces an asymmetrical spot on the print. This means the paint head is clogged, the nozzle or the air cap center hole is damaged. You can replace the air head, clean its center hole, replace the needle and head, or clean the nozzle.
- There is no paint supply during setup. If the gun refuses to paint, there may be a lack of pressure or reduced pressure. This may mean that the nozzle is clogged, the needle is damaged, or the flow is blocked. Try adjusting your pressure readings. If this does not help, clean the needle or nozzle and adjust the paint flow. If these measures do not work, replace the needle and head.
- You notice that paint is leaking from the head nozzle. This defect indicates that the nozzle cone is clogged or the guide bushing nut is overtightened. Loosen the tightening, clean the nozzle, or replace the needle and head.
- The torch operates intermittently. This indicates a damaged nozzle cone, loose paint head, worn gasket or damage. You can: tighten the head or replace it, and replace the needle or gasket.
Useful! And finally, one more piece of advice for beginners. When buying a spray gun, you should not save! Even if you have a good understanding of how to properly set up the spray gun, this does not guarantee you full, uninterrupted operation. Much depends on the model of the device and the manufacturer of the equipment.
By buying a cheap tool from a dubious manufacturer, you risk creating unforeseen difficulties for yourself. Today on the market there are Chinese spray guns at incredibly low prices, which beginners should not buy at all. When tested in the store, the device works perfectly, sprays paint well and looks like a very good purchase. But in terms of setup, it is not suitable for beginners.
If an experienced master can cope with it, then this will also require a subtle sense and lengthy trials. And not every paint is suitable for working with such a capricious instrument. Often, the spraying of the mixture is affected not only by the correct adjustment of the spray gun, but also by the degree of grinding of the coloring pigment.
If you use, for example, a convection-type device, you will be able to notice, in case of excess supply, a non-standard torch imprint, a concentration of compaction in the central area of the imprint.
And if the tool you buy is based on Trans-Tech spray technology, then the ink compactions will be concentrated at the edges of the print. Before you buy a spray gun, carefully study the market offers, reviews about the equipment, and consult with the craftsmen you trust.
Compressor types
Perhaps the most accurate classification of compressors is based on the method of pumping air into the receiver. Based on the method of operation of the pumping device, one can draw conclusions about the effectiveness of the device as a whole, and draw a conclusion about the advisability of its use in certain works. To understand how to choose a compressor for a spray gun, you should define your field of activity as accurately as possible and set your requirements for the quality of the applied layer. Do you need a perfectly even layer, like when painting a car, or just a uniform spray with minor imperfections, but at a better price? Understanding the principle of operation and the types of devices offered, it is much easier to make the optimal choice of a device that suits your requirements.
Piston
One of the first types of compressors widely used in production and everyday life. Air is pumped into the receiver due to reciprocating movements performed by the piston in the working cylinder, of which there may be several. Devices of this type have the lowest performance and high noise levels, but can operate in very dusty rooms and pump up the highest pressure (up to 40 atm).
Today, it is considered advisable to use a piston compressor for a spray gun in everyday life to obtain a layer of relatively low quality. This device is compact in size and low cost. Definitely not suitable for processing large areas due to low productivity.
Oily
A more advanced version of the piston compressor with reduced noise levels and high reliability. As the name implies, it requires a sufficient amount of oil in the system to operate, which requires periodic (not frequent) replacement. Such devices have a more advanced design and are equipped with filters for air degreasing and thermostats for determining the oil temperature. When such a device operates, condensation accumulates in the receiver, which can be drained manually, through a special hole, or automatically, using a special device.
The drive of oil compressors can be direct or belt driven. In everyday life or small business, the second type is the most popular, as it has low energy consumption and similar technical characteristics. The drive belt is subject to wear and requires periodic replacement, but at the same time it puts less load on the motor, extending its service life.
If you choose a suitable oil compressor, the spray gun will be able to produce decent, professional-level results. Since such equipment is most resistant to wear, it can be used for long-term work on painting large areas, without damaging the mechanism.
Screw
Industrial compressor units of high reliability and performance. Air is pumped into the receiver by rotating 2 spiral-shaped rotors, tightly adjacent to each other. The high efficiency of equipment of this type makes it extremely popular in industrial applications. The high cost of screw compressors, the minimum cost of which starts from 100 thousand rubles, makes their purchase impractical for small businesses, not to mention home projects.