Replacing the generator on a VAZ 2107-2101
- 831 13 700k
- 258 1 252k
Current to power conversion calculator
Convert how many amperes a kW has online.
Calculator for converting ampere current to watt power Replacing a generator on a VAZ 2107 is quite easy; even a beginner can handle this procedure. It is worth noting that this part can be partially repaired, and also that the design of the generator and its mounting are identical in all models of Russian “classics” starting from the VAZ 2101 and ending with the VAZ 2107.
Tools you will need for this procedure:
- Ratchet wrench and head for it 17, 10 (+ extension);
- Wrench 19;
- Hammer;
Disconnect the battery terminal. After this, unscrew the nut securing the power wire of the VAZ generator with a 10mm head.
We also disconnect the second wire; it is not secured by anything, since it is made in the form of a regular plug; you just need to pull it to the side.
Removing and replacing the generator on VAZ 2101, 2102, 2103, 2104, 2105, 2106, 2107
Hello, in this article you will learn how to replace the generator on a VAZ 2101, 2102, 2103, 2104, 2105, 2106, 2107. The generator is needed to generate charging for the battery and provide voltage to all electrically dependent parts of the car. The generator does not have a specific service life; it can last 100,000 km, but it can fail even after 10,000 km. The first sign of a generator failure is a constantly draining battery (in rare cases, the cause may be in the battery itself). To check the operation of the generator, you need to use a tester to check the voltage at the battery terminals with the car running. The voltage values should be between 13.8 and 14.5 volts; if it is lower, then the generator definitely needs to be repaired or replaced with a new one. Most often, the generator can be repaired; usually the diode bridge or voltage regulator fails; replacing these parts will cost much less than buying a new generator, since its average cost in the automotive market is about 5,500 rubles. To remove the generator you will need: keys or sockets for 10, 13, 17 and 19. First of all, we remove the terminal from the battery. After this, unscrew the nut that secures the generator to the adjusting bar (depending on the type of generator, you will need a 13 or 17 socket here)
Next, move the generator so as to loosen the tension on the generator belt and remove the generator belt. Then remove the terminal from the generator
The next step is to unscrew the nut securing the positive wire using a 10mm wrench and remove the terminal
Now use a 19 mm socket to unscrew the generator mounting bolt and remove it by removing the bolt from the bracket
Installation of the generator is carried out in reverse order.
VAZ 2107 gearbox repair | Topic author: Sharlet
Removing the rear axle gearbox If you need to remove the rear axle gearbox yourself at home, but don’t understand how to do it, then this is for you.
The gearbox is removed from the axle to be replaced with a new one, otherwise during repairs, usually it is removed when it begins to scream or hum, but it may not be due to a breakdown of the gearbox gear, cone, replacement of the satellite gears, or bearings. In fact, the design of the rear axle is identical for all cars, so the removal principle is not the same, but there may be small aspects. How to remove the generator
VAZ 2107. How to replace the rear shock absorbers in a VAZ 2107 2105 2106. When removing the generator, you can do without an inspection hole How.
I’ll show you an example of removing the rear axle gearbox on a VAZ-2103, although our client still has VAZs from 2101 to 2107
that have the same axle, you will like the difference more exclusively in the gearbox, as annoying as it may sound, there is an option to install any VAZ gearbox on any Zhiguli, one the gearbox is designed for traction, and the other for speed. Enough with the introduction, let’s move on to removing the gearbox from the bridge, I will remove the gearbox without a pit. First, put stones or bricks under the front wheels so that the car does not accidentally roll. We jack up the rear wheels to such a height that it is comfortable to crawl up to the rear axle, it is better to secure the jack with a block of wood, or it is also called a stack of bricks. insurance.
If you set a goal to remove
the gearbox from the axle must first be removed from the wheels, not the axle shafts. As annoying as it may sound, while removing the axle shaft you need to get to it, not when the wheel has been removed, remove the brake drum, unscrew the guide pins from the drum, do not remove the drum. how to remove a generator from a classic VAZ car. How to remove a VAZ 2101-2107 generator. How to remove the front bumper on a VAZ 2114, 2113, 2115? But it is very difficult to remove the brake drum; often it sits very tightly on the axle shaft; it’s not for nothing that you can’t tear it off; some people start hitting the edge of the brake drum with a hammer, breaking the edges. There are special threads on the drum (as annoying as it may sound, they are often torn off, in other words, they are torn off during removal) on which the bolts are screwed in and they squeeze the brake drum out of the axle shaft. If the thread is not, as it is also called, torn, there is a method to remove the drum from the axle shaft. Because the rear wheels are removed, unscrew the guide bolts from the drum and leave on the other one, just in case, tighten one wheel bolt for greater rigidity. Start the car, engage first gear, not with a little gas, press the brake, the drum that is without guide bolts will break off. HOW TO REMOVE THE BUMPER. VAZ 2114 How to remove the box of a VAZ 2101 without a pit Then unscrew the twisted drum, do not twist the torn one, do not tear off the 2nd drum using this method.
The brake drums have been removed, we remove the brake pads, they are easy to remove, only hard springs, don’t remove the springs, there is an option to remove the upper spring with pliers, and the lower one, place a screwdriver on top of the hook of the spring, do not knock it down. How to remove a VAZ 2107 generator with your own hands. Just remember right away how the spacer was positioned under the upper spring, so as not to pore over it later.
The brake pads have been removed, we begin to remove the axle shaft, the arrow in the photo shows which nuts need to be unscrewed, unscrew them, there are 4 of them in a circle.
Generator 2107-3701010
For lovers of various additional equipment, an even stronger “gene” is required. They can recommend installing a device from a VAZ 2107i. This unit produces 80 amps, which is sufficient to operate any electrical systems added by the owner. When purchasing such a generator, keep in mind that there are several varieties. For installation on a VAZ 2106, only model 2107-3701010 is suitable; any generators of this series can be installed on carburetor “sevens”.
It is advisable to modify the device for installation on the “six”. To do this, the relay regulator is replaced with a similar one from G222. The connection is completely similar to working with a figure-of-eight generator.
Conclusion. Initially, rather weak generators were installed on the “sixes” and “sevens”. But, in the process of technology development, their power was no longer enough to provide adequate power to the car. So the question arose, which generator is better to install on the VAZ 2106 and 2107. Fortunately, there is plenty to choose from. The next generations of devices are perfect for old Zhiguli cars after a little modification.
VAZ 2107 is one of the legends of the domestic automobile industry. The car was created as a luxury version of the VAZ 2105 model. At the same time, the differences affected not only the interior, but also other key components. In total, there are about 15 modifications that differ from the basic version. Unfortunately, the company's management decided to close production in 2012.
Over the course of 30 years, a huge number of cars of the described model were created. One of the most popular is the VAZ 21074, which received an engine from the VAZ 2106 model.
During their service, many cars have undergone repairs of varying complexity more than once. Let's look at the generator and its associated faults.
Constantly lit indicator (even when the ignition is turned off)
To eliminate the problem, you will need to replace the diode bridge with a new one. The reason for this was a short circuit on it. You can try to repair it, but this requires knowledge. Replacement cost is low.
Technical specifications
If the old generator fails, many motorists wonder which generator they should now replace the old one with.
There is no need to invent anything here. The most correct solution is to install the same generator as before, or a more powerful one.
Today, the VAZ 2110 provides for the use of three types of power supply devices:
- Katek 5102.3771. The generator produces 80 Ampere power and its voltage is approximately 14V.
- Katek 94.3701. This is a device with the same parameters. They are not seriously different.
- Catek 120 amp. A generator that is more adapted to modern realities, when in addition to standard electrical equipment, motorists install many additional devices.
If you have a powerful audio system in your car, you use an electric pump powered by the car, as well as a number of other additional consumers, it is recommended to install a 120-amp unit instead of a standard 80-amp generator.
If we take into account the size of the devices, then we can distinguish between ordinary and compact ones. They have a certain difference in design
To be specific, the differences are in the following components:
- Brackets;
- Anchor;
- Excitation wire;
- Drive pulley;
- Number of mounting bolts.
But in reality this does not play a special role. After all, the structure of all generators used for the VAZ 2110 is the same. Therefore, let's look at the circuit and structure of this unit.
| Element | Functions |
| He's an anchor. It is a rotating element of the generator, which creates a magnetic field due to the excitation winding located on the shaft. The field wire receives power from the slip rings. They are mounted on the same shaft. There was also room for a drive pulley, field winding wire, bearing assembly and fan impeller. There may be 1-2 last ones | |
| This is a stationary three-phase element that includes three windings. They provide the creation of alternating current. The windings are connected to each other using a triangle or star | |
| A lightweight non-magnetic aluminum alloy is most often used to make the generator housing. The body looks like a pair of covers connected by a bolt. The front cover is located near the drive pulley, and the rear cover is located on the side of the slip rings. Each connecting bolt must be tightened. To disassemble the housing, simply unscrew the mounting bolts. | |
| The upper mounting bracket for the generator uses two bolts, while the lower bracket is predominantly mounted on one bolt. In some cases there are two. It is not recommended to modify the brackets, since the factory one performs important functions. The purpose of the brackets is to hold the generator. It is recommended to monitor the condition of the brackets as they are subject to wear and breakage | |
| Brush unit | It consists of a pair of graphite brushes, springs that press the brushes, as well as a brush holder |
| Brush holder assembly and voltage wires | This design is typical for modern Katek generators. Therefore, if the regulator fails, you will have to replace the entire assembly |
| Rectifier block | Equipped with 6 diodes, it is responsible for converting alternating current into direct current. It is direct current that is required for the operation of all auto equipment. This element charges the battery, among other functions. |
| Belt drive transmission | The belt drive allows you to increase the speed at which the crankshaft rotates. If the pulley has a small diameter, then the V-belt will wear out faster. Therefore, for small driven pulleys it is recommended to use a poly-V-ribbed drive. It is most often found in modern generators |
The presented device is relevant for all generators used on the VAZ 2110, regardless of their power - 80-120 Amperes.
Margin of safety
If we take into account the standard Katek generator, which is installed on domestic dozens, then its resource is enough for about 10 years of operation or 140 thousand kilometers. The specified safety margin of the device can only be relied upon if it is handled properly
The specified safety margin of the device can only be relied upon if it is handled properly.
Many people fear that a powerful 120 A generator can negatively affect the condition of the battery. In practice, nothing like this happens. Moreover, installing a more powerful unit is recommended if you plan to install an impressive audio system or video equipment on the car.
VAZ 2105 | Generator repair
Generator parts 37.3701
| 1 – voltage regulator assembled with brush holder for generators manufactured since 1996; 2 – voltage regulator and brush holder for generators produced before 1996; 3 – terminal block for additional diodes; 4 – insulating bushings; 5 – rectifier block; 6 – contact bolt; 7 - stator; 8 - rotor; 9 – spacer sleeve; | 10 – inner bearing mounting washer; 11 – drive side cover; 12 – pulley; 13 – outer bearing mounting washer; 14 – coupling bolt; 15 – front rotor ball bearing; 16 – bushing; 17 – cover from the side of the slip rings; 18 – buffer sleeve; 19 – clamping sleeve; 20 – capacitor |
Details of the front part of the G-222 generator
How to replace a generator on a VAZ 2107
Replacing a generator in a VAZ 2107 is a fairly rare occurrence. This unit usually works without failures and does not need repairs. However, in fairness, it is worth noting that it also has malfunctions, the elimination of which requires immediate repair, or even its complete replacement. The most common generator problems are listed below:
- Failure of the diode bridge (rectifier unit);
- Failure of the stator winding (break, short circuit);
- Failure of the excitation winding (break or short circuit);
- Worn or stuck brushes;
- Worn or jammed bearings;
- Failure of the voltage regulator.
These faults in the VAZ 2107 are quite easily diagnosed, which cannot be said about their elimination. For example, bearing wear is accompanied by noise or knocking noise during operation. In order to make sure that the cause of its appearance is damage to the generator bearings, you should loosen and remove the drive belt and shake/turn the pulley. If there is play or difficult rotation, the bearings must be replaced immediately.
Unlike the mechanical problem described above, electrical problems are more problematic from a diagnostic point of view. The fact that the VAZ 2107 generator is not working is indicated by the battery charge lamp. But the cause of such a malfunction will be more difficult to establish. If you do not have sufficient experience in handling auto electronics and special measuring instruments, then it is better to entrust this matter to specialists.
If you feel that you are able to solve the problem yourself, then proceed with the initial diagnosis of the malfunction. To do this, at a minimum, you need to have a multimeter on hand that can measure the voltage at the generator output and test the rotor and stator windings.
It should be noted that with an interturn short circuit in the stator winding, you can do without a measuring device. With such a malfunction, the generator emits a characteristic howl. In other cases, you will still have to remove the generator, disassemble it and try to determine the cause of the malfunction from the inside.
Typically, any of the above malfunctions can be eliminated by replacing the failed element: rotor, stator, bearing, brushes. However, if repairs take time, and the car is needed urgently, a known working generator is installed in place of the faulty one. Typically, for classic cars, which includes the VAZ 2107, separate replacement units are available both from car enthusiasts and in workshops. After repairing the original generator, a reverse replacement is performed.
Removing the generator from a VAZ 2107 is quite simple. To do this, you will need two wrenches, 17 and 19, and penetrating lubricant like WD-40 in case you can’t just unscrew the nuts. First, use a 17mm wrench to unscrew the nut intended for tensioning the drive belt, and then use a 19mm wrench to unscrew the nut securing the generator to the engine housing.
Reinstall the generator in reverse order, while monitoring the tension of the drive belt. When pressing on it between the pulleys, the degree of deflection should be 10-17 mm. If you lose sight of this important point, you may end up with new troubles in the future, such as belt damage, premature wear of bearings, or loss of charging due to belt slippage.
DISASSEMBLY AND CHECKING VOLTAGE REGULATORS FOR VAZ 2107
First, let's decide on the tools and devices that will be needed for the job. Here they are:
- household multimeter;
- open-end wrench 10;
- flat screwdriver;
- Phillips screwdriver.
SEQUENCE OF OPERATION
If the driver suspects that the voltage regulator is broken, then the first thing he should do is check the voltage supplied by the battery.
- The car engine turns off and the hood opens. Using a multimeter, the voltage between the battery terminals is measured. If it drops below 13 volts (or, conversely, rises above 14 volts), then this indicates a breakdown of the regulator.
- Having made sure that the battery is not charging well precisely because of a faulty regulator, it must be disconnected from the car's network, but first the ground wire must be removed from the battery. If this wire is not disconnected, then there is a high probability of a short circuit, which will lead not only to the burnout of many fuses in the closed section, but also to melting of the electrical wiring itself.
- If an old external regulator is installed on a VAZ 2107, then all terminals are manually removed from it, after which the nuts that hold the regulator to the car body are unscrewed with a 10-mm open-end wrench.
- If the VAZ 2107 is equipped with an internal three-level regulator, then to remove it you will need to unscrew a pair of mounting bolts holding this device in the generator housing with a Phillips screwdriver.
- After removing the regulator, the negative pole of the battery is connected to the relay ground (if the regulator is external), or to contact “Ш” (if the regulator is internal);
- The positive pole of the battery is connected to contact “K” (this contact is available on all types of regulators);
- The multimeter is connected either to the generator brushes or to the relay outputs.
- After turning on the multimeter and applying a voltage of 12–15 volts, it should also appear on the generator brushes (or on the relay outputs, if the regulator is external). If the voltage generated on the brushes or outputs remains constant, then this is a clear sign of a breakdown of the regulator. If no voltage is detected at the brushes or outputs at all, there is a break in the regulator.
- Both in the event of a breakdown and in the event of a break, the regulator will have to be changed, since this device cannot be repaired.
- The failed regulator is replaced with a new one, after which the vehicle's electrical system is reassembled.
VIDEO: CHECKING THE VOLTAGE REGULATOR ON A VAZ 2107
Like any other device, the voltage regulator can break down suddenly. And it’s especially difficult for the driver if the breakdown occurs far from home. There is nothing surprising here: drivers who constantly carry spare regulators with them need to look further. But even in such a difficult situation, there is still a way to get home (or to the nearest service center). But you won’t be able to get there quickly, because every hour you’ll have to crawl under the hood and remove the terminals from the voltage regulator. And then, using a suitable piece of insulated wire, connect the positive terminal of the battery and contact “Ш” on the regulator. This is done so that the charging current does not exceed 25 amperes. After this, the regulator terminals return to their place, and the car starts. You can drive it for about 30 minutes, and you should turn on the maximum number of energy consumers - from the headlights to the radio. And after 30 minutes you should stop again and do the entire above procedure again, since without this the battery will simply recharge and boil.
So, even a novice car enthusiast can check the voltage regulator on a VAZ 2107. All that is required is the ability to use a multimeter and a screwdriver. Following the recommendations listed above will allow the car owner to save about 500 rubles. This is how much it costs at a car service center to check and replace the voltage regulator.
Generator 2108
This device is often installed on both 2106 and 2107. This is due to its greater efficiency; it produces a charging current of 55 A, which is quite enough for most motorists. But, if your car has significantly more equipment, then it is better to choose something more powerful.
These generators are identical in terms of mounting, so there will be no problems with the installation itself. Of course, if you remember to remove the terminal from the battery. The fun starts when you connect. The whole point is that 4 wires are attached to the original device. There are only 3 for the “eight” one. This is due to the built-in voltage relay.
In principle, you can already drive like this, but if you want to do everything as expected, you will have to make some more modifications. We remove the old relay and replace it with a regular power relay. Now the light will light only when the engine starts, and also at low speeds, which is quite acceptable.
When installing on a VAZ 2107, you only need to add a power relay.
How to change the diode bridge of a VAZ 2107
In order to change the diode bridge (horseshoe), you need to unscrew the three screws holding the stator windings.
Before deciding to replace the diode bridge, it is better to test the diodes using a multimeter. If one of the diodes is broken (resistance is close to zero), it is better to replace the entire horseshoe with a new one. Self-repair of a diode bridge is possible if you have the appropriate diodes, but it is not ineffective, since the price is low.
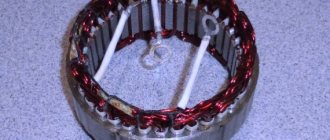
If the stator windings are blackened, this means that during operation they overheated greatly and the stator needs to be replaced.
After the repair is completed, assembly and installation in the car is done in the reverse order. Having installed the generator belt, it is tensioned and secured with a nut. When tensioning the belt, use a tensioner, inserting it between the generator and the engine block. The same is done when replacing the VAZ 2107 alternator belt.
Next, connect the terminals of the wires to the battery in the sequence: positive, then negative.
Upon completion of installation work, a test run of the engine is performed and the battery charge parameters are measured. If the parameters match, the repair is considered completed. A complete replacement of the VAZ 2107 generator is carried out only if it is significantly damaged or, if desired, in the absence of spare parts. The price of a new generator ranges from 3,000 to 5,000 rubles.
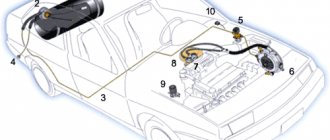
The generator of each car is designed to supply all consumers with electric current and to charge the battery. The VAZ 2107 generator is an alternating current device with a unique electromagnetic excitation. It is installed to the right of the engine and is driven by a V-belt from the crankshaft. The key elements of this assembly are the rotor, stator and covers, cast from aluminum alloy.
In the history of the VAZ 2107, there are cases when models were equipped with generators 9412.3701, which have some design differences.
Before dismantling the “seven” generator, you need to realize that this work is considered difficult. In some cases, dismantling causes some problems, so first you need to think about how and what tools you will do everything with.
Fasteners and bolted connections usually stick tightly to the fasteners, so it is usually not possible to carry out dismantling work without WD-40. To remove the generator, you need to work from under the right wheel arch, which is not very convenient, so it is better to dismantle it by driving the car onto a lift or inspection hole.
Communities › VAZ: Repair and Modification › Blog › Detailed check and repair of the VAZ generator
Diagnostics, testing and repair of the VAZ 2104 generator. I also eliminate additional problems with charging.
Today we are working on a VAZ 2104 with an injection engine. Problem: no battery charge. This is indicated by the corresponding light on the instrument panel + I checked with a multimeter.
In this post I’ll tell you and show you: how to remove the generator from a VAZ 2104; how to determine its malfunction - why the battery is not charging; How to repair a generator yourself.
I connect the multimeter to the battery and see that it is slightly discharged. Now the voltage on it is 12.5 V. I try to start the car - there is no charging, the light on the panel is on. I try to start it a second time and it doesn’t work. The starter solenoid relay operates, but the car does not start. The battery voltage is about 12 V.
I'm trying to start the car using a 16 A/h jump starter, which I bought on Aliexpress - goo.gl/63Js4B. The car started up and the battery was charging.
Dismantling the generator. We de-energize the car and remove the voltage from the generator by removing any of the terminals from the battery. To do this, I use a 10mm wrench. I decided to remove the battery because I need to get to the tension bolt.
Using a device that I made with my own hands, based on a computer power supply, I charge the removed battery. While I'm doing the repairs, the battery will charge a little.
How to remove the generator on a VAZ 2104? First, let's free it from the belt. To do this, unscrew the nut and bolt and remove the belt. You need to remove the positive power terminal from the generator itself. One wire of the generator is simply pulled out, the other is held in place with a 10mm nut. And finally, unscrew the lower mount of the generator. We do this from under the car.
Disassembling the generator. We immediately see that the generator cover has melted. Several diodes also burned out. Most likely there was a short circuit.
The diode bridge needs to be replaced. To replace the diode bridge you need to unscrew several bolts; remove the regulator relay (modification 9402.3702) and capacitor; Remove the starter winding contacts. I remove the relay and look at its integrity and performance. The brushes are already worn out, so if the relay is working, I will re-solder them.
The slip rings on the armature are intact. At the same time, I check the bearings; in my case, the outer one is in fairly good condition.
The big advantage of this generator is that it can be repaired without resorting to soldering. All parts are replaceable.
I call the stator winding. There are 3 phases, there should be the same resistance between them. I will also spin up the generator and look at the windings to make a visual assessment. To do this, unscrew the 4 bolts using a 8mm socket. Remove the back cover of the generator. The winding was not burned.
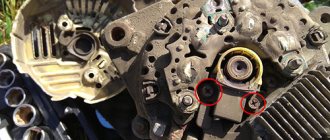
The contact rings to which the brushes are attached have no holes, but there is already a hook. The rear bearing is noisy, it is dry, it is advisable to change it.
I check with a multimeter that the winding is not pierced to the housing.
How to check the generator regulator relay? I connect a light bulb to the brush load. I supply “minus” and “plus” power to the relay. For this I use a power supply. Additionally, I connect a voltmeter to see what voltage I am applying to the voltage regulator. When high voltage is applied, with the relay working, the light should go out. At 14.5 volts, the light goes out, which means everything is working.
As a result, I need to change the diode bridge, the brushes on the relay regulator, replace the insulators on the stator winding and the rear bearing.
How to remove the rear generator bearing? To begin with, I wanted to use a puller, but it could damage the armature axis, so I used 2 wrenches. This way you can do without a special tool.
I am installing new spare parts on the generator. Since the store didn't have a new regulator relay, I will replace the brushes with a relay that has them in better condition.
To insulate the conductors that come out of the stator winding, I used heat shrink tubing.
Generator assembly. Before assembly, I clean the parts from oxides using sandpaper, a knife, and a screwdriver. I lubricate the seating surfaces of the lid with lithol. Make sure that there are dielectric washers made of textolite on the bolts under the terminals, and that the terminal does not touch the bolt. Otherwise there will be a short circuit. I ran the whole thing with a multimeter. I install the generator in the car, tighten the belt, and return the battery. I start the car and check if there is a charger. Another problem has emerged: voltage is lost on the ground wire that goes to the engine. Most likely the winding in it has rusted. I implemented a loop, using braided wire, from the intake manifold mount to the mass bolt. With this jumper I eliminated the losses.
It will be useful: Change the oil in the Toyota Rav 4 variator
This completes the diagnostics, testing and repair of the VAZ generator!
Auto electrician Sergei Zaitsev worked for you!
Source
Repair of VAZ 2107 generator
During the operation of VAZ 2107 vehicles, one of the common malfunctions is the lack of charging of the battery. Most often this is due to a malfunction of the relay regulator. In this case, it is possible to remove and repair the VAZ 2107 generator with your own hands, even without a pit or overpass.
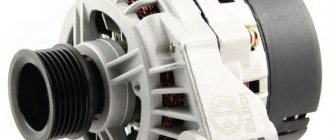
Generator VAZ 2107
The sequence of repairs to eliminate the malfunction:
- control of output parameters;
- diagnosing the generator without dismantling;
- dismantling;
- disassembly;
- monitoring the performance of nodes;
- repair, replacement of a faulty unit;
- assembly;
- installation on a car;
- connection to the electrical equipment of the machine;
- test start of the engine, monitoring of output parameters.
Do-it-yourself disassembly and assembly of the Lada 2107 generator, removal and installation of brushes on the VAZ 2104, VAZ 2105, VAZ 2107 generator. Diagnostics of electrical equipment of the Lada 2105. Instructions for repairing electrical equipment: ignition systems, starter of the Lada 2104. Operation of the generator, battery, purifier. Diagram of fret 2107.
Generator 37.3701. Clean and blow out the generator with compressed air. Lock the generator pulley with the clamp included in the set of tool 67.7823.9504, unscrew the pulley fastening nut and compress the pulley using a puller. Remove the key and conical washer from the pulley. The set of tool 67.7823.9504 includes a regular puller and grip. The latter consists of two steel half-rings that are inserted into the pulley groove. The half rings have the same cross-section as the generator drive belt. On one side they are hinged, and on the other they are equipped with levers that are compressed with one hand when removing the pulley.
Parts of the VAZ 2107 generator - 37.3701: 1 - voltage regulator assembled with brush holder for generators manufactured since 1996; 2 - voltage regulator and brush holder for generators manufactured before 1996; 3 — terminal block for additional diodes; 4 — insulating bushings; 5 - rectifier block; 6 — contact bolt; 7 - stator; 8 - rotor; 9 — spacer sleeve; 10—inner bearing mounting washer; 11 — cover from the drive side; 12 - pulley; 13 - outer bearing mounting washer; 14 - coupling bolt; 15 — front rotor ball bearing; 16 — bushing; 17 — cover from the side of the slip rings; 18 — buffer sleeve; 19 — clamping sleeve; 20 - capacitor
Disconnect the wire from plug “B” of the voltage regulator. Disconnect the wires of the regulator and capacitor from terminal “30” of the VAZ 2104, VAZ 2105, VAZ 2107 generator and unscrew the screws securing the voltage regulator. For generators made before 1996, in order not to break the brushes when removing the brush holder, insert the blade of a screwdriver between the body of the regulator 2 and the brush holder and partially pull the regulator out of the generator, leaving the brush holder of the VAZ 2105 generator in place. After this, tilt and remove the regulator together with the brush holder from generator Remove capacitor 20 by unscrewing the fastening screw. Unscrew the nuts of the coupling bolts 14 and remove the generator cover 11 and the rotor 8. Unscrew the nuts of the bolts connecting the tips of the diodes to the terminals of the stator winding and remove the stator 7 from the generator cover 17. Unscrew the nut of the contact bolt 6, disconnect the plug of the wire of additional diodes from block 3 and remove the rectifier block 5.
Details of the front part of the G-222 generator: 1 - casing; 2 - voltage regulator; 3 - base; 4 — brush holder with brushes; 5 — generator cover from the slip ring side; 6 — plug block of the central output of the stator winding; 7 — terminal “15” of the generator (terminal “B” of the voltage regulator)
The G-222 generator is disassembled in the same order. To remove the voltage regulator, you need to unscrew the fastening screws and remove casing 1 as an assembly with regulator 2, base 3 and brush holder 4. Then, unscrewing the screws, disconnect the regulator, base and brush holder with brushes. Further disassembly of the VAZ 2104 G-222 generator is similar to the disassembly of the 37.3701 generator.
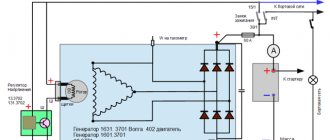
How to independently connect a generator to a VAZ 2107?
Every G7 car owner should know what the generator set connection diagram is.
Despite the fact that this unit is quite reliable and has a long service life, sooner or later it will still fail, the reasons may be as follows:
- burnt out windings inside the unit;
- interturn short circuit formed in the system;
- damage and other defects in the device body, etc.
If you do not plan to repair the generator or the repair work is not successful, then you will need to replace the device.
To do this you need to do the following:
- First you need to turn off the power to the vehicle's on-board network. To do this, turn off the ignition, then open the hood and disconnect the negative terminal from the battery.
- Then you will need to find the generator itself - as we reported above, it is located on the right side of the power unit. Wires and a power cable with a plug are supplied to the generator - it must be disconnected. It is advisable to remember the location of the wires.
- Next, it is necessary to dismantle the mudguard on the right, as well as the motor protection, if any.
- Now comes the hard part. Using a wrench, you will need to unscrew the nut of the screw that secures the unit to the power unit housing. If you have difficulty unscrewing the nut, treat it with WD-40, after which the screw itself will need to be removed from its seat. Try hitting it with a hammer from the other side, but not too hard, this will knock out the bolt. If you were unable to remove the screw, you will have to dismantle the unit with the bracket on which it is fixed.
- To dismantle the bracket you will need to unscrew two screws; some modifications of the VAZ 2107 use three-screw fastenings. In any case, when performing these actions you must be guided by the design features of the vehicle. Sometimes, to remove the unit, you also need to remove the radiator device or move it a little to the side to gain access to the bracket. In this case, there is no need to disconnect the pipes connected to the radiator.
- After the unit is removed from its installation location, you will need to remove the drive belt and remove the generator.
- This way the knot is removed. To dismantle it, you must perform all these steps, only in reverse order. Before installing the device, you must familiarize yourself with the installation wiring diagram and the electrical connection diagram; all this must be indicated in the service book for the car.
- When the knot is installed, it is necessary to adjust the strap tension. To perform these steps, you will need to loosen the two screws that secure the assembly. Using a pry bar, you need to tighten the strap and secure it in the appropriate position with a nut located on the adjusting plate. When adjusting, be sure to check the degree of belt tension; to do this, press the belt in the free space between the pulleys. The belt will bend, and the deflection should be at least 1 cm and no more than 1.7 cm, otherwise the generator will not work correctly, and the belt may wear out earlier. When the adjustment procedure is completed, you need to tighten all the nuts.
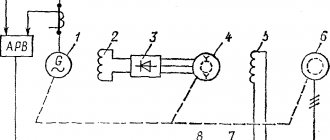
Checking the generator on the stand
Allows you to determine the serviceability of the generator and whether its characteristics correspond to the nominal ones. The brushes of the generator being tested must be well ground into the slip rings, and the rings themselves must be clean.
Install the generator on the stand and make connections as shown in Fig. 228. For generator 37.3701, a 12 V, 3 W lamp is switched on between terminals “30” and “61”. Turn on the electric motor of the stand, set the voltage at the generator output to 13 V using rheostat 4 and increase the rotor speed to 5000 rpm. Let the generator operate in this mode for at least 2 minutes, and then measure the output current. For a working generator it should be at least 45 A (55 A for generator 37.3701).
If the measured value of the supplied current is less, this indicates a malfunction in the stator or rotor windings, damage to the valves or wear of the slip rings and brushes. In this case, a thorough check of the windings and valves is necessary to determine the location of the fault.
The voltage at the generator output is checked at a rotor speed of 5000 rpm. Using a rheostat, set the output current to 15 A and measure the voltage at the generator output, which should be (14.1 ± 0.5) V at the ambient and generator temperature (25 ± 10) ° C.
If the voltage does not fall within the specified limits, replace the voltage regulator with a new one that is known to be good and repeat the test. If the voltage is normal, then the old voltage regulator is damaged. And if the voltage still does not fall within the above limits, then it is necessary to check the windings and valves of the generator.
Disassembling the VAZ 2105 Zhiguli generator
- Repair manuals
- Repair manual for VAZ 2105 (Zhiguli) 1980-1992.
- Disassembling the generator
Generator parts 37.3701
| 1 – voltage regulator assembled with brush holder for generators manufactured since 1996; 2 – voltage regulator and brush holder for generators produced before 1996; 3 – terminal block for additional diodes; 4 – insulating bushings; 5 – rectifier block; 6 – contact bolt; 7 - stator; 8 - rotor; 9 – spacer sleeve; | 10 – inner bearing mounting washer; 11 – drive side cover; 12 – pulley; 13 – outer bearing mounting washer; 14 – coupling bolt; 15 – front rotor ball bearing; 16 – bushing; 17 – cover from the side of the slip rings; 18 – buffer sleeve; 19 – clamping sleeve; 20 – capacitor |
Details of the front part of the G-222 generator
| 1 – casing; 2 – voltage regulator; 3 – base; 4 – brush holder with brushes; 5 – generator cover from the slip ring side; | 6 – plug block of the central output of the stator winding; 7 – terminal “15” of the generator (terminal “B” of the voltage regulator) |
The set of tool 67.7823.9504 includes a regular puller and grip.
The latter consists of two steel half-rings that are inserted into the pulley groove. The half rings have the same cross-section as the generator drive belt. On one side they are hinged, and on the other they are equipped with levers that are compressed with one hand when removing the pulley. GENERATOR 37.3701
| EXECUTION ORDER | ||
GENERATOR G-222
|
Do-it-yourself repair of the VAZ 2101 generator: disassembly, cleaning, replacement of parts
This article describes in detail the process of repairing a VAZ 2101 generator with your own hands - disassembling, cleaning, replacing non-working parts, assembly and installation. The generator repair will be carried out on model 37.3701 (it is almost identical to the model G222).
To rebuild a VAZ 2101 generator you will need the following spare parts:
- Andycar bearings;
- Generator capacitor;
- Diode bridge;
- Nuts for 8 (4 pcs);
- Relay regulator (if there is a need to replace it).
I decided not to change my relay regulator, because its condition suits me quite well.
Tools you will need:
- A universal puller for removing the bearing; as an option, you can use a rod puller, but I warn you, this is very inconvenient;
- Also find a good metal brush and a cloth-based sandpaper;
- Hammer;
- WD-40;
- Standard set of wrenches and screwdrivers.
This is what the VAZ 2101 generator looked like before repair, remember it like this, because after the overhaul it will change beyond recognition
Malfunctions
The main malfunctions of the VAZ 2107 generator include:
- brush wear;
- failure of the diode bridge (rectifier unit);
- failure of rotor bearings;
- short circuit in the excitation winding;
- break or short circuit in the stator winding.
Signs of a faulty generator are:
- no indicator light on the dashboard comes on;
- the voltmeter needle is in the red zone;
- sparking inside the generator;
- noise during operation (hum or howl);
- smoke and burning smell coming from the generator.
Do I need to change the generator?
It is quite difficult to determine the cause of generator failure without having a clue about electrical engineering, so in order to repair it, it is better to contact specialists. Most often, in VAZ 2107 cars, the generator fails due to brush wear, which occurs due to an expended resource or mechanical damage to the commutator. In addition, a short circuit or open circuit in the rectifier often occurs, which is “treated” by replacing the diode bridge.
The hum or howl of the generator indicates bearing failure, which can also be repaired. But if suddenly a short circuit occurs in one of the windings, you will have to either negotiate with home-grown specialists about winding a new winding, which is quite risky, or replace the generator with a new one. The last option would be most appropriate here, especially if it also comes with a guarantee.
A new generator, depending on the model and manufacturer, can cost from 2800 to 5000 rubles. Replacing it at a service station will cost about 500 rubles.
Generator breakdowns and how to fix them
"https://www.w3.org/TR/xhtml1/DTD/xhtml1-transitional.dtd">
Generator breakdowns and ways to fix them VAZ 2105 (VAZ 2104)
| Repair manual for VAZ 2105 repair and operation of VAZ-2104 and 2105 |
| + Operation + General information + Engine + Transmission + Chassis + Steering + Brake system - Electrical equipment Breakdowns and how to fix them Fuses (purpose) + Battery - Generator Breakdowns and how to fix them Technical specifications + Generator checks + Generator repair + Starter + System ignition + Lighting + Sound signals + Wipers Headlight wipers + Heater fan electric motor + Control instruments + Carburetor pneumatic valve control + Body + Electrical circuits |
| REMEDY METHOD | |
| The voltmeter needle is in the red zone at the beginning of the scale | |
| Alternator drive belt slipping | Adjust the belt tension |
| Open circuit in the power supply circuit of the excitation winding | Restore connections |
| *Open circuit in the voltage supply from terminal “30” to plug “15” of the generator | Restore connections, check fuse “10” |
| Damaged generator voltage regulator | Replace regulator |
| *Short circuit between the brush holder fastening screw and the brush bus connected to terminal “B” of the regulator | Repair short or replace plastic brush holder base |
| Worn or stuck generator brushes, oxidation of slip rings | Replace the brush holder with brushes, wipe the rings with a cloth soaked in gasoline |
| Open circuit or short circuit to ground in the generator excitation winding | Replace the rotor |
| Short circuit or open circuit in one or more diodes of the rectifier unit | Replace the generator rectifier unit |
| Open circuit or interturn short circuit in the stator winding | Replace stator |
| ** Open circuit or short circuit in additional diodes of the rectifier unit | Replace damaged diodes or rectifier unit |
| The control lamp does not light up. The voltmeter needle is in the red zone at the beginning of the scale** | |
| The control lamp has burned out | Replace the lamp |
| Open circuit between terminal “30” and plug “61” of the generator | Restore connections, check fuse “10” |
| There is no contact between terminals “B” and “W” of the voltage regulator and the brush terminals (for generators produced before 1996) | Clean the terminals “B” and “W” of the voltage regulator and the brush terminals, bend the regulator terminals |
| The wire is disconnected from terminal “B” of the brush holder | Connect the wire |
| The voltmeter needle is in the red zone at the end of the scale | |
| The voltage regulator is damaged (short circuit between terminal “Ш” and ground) | Replace voltage regulator |
| * Short circuit between the brush holder fastening screw and the brush bus connected to terminal “Ш” of the regulator | Repair short or replace plastic brush holder base |
| Increased generator noise | |
| Generator pulley nut loose | Tighten the nut |
| Generator bearings are damaged | Replace bearings |
| Turn-to-turn short circuit of the stator winding (generator whine) | Replace stator |
| Brushes creaking | Wipe the brushes and slip rings with a cotton cloth soaked in gasoline. |
*Faults only for generator G-222. **Faults only for generator 37. 3701. Other faults are common to both generators.