Installing new headlights is a panacea, but not always
Often, having suffered fairly with poor-quality light, car owners decide to simply change the headlights to new ones. But don't think that this step will solve all your problems. For example, the problem may be due to incorrect connection of the equipment. First of all, this situation affects the quality of light from the bulbs. The lamps do not receive the required voltage and produce poor light. The following situation is quite possible:
- you select new factory-type headlights, pay a lot of money for their purchase, joyfully realize the impending improvement of headlights and solutions to problems;
- after this, the purchase is installed, all electrical contacts are connected and joyful anticipation of completely changed lighting characteristics;
- but in reality the light may remain the same, and you have not checked all the features and guesses about the operation of your car without looking at the electrical aspects;
- This is followed by disappointment and understanding of the unnecessary costs of purchasing new headlights (even for a domestic car, such costs will be quite serious).
So don’t rush into making serious investments; it’s better to try to correct the situation on your own or replace the light bulbs with more efficient ones. Most likely, you can get more efficiency from your optical equipment without purchasing new headlight sources. However, such a step is not excluded in very advanced cases. We invite you to watch a video describing methods for improving headlights with your own hands for cars older than 10 years:
Why do headlights dim and how to quickly restore their power?
Good evening, Evgeniy! I don’t know why VKontakte somehow “wrongly” authorized me here, but I’ll introduce myself, for cultural communication , my name is Vladislav. I am very glad that the rather “sluggish” discussion of the topic has moved into an active phase, so to speak, the truth is always born in a dispute. First of all, let me object to you, I didn’t write anything about…”conceived…, although if correctly paraphrased, it should sound something like this: the car’s designer laid down certain parameters of the on-board network regarding voltage, power and current in the car’s circuits. The meaning of what I wrote, in brief, comes down to one definition: if something happens to the wiring in the car, you cannot leave it in a neglected state, because... all this can lead to disastrous consequences. Here, I think, you will have nothing against it. As for the circuit with a relay, as a buffer, this is even used in many cases when additional equipment is “hung” in the form of ramps and other things, here I can say for sure that this is the right decision, the rationale is also simple - standard wiring is not designed for a significant increase loads in standard circuits. Now let's return to our “rams”. What did I write wrong? I didn’t even write about the fact that there should be 12 volts at the connection point of the incandescent lamp. Considering that the on-board network uses direct current power, all calculations of powers, currents and resistances can be made at the 8th grade level of a secondary school. If we are talking about the simplest “Zhiguli” in-flight meals, i.e. where controllers do not measure the currents and voltages of the on-board network in critical circuits, xenon lamps are not used, then the approach with duplication through a relay may, of course, solve the problem, temporarily, but, as I wrote in my first post, this does not solve the main problem at all - troubleshooting, because The reason for the voltage drop has not been found, and there are two of them in the car: oxidation of the contact and disruption of the wiring, together with a leak to ground, through the same oxidation. If the oxidation is sufficient to significantly increase the resistance in the circuit, then the relay included in such a circuit will eventually stop working. Moreover, we have a galvanic connection, which over time can lead to a car fire, regardless of the power of the load connected to this circuit. That's what I was talking about. And that such a measure may be temporary, until the problem is corrected, maybe I should have made such a reservation right away. It was not for nothing that I mentioned the “Zhiguli” wiring, this applies not only to VAZ cars, this applies to most cars of old age, sometimes, in a stream of cars, such “experienced” ones can be seen with “shimmering and merging” “stoppers” and turn signals, winking or completely dead dimensions and other “lights”. Well, about the measurements, you didn’t challenge or confirm any new theory; indeed, there is a voltage drop and it completely confirms Ohm’s law ... the experiment was a success . And regarding “getting some cognac... I and so ready forever Well, now, it’s completely “seditious.” You have not at all covered the topic of dimming of everything that is inside the headlight: the bulb of the incandescent lamp itself, the lamp reflector, the protective glass of the headlight... I would like to point out to you that you completely forgot to mention these three main components. And at the same time, significant losses occur here. Let's take three main problems: 1. incandescent lamp - the loss of light output can reach a staggering 30% due to wear, burnout of the filament and sputtering of metal particles inside the bulb of the lamp itself. 2. Clouding of the headlight reflector also eats up quite a lot, there are no standards here, it all depends on the condition of the reflector. 3. The most significant loss of luminous flux is created, of course, by the protective glass of the headlight. There are several reasons for this, I wrote about them, but I can repeat them again: microcracks on the surface and in the body, sandblasting, loss of transparency, clouding of glass (applies mainly to plastic headlights, of which almost 100% are now used). I won’t go off-topic here anymore, because... So much has been written about these problems that only the lazy have not read at least one article on this topic. Something like this... And, I can assure you, over many years of owning different cars, and a large number of them have passed through me, I have dealt with various problems, including those related to lighting. I have always been especially pleased with the “American” light. Best regards, Vladislav.
Causes of bad light
If your headlights aren't bright enough, it's most likely due to one of the following:
- damage to contacts;
- the lampshade is clogged or damaged;
- in a faulty or old light bulb;
- in cloudy glass;
- due to improper lighting adjustment.
If the low beam headlights are dim, but you have no complaints about the performance of the high beam ones, then most likely you should look for the cause in the outgoing contacts, incorrect adjustment or a bad light bulb. Since if there were problems with the lampshade, any light would not work well.
If one headlight burns brighter than the other, it means that the fault must be looked for in its device.
Now that we've looked at the possible reasons why your headlights are dim, it's time to talk about how to make your headlights shine brighter.
Automotive halogen lamp protection relay
The relay is designed for smooth ignition and extinguishing of halogen lamps used in fog lights and low beam headlights of cars. Smooth ignition of the spiral allows you to extend the life of the lamp and reduce the inrush current loads on the contacts of switches and relays.
The relay is made in the size of a standard relay housing and can be installed on most domestic cars instead of low beam or fog lamp relays.
Before installing the relay in the mounting block in place of the standard one, be sure to make sure that the signals on the contacts of the mounting block correspond to the purpose of the relay contacts.
The appearance of the relay and the connection diagram are shown in Figure 1.
If you add a diode as in the diagram and connect it to the driver’s door lock activator (to the terminal on which a plus appears when opening), then when the lock is opened, the low beam or fog lights will gradually light up, and after two seconds they will go out smoothly.
Price
: about 700 rub.
Buy
: link
Voltage problem
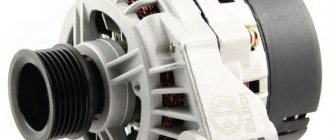
Also, the light may become dim due to any voltage problems. Due to voltage, problems with headlights may occur. The cause of the malfunction lies in the generator.
Advice
How to turn on the lights on a car
Any alternator replacement work should be carried out with extreme caution, so it would be best to consult a professional electrician
Another cause of malfunction is incorrectly adjusted headlight position.
Comparison of luminous flux of different light bulbs
It also happens that a person initially adjusted the headlights properly, but due to some small push the adjustment was disrupted. This situation most often occurs due to a push. How to improve the headlights on a VAZ 2114 in such a case? This does not require any specialized optical devices, but you will have to spend quite a lot of time so that the direction of the light flux again becomes the same as before.
Adjusting the headlights
- The first stage is to place the car at a distance of 5 meters from a flat wall. Then you need to put a person in the driver's seat, and then fill the fuel tank. This is necessary in order to adjust the headlights as accurately as possible.
- Now you need to make special markings on the wall. It is necessary to ensure that the vertical center line completely coincides with the central part of the car, and the side markings coincide with the center of the headlights.
- Horizontal markings must be made at the level of the lamps.
- Now you need to remove the glass from the headlight. This is necessary to provide access to the screw that is intended for adjustment. The second headlight must be covered with some cardboard. The direction of the light must be “adjusted” until it hits the point where straight lines intersect as accurately as possible. It should be remembered that adjustment can only be made with the low beam headlights on. In this case, you can adjust both the low beam and high beam.
Didn't find the information you are looking for? on our forum.
Options for solving problems with weak auto lighting
Problems with insufficient brightness of car headlights are more likely to occur with halogen lamps, since their light output is less intense and bright compared to alternative options: LED headlights and xenon. Therefore, the obvious way to increase the brightness of headlights is to replace weak halogens with modern LEDs or approved xenon.
Do you think that legal xenon does not exist? Read the article: “How to legally install xenon headlights in 2021”, it describes in detail how to drive with gas-discharge lamps and not break the rules.
If you need bright light for off-road driving, install an additional light on your vehicle. Let's talk about alternative, less expensive options for increasing the brightness of standard headlights .
How to adjust headlights yourself
You can adjust the light flow yourself, but you need to know some of the features of lighting equipment and how to configure it.
Types of headlights
The factory equipment may consist of lighting devices of the following design:
The headlight fogs up from the inside, what to do + video
- Halogen headlights. The most common optics option installed by manufacturers. Can be used for low and high beam lighting modes. The light flow power parameters range from 1500 to 2100 lumens with a service life in the range of 500-1500 hours.
- Xenon light. Such elements are characterized by an improved design and improved focusing. Xenon is available only on low beam, or on low beam and high beam (the so-called bi-xenon). Power up to 3200 lumens and service life up to 4000 hours.
- LED models. The most modern option with the ability to supply a light stream of 6000 lumens in a wide range of color temperatures of the light beam. Durability of work – from 5000 to 10000 hours.
You can independently change the lamps in the optics for products of a different type only if you have a document confirming the compliance of the LEDs or xenon with the design provided by the car manufacturer. Therefore, unauthorized placement of LED lamps in fog lamps, which affects the functioning of optical devices, entails liability in accordance with clause 3 of Art. 12.5 Code of Administrative Offenses of the Russian Federation.
Settings Features
Before starting the procedure, it is important to check and install the shock absorbers and tire inflation parameters in the normal position, and evenly distribute the existing load in the car. Correct adjustments can only be made if the following condition is met: a flat vertical wall is required with space for a vehicle at a distance of 7.5 m from it
Markings are done with adhesive tape or chalk
Correct adjustment can only be made if the following condition is met: a flat vertical wall is required with space for a vehicle at a distance of 7.5 m from it. Markings are done with adhesive tape or chalk.
Experienced drivers usually use one of the following two adjustment methods:
№1
The machine is adjusted as close as possible to the vertical surface, on which its center points and similar marks for lamps are applied. The distance between them, as well as from the surface of the earth to the lamp, is determined.
An additional line is drawn below 5.5 cm from the first (secant line). After this, the car is driven back to 7.5 m, a line is drawn on the wall between the points from the center of the display of the switched-on light bulbs.
Next – 3 vertical lines through the centers of the headlights and the middle of the distance between them (the axis of the car).
Now is the time to start setting things up. It is necessary that the angle of inclination of the optics ideally coincides with the horizontal markings. The location where the light begins to rise is adjusted until it coincides with the intersecting lines.
How to properly wash a car engine with your own hands
Adjusting bolts under the hood at the rear of the headlights will be needed to adjust the optimal beam of light
It is important that the beam of light is located just below the center mark of the headlights
№2
The main difference from the previous method is that the car will need to be driven 10 m away from the wall. In this case, the center points of the lamps are marked both in close proximity to the wall and at the specified distance. The markings are connected horizontally, after which two parallel lines are drawn - 22 cm higher and 12 cm lower.
Next, at the zero indicator, is the illumination width regulator. For the light spot from the headlights, the middle line will serve as the upper boundary of the main headlights, and the highest - the fog ones.
The intersection of the light streams should be 12 cm below the center of the lamps.
Features of adjusting fog lights
The key feature of this adjustment method is that the tank must be fully refilled and an additional load of 70 kg on the car is required. Lines are drawn on the wall: the lower one - along the distance from the ground to the fog lights and the upper one - the same size, multiplied by two.
A mark is made to the central axis of the vehicle, thereby creating a drawing with two points of the centers of optical devices and restrictions on the upper and lower limits of light.
In order to set the focus of radiation at the intersection marks of the headlights, adjusting bolts are used in the foglight mount.
Using an additional relay
If the headlights do not need cleaning, but their performance has become worse, you should think about how to improve their brightness. There are several ways: installing more powerful light bulbs or adding an additional relay.
The main idea of this method is to connect the low and high beam headlights to the battery using additional relay contacts. This method makes it possible to increase the voltage in the lamps to 14 V, which will improve the light characteristics of the headlights by approximately 20%.
Thanks to the use of an additional relay, the steering column switch will be relieved.
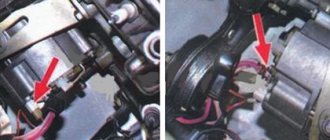
Problems with the generator - the light dims due to lack of voltage
Many car owners drive with poor lighting and do not even suspect that the culprit is not the lamps or the headlights themselves, but the electrical circuit in the car. The first step is to check the generator, which produces a certain voltage during the trip and is the main source of electricity after the engine has been started. If the generator does not work well and does not produce the required voltage, the following troubles are possible:
- all elements of electricity consumption will not work very well, many may not turn on at all due to the lack of normal network operating conditions in the car;
- instead of the required 12V, 8-9V is supplied to the headlights at a constant network load, this can be checked by turning on the headlights with the engine off (if the light is normal, the generator is to blame);
- Also, if the generator malfunctions, fuel consumption increases, since the computer increases engine speed in order to obtain a more or less normal voltage in the network;
- Also, the poor quality of the generator is due to the fact that when you press the gas pedal, all lighting elements, as well as fans and other electrical appliances, begin to work better.
If your car has a non-original generator, the most logical solution would be to install a factory version of this device. Often, for various modifications, the plant offers a more powerful version of the generator. This is an excellent solution, but remember that it may somewhat spoil the impression of the machine. In particular, fuel consumption may increase. Otherwise, only native generators can seriously change the situation.
A bad generator in winter is a real problem
Particularly serious problems occur with the device for providing electricity in the car in winter. This is due to the increased load on the device. Often, only music from electrical devices works in the car. At night, the headlights also turn on. The fan can also work in the rain. But in winter, heated windows, high fan speeds, constant light, heated seats and air conditioning are activated to reduce window fogging. All this heavily loads the generator and shows all its problems.
Let's sum it up
If you have ever encountered very bad light in a car, then you understand all the disadvantages of this situation. This is a rather difficult moment, which will always be an important point for all drivers. Operating a car on wet asphalt can be a very unpleasant experience when the road is poorly lit. In any case, the driver receives only negative emotions in this situation and does not ensure the safety of himself and the people around him. So such unpleasant effects are unacceptable. The headlight should work at least as well as when the car left the factory. Ideally, it should work better.
Check your car's electrical systems, the voltage supplied by the generator and other important features. This will help you understand the characteristics of poor electrical appliances much better. Also think about possibly replacing the light bulbs with brighter ones. The fact is that in modern traffic with bright light, dim light bulbs cope very poorly with their tasks. It will be much better to use the possibilities of inexpensive headlight modifications than to drive with dim low and high beams. So take advantage of the tips given above, get better road lighting and increase safety. Have you improved the headlights in your car in any way?
Installation of high power lamps
There is nothing strange in the method. It is suitable for cars with a mileage of more than 10 thousand km. It is clear that powerful lamps will provide excellent lighting. But before you start replacing, you should think carefully: the manipulation is not as simple as it might seem.
Attention!
You need to take into account the optics capabilities of your “iron horse”. It is possible that they will not cope with the new lamps.
Neglecting this rule can lead to rapid failure of the reflector and not only
It is also necessary to take into account that such light has a negative impact on oncoming cars.
If you choose to replace lamps with more powerful ones, then it is better to install devices with a whiter light spectrum. There are also devices that provide almost xenon lighting. White light, also called daylight, helps to illuminate a dry road well. But for a wet surface, the ideal option is yellow. Therefore, yellow fog lights are installed in the headlights.
External lighting in cars is an important parameter of its operation. If the headlights malfunction or their functionality deteriorates, you can become involved in an accident. Therefore, you need to monitor their condition in order to save not only your life, but also other participants in the traffic rules.
Installation of increased brightness lamps
Of course, you can replace the lamps with brighter ones. The only requirement is that their brightness meets the requirements of the road inspection. Moreover, they can be halogen, xenon, or LED. The main thing is that they are developed specifically for a specific car model.
You also need to understand that more powerful lamps burn out much faster, because all their elements are subject to greater load.
The easiest and most legal way to make the light brighter is to install high-quality lamps. After all, most new cars have cheap units that are not designed for long-term operation. This is especially true for budget cars with basic equipment. Lamps can be expensive, but they are more durable, do not go beyond the law, and they will not have to be removed in the impound lot, where the car will definitely be parked if its headlights are too bright.
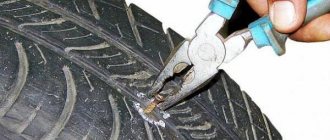
Lack of mass
This is a very common problem. The fact is that the minus of the Volga, like most other cars, goes along the body (some cars before 1960 have a plus on the body), accordingly, the minus comes to the headlights along the wings, and on the Volga they are not welded, but removable and secured with bolts. Over the years, corrosion breaks down the contact between the body and the fender, and losses occur in the headlight circuit. This is why the headlights of some Volgas do not light up, but smolder. By the way, sometimes after serious body repairs, the light may disappear completely. The craftsman, with the best intentions, carefully processed the wings removed from the car, primed them, painted them and even coated them on the reverse side with mastic. Of course, contact was lost.
It is best, of course, not to scratch the soil under the bolts to bare metal. Just lay separate negative wires to the headlights, taking ground either from the body or from the engine. Use a cable with a cross section of 1.5 mm. This is more than enough, the load is only 120-140 W.
By the way, this same reason is most likely creating problems for you with the correct operation of your turn indicators. Route the minus to the turn signals as well.
What else can you do to improve your headlights?
Often people resort to drastic measures, not realizing that this is often not necessary. Very often, simple things help improve the light, such as: adjusting the headlights, checking the voltage in the network, cleaning the contacts, buying the right light bulbs, washing and polishing, which I already mentioned above. Also, make sure that your car's windshield is not tinted. Sometimes it is the tinting that is to blame for the fact that you cannot see the road, and not the light bulbs or headlights.
Visit a service station that has a diagnostic stand and equipment capable of correctly setting the headlights. Check the condition of the reflector; perhaps the reflective layer has burned out and the light from the bulb does not increase. Also make sure that you have the correct bulbs installed and that the headlights themselves do not require the procedures listed above.
Text: FaraInfo
Method 1: Disassemble and clean the lighting system
This method of dealing with insufficient headlight brightness is suitable for fairly old cars that are rarely serviced. Over time, a large amount of dust and dirt accumulates in the headlights, which settles both on the light sources and on the lenses.
Thus, the owner will have to completely disassemble the lighting systems (both near and far) and thoroughly rinse everything from the inside. This method is recommended for car owners of any car, since even if the car is new, a certain amount of dust still accumulates in it, worsening the brightness of the main lighting sources.
What to do if the headlights dim?
Sometimes it happens that the light was initially sufficient, but then became weak. In this and in some other situations, quite simple actions help. Therefore, in any case, they should be implemented in the first order.
So, you need to check the cleanliness of the reflector and make sure that no dust has accumulated inside. If contamination is detected, you simply need to remove the headlights and wash them. Then you need to dry them properly, and then install them in place.
Also, headlights can dim due to small scratches from stones and dirt, which are more than enough on our roads. In this case, polishing will be necessary.
If cleaning and polishing does not change anything, it is worth considering further action.
1. Reasons affecting the quality of headlights
Here are some of the main reasons that reduce lighting efficiency, as well as how to eliminate them.
1.1 Design flaws
The reason for the formation of a light beam of insufficient strength and intensity is often the small size of the reflectors. Lately, designers have often sacrificed the efficiency of headlights to super-fashionable design. As a solution to this problem, experts suggest replacing existing lamps with incandescent lamps with improved light output. In addition, it is possible to carry out a small modernization of the headlight, involving the installation of gas-discharge (xenon) lamps.
1.2 Headlight reflector
This problem is typical for cars with high mileage, in which, due to their advanced age, the reflective surface peels off from the metal body, which significantly worsens the reflective properties of the product. The optimal solution is to replace the headlight unit with a new one.
1.3 Matte
The ingress of stones and sand, causing microscopic damage to plastic headlight covers, is a common occurrence on difficult Russian roads. And neither new nor used cars are insured against it. The main negative consequence of this phenomenon is the loss of the ability to transmit directed rays of light, or “haze.” The problem can be solved in two ways: by polishing the glass or replacing it (replacing the headlight). A special protective film is often used as a safety precaution.
1.4 Lamps
There are frequent cases of installation of low-quality lamps, the quality of light of which initially does not meet the requirements or significantly deteriorates over a short period of operation. A sign of such a lamp is the formation of a black coating on its bulb. The solution in this case is quite obvious - installing a new lamp with improved light output, or xenon.
1.5 Condensation
Moisture getting inside the headlamp structure and its subsequent loss in the form of condensation significantly reduces the efficiency of roadway lighting. Often, the headlight is subject to deformation under the influence of condensation. Therefore, the only correct solution to the problem is to replace the headlight.
Types of lamps
There are three most common types of light bulbs in PTF:
- halogen;
- xenon;
- LED
All three types of sources have different characteristics.
Halogen
As standard, most automakers install halogen lamps in PTFs. Their service life is on average 150-250 hours or 2-3 years. They give off an orange or yellow luminous flux. The main advantages are the affordable price and sufficient power.
Halogen lamps H3
Many car lamp manufacturers, such as the German OSRAM or the Korean MTF, produce improved halogen emitters with a xenon effect. The flask contains a more saturated gas mixture, which gives a powerful light flux. Improved filament design and laser technology are used. The base is designated H11. As a result, improved halogens have a higher cost.
Xenon (gas discharge)
The sockets of gas-discharge or xenon lamps are marked with the letters “D”, “DC”, “DCR”. They produce a very bright beam of light that can blind oncoming cars. This is ensured by a high color temperature of 6000-8000K. Therefore, according to GOST, such headlights must be equipped with an automatic leveler, an ignition unit and headlight washers. Special reflectors are used to focus the beam.
Xenon PTF
The spectrum is closer to yellow or daylight. The advantages of xenon in PTF are low energy consumption, good light output and long service life of up to 3 years. The disadvantages include the high cost and complexity of installation.
Light-emitting diode (LED)
LEDs are becoming increasingly popular in both PTF and headlights. The spectrum is close to daylight. A clear and bright light beam does not dissipate in drops of fog or rain. The power of LED lamps reaches 700-1000 Lm/W. Long service life up to 20,000 hours. Installation requires a cooling system, which does not always fit into a standard headlight housing. Therefore, it is worth checking the possibility of installing LEDs.
LED bulbs
If the contacts are damaged
So, let's say you figured out why the lamps are not working well or why one headlight is dim. This means that the problem can now be fixed.
If the headlight's contacts are loose or damaged, it may not be immediately obvious. A distinctive feature of this malfunction is that the headlights periodically begin to burn brighter. This happens, for example, after the car shakes due to hitting a bump, during a sharp turn or hitting the hood.
In such cases, the contacts temporarily change their position, clinging more tightly, and the lamps begin to work at full capacity.
However, we note that such a characteristic is only a sign, and not a way to repair lamps. In order to fix the problem, you need to fix the problem with the contacts.
The contacts may be damaged or clogged, or they may become loose. The easiest way to fix this problem is to contact a car service.
But you can also try to remove the headlights yourself, check the contact coils and, if they come off, weld them or cover them with epoxy glue.
Voltage
Additionally, you need to check whether the voltage supplied to the lamps is sufficient for bright light. Low voltage can be caused not only by damaged contacts, but also by problems with the generator.
Some car owners make a grave mistake. When they realize that the reason for poor lighting lies in problems with the contacts, they change them to more powerful ones. But because of this, the contact area begins to overheat regularly.
To check the voltage level in the contacts, you need to use a multimeter. This device will help to effectively identify the section of the electrical circuit where problems arise.
Why pay if you can do it yourself?
Nowadays, it is customary for motorists with any, even the most trivial, problem to immediately contact a car service center. It is not only unreasonable to do this, but also too wasteful, because the services of auto mechanics are not cheap at all. Therefore, in order to restore the lost brightness to the headlights of your car, we will use time-tested “old-fashioned” methods, which consist of polishing the headlights ourselves.
Photo: https://drive2.ru
Restoring reflectors
A decrease in lighting quality may be caused by a deterioration in the reflective properties of the reflector. New cars, of course, do not suffer from this, which cannot be said with certainty about vehicles that have traveled hundreds of kilometers. Here it is necessary to either replace the reflector or restore it. And since the cost of such work will be at least 1000 rubles, some car enthusiasts will prefer to do it themselves.
To repair the reflector, you need to remove the headlight module and completely disassemble it. And there are two options:
- Walk several times with a hot stream of air from a hair dryer.
- Place the headlight in an oven preheated to 100 °C for 20 minutes.
After disassembly, all parts must be cleaned of residual adhesive and sealant, rinsed well (liquids containing alcohol are not suitable) and dried. As for recovery, there are also several options:
- Metallized tape. It is inexpensive, around 30 rubles. The adhesive base can withstand both low and high temperatures, and the aluminum film has high wear-resistant properties. It is worth preparing several pieces of a suitable size, after which you can move on to the sticker. This will result in a smoother surface with minimal seams.
- Metal foil. This is also an effective technique for improving low beam headlights. To maintain the smoothness of the surface, you need to make a pattern from paper, and then cut out the parts from foil. It is better to glue the material onto epoxy resin, removing its excess during operation.
- Mirror film. We are talking about a film from Oracal, which can withstand a wide temperature range from -40 to +120 °C, while maintaining its performance properties for 2 years outdoors. Since the car headlight has a good seal, the service life will be longer. Glue in the same way as above. The film must be smoothed well to prevent air from entering. The joints and edges can be painted over with chrome paint.
- Chrome paint. The method is very popular, since there is no need to glue or cut anything, just spray the paint in an even layer. After treatment, the paint needs to dry for a certain time (indicated in the instructions for the can). In order for the coating to withstand high temperatures, you need to try to find a heat-resistant option, which is not easy.
Immediately before gluing the films, the entire surface must be degreased. All the work can be easily done in your garage. In addition, the family budget can be saved.
Installing xenon and bi-xenon
Many car owners are not satisfied with the intensity of the standard light. Indeed, in order to save money, automakers install the simplest lights on their cars, which do not provide high-quality illumination of the road at night. This problem can be solved by using xenon and bi-xenon, which can be easily installed in the basic optics of a car.
Bi-xenon and xenon provide high-quality illumination of the road surface, while the light bulbs themselves and the control units necessary for their operation are affordable. Replacing lamps is not particularly difficult. In specialized auto stores you can purchase ready-made kits of lamps and control units, the installation of which can be carried out independently.
If you doubt your abilities and have no idea about the structure of the car’s electrical network, then you can easily contact specialized workshops where you will be offered inexpensive and high-quality services. The cost of such headlight polishing today is not too high, which allows all car owners, without exception, to take advantage of the offer of specialized service stations and restore the performance of the car's head optics, without increasing the cost of operating the car.
Should I take bi-xenon?
Some motorists are thinking about the possibility of installing bi-xenon when using standard reflector equipment. It is worth keeping in mind that this approach is not entirely legal. However, many motorists are not at all embarrassed by this point. In general, installing bi-xenon is not difficult. So, you need to buy a set of lamps and ignition units. Then all that remains is to install it all.
However, reflective optics are not initially adapted for these lamps. This can cause problems with focus. Also, the distribution of lighting flows will be problematic. And there will be no point in regulating such a misunderstanding.
If you still bet on bi-xenon, it makes sense to purchase additional lenses for the kit. Then the result will be better. Among the advantages will be decent road lighting and no risk of blinding oncoming motorists. The installation of lenses itself also does not create problems.
Why do the headlights on VAZ 2110 and 2114 shine poorly? We fix and improve
You need to understand and find out the reasons why the headlights on the VAZ 2110 and 2114 shine poorly as quickly as possible. Light on the road is the key to your well-being after sunset, and especially in winter, when it gets dark early (and dawn comes late). If bad weather conditions in the form of rain or snow are added to the general theme, then the lack of lighting becomes literally dangerous.
To drive almost by touch means to begin with risking the integrity of your iron horse: an undetected hole can seriously damage the chassis, or even cause a skid, which is fraught with injuries not only for your car, but also for oncoming/passing people. Why do the headlights on a VAZ shine poorly? 2110 and 2114, you need to look for the reasons until you are completely sure that this particular factor is interfering with proper functioning. Simply changing lamps to more powerful ones does not always solve the problem and may turn out to be an unnecessary waste of money.
Glass The simplest reasons are usually the most likely. Dirty headlights reduce illumination by 50%! Wiping them with a dry cloth is not a good idea. With this approach, you also scratch the glass, which over time will make their dim glow permanent. If you don’t want to regularly wash your headlights by hand, install a washer. By the way, the unit from Volga is perfect for the “ten”.
Moreover, the installation is quite simple and can be done on your own. The glass may burst. If you notice a crack on the surface, you will have to remove the headlight unit and replace it with a new one. If your car has already run well, the glass may naturally become cloudy from age.
Reflector If everything is in order with the glass, a possible reason for the dim glow may be a peeling reflector. No matter how powerful the lamp you screw into the headlight, you will not get the proper brightness of light. On most foreign cars, in this case, you have to change the entire headlight; On VAZs, only the reflector can be replaced. Moreover, the procedure is very simple:
- The headlight unit is dismantled with the battery disconnected;
- The glass is removed from it. It is placed on a sealant, which is softened by heating using a hair dryer. Then the glass is pryed up and carefully removed;
- The light bulb is unscrewed;
- The shabby reflector is dismantled, a new one is installed, and the headlight is assembled in the reverse order.
Voltage problems: Especially typical for cars with halogen lamps. A lack of voltage can be caused by a malfunctioning generator or oxidation/breakage of the contact. Normal light is produced at a voltage of 13.8-14.2 V, and the same should be at the ends of the working lamp. A drop on it of no more than 0.2-0.3 V at 2000 rpm is acceptable.
A lower voltage indicates that there is a faulty contact in the circuit. It is required to detect and eliminate the defect; Installing stronger lamps before repair is strictly prohibited: it can lead to overheating and even ignition of the faulty contact. Direction of luminous flux Insufficient lighting can be caused by unadjusted position of the headlights.
Moreover, at one time the adjustment could be correct, but due to an accidental shock (for example, a bumper catching a curb) it was disrupted. You can correct the position yourself, without optical instruments.
- A flat wall is selected, the car is installed at a distance of 5 m from it and loaded as standard: the tank must be full, and someone must be sitting in the driver’s seat.
- Markings are made on the wall: the central vertical line should coincide with the center of the car, the side lines should coincide with the center of the headlights.
- Horizontal is carried out at the level of the lamps. The border of the light spot is marked 6.5 cm below.
- The glass is removed from the headlight to access the adjustment screw, the second one is covered with any cardboard. The direction is adjusted to exactly hit the point of intersection of the lines. The adjustment is carried out with the low beam on: then the high beam will also be adjusted correctly.
- “How to properly adjust headlights”;
- "How to improve headlights."
After debugging one headlight, the same manipulations are carried out with the second. If the reason why the headlights on the VAZ 2110 and 2114 shine poorly was an imbalance of direction, after adjustment it will become easier not only for you, but also for other drivers: often crooked headlights blind oncoming people. And it also causes inconvenience to fellow travelers if they get caught in the interior rearview mirror.
Modules for smooth ignition of low beam lamps
The module is designed for smooth ignition of halogen lamps with H7 socket used in low beam headlights of Lada Vesta, XRAY, Kalina, Priora, Niva (Chevrolet) and others.
Smooth ignition of the spiral allows you to extend the life of the lamp and reduce the inrush current loads on the contacts of switches and relays.
To install you need
:
- Open the cover that blocks access to the low beam lamp.
- Disconnect the wires from the lamp base.
- Connect the wires to the module, observing the polarity (red wire is “plus”, black is “ground”). You can determine the polarity using a test lamp.
- Attach the module to the lamp base.
- Close the protective cover of the headlight unit.
Photo by viktor1509
Price
: about 700 rub.
Buy
: link
Will you modify your car in this way? Which method suits you best?
3.Improving the light of car headlights by replacing standard elements
Another way to radically improve the quality of light, including low beam, of car headlights is to replace standard optical devices with devices that have an increased level of functionality.
3.1 “Crystal” headlights
A design feature of automobile headlights of this type is the principle of light beam formation. Instead of a traditional diffuser, they use a small screen and a specially shaped reflector. This design allows the formation of a large volume of light beam combined with the widest possible distribution range. And this, in turn, creates more powerful illumination of the roadway, increasing the degree of traffic safety.
3.2 Xenon headlights
The attractiveness of xenon headlights lies in the fact that the process of improving the headlight of a vehicle with their participation provides for the possibility of installing them not only in standard optical devices, but also in fog lights.
The design feature of xenon headlights is the use as a light source of an electric arc that occurs between the electrodes of the lamp, the bulb of which is filled with xenon. The brightness of the generated light flux almost doubles in comparison with the brightness of halogen lamps. The logical conclusion from the above is the statement about the greater efficiency of the xenon light source when illuminating the roadway.
Another important advantage of xenon headlights is that the spectral composition of the light beam is different from others, allowing the driver to distinguish objects located not only on the road, but also on its side (road signs, fences, stops, etc.) at a fairly large distance. Xenon headlights do not create a “wall of light” effect when used in conditions of limited visibility (rain, fog, snow), and the “color temperature” of the xenon light beam is close to that of daylight.
The service life of xenon lamps is much longer (4-5 times) than the service life of halogen lamps; they consume little energy and hardly heat up. The cost of conversion is low, which is due to the possibility of using standard optics and seats.
In conclusion, summarizing the above, we note that the choice of method for improving headlights depends entirely on the wishes of a particular car owner and his financial capabilities.
Polishing the headlights and installing brighter lamps solves only part of the problem. The most common cause of insufficient light brightness is a voltage drop across the lamp . It should be noted that the voltage always drops under load. Any power source has its own internal resistance. Because of this, the voltage directly at the lamp contacts will be slightly less than the on-board voltage measured at the terminals of the battery or generator.
See more details - why does the voltage sags under load?
How to get MAXIMUM BRIGHTNESS from halogen headlights and not get fined?
Additional voltage losses appear over time due to an increase in circuit resistance. This is due to contact wear, loss of battery capacity, and other things. To reduce additional voltage losses, you can install relays and wiring directly from the battery or generator. An additional relay is controlled by the headlight low beam switch; large cross-section wires reduce voltage losses, but do not completely solve the problem of voltage drop across the lamp. Ready-made sets of wires with unloading relays are sold, but we will take a slightly different route.
The maximum brightness of a headlight will depend on the design of the headlight itself and the lamp used. The brightness of the headlight (pictured) changes noticeably even with a 1 volt change in voltage. At 12.5 volts the device showed 4720 lux, and at 13.5 volts it was already 5930 lux, which is about 25% brighter. You can apply more voltage to the coil, and then we get higher brightness and a slightly higher color temperature.
will not the installation of xenon and LED lamps instead of halogen here , since the design of such lamps (modules) differs from the design of halogen lamps for which the headlights were originally designed and their use often violates the light-shadow boundary of the headlight. This causes blinding to oncoming drivers. Moreover, we will not discuss the “legality” of such modernization.
Halogen headlights
Installing lamps of higher power provokes an even greater voltage drop. Due to lack of voltage, the brightness of such lamps decreases. If the voltage is sufficient, then the body load on the structural elements of the headlight increases due to the infrared radiation of the lamp.
Separately, it is worth mentioning the complete redesign of the headlight and the installation of light-emitting modules inside it [Xenon, Bi-Xenon, Led, Bi-Led] with connection to the headlight leveling system. If the brightness is above 2000 Lm, a headlight washer must be installed. All this is an expensive and technically complex procedure, which can provide a significant increase in brightness, but we are not yet aware of cases of legalization of such a procedure in Russia.
If finances allow, the optimal and legally permitted way to improve light is to install standard headlights from more expensive versions of your car. Any other design changes will be considered an unacceptable change not intended by the manufacturer.
Solution - installing a DC-DC voltage converter
The goal is to obtain maximum brightness from the standard halogen headlights with minimal interference in the vehicle's standard wiring and without significantly reducing the life of the lamps.
An increase in the brightness of the head light can be achieved by stabilizing the voltage directly at the lamp contacts . Mitsubishi Outlander III was chosen as the test subject . The lens with the H7 lamp is responsible for the low beam. Left/right voltage is 13.1/12.9 Volts when the engine is running. We connect the converter - the voltage stabilizes at 13.75 Volts .
Specifications
| Name | Halogen Lamp Voltage Converter/Stabilizer |
| Model | ULTRA-A DC/DC1375-H7-5A |
| Output voltage | 13.75 V |
| Maximum load current | 5 A (67 Watt) |
| Input voltage | 8.0 - 14.5 V |
| Lamp base | H7 |
| Efficiency (Uin=12V) | > 90 % |
| Current consumption (no load) | 70 mA |
| Deviation Uout | < 2% (under load) |
| Ripple (peak value) | < 200 mV |
| Operating temperature | -30°..+80° С |
| Type of execution | IP68, passive cooling |
| Dimensions of the block | 50 x 82 x 20 mm |
| Weight | 140 grams |
The DC-DC ULTRA-A converter (DC voltage stabilizer) block is connected to the H7 lamp connector, the lamp is connected to the converter. Now the lamp is always supplied with 13.75 Volts , while the input voltage can vary from 8.0 to 14.5 Volts . The color temperature of the headlights increases (they give off less yellowness), but remains in the region of 3200K - 3300K (for lamps without a filter). Everything is simple and convenient to install, and if necessary, the headlight power circuit can be easily returned to its factory state.
| Converter output voltage 13.75 Volts was not chosen by chance. This voltage provides 90% maximum powerspecified in GOST R 41.37 for this type of lamp and corresponds to the test voltage for headlights according to GOST R 41.112. Lamp manufacturers also declare the service life of their products specifically for the test voltage 13.2 Volts +/- 5%. The converter's power supply is from 9 to 14.5 Volts. Will the lamp life be shortened by increasing the voltage? Most likely yes, but not significantly. We do not have exact data confirmed by test results. In combination with the protection of the filament during cold start-up, the service life of the lamps will most likely not change. |
We are not talking about any significant increase in the power of the headlights, which could melt the reflectors and damage the glass (monolithic polycarbonate) of the headlights. Often it is enough to eliminate the very reason for the low brightness of the halogen lamp - lack of voltage. The use of a voltage converter allows you to stabilize the power supply to halogen lamps, eliminate voltage sags and ensure maximum light brightness provided by the design of the headlight and the lamp used. The voltage converter allows you to obtain stable headlights that are independent of voltage fluctuations in the on-board network.
The stabilizer is suitable for any lamps with H7 socket, 55 Watt power, 12V voltage. The connector is suitable for installation in most KIA and Mitsubishi headlights (connectors compatible with other headlight manufacturers may appear in the near future).
Model of the converter in a new housing for installation inside the headlight:
The converter has short circuit protection, turns off when the input voltage drops below 8.0 Volts, protects the lamps from burning out when turned on, has high efficiency and provides the stable voltage and current necessary for optimal operation of a 55 W halogen lamp. Installation of the ULTRA-A DC_DC1375-H7-5A does not require special skills and does not affect the design of the headlight, which allows you to obtain a legal increase in brightness without problems with passing a technical inspection.
This is a new product. We have not yet tested compatibility with all vehicle makes and models. Data on the compatibility of the converter with lamp control systems from various manufacturers will appear in the near future.
As of May 31, 2021 — We have not received any returns or complaints about the problem of compatibility of our converters with the vehicle lamp control system from Customers.
Warranty - 6 months, 30 days for return;
| Voltage converter 13.75 Volt H7 ULTRA-A DC_DC1375-H7-5A Set for 2 headlights; For lamps 12V H7 55W | |
| Converter with connectors | Converter without connectors |
| out of stock | 2650 rub. |
| Voltage converter 13.75 Volt H4 ULTRA-A DC_DC1375-H4-6A Set for 2 headlights (increased low beam) For lamps 12V H4 60/ 55W | |
| General "minus" | Overall plus |
| out of stock | out of stock |
| Voltage converter 28.0 Volt H7 ULTRA-A DC_DC2800-H7-3A-Dim Power 8 - 14.5 Volts Set for 2 headlights For lamps 24V H7 70W | |
| Converters with synchronous dimming via radio remote control to control power. | Converters with synchronous dimming via radio remote control to control power. |
| 5450 RUR (on order) | Coming soon |
If you have questions about purchasing a converter, write - email: This email address is being protected from spambots. You must have JavaScript enabled to view it.
Output voltage: 13.25; 13.5; 14.0; 14.25; 28.0 Volt - on request;
Produced in limited quantities.
< IN SECTION: OUR CONTACTS >
< IN SECTION: OUR WORKS >
DRIVE2.RU
Opel Vectra 1.8 Isitronic › Logbook › Headlights dim when turning the steering wheel. Perhaps I found a solution. Part 1.
Opel Vectra 1.8 Isitronic › Logbook › Headlights dim when turning the steering wheel. Part 2. Victory!
Voltage converter for halogen headlights
Frequently asked questions about the converter: ULTRA-A DC_DC1375-H7-5A
| 1. Will the service life of a lamp with a converter be reduced? |
| An increase in voltage inevitably leads to an increase in the intensity of sublimation (evaporation) of the lamp filament and reduces the life of the lamp. Protection against current surges when the lamps are turned on - increases the life of the lamp. Currently, we do not have experimentally confirmed data on a decrease or increase in the resource of llamas. Subjectively, lamps at a voltage of 13.75 Volts burn out no more often than usual. |
| 2. How does the converter increase the voltage? |
| An increase in voltage occurs due to an increase in electrical current consumption. Ohm's Law relates Power (P), Voltage (U) and Current (I) by the expression: P = U * I; |
| 3. How much power does the converter itself consume/consume? |
| The converter consumes about 4-6 W (depending on the difference between input and output voltages). The converter's aluminum housing dissipates heat and can heat up 20-30 degrees above ambient temperature during prolonged operation. |
| 4. Do you need to make changes to the standard wiring? |
| If the standard wiring is not damaged, its contacts and connections are not oxidized, no changes will be required. The converter is connected instead of a lamp, observing polarity. The lamp is connected to the converter. |
| 5. What fuse rating should I install on the lamp? |
| For 55 W lamps, use a 10A fuse. It also remains when the lamp is connected through a voltage converter. |
| 6. Can I order a converter with an output voltage of 14.0 - 15.0 Volts? |
| For H7 low beam lamps with a power of 55 W, we consider it inappropriate to use a voltage higher than 14.0 Volts. Yes, you can order a converter with this voltage by indicating this in the order. |
| 7. My car has electric power steering, which causes the headlights to dim when the steering wheel is turned. Will the converter solve this problem? |
| Yes. The converter stabilizes the power supply to the lamps and removes voltage dips caused by the inclusion of powerful electrical consumers, such as an engine cooling radiator fan, electric power steering, gearbox robot and others. Lamps with an installed converter shining with constant brightness. |
| 8. My headlight does not fit a converter of this size, what should I do? |
| This converter has a sealed housing and can be installed not only inside the headlight, but also in the engine compartment. For now, we are collecting statistics on requests for car models and will solve the problem of simplifying installation as we generate statistics on the most popular car models. |
| 9. Where can I buy a converter with delivery or offline? |
| We are working on organizing an online store. For now, we offer to send your order by mail/transport company or you can pick it up from our warehouse in Moscow. If something doesn't work or you don't like, you can return the converter within 30 days. |
If you have questions about purchasing a converter, write - email: This email address is being protected from spambots. You must have JavaScript enabled to view it.
Where would you like to see us?
Youtube