Many have heard from experienced drivers that instead of expensive store-bought products, you can use toothpaste to polish headlights. Despite the seeming absurdity of this idea, toothpaste actually shows good results when polishing glass and plastic products. Let's figure out what this method is based on and how to properly clean the headlights.
Why periodically polish
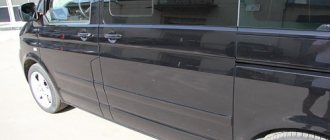
Optics in a car are very important, but headlights are constantly exposed to various influences - sand, gravel, dirt, stones flying out from under the wheels of other cars. In addition, various insects affect the optics. All this, sooner or later, can lead to the light losing its brightness and directionality. In addition, the car loses its appearance, presentability and attractiveness.
There is no way to avoid this. Therefore, periodic cleaning, polishing, and repair of the headlight is necessary. It is best to tidy up the optics yourself - this way you can save a considerable amount of money and time. Plastic headlights can become cloudy and deteriorate due to careless cleaning with a cloth. The cloth may not be soft or clean enough, or may have been saturated with some harmful detergent.
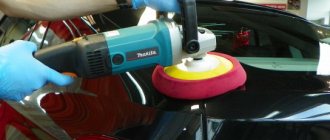
Polishing on a cloth wheel
Do-it-yourself car polishing
Plexiglas parts can be polished mechanically by holding the part over a cloth rotating disk on a special machine, or by sanding the PMMA surface with a cloth that has previously been coated with polishing paste or plastic polish. Using the mechanical polishing method, large surfaces and angled sides can be processed
and also remove minor scratches.
However, the disadvantage of this method is that as a result of mechanical polishing, the acrylic surface may become covered with microcracks and still remain cloudy. This method is quite time-consuming and is most often used for local grinding.
or for polishing a small number of single and expensive parts.
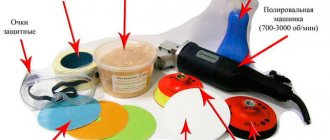
Tools and materials
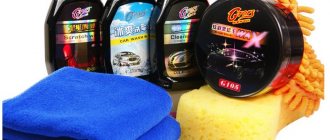
The standard polishing arsenal must include tools that can be used to remove the caps. You should also stock up on masking tape. To sand deep scratches, you need sandpaper with different grits. The maximum grit range should be from 600 to 4000. To complete this job as quickly as possible, a sander or any other power tool will come in handy. Naturally, polishing a headlight with toothpaste will not work without the toothpaste itself. Moisten the surface to be sanded with clean water and rinse it.
Polishing plastic headlights with toothpaste requires a foam sponge. Felt or felt is also perfect. If you don’t have any of this, then you can use a polishing attachment for an electric drill.
Before starting work, the optics must be removed, having previously taken care of electrical safety, and the headlights must be fixed in a convenient position. Only then can you start working.
Method number 3. Using polishing paste and a sander
The fact that the protective layer of your headlights has been depleted can be determined by the appearance of a halo. As noted above, polishing will no longer help if there is a clear spot on the headlight with yellowish edges (without a protective layer, the plastic will become cloudy for just a few weeks). Here all that remains is to either replace the head optics or apply a special protective varnish (the second option is very expensive - about 5 thousand rubles for one headlight, and therefore is only suitable for vintage cars).
The polishing itself takes from 10 to 15 minutes. First, the headlight is covered with tape - this way the coating of adjacent body elements will not be damaged.
The headlight is covered with tape
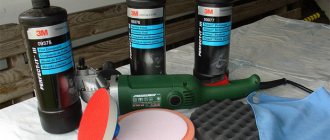
Further actions depend on what kind of paste is used. As a rule, car services use 3M and Wurth for this. First, a more granular paste is used, as well as an appropriate polishing wheel (the grinder operates at 1500-2000 rpm).
Polishing with a more granular paste Machine speed - 1500-2000 rpm
After this, a finishing paste with a softer polishing wheel is applied. In this case, the machine should operate at a speed of no more than 3000-3500 revolutions, otherwise the plastic will overheat and the protective layer will burn (if it is overheated, it is blown away, and then, as it cools, it becomes covered with cracks).
Polishing with finishing paste
In addition, you can use a universal paste for polishing - for example, this is a product from the Cut company. This paste combines the properties of finishing and regular polishes, and only one polishing wheel is required for the job.
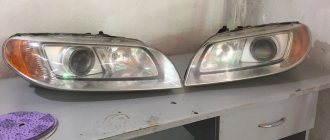
Polishing two headlights on a Mitsubishi Pajero
Polishing process
The technology includes several stages:
- Metal parts and rubber seals are closed.
- Preliminary cleaning of dust or dirt.
- Polishing headlights with toothpaste.
- Cleaning.
At the first stage, it is necessary to prepare the field for work.
The first step is to seal all metal parts or seals with tape to protect them from possible damage during the polishing process. Next, the entire surface is thoroughly cleaned of any contaminants. Not only dust and dirt are removed, but also various fats, oils, etc. For such cleaning, it is best to use a degreaser.
When all the preparatory work is completed, you can proceed to the rubbing process. Polishing headlights with your own hands with toothpaste involves applying the substance directly to the surface or to felt or any other soft cloth. To polish the surface, you need to make vigorous and very fast circular movements.
For greater efficiency and high results, it is recommended to use electric tools. It can be either a grinder, a hammer drill, or a drill. Power tools must be equipped with special polishing devices or grinding wheels on which toothpaste or any other material is applied. Polishing car headlights can also be performed using a specially designed composition based on diamond dust.
If it is necessary to process a glass or plastic headlight, it is important that the surface is not overheated. Otherwise, this may lead to cracks, and the plastic may become deformed at high temperatures. To prevent this, the temperature is constantly monitored during the process. This is done with one hand - if you can hold on to the glass, then everything is in order. It is important to pause during the process. If you have certain skills, you can easily achieve excellent results.
What will you need for work?
In order for any work to take a minimum of time and give good results, it is necessary to prepare the necessary tools before starting active actions.
To polish car headlights you will need:
- tool for removing glass: screwdriver, knife;
- masking tape;
- brush with a comfortable handle;
- glass cleaner, white spirit;
- clean rag;
- sponge.
Since the glass headlight cover has a small area, polishing can be done manually. But using a power tool will significantly speed up the process. It’s good if you have a drill with a polishing attachment or a grinder on hand. But if there is no such tool (and nowhere to borrow it for a while), you will have to cope without it.
Features of glass polishing
Polishing a headlight with toothpaste, if the surface of the optical device is glass, is virtually no different from polishing plastic. But the process itself requires extreme accuracy. It should also be taken into account that the same work at a service station will cost much more. It is recommended to use brushes with a medium degree of hardness. The process is carried out until there are no scratches on the surface. Then sanding is carried out with felt or a towel, but without toothpaste. The entire process from start to finish will take from 30 minutes to a couple of hours. The total time depends on several factors:
- Size of scratches.
- The product used.
- Manual or automated polishing.
- Optics material.
If the scratch is quite deep, you can apply sandpaper treatment, but only for a rough draft. And after the scratch is destroyed, you can move on to the process of polishing and grinding the glass. There are situations when, after work, the headlight is still cloudy. In this case, the optics are completely disassembled and all actions are carried out, but from the reverse, inner side.
How to clean headlights with toothpaste
Every car enthusiast, after a certain period of using a car, has a problem associated with wear on the outer surface of the headlights. And this is not surprising, because the headlights are located on the front of your car and, first of all, take on any negative external influences. The following factors may play a role:
- pebbles from under the wheels of passing vehicles;
- dust, sand;
- bushes and tree branches;
- ultraviolet radiation;
- aggressive chemicals on the road;
- atmospheric factors: snow, rain, etc.
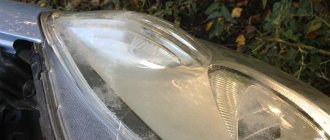
As a result, the headlights may become cloudy and yellow. Chips, scratches and other defects appear on their surface. All this significantly reduces the efficiency of their work and degrades the quality of visibility on the road.
Considering that your safety directly depends on the efficiency of headlights on your car, the problem requires a prompt solution.
The appearance of such defects is not yet a reason to replace headlights. You can simply clean them and remove damage. To do this, you can either contact a service station or clean the headlights yourself. This is a job that does not require special knowledge and skills - anyone who knows how to do the work conscientiously and accurately can handle it.
Headlights are cleaned using special abrasive pastes. The principle of operation is that we remove a layer of material equal to the thickness of the damage, and then carefully polish the surface.
One of the means to clean the glass or plastic of your car's headlights can be ordinary toothpaste or tooth powder. Experts claim that it is much more effective than many proprietary polishing pastes. Let's figure out how you can use toothpaste to restore your car's headlights to their former efficiency and attractiveness.
Benefits of DIY polishing
Polishing a headlight with toothpaste is a simple process that everyone can do. But there are also other undeniable advantages of this method. So, the price of polishing at a service station will be about 800 rubles. In severe cases it may be higher.
At home, the same process will be practically free. Another advantage is time. Finally, the entire technology is performed without special tools and devices. Reviews say that this way you can polish a headlight in absolutely any conditions.
How to polish plastic from scratches yourself
If abrasions and scratches appear on the surface of the plastic, it is not necessary to throw away the old one and buy a new product. There are several effective techniques that can be used to polish glossy plastic to a mirror finish. To do this, you can use factory-made and home-made preparations, and various improvised means.
The effort spent will pay off, since the services of repairmen or replacement of a product can cost a considerable amount. The right approach will provide good savings and the acquisition of precious experience that will come in handy more than once.
Hand polishing
This procedure is carried out in cases where the surface has shallow cracks, abrasions, or has been subjected to a primary sandpaper treatment. The material is exposed to an abrasive with microscopic grains, traces of which can only be seen with a magnifying glass. Similar services are provided by auto repair shops and cleaning companies, but their price is comparable to purchasing a new product. It is cheaper to restore plastic yourself and for free.
The abrasives used are GOI paste, tooth powder, ash and fine volcanic dust, which can be purchased at pet stores. Felt, felt, wool and batting are best suited for the nozzle. The fabric is moistened with alcohol or water, after which an abrasive is applied to it. To polish the plastic to its original state, you need to wipe the products with smooth movements and even, gentle pressure.
The advantages of this method, compared to the mechanical one, are that there is no chance of the material melting or being damaged by careless movement. In addition, the sense of touch ensures high processing accuracy.
Polishing
If you don’t have the necessary improvised and factory equipment in your home, you should remember about polish. This is a product consisting of an emulsion and tiny particles that grind down irregularities on the surface of plastic and glass products. Thanks to the thoughtful composition and proportion of components, a high-quality final result is achieved.
This paste for polishing plastic is used according to the following method:
- The substance is applied to the surface and distributed over it in an even layer.
- The object is wiped with a sponge or terry cloth. The degree of pressure is determined based on the hardness of the material and the depth of its damage.
- The product is rinsed under running cold water. If defects remain, the procedure must be repeated until the desired result is achieved.
A special feature of the polish is that it can be safely used when using mechanical brushes. The presence of lubricant prevents overheating, even when processing is carried out at high speeds.
Using a polishing machine
The tool belongs to the category of professional equipment, but has an affordable price for purchase in a home workshop. The device is characterized by ease of use and high performance, which is achieved by the high speed of rotation of the nozzles. Designed for the restoration of car plastic over a large area; it can also be used for other purposes when restoring housings of household appliances, window sills and worn glass.
During the polishing process, the following rules must be observed:
- Before starting work, clean the area from dirt, dust, grease and oil deposits. To do this, use a tile and glaze cleaner.
- Start processing with the coarsest nozzle, which will remove the thin top layer of material. Then change attachments as you get closer to finishing the job.
- Finish the procedure with a foam nozzle, which will bring the final shine to the plastic, eliminating all the smallest abrasions.
The machine has proven itself well in the restoration of plumbing fixtures, window glass, window sills and even furniture varnish.
Depending on the area of the damaged surface and its characteristics, a household or construction hair dryer is used. The principle of this method is that when heated, the transparent plastic becomes viscous. In this state, like water, it fills all the depressions, forming a flat plane.
The rules for using a hair dryer are as follows:
- No dirt or dust on the plastic.
- Checking the reaction of the material to heating in an inconspicuous area.
- Gradual warming up with a slow increase in power.
- Smooth movement of a jet of hot air over the area so as not to burn the polymer plate.
- If cracks persist, do not increase power to maximum as this may cause a fire.
If the work is done correctly, the result will be no worse than after lengthy and labor-intensive grinding. All abrasions will disappear, and in their place a shiny gloss will appear.
Toothpaste
As practice shows, polishing plastic with toothpaste, when done skillfully, can give results that are not inferior to patented products. For work, you should choose neutral compounds without acids and alkalis. You should pay attention to the size of the abrasive particles. The smaller they are, the better the surface will be leveled. If there is a large amount of work to be done, then it is advisable to purchase an inexpensive tube that can be used only for technical purposes. You can enhance the abrasive properties with fine dispersion dental cleaning powder.
Cleaning is done in this way:
- The product is prepared for processing.
- The paste is applied to felt or thick fabric.
- Polishing is carried out by making circular movements.
- As the composition becomes contaminated, it is removed and replaced with a fresh one.
- At the end of the treatment, the surface is washed under running water and wiped dry to avoid the formation of a white coating.
If you are going to restore transparent plastic, it is advisable to use a gel for sensitive teeth.
Minuses
With all the advantages, there are also disadvantages. The main disadvantage is that the effect is short-term, and the process itself must be repeated with sufficient regularity. In addition, if due care is not taken during the process, the glass can easily be damaged.
But in general, despite the shortcomings, home polishing of headlights is the best option when you need to quickly and inexpensively return your optics to their excellent appearance and performance characteristics. Owner reviews say that for greater effect you should purchase a special polish.
Why do headlights get worse over time?
Like any part of a car, optical instruments are subject to wear and tear. This is expressed in tarnishing of glass or plastic. In this case, it is more difficult for light to penetrate through the dim coating, and its refraction changes. What leads to this?
Many people believe that regular car washing is insurance against cloudy headlights, but it's not entirely about cleanliness.
While driving, small and not so small particles hit the surface of the headlight. As a result of impacts, small damage occurs, which becomes noticeable over time.
They cannot be removed by regular washing with water or chemicals. The only way out of the situation is to buy new headlights or polish them. The second option is much more economical, while improving the performance of optical instruments by at least 40%.