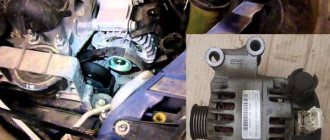
Sometimes it happens that a car generator completely fails and cannot be repaired. This happens in two cases, after a serious accident, when the generator housing is broken or when the housing falls apart due to age. In such cases, repairing the generator is impractical and it is easier to replace it with a new one. It also happens that after installing a powerful sound system on a car, the owner begins to notice that the standard generator does not have time to charge the battery. In this case, the generator is replaced with a more powerful one.
Often, old cars have simple and reliable generators that work for decades without replacement. When removing such units, it is often necessary to cut off the fastening elements, as they literally “stick.”
Replacing a generator, especially on older cars, is a rather complicated and problematic procedure. You need to stock up on a set of tools in advance that will help you remove the generator from the car yourself. On some foreign cars, the generator can be removed from above, while on others you have to work through the wheel arch or even from below. First you need to decide how it will be easier to remove the generator on a particular car. In order to prevent fasteners from breaking, all fasteners must be treated with WD-40 liquid. To simplify the process of removing the generator, it is advisable to carry out work on a pit or a lift.
The generator can be removed in three ways:
- Up, pulling it towards you;
- Down, moving it under the engine;
- Or down, leading it out through the wheel arch.
How to get a generator must be determined on the spot, based on the model of your car. If you have a car owner's manual, these details will be noted there.
How does the generator work on a VAZ?
Main details:
- Brush holder with voltage regulator.
- Stator.
- Rotor.
- Fan with pulley.
- Distance ring.
- Bushings.
- Bearings.
How does the generator work on a VAZ?
With the help of the stator and the generating part, a 3-phase alternating current is generated, which 6 large diodes change to direct current, and the battery is charged.
The generator operates by rotating the crankshaft. The device is located under the hood, on VAZ cars - in the front part. Therefore, it is not difficult to remove the VAZ-2114 and other models generator.
Tools for replacing the generator on a VAZ car
Before changing the generator, you need to prepare the necessary tools. For this work you will need:
- gloves to protect hands;
- a set of ring or open-end wrenches for 8, 13, 19;
- ratchet wrench and sockets for 8, 13 and 19;
- extension cord with crank;
- hammer;
- pliers and a flat-head screwdriver (you may not need it, but it’s still better to have it ready);
- permanent marker for marking wires so as not to confuse their location during assembly.
Now let's look at the process of replacing the generator itself.
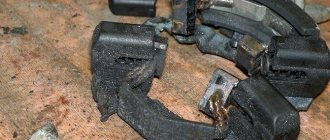
Types of mechanical failures
Failure in the technical part of the generator - wear of the bearings, bending of the pulley (if it is not bent too much, the device will work with a whistling belt), failure of the fasteners.
Attention! Mechanical breakdowns appear after an accident; they rarely occur during operation.
Signs of damage:
- Unnatural noises when the generator is running.
- Voltage drop.
- The car drives faster, then slows down sharply when you press the gas pedal with the same amount of force.
Elimination of a simple breakdown - repair. If several parts fail on a VAZ-2113, 2114, 2115 or other Lada model, replacement is needed.
Preparation for repair
As a rule, the need to check the generator appears before repairing it - when the corresponding symptoms appear. Signs that it is not working or its performance has deteriorated significantly are clearly noticeable and understandable even to a non-specialist. How to change and how to check the generator can be read in the relevant literature or look for tips on the Internet, but without experience it is better to entrust this to professionals. These are inexpensive services that will obviously be comprehensive, but will take relatively little time. Please note that these procedures require special equipment and standard tools.
First, in logical order, the problem arises, how to check the generator ? What is needed for this, and what is the procedure?
Using an ohmmeter you can check the main indicators:
- Performance of capacitors. When connecting an ohmmeter, the resistance should gradually increase, but soon stop changing.
- Integrity of the diode bridge. In addition to the standard procedure, it is necessary to exclude the short circuit of the diode to the car body.
- The performance of the voltage regulator. It would be a good idea to check the brushes and make sure that they are secured correctly and that their protrusion is not too large.
- Integrity of the stator winding. Winding resistance values must be within the range specified by the manufacturer. Otherwise there is a gap. You also need to check the reliability of the insulation and make sure that there is no short circuit to the housing.
- Bearing condition. This question is mechanical, but no less important. According to statistics, bearing failure is a very common problem. A typical symptom is an unpleasant grinding noise coming from the generator. As a rule, this is typical for older products that have served for several years in unfavorable conditions. Sometimes the reason for this is improper belt tension, which can lead to more serious damage and ineffective operation of the batteries (in this case, the problem can be determined by the battery indicator, which is installed in all modern cars).
Measurement locations must be determined based on specific models. Finding appropriate diagrams with detailed instructions on how to test the generator is not a problem.
Types of electrical faults
The problem with the generator is that it stops producing current. The indicator on the dashboard lights up. Electrical faults lead to breakdown:
- The fuse or contacts have blown. Making a replacement is a matter of minutes. With contacts things are different.
- The brushes are worn out. You can change it yourself; you don’t need to buy a new device.
- The regulator relay has failed. You can repair it yourself or contact a professional.
- Diode bridge failure. Cannot be repaired, only replaced. To do this, you need to disassemble the generator; without experience, it is better not to carry out such work; it should be left to the experts.
Diode bridge failure.
- An open circuit in the stator or rotor due to a short circuit. Repairing is more expensive than purchasing a new electrical unit.
Signs to help detect an electrical problem:
- The battery indicator on the dashboard does not go out after starting the power unit or blinks.
- Burnt wire smell coming from under the hood (a serious problem that may not be related to the alternator).
- The appearance of sparks in the housing.
- Voltage drop.
- Constantly recharging the battery.
- The headlights are adjusted, they shine dimly, and when other sources of power consumption are turned on, they almost do not light up.
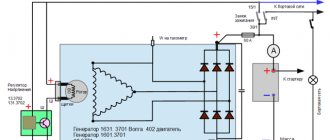
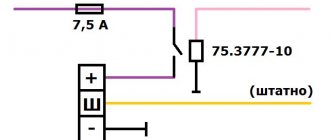
Generator connection diagram
How does a generator work?
To identify a generator malfunction, as well as successfully eliminate it, it is important to know the operating principle of the device. The main parts of a car generator are:
- frame,
- stator,
- rotor,
- relay-regulator,
- rectifier bridge,
- pulley.
Essentially, a generator converts the rotational motion transmitted from a running motor into electrical energy.
The generator pulley is used for belt transmission. When the rotor rotates, a magnetic flux is generated, the strength of which is regulated by a relay regulator.
Voltage is transmitted from the commutator rings to the brushes. A bridge rectifier, made up of diodes, causes electrical current to flow in only one direction.
And the relay regulator or “chocolate bar” limits the output voltage to 13.6-14.7 V.
The rotation of the rotor shaft occurs in bearings, the smooth operation of which determines the ease of rotation.
How to remove a generator on a VAZ
On front-wheel drive Lada cars with an injector engine (with the exception of Vesta and Largus), the location of the device is the same. The fastenings are identical.
Removing the generator using the example of a VAZ-2115 with an 8-valve engine
Required tools:
- Keys for 8, 10, 13, 17, 19.
- Puller for convenience.
- Adjustable wrench.
- The head is 27 elongated.
Stages of work:
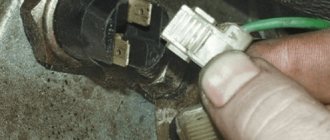
- Remove the terminal (−) from the battery (must be done before starting any work).
Disconnecting the terminal from the battery
- Unscrew the fastening bolt located below.
- Move the terminal protective cover (on the side) and unscrew the fixing element.
- Remove the top mounting bolt.
- Remove the belt from the pulley.
- Dismantle the device.
On a car with an 8-valve engine, you can do without a pit. The knot is taken from above. If the engine has 16 valves, it will be more difficult to remove.
On classic models (2101, 2105, 2106, 2107 and others), the generator is located under the hood; dismantling differs from front-wheel drive cars. The engine of the “classic” has a different location, which is why some peculiarities arise.
Removing the generator on a VAZ-2107
The same tool is needed. The process is as follows:
- For convenience, drive the car onto the overpass.
- Unscrew the terminal (−) from the battery.
- Remove the battery (you will need a 10mm key).
- Unscrew the top bolt with a 13 or 17 key (it differs on different models).
- Remove the protection from the bottom.
- Remove the belt.
- Remove the wires from the device.
- Bend the terminal protective cover (+) and unscrew it with a 10mm head.
- Using a wrench (19), unscrew the nut securing the stator and the unit mount.
- Remove the nut and remove the device from below.
After removal, you can begin repairing the generator. If key elements of the device fail, it is more economical to purchase a new one.
The procedure for removing the generator with your own hands
When removing the generator, you need to follow this sequence:
- All units that block access to the generator are removed from the engine;
- Remove the drive belt from the generator pulley;
- The generator mounts are unscrewed;
- The generator is removed.
The thermostat, battery, and various wires and pipes may interfere with removal. If you do not mark the wires during removal, problems may arise when connecting the generator (if you have a diagram for installing and connecting the generator, you don’t have to mark the wires).
To remove the generator belt, you need to loosen the generator mount and change the position of the tension roller. After this, you can easily remove the belt. Before you begin the procedure of unscrewing the bolts that hold the generator in place, you should spray the fasteners with Vedashka. If everything is done correctly, the generator can be easily removed from the engine compartment.
This is interesting: Removing the automatic transmission selector
Procedure for replacing the generator
If the electrical unit fails and repair is impractical, you must first find a replacement. It is recommended to buy a factory version that will fit the fasteners and terminals. Otherwise, the repair will be accompanied by changing the wires.
Replacement process for VAZ 2109-2115:
- Drive the car onto the overpass.
- Remove engine protection.
- Remove the (−) terminal from the battery.
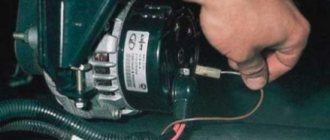
- Move the protective cover away from the positive one, unscrew the fixing bolt and remove the terminal.
- Remove the wires (secured with a block).
- Remove the upper fastening element.
Upper mounting bolt
- Take off the belt.
- Unscrew the bottom bolt.
Bottom bolt
- Dismantle the device.
- Install a new unit so that the fasteners match.
- Secure with the lower and upper bolts.
- Install the belt (preferably a new one).
- Place the terminal, secure it, and return the protective cover.
Securing the terminals on the generator
- Connect the wire block.
- Adjust tension.
Attention! If you overtighten when adjusting the belt, the bearings will quickly fail. If the tension is weak, there will be no proper grip and the battery will not be able to charge.
To tighten, you need to turn the adjusting screw, which, when moving clockwise, is tightened, and when moved counterclockwise, it is loosened. It's easy to check - you need to gently press the belt so that it bends no more than 15 mm.
Installation of a new generator
The new generator should be installed in accordance with the installation diagram. First, the generator is installed in its place, then the mounting bolts are tightened. Then the generator belt is put on, which will need to be adjusted later, and all the chips and wires are connected. There is no need to put on the protection yet; you will still need to adjust the belt. When carrying out the adjustment procedure, you must tension the belt strictly according to the installation instructions.
This is interesting: How is the filter element classified?
When installing, you need to pay attention to the condition of the rollers, tension bar and bottom bolt. It is better to replace them immediately if they have play (rollers) and damaged threads (bolts). It should be remembered that the rollers must be installed without distortions.