Hello, in this article you will learn how to remove and replace the generator on a VAZ 2110, 2111, 2112. The generator is a part without which the operation of the car is impossible, because it ensures the functioning of all electrical appliances, generates electricity and charges the battery. With the generator not working, the battery will quickly discharge and you will no longer be able to start the engine. The price of a new generator is from 3,500 rubles and above, so to save money, you should try to figure out the reasons for the malfunction of the old generator yourself. Most often, the diode bridge, brushes and bearings fail, and it is also necessary to check the generator belt and its tension.
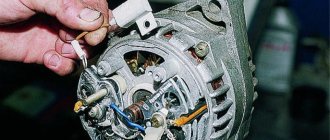
So let's get started. First of all, remove the terminals from the battery, disconnect the wires from the generator
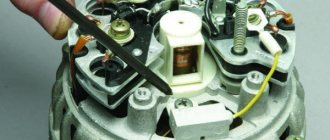
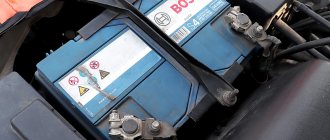
Then remove the protective rubber cover, unscrew the nut and disconnect the wires
Loosen the two generator mounting bolts (top and bottom)
Now, using a 10mm wrench, you need to loosen the tension on the alternator belt and remove the belt
We completely unscrew the lower bolt of the generator using a 13mm wrench, the upper fastening and the tension bar
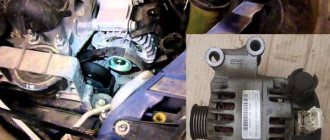
We remove the generator itself to replace it with a new one or repair the old one
Installation of the generator occurs in the reverse order.
Often, many VAZ 2110-2112 car owners are in too much of a hurry at the first generator malfunction and prefer to replace it with a new one, instead of simply finding out the cause of the breakdown and eliminating it. In this case, we will not consider repairing this device, but will only look at the procedure that must be performed to remove and install the unit.
So, to dismantle it without problems, we will need a tool such as:
- Socket heads for 10 and 13
- Ratchet handles or cranks
Photo report on repairs
I would like to warn you right away that in this example of my VAZ 2110, the generator is slightly clamped by the mounting bracket, since it broke off during the accident, so I cannot show you the removal procedure in all its details. But still, the main points will be shown quite clearly in the photo.
Unscrew the tensioner nut, which is shown by the arrow below:
After this, move the generator back (towards the car interior) and remove the belt from the pulleys. Now you can disconnect all power wires. One “bundle” is secured with a stud and nut, and another plug is simply fixed with a connector:
Then you can unscrew the lower nut securing the generator, first crawl under the car and remove the engine protection (if installed):
Usually the bolt fits tightly, so it can be knocked out carefully and without excessive force with the handle of a hammer:
Then from the reverse side we try to remove this very bolt to the end:
Next, unscrew the tensioner nut from top to bottom and you can carefully move the VAZ 2110 generator to the side in order to remove it later:
If you are replacing the complete device, install it in the reverse order. But please note that the generator model, if possible, should be the same as the one installed by the factory. That is, first of all, look at the applicability specifically to your car, and then at the current rating in Amperes.
As for the price of generators for VAZ 2110-2112, it may vary depending on the type and manufacturer. But if you take the KZATE model, which in most cases is installed by the factory, then the cost can be about 3,500 rubles. Although, Chinese options can be obtained at almost half the price. True, you should not chase low cost, since the service life of these parts can be quite short.
AutoNews / Reviews / Tests
How to Remove the Generator VAZ 2112 16 Valves
We change the alternator belt on a VAZ 2112 ourselves
The belt drive enables the alternator to produce electricity in the vehicle. The device can operate normally on the condition that what remains for our client to do is that its components are in good working order. This also applies to the strap. Replacing the VAZ 2112 16 valve alternator belt is not an easy procedure, which is created in the garage. An article with a detailed summary and video will help in this matter.
Replacing parts of the VAZ 2110 generator
There are situations where the electronic components of the VAZ 2110 generator set fail. Replacement can be made without completely dismantling the generator, directly on the car. The voltage regulator and diode rectifier are located under the rear cover of the generator. It is much more convenient to make such repairs on a repair table.
In the field it is necessary:
- de-energize the generator (disconnect the negative battery cable, the wires on the back of the device);
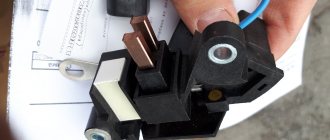
- remove the plastic cover on the back of the device, gaining access to the electronics;
- unscrew, remove the relay-regulator,
- pay attention, remember the location of the fastening elements (screws, insulating washers, metal), wrap them, strictly observing the order of placement, excluding short circuits,
- replace the holder with diodes, put it back together, tighten the contacts.
In what cases is replacement necessary?
Like any consumable material, the alternator belt has a certain resource and requires constant technical inspection. According to the advice of the manufacturer at VAZ 2112
Regardless of whether there are 16 valves on the engine or 8, it is necessary to change the consumables after 45 thousand kilometers. But these are only tips; you need to constantly worry about the condition of the product and change it when it’s time. The service life depends on the following reasons:
- driving habits;
- operation criterion;
- product properties.
A visual inspection of the drive components should be carried out when the car has traveled a maximum of 10,000 km and before a long trip. This makes it possible to avoid nasty surprises while driving – a broken belt. It is recommended to carry a spare one in the trunk on your own, because if it breaks, the car will no longer be able to move without the help of others.
It is necessary to change the strap if it is torn, stretched, as it is also called, and has become unusable. There is an option to find a bad tension by the specific whistle that occurs when starting the engine. Tension plays an important role in the performance of a belt drive. If the tension is weak, the unit does not produce the amount of electricity required for normal vehicle operation. If it is strong, the service life of the belt, drive bearings and crankshaft is reduced.
KEY-DOP
It is natural to find the need for replacement when examining the following signs:
- the appearance of cracks and tears;
- worn surface;
An old product with a worn surface
- material delamination;
- frayed edges;
- strong stretch.
It's easy to check the strap tension. It is considered normal if, with a force of 10 kg, it bends by 10-15 mm. To check, he needs to press with his huge finger approximately in the center of the belt between the crankshaft pulley and the generator.
Place to check tension (where to press)
When should a generator be repaired?
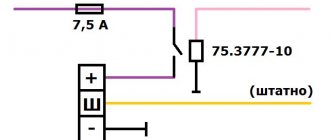
If it stops supplying current and the voltage going to the battery drops (By the way, the voltage can be checked using a voltmeter, to do this it will be enough to start the car and connect the wires of this device to both terminals, if the device itself shows too low a voltage and while the car is running the volts will drop, then this indicates that the generator is faulty and needs to be replaced), then it must be replaced, in addition to this method, you can also check the generator like this: start the car and let it work for a while, then pull out the choke to about the middle and remove the minus terminal from The battery, if the car stalls, then the generator needs either repair or replacement (This operation cannot be performed on injection cars, and on a carburetor it is also not advisable, because the diode bridge can burn out, so carry out it at your own peril and risk and if everything after all, they threw it off and the car did not stall, immediately install the terminal in its place and tighten the nut that secures it), the last way to understand whether it needs repair or not is the battery charge lamp (by the way, it is indicated by an arrow in the photo below) , so if this lamp suddenly lights up while the engine is running, then again, there is a high probability that the generator is not producing current and needs to be repaired.
As you already understood, the best way to check is with the help of a multi-meter that has a voltmeter function (And everyone has it), so if you still decide to check with it, then remember the current that should be on the battery when the engine is running equals approximately 13-14.5 volts, if it is less, then either the battery is completely discharged, or the generator has become unusable, in this case, try accelerating, to do this, briefly press the gas pedal and remove your foot from it, if the current supply increases, then the battery is discharged , if nothing happens, then try to do this again and remember, if the current is less than 12 volts, which is no longer acceptable, then in a very short time the battery will be completely discharged and you will no longer be able to start the car (To start the car, you need at least 11.5 volts , if the battery produces less, then starting the engine will be problematic)!
Stages
The replacement procedure is different for cars equipped with and without power steering. Below we will look at both options.
Replacing the alternator belt on a VAZ 2112 16 valve with installed power steering consists of the following steps:
- First, remove
the power steering fluid reservoir. - Then, using a key set to “13”, you need to unscrew the nut, thanks to which the generator is attached to the mounting plate.
Generator drive with hydraulic booster
the motor from the support. First you need to unscrew the cushion, and then jack up the engine in anticipation of the gap. We take out the belt through the gap formed.
KEY-DOP
This is where the difference between a car with a hydraulic booster appears - there is no adjusting bolt. The tension is adjusted using a tension roller.
The procedure on a car without power steering is simpler:
- Using a wrench set to “13”, unscrew the generator mounting nut.
- We loosen the belt tension by turning the adjusting bolt with a wrench to “10” counterclockwise.
- Having moved the generator
towards the cylinder block, we remove the belt. - Next, we put the new consumable on the drive by rotating the adjusting bolt.
- Next, we tighten the strap using the adjusting nut. We move the generator
furthest away from the cylinder block. By rotating the adjusting bolt clockwise, we increase the tension, and counterclockwise, we loosen it. - Then the crankshaft must be turned two turns and the tension checked again.
Generator drive without power steering
At this point, the procedure for replacing the alternator belt on a VAZ 2112 16 valves is completed. Having completed it in a homemade manner, you benefit from a trip to a car service center. Now, knowing how to change the alternator belt, you will feel confident when traveling, because you can always change this spare part without the help of others.
Replacement process detailed instructions
We will look at options with 8- and 16-valve engines, which are present in the VAZ 2112 and 2110 models. Regardless of the number of valves, the same set of tools will be required for replacement. The list includes standard tools that can be found in almost every driver's garage.
Timing belt for VAZ 2110 16 valves
In addition to the timing belt itself and the roller for the VAZ 2110 or 2112, you will need:
- a special key that regulates the degree of tension of the roller;
- spanner set to “17”;
- key to “15”;
- key to “10”;
- installation, as an alternative - a powerful screwdriver.
Replacement on an 8-valve engine
Replacing the VAZ 2110 8 valve timing belt is as follows:
- First of all, we de-energize the battery - for this you need to get the negative wire;
- We unscrew the bolts that hold the timing belt protective casing, and then remove the casing;
- On the passenger side, it is necessary to remove the engine compartment mudguard along with the protective element and the right wheel;
- Our task is to ensure that the marks on the cover and, accordingly, on the pulley match, as indicated in all the diagrams. To do this, you need to twist the part clockwise;
- We go to the gearbox and remove the plug from it;
- We need to check the alignment of the marks in this hole;
- We block the flywheel - for this you can use a mounting tool or a powerful screwdriver;
- Now you can remove the timing generator pulley;
- We got to the nut that holds the timing belt pulley - it needs to be loosened, but not unscrewed;
- Now we have reached the required element of the VAZ 2110 or 2112 timing belt. Now it can be removed. All parts that it covered must be cleaned with detergent. After removing dirt, the area should be wiped with a clean rag;
- Next, a new timing belt and tensioner roller are installed - follow the direction indicated on the arrow. Sometimes it happens that the manufacturer does not indicate the arrows, in which case, you need to place the element so that the inscription is read from left to right;
- To tension, you need to turn the roller counterclockwise.
- The next step is to test the timing belt and its tension. You need to check the element with a cold engine, and the temperature in the garage or box should be within +15-+30C. We start the engine and inspect the timing belt.
If there are no unnecessary sounds or vibrations, then all the elements can be installed back - these are the wheel, casing and mudguard.
Replacement on a 16-valve engine
Despite the fact that there are more valves, replacing the timing belt is no more difficult than on the version with 8 valves. So, replacing the VAZ 2110 16 valve timing belt is performed as follows:
- As in the case of the VAZ 2110 or 2112, where there are 8 valves, we need to dismantle the belt protection. It is held in place by 6 bolts.
- Next, you need to remove the chip from the crankshaft sensor - unscrew the mount and take out the sensor itself. For clarity, you can study the photo.
- If you dismantle the gas distribution mechanism yourself, then you probably noticed the absence of one tooth. This is done so that the sensor can independently find the dead center. This feature can also be used to lock the crankshaft.
- Blocking can be done when a tube of a suitable size is placed in the hole under the sensor. Now the pulley is blocked, as a result, it can be safely dismantled.
- Next, the work scheme is practically no different from removing the 8-valve timing mechanism with your own hands - loosen the roller fastening and remove the faulty or worn belt.
- There are two ways to install a new element: remove the tension roller and then install the belt along with it, or do it by turning the camshaft.
- When the new element is installed, you can return everything to its original position. You should start by fastening the pulley - tighten the bolt and align the gear - the marks on the oil pump will help with this. If they are missing, then you can make a mark yourself.
- The parts must be combined carefully, since the timing gear should not get knocked out.
- Using a special wrench, we must tighten the belt. Not everyone has such a wrench, but as an alternative you can always take a powerful screwdriver and two nails. It is also worth remembering the nut, which must be tightened tightly.
- We check the tension; the rubber should move away from the gears, but there should be no folds.
- All that remains is to turn the crankshaft 2 times and make sure that the marks remain in the same place - the work is completed
Check the gas distribution mechanism every 10 thousand kilometers, and then you will not have to spend money on expensive repairs.
Open circuit (short circuit) in the windings
In a VAZ-2110, the generator may also fail due to a break (short circuit) in the rotor or stator windings. Such a malfunction does not bode well, since it is almost impossible to eliminate it on your own. Here you will need to either rewind the windings or replace the faulty element (rotor or stator).
Before checking the generator on the VAZ-2110, it will need to be removed from the car and disassembled. Let's start with the stator. We take the tester, turn it on in ohmmeter mode and measure the resistance between each winding terminal and the housing. For a working stator it should tend to infinity. If the device shows less than 50 kOhm, there is a short circuit in the winding.
Let's move on to the rotor. Here it is necessary to measure the resistance between the slip rings. It should be within a few ohms. If the resistance is close to zero, the winding turns are closed. If the device produces too high readings, a break may occur.
How does he work
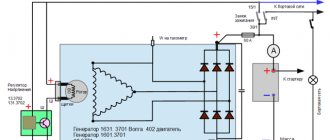
First, let's figure out how this device functions. His work scheme is as follows:
- The key is inserted into the ignition switch;
- The current goes to the excitation wires;
- The magnetic field created by the armature passes through the stator windings, and voltage appears at its terminals;
- When the armature rotation frequency becomes high enough, the self-excitation mode begins;
- The rectifier unit provided by the car design converts alternating current into direct current;
- The voltage regulator starts working when the crankshaft rotation speed changes, and the time for which the excitation wire is activated is adjusted.
The presented video will allow you to clearly get acquainted with the principle of operation of the generator.
Functions
Beginners are very interested in the most important question, without which there is no point in trying to fix something on their own - what is the generator used for.
First of all, the generator’s task is to provide energy to all electrically dependent equipment.
The mistake many people make is that the equipment is powered by a battery. The battery is needed to maintain the functionality of the devices when the engine is turned off. It powers the audio system, alarm system, etc.
When the engine is started with the help of the battery, all the reins of power pass to the generator. He is now responsible for the operation of the audio system, air conditioning, power windows, etc.
The second, but no less important task of the battery is to recharge the battery. This happens when the engine is running. If it were not for the generator, the battery would not be able to provide power to all consumers for a long time; it would have to be charged regularly in the garage.
Scheme
Source
Classification of automobile shock absorbers
Shock-absorbing mechanisms are divided according to the content of the working substance into:
In fact, oil is contained in every variant.
Depending on the number of tubes, the mechanisms are:
- Single-pipe. One cavity (tube) for oil and gas-oil devices.
- Two-pipe. This design occurs only in gas mechanisms.
By control method:
- With the ability to control.
- Without the ability to control.
Depending on the installation of one type or another, the car can move smoothly, like a business class car, or hard, like a sports model.
How to replace bearings with your own hands (in detail)
First of all, let's look at replacing the front bearing:
Disassembled device
- We unscrew the mounting nut on the generator, and then you need to loosen the adjusting bolt.
- We remove the generator belt and start the engine to make sure that the cause of the breakdown is the generator bearing.
- If the noise disappears, remove the negative terminal from the battery.
- We unscrew all the wires that go to the generator.
- We remove the crankcase protection to get to the lower mounting of the generator unit and remove it.
- We take out the generator through the engine compartment.
- Using a regular screwdriver or other handy tool, we block the generator rotor, and then unscrew the pulley.
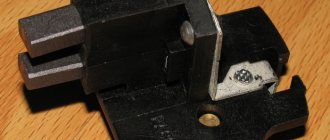
Now let's move on to replacing the rear bearing:
Press-fitting
- To dismantle this element you will need a special puller.
- If a puller is missing, knock out the component with a chisel. An alternative is a metal rod and a strong screwdriver.
- Using your chosen tool and hammer, knock out the bearing. Be sure to move across the surface in the opposite direction.
- You can also dismantle the bearing using a regular open-end wrench.
- Now we take the old bearing and the head with which the front bearing was removed. Use them to drive the new bearing into place.
- If this method does not suit you, use a tubular wrench or a metal pipe whose diameter corresponds to the diameter of the rear bearing.
Verification Guide
How much voltage does the VAZ 2110 generator device produce and how much voltage should it produce? What generator voltage should be in the on-board network to ensure normal operation of units and components? Many drivers have no idea how the device should be checked if there is low voltage in the network, but we are ready to share this information with you.
Tools and materials
To check the generator, you will need:
- tester (multimeter);
- control light with wire;
- set of wrenches;
- power supply with voltage regulator.
1. Tester
2. Warning lamp
3. Wrenches
4. Power supply with voltage regulator
Algorithm of actions
Before increasing the voltage, it is necessary to correctly diagnose:
First, pay attention to the indicator light on the control panel. This light works as follows: it appears when the ignition is turned on, but disappears after the engine starts
If the indicator continues to light when the engine is running, this indicates that the battery is not charging. using a multimeter, diagnose the voltage in the car's electrical wiring; this parameter must be at least 12 volts. As practice shows, the reason for the appearance of the indicator is usually associated with either wiring faults in the on-board network or a break in the device’s strap. If the indicator lights up at half strength, then most likely the problem lies in weak strap tension. The problem can be solved by tensioning it to the desired state; this will allow increasing the voltage. The next step will be diagnosing fuse F2 - if the strap is tensioned correctly, the voltage level in the wiring should correspond to the nominal one. If the fuse is faulty, you need to replace it, then check for the presence of a charge on the battery itself. If the fuse is working or replacing it does not produce results, try measuring the parameter at pin 61 - the resulting value should be approximately 6 volts. If you detect a lack of voltage, you need to dismantle the control panel and look for the cause in the soldering areas. It often happens that the problem is a break in one or another cable that goes to the control panel from the 61 connector. The next stage of testing, if the measured parameter is higher than the nominal value, is to remove the regulator relay. Relay diagnostics are carried out using a test light; to do this, apply a 12-volt current to the relay. In this case, the plus is supplied to the plug output of the relay, and the minus is supplied to the vehicle body. The light bulb itself, rated for 12 volts, must be connected to the regulator brushes. If the voltage level is 12 volts, then the light bulb will light without problems, and when this parameter increases to 16 volts, the light bulb will go out. If the lamp does not go out, then it is necessary to replace the regulator relay. But if the relay is working properly, but there is no charging, then the only way out is to dismantle the generator and find the fault in it. Next, using a multimeter, you need to check the performance of the winding; the resistance level in this case should be 4.5 Ohms. If the resistance is lower, then the winding needs to be repaired, that is, change the armature or simply rewind the element. In some cases, the problem lies in clogged slip rings - this problem can be solved by replacing or cleaning them. If after these steps the tester still shows a break in the wiring in the winding, the rotor will need to be replaced. The next step will be to check the diode bridge of the VAZ generator; in particular, each diode should be diagnosed for breakdown. The semiconductor itself transmits current in one direction, and diode diagnostics are carried out accordingly. If several elements burn out at once and it is not possible to get rid of the malfunction, then the unit must be completely replaced with a new one.