Print this article Font size 16
The generator is an incredibly important component of the car, the functioning of which determines the performance of the entire car.
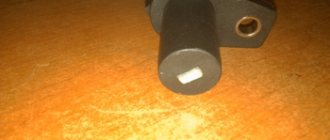
If you hear a grinding noise coming from under the hood, you can immediately suspect that the generator bearings are faulty. This metal element often becomes deformed during operation and loses its performance characteristics.
This may manifest itself as annoying grinding, ringing or whistling noises. If the situation is really bad, the bearing may be even louder than your running engine.
Generator bearing
Article on the topic:
— Self-repair of the generator on a VAZ 2114
Replacing generator brushes for VAZ 2113, 2114, 2115
If on VAZ 2114, 2113, 2115 cars the battery starts to hold the ignition only for a few minutes, the alternator brushes need to be replaced. If repairs are not carried out in a timely manner, you will have to constantly charge the unit and install a new one in the near future. It is easy to check the functionality of the brushes - by the size of the protrusion from the socket. If the result obtained exceeds 5 millimeters, you need to start working. You can act according to the regulations: every 50 thousand kilometers or every season. This repair is not complicated, you can do it yourself.
Tools required for repairs
To work you need to prepare the following tool:
- socket head with ratchet 8;
- key to 13;
- a regular flat screwdriver.
The price for replacing generator brushes without removal and with removal on VAZ 2113, 2114 and 2115 as of November 8, 2019 varies from 500 to 600 rubles. Inexpensive, but why pay? Independent work is quite advisable, it is not complicated, does not require special skills, and at the same time you can inspect the condition of the generator and adjacent components.
Unit Removal Guide
If the bearing is destroyed, disassembly of the generator is necessary, and for this you will have to dismantle it. The generator set is attached to the engine cylinder block on a special bracket. There is also a bar for adjusting the belt tension.
To remove the generator set on a VAZ 2114, you need to stock up on the following tools:
- a set of wrenches, preferably both box and open-end wrenches;
- socket head at “15”;
- mount, or a piece of metal pipe.
There are options for dismantling the generator set with or without removing the power unit protection. We will consider the option without dismantling the protection. Before removing the generator set, you must disconnect the negative terminal on the battery to avoid short circuiting.
The procedure consists of the following steps:
First, using a key set to “17”, you need to loosen the tension on the generator belt. To do this, you need to unscrew the fastening nut from above and move the unit to the cylinder block. Next, you need to unscrew the nut on the output bolt “31” and disconnect the supply wire that goes to the rotor excitation winding. The generator is attached to the bottom using a nut and a long bolt; they need to be unscrewed. To make it more convenient to remove the generator, you need to unscrew the bar with which the unit is attached to the engine cylinder block
To do this, you need to unscrew two bolts. You should also carefully unscrew the nut securing the bar to the starter. If the fasteners are stuck, you can use a penetrating lubricant, which makes it possible to remove rust and dirt. To remove the axis of fastening the generator to the bracket, it is better to turn it clockwise. Next, use a key set to “19” to unscrew the nut and remove it and the spacer sleeve. Now the generator unit can be lifted up.
If you dismantle the generator through the bottom, you need to remove the protection.
Main problems
Signs by which you can understand that the VAZ 2115, 2113 or 2114 generator brushes need to be replaced are:
- the battery does not charge or runs out of power quickly;
- warning lights on the dashboard are flashing;
- voltage failures;
- on-board electronics turn off or there is not enough power for its operation;
- the headlights begin to flicker or their light has become dim.
All these signs indicate brush wear. The following message appears on the instrument panel.
Work order
Before starting work, you must read the instructions in full on how to fix the problem. This will allow you to act confidently. You need to understand that the reason for the loss of functionality of the generator may be not only the failure of the brushes, but also the belt or relay regulator. It is possible that the entire generator set is worn out. Therefore, during repairs, you need to check the condition of all elements. First you need to prepare the car for work: remove the terminal from the battery to eliminate problems, and disconnect the plus from the generator.
Now you can start the main work:
- Unscrew the alternator belt mounting bolt.
- Move the unit towards the engine and remove the belt.
- Disconnect the tensioner bar, plug, and terminals.
- We remove the engine.
- Now you need to make the brush assembly accessible for work; to do this, you need to open the protective casing. It is secured with three latches.
- After unscrewing the two bolts, disconnect the wires.
- There is a nut on the right that also needs to be unscrewed.
- Now you need to raise the voltage regulator.
We remove the brushes of the VAZ 2114, 2113 or 2115 generator and check them. It often happens that they are completely over.Be sure to check the stem at anchor. It is located at the point of contact between the shaft and brushes. If it is large, it needs to be sanded.
- Now you need to thoroughly clean the location of the brush assembly, clean the contacts, and check the reliability of the springs.
- Installation of new parts.
- Reassemble in reverse order.
Compare old and new brush lengths.
Also watch the video of replacing the VAZ 2114 generator brushes without removing the generator:
You can also proceed in the following order:
- We de-energize the battery by disconnecting the negative terminal.
- Disconnect the contacts.
- We unscrew the two fasteners located on the brush holder body.
- We remove the node.
- Inspect the structure for defects.
- Measuring the protruding part of the brushes.
- Installing new components.
- Installation of the unit in reverse order.
This option is relevant if you are absolutely sure that the brushes are the cause of the generator malfunction. After the work has been correctly completed, the following message appears on the dashboard.
"Symptoms" of a breakdown
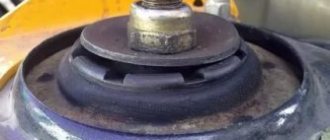
There can be a lot of breakdowns, including burnt-out diodes and complete discharge of the generator. But these are all separate topics, but when the bearings start to act up, it cannot be confused with anything. When the car is running, there is a loud noise, and often a squeaking sound. The reason for this is (usually) the grease in the bearings has worn off. As long as it is there, everything will work fine. But if there is no longer enough lubrication, there won’t be enough work for a long time. As soon as the first symptoms appear, repairs must be made immediately.
If the bearing housing itself is intact, then lubricating it will not be a problem.
But you need to get to them first. The VAZ assembly uses generators from the Eltra series of models, which, of course, is a plus. But for home disassembly it promises a little more work and attention. To get to the ill-fated bearings, you need to highlight a number of unpleasant points:
- special tools are needed, and without a puller it will be difficult to check;
- problems with checking the bearing in the front cover (in the article a little later).
This process is very difficult. First of all, in these generators, as a rule, the bearing is sealed. Therefore, in order to get it without the above-mentioned devices, it must be knocked out, having first selected the desired nozzle. But since it is cored, before doing this you should remove part of the metal that holds it there. If not operated correctly, the generator cover can easily be damaged, in which case you will have to purchase a new one. For reference, it should be noted that the service cost of replacing bearings (as a rule) also includes the cost of a new cover.
In order for everything to be correct, you should follow simple instructions. You need to take a drill and a drill bit with a diameter of 4 mm. We set the drill at 45 degrees so that the drill is in the cored hole. We drill 2-3 mm in each hole. This way, both the bearing and the residual metal will have somewhere to go.
Other work tips can be found below. The described tips will be a good recommendation on how to correctly replace the bearings of a VAZ-2114 generator with your own hands. Video instructions will become an even better advisor, since in auto repair theory alone is not enough.
An example of disassembly is shown on a newer generator model, which differs from its predecessor only in a number of indicators and characteristics.
Let's summarize
As can be seen from the above, replacing brushes is not difficult. It is accessible to a motorist who knows how to hold a tool in his hands and has common sense. No special skills required. After replacing the brushes, a message may appear indicating that the battery is low or the generator is faulty. There is no need to immediately panic and look for the reason. This is a fairly common occurrence as new parts are just starting to break in. After a short period of time, you will be able to confidently use the car.
Generator brushes: troubleshooting
The generator is the main component in the vehicle's electrical power supply system. Sometimes it breaks down, but you shouldn’t throw it away and rush to buy a new one. Often the problem is that the generator brushes are worn out and it is enough to replace them for further uninterrupted operation of this unit. Replacing generator brushes is a fairly simple procedure, but first you should find out what signs may indicate brush wear.
Often, when carrying out a preventive inspection of a car, attention is not paid to various details. Alternator brushes are one of these little things; if they wear out, the generator will stop charging the battery. Experts recommend inspecting the brush assembly once every 45-55 thousand kilometers. Diagnostics of the brushes can be carried out without removing the generator, and in some cases it may even be possible to replace them without removing the main unit.
Generator bearing and belt diagnostics
While the generator is running, with or without noise, it is rarely noticed. But as soon as it stops producing current, its absence is immediately noticed. The battery charging light comes on and the search for a fault begins. But it was enough to just listen to the sounds that the generator makes, and the trouble could have been avoided.
Replacing the VAZ 2114 generator bearing may be required as early as 60-80 thousand km. It all depends on how much the owner pays attention to such little things as the tension of the generator drive belt. First of all, this is what affects the resource of the generator. For prevention, let's check the degree of belt tension.
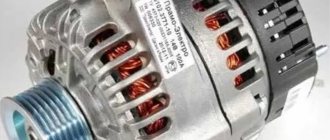
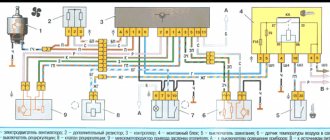
An ordinary eight-cylinder engine, which costs 2114, does not require special maintenance skills. On the tenth family, the belt is tensioned through a tension roller, but in 2114 there is none of this, and the belt itself no longer drives any mechanisms or assemblies. There is no power steering or air conditioning compressor. It's simple, the main thing is to buy the right belt. Its index is 21082-3701720, and it is better to take Gates or Bosch. Such a belt costs the same as two domestic ones, but its service life is longer. A German belt will cost 530 rubles.
Signs that it's time to change the alternator brushes:
Each of these points may indicate wear on the generator brushes, which are located inside this unit. Many people wonder how to check brushes. In order to check the remaining length of the generator brushes, it is enough to disconnect the generator from the battery and remove the voltage regulator. After this procedure, you can determine by eye how worn out any of the generator brushes are. If the length is less than 0.5 centimeters, the brushes definitely need to be changed. Checking the brushes should be carried out during routine inspection of the generator.
Where are the generator brushes located?
Changing generator brushes is not difficult. They are located in the rear half of the device and are held in place by a single bolt. The brush assembly itself is located next to the slip rings and is connected to the voltage regulator. The brushes are held in place by springs next to the rings. Knowing the circuit diagram of the generator, it is not difficult to find the brushes. To replace, you will need a standard set of tools:
- Several wrenches;
- A pair of screwdrivers;
- New brushes;
- Liquid WD-40 (in order not to strip the threads of the bolts).
How to replace brushes on a removed generator
With the generator removed, work on replacing the brushes will be much easier. Having access from all sides, it is easy to examine the wear of the brushes and replace them. The main problem in this option will be removing the generator from the car. You need to unscrew the generator mounting bolt, loosen the belt tension, remove it and unscrew the mounting bolts connecting the generator to the engine housing. If you can get the generator from above, consider yourself lucky. There are often cases when, to remove the generator, you have to remove not only the air filter and pipes, but even the radiator.
First of all, you need to clean the mounting area of the brush holder from dirt and dust. You can wipe it with solvent and then blow it with compressed air. After this, you need to remove the brushes; to do this, you need to unsolder them. Leaving the generator without brushes, be sure to clean all contacts and check the springs for elasticity. It is advisable to polish the slip ring after this.
The replacement itself consists of unsoldering the old wires from the used brushes and soldering them to a new set. When carrying out this operation, you must be careful, since the material of the brushes is very fragile. After installing the brushes on the seat, you should make sure that they move freely.
Installation of new brushes should be done in the reverse order, after which the generator is assembled and installed on the car. It is recommended to change the generator bearings when replacing the brushes. When installing a generator on a car, the main thing is to correctly adjust the belt tension. If the tension is insufficient, the belt will slip on the rollers.
It happens that the computer in the car begins to show a malfunction of the generator immediately after replacing the brushes. This occurs due to insufficient grinding in of new parts. During operation they will rub in and the error will disappear. If the error persists, the reason is that the case is stuck due to excess dirt. This problem can easily be eliminated by blowing the parts with compressed air. Before checking the operation of the generator, be sure to inspect the brushes for chips and cracks. New parts often have manufacturing defects.
It happens that the brushes are replaced together with the relay and generator regulator. In this case, the replacement process proceeds as follows:
- The negative terminal is disconnected from the battery;
- You need to remove the rubber tip from the positive wire;
- The generator is dismantled (if necessary, the air filter housing must be removed);
- You get a brush block with a relay regulator;
- The fixing springs are removed;
- The brushes are unscrewed;
- All associated wiring is disconnected;
- A new block is being installed.
The generator is connected only after checking the absence of defects on the new brushes. After assembly, we put the generator in place, tighten the belt, connect the battery and start the car.
Additional recommendations for replacing rotor ball bearings
- Reasons for ball bearing failure (for subsequent replacement):
- Wear of parts to failure (service life from 100,000 km);
- Ingress of dirt, abrasive particles, moisture;
- Damage to sealing protective washers, separator;
- Drying of the lubricant, insufficient quantity;
- Development of landing surfaces;
- Corrosion on rings;
- Low-quality steel (non-metallic inclusions, inconsistency in hardening, hardness);
- Inconsistency in the processing accuracy of rings, micro-geometry of raceways, balls;
- Before reassembling, check the condition of the internal elements of the mechanism (brushes, contacts); they should be changed at the same time;
- Additionally, it is recommended to check the condition of the clutch release ball bearing and the hub bearings on the VAZ.
- If, when unscrewing the pulley nut, it turns, insert a screwdriver into the groove of the cover, thereby stopping the rotor.
- When tightening bolts, lubricate them with graphite lubricant.
- Be sure to watch useful videos on how to correctly change bearings on a Lada model fourteen, as well as how to improve and strengthen the generator.
Improving the VAZ generator
Replacing generator bearings 2114
Ilya Vasiliev
I drive a Ford Focus ST in Moscow
This email address is being protected from spambots. You must have JavaScript enabled to view it.
How to remove brushes from a generator located on a car
If the previous owner installed a brush block with a relay regulator in the generator, then the question of how to change the brushes on the generator without removing it from the car is much easier to solve than replacing individual brushes. If there is sufficient space in the engine compartment, it is also possible to replace the brushes separately without having to remove the generator.
All work on the vehicle's electrical equipment should begin by disconnecting the battery.
- The voltage regulator is removed;
- The production of brushes is measured;
- Old brushes are unsoldered;
- Contacts are cleaned;
- New brushes are soldered;
- The free movement of the generator brushes is checked;
- The regulator is installed in place;
- We connect the battery and start the car.
If everything went without errors, you won’t have to worry about how to check the generator brushes for a long time. Now, knowing perfectly the structure of the generator after disassembling it, it will not be difficult for you to fix other generator malfunctions with your own hands.
What problems may arise in the operation of the generator and options for solving them.
- If the brushes or voltage regulator malfunction, you will have to replace the entire assembly due to the fact that it is not collapsible.
- Rotor bearings and their replacement. We have already discussed in detail how to change a bearing on a generator, so let us just remind you that there are two bearings in the generator. One is pressed into the front cover and if it malfunctions, it is most often replaced along with the cover assembly. The second bearing is attached, rolled onto the rotor shaft, it is removed using a special puller and a new one is pressed in its place.
- Additional diodes. If the diode malfunctions, its leads can be unsoldered and then, carefully trying not to break the rectifier unit with blows, pulled out of the holder. Clean the area from epoxy resin, then install the diode and solder it. After the entire procedure, the lead of the diode, which has a color mark, is soldered to the bus, and the diode body is attached to the holder with epoxy resin.
- The generator tension belt needs adjustment. But this must be done competently and carefully, since excessive tension can increase the load on the bearing and lead to its unsuitability in a short period of time.
Many of these problems may seem trivial, but they could mean you need a new generator. You can repair the generator yourself, but to do this you need to have certain skills, so we still recommend leaving this work to knowledgeable craftsmen.
Basic faults
The primary reason for the breakdown of generator brushes is their wear, which makes itself felt by a poor battery charge. You can detect a failed part by the following problems:
- voltage failures;
- the battery discharges quickly or does not charge at all;
- the headlights begin to burn much weaker or blink;
- instrument lights blink;
- There is not enough voltage for the electronics to operate and it turns off (radio tape recorder, for example).
Why change brushes?
If signs of brush breakage are detected, they should be replaced. If repairs are not carried out in a timely manner, there is a possibility that you will soon need to purchase a new generator, and this is a completely different expense. The battery can only hold the ignition without brushes for a few minutes, which means it will have to be constantly charged. And soon it will be replaced.
You can check the condition of the brushes by the size of their protrusion from the seat. If the protrusion size does not reach five millimeters , then they should be replaced immediately to avoid possible problems.
It is recommended to replace it every 50,000 km or every season, which is the key to safe operation of the vehicle. It is better to have a spare set of spare parts so as not to get into an unpleasant situation on the road and then call a tow truck.
For a set of brushes you will need to pay from 150 to 200 rubles, depending on the store. The cost of repairs at a car service center will cost 200-300 rubles, inexpensive, of course, but why pay for something that you can do yourself?
What to use
Before you start replacing the bearings on the generator, you need to determine what elements are on your car, and also what they can be replaced with
When choosing bearings, pay attention to the hub manufacturers. For VAZ 2110, bearing hubs are produced in the city of Samara and are marked SPZ-4
But there are also Vologda and Saratov hubs marked 23 GPZ and 3 GPZ, respectively. It is not recommended to purchase bearings with unmarked hubs, much less use Chinese generator elements.
Front and rear.
Dimensions
It will not be superfluous to know what dimensions the standard front and rear generator bearings for your “ten” should have in order to make sure that the spare parts are selected correctly. The rear bearings of the new type, marked 6202, have the following dimensions:
- Inner diameter - 15 millimeters
- External diameter - 35 millimeters
- Width - 11 millimeters.
The front bearings marked 6303 have the following dimensions:
- Inner diameter - 17 millimeters
- External diameter - 47 millimeters
- Width - 14 millimeters.
The device is being disassembled.
Generator repair for VAZ 2113, VAZ 2114, VAZ 2115
Like any part, the generator sooner or later becomes unusable. However, the breakdown of some parts does not interfere with the operation of the car, provided that the broken element is promptly replaced and repaired. And a failed car generator will not allow you to drive even 50-400 kilometers (depending on the battery and working devices) - the car will no longer drive. An injection engine will immediately start to malfunction and eventually stall; with carburetor cars, things are a little easier. Monitor the condition of the generator and, as necessary, either replace it with a new one or repair the installed one.
Note! You will need the following tools: a good set of wrenches, including wrenches, sockets, etc., two types of screwdrivers, a multimeter with an ohmmeter function, a special puller to remove the bearing from the shaft, a hammer and tubular mandrels (socket heads are suitable).
When to repair a generator?
A generator that has become unusable begins to supply current poorly and incorrectly to the vehicle’s on-board network, which causes problems with the electronics:
- at low speeds, the car's headlights shine dimly;
- Increasing speeds bring the light back to normal.
These symptoms indicate a malfunction of the generator or voltage regulator.
Another sign is that the generator is making noise: the generator bearings are out of order, they are not very difficult to replace and are inexpensive. We recommend disassembling and replacing the bearings as quickly as possible, otherwise it is possible that other parts will have to be changed due to bearings, for example, the stator suffers.
Generator repair for VAZ 2113-VAZ 2115
Disassembly
1) First you need to remove the generator; the article will help you understand the procedure: “Replacing the generator on a car.” Then remove the voltage regulator from the generator and the rectifier unit, the publication will help you with this: “Replacing the generator rectifier unit on a VAZ.”
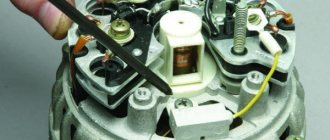
Note! The roller can be removed using an 8mm hex key. If you don't have one, try finding a flat-head screwdriver of the appropriate size. Be careful not to strip the thread when unscrewing the nut. The removal mechanism is as follows: a hex wrench stops the shaft with the installed roller from turning, and the roller fastening nut is unscrewed with a spanner (photo 1). Remove the unscrewed nut and its spring washer. By the way, this washer is of an unusual shape; examine it carefully: on one side it has a convex shape, and on the other it is flat. The convex part must be installed to the nut (photo 2).
2) We proceed directly to the repair. Use a marker or chalk to mark the two generator covers, noting their location relative to each other - you need to install them exactly as they were. Proceed to unscrewing the four bolts located around the circumference of the generator (photo 1). Next, use a flat-head screwdriver to separate both covers from each other (photo 2). Disconnect the cover located on the side of the slip rings (photo 3, rings are indicated by arrows). Now remove one of the important elements of the generator - the stator, by pulling it and removing it (photo 4).
Note! Be sure to check the removed stator for integrity; the condition should be acceptable, the inner surface (indicated by the arrow) without scratches - signs of touching the armature. The presence of marks and damage is a sign of faulty bearings or deformation of the generator cover.
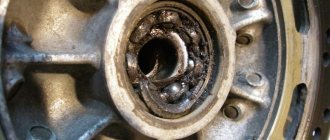
3) Separate the cover from the rotor, and remove the rotor itself - simply grab the rotor with your hand and pull out the shaft (photo 1, the rotor shaft is indicated by a red arrow) from the bearing (indicated by a blue arrow). If the shaft does not pull out, screw the nut that previously secured the roller onto it. There is no need to install the roller, just screw on the nut. Then, having started to knock out the shaft, the rotor will not fly out of the bearing and will not hit the asphalt. Do not tighten the nut all the way, just screw it a little onto the thread. Using a hammer and a wooden spacer, knock the shaft with the rotor out of the bearing, controlling the effort. After removing the rotor, inspect the cover (photo 2). Pay special attention to the bearing; rotate it by hand: rotate the inner part in the direction where the rotor shaft was inserted. If you notice jamming, play, or rolling, replace the bearing. Take a screwdriver and remove the four screws securing the metal washer (photo 3), remove them from both sides of the cover. The bearing is knocked out using a hammer and a socket or mandrel of suitable diameter (photo 4).
Note! Check the cover for defects and if there is significant damage (large cracks, dents, etc.), replace the cover with a new one.
Bearing replacement, instructions
Now for the procedure. There should not be any particular difficulties in dismantling the generator. Now that we have the generator in our hands, we can start disassembling it, but we will have to disassemble it completely. To do this, it is advisable to have a vice, and the process itself schematically looks like this:
- Remove the back cover.
- Remove the diode bridge.
- Remove the brushes.
- Unscrew the pulley nut, holding it in a vice through an elastic spacer so as not to damage it.
- Attention! Be sure to mark the covers with a marker so as not to disturb the alignment.
- Use brake fluid or magic WD40 to treat the tightening bolts and the cover mounting areas.
- Unscrew the tightening bolts and remove the covers.
- Use a wooden punch to knock out the anchor from the cage on both sides.
- Use old bearings instead of mandrels to press in new ones.
It is done. The bearings are pressed in, now all that remains is to put everything back together so that the rotor does not touch the stator. After installing the generator and a new belt, we check the voltage at the battery terminals, if as a result the generator runs quietly, the voltage is at least 14 V, we can consider the mission completed. Good luck to everyone!
Sources:
https://zamena-podshipnikov.ru/zamena-podshipnikov-generatora-vaz-2114.html https://etlib.ru/report/1369-zamena-podshipnika-generatora-vaz-2114 https://luxvaz.ru/ vaz-2114/186-zamena-podshipnikov-generatora.html https://ladaautos.ru/vaz-2114/kak-proizvoditsya-zamena-podshipnikov-generatora-vaz-2114.html https://ladamaster.com/zamena- podshipnika-generatora-vaz-2114