Wiring diagram for power windows LADA Priora
Lada Priora: Removing the window regulator, repairing the motor
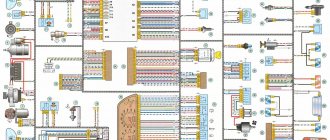
Wiring harness diagram for the left front door: 1. block to the rear wiring harness; 2. to the speaker; 3. window lift
; 4. switch block; 5. door lock; 6. rear view mirror;
Wiring harness diagram for the right front door: 1. block to the rear wiring harness; 2. to the speaker; 3. window lift
; 4. switch block; 5. door lock; 6. rear view mirror; 7. block to the rear wiring harness;
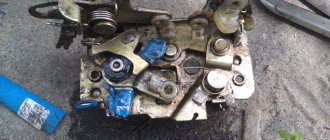
Complete set of window regulators for VAZ 2110
Let's consider the completeness of the ESP using the example of the Berkut product. The electric window kit includes:
- A hinge-lever complex for moving glass vertically, which is installed on many modern passenger cars.
- Window lift motor gearbox "tens" brand PT-060, assembled using new technologies from Switzerland. The product can also be equipped with Mabuchi window lift motors. In addition, in the VAZ 2110 the window lift motor is produced by the famous European automobile concern Bosch. Thus, the VAZ window lift motor meets all international standards.
- Electrical wiring, which has the numbering of wires on the insulation according to the standard electrical diagram.
- Decorative type plugs.
- Window lifter button for VAZ 2110, the layout diagram of which can be found on our website.
- Additional fastening connections.
- Rubber adapter cuffs from the door to the counter.
To control the power windows of the VAZ 2110, there is a separate electrical circuit. The main element of the circuit is the power window control unit, which receives the command to open (close) the glass. The fundamental connection of the power windows is carried out in such a way that all commands pass through the VAZ 2110 power window relay, which “opens” or “closes” the electrical circuit.
Procedure when the window regulator does not work
The Priora power window circuit differs from the usual ones, which use a relay and a power window fuse
. AVTOVAZ made the glass control using an electrical package control controller (TSBKE), which is located near the ECU.
In the mounting block, check the TsBKE fuse (F31, 30A).
Remove the door trim and check the voltage at the power window
using a multimeter or a 12V test lamp.
If there is no voltage, then check the serviceability:
- window control unit (buttons in doors)
- wiring (connector connection)
- electrical package control unit, which is located above the ECU unit (more on this below)
If current flows to the electric motor, but the glass does not move, then we check:
- malfunction of the window lift
(for example, the drive motor brushes are stuck/sticking, the plastic gear in the gearbox is worn out) - The window lift cable is frayed
- glass is jammed (distorted)
The most common problems with power windows are:
- Faulty double-glazed window control unit (GCU)
- Window lift motor malfunction
- Skewed, broken power window cable
- Poor contact
What is the cause of the problem
Sometimes there is no malfunction as such. For example, window regulators may fail in severe frost, but other electrics also suffer from similar problems. Therefore, experts advise not to save on buying/renting and heating a garage. But mechanical failures are much more common.
If you suspect a breakdown, you first need to check the TsBKE - this is AvtoVAZ’s personal innovation, which operates the electrical package. First you need to make sure the fuse is working. If everything is fine, we disassemble the doors, arm ourselves with a multimeter and measure the voltage at the terminals of the window lift motor. If there is no voltage, then:
If there is voltage in the network, which is clearly shown by a multimeter or a 12V light bulb, then the problems described above automatically disappear. This means you need to look for the problem elsewhere. Most likely, it lies in the following system nodes:
All of the above breakdowns occur with approximately equal frequency, with the exception of glass distortion, which occurs much less frequently.
Self-detecting a broken power window can be seriously difficult. First, it is difficult to diagnose a CBCE problem. The device is designed in such a way that one of the cables is multifunctional. It could be:
The essence of multifunctionality lies in the fact that some conductors are capable of independently changing polarity if the appropriate command is received from the CBKE. These pairs can simultaneously control side mirrors, central locking, provide power, etc.
The control panel is located on the interior handle
The window regulator on the Priora is used to raise or lower the windows in the car. The mechanism is installed inside the car doors either in a special subframe or by attaching it to the car body.
The design of the window regulator includes:
Checking the electrical package control unit (CBKE)
The difficulty in determining the cause of an ESP malfunction lies in the fact that a pair of wires (X1-4 or X1-6) coming from the TsBKE are multifunctional. That is, one wire can change polarity depending on the function (mirror control, power supply, central locking control).
Using a test lamp connected to the car body, we check the power from the glass unit control module (X1-4 or X1-6, depending on the side), while simultaneously pressing the button on the door. We check X1-1, X1-13, X1-5 and X1-11 in the same way. If the lamp is on in all cases, then the CBKE unit is working. The block with ESP control buttons on the driver's door controls all the modules in the cabin at once, so in some cases it will not be possible to determine the malfunction without diagnostic equipment.
Have you encountered problems with the ESP? What was the reason? Have your window regulator been repaired? It's time to start improving the LADA Priora.
Design and types of window lifters
The Lada Priora has tempered glass on the front and rear doors. A window lifting mechanism is used to raise and lower them. The power windows are controlled using a button on the car door module. The driver can control the movement of the glass of all doors, and the passenger can only control the glass of his door. According to the principle of operation, the devices are divided into rack and cable.
Despite the fact that the Priora's window lifting mechanism is similar to other models, its difference lies in the absence of a window lifter block. Its function is performed by the built-in electrical package control controller (CBKE), located near the ECU.
In addition, power is supplied to the drive in a specific way. One of the wires is multifunctional. It changes polarity depending on the function performed: it controls the central locking, mirrors, and power supply. This makes it difficult to troubleshoot and repair the window regulator.
Replacing the window lift motor of Lada Priora
As mentioned above, the most common reason is the failure of the electric motor. And in this paragraph we will consider the procedure for replacing it. First, you need to turn the mechanism over so that the pins are facing us.
- Turn out all three studs
- Using a flat-head screwdriver, unscrew the screws securing the motor housing to the window regulator.
- We separate the two parts of the structure and install the new electric motor in place
I think that there will be no problems with replacing the electric motor itself, since its attachment to the main structure is elementary. If you still have questions, you can discuss them in the comments below or under the video on the channel.
I hope that the replacement process is shown in the most accessible and understandable way!
, but for the entire assembled mechanism you will have to pay at least 1000 rubles. The Priora has lifts from the VAZ 2110, so you shouldn’t look for “Prior” ones.
Lada Priora Sedan › Logbook › Rear esp
I’ve been wanting rear ESPs for a long time, but now I have the opportunity to order new ones for only 1400, I decided to take it, I’ll finally get rid of the spontaneous lowering. We will need: — 2 assembled lifts; — driver’s door block; — 2 buttons for passengers; — wires; 1. I got the driver's door block for free, I exchanged it with a friend, he doesn't need it anyway) we remove the old block and install a new one, if necessary we overexpose it, there is no need to pull any wires to it! 2. Replacing the mechanism.
unscrew the 5 nuts, then unscrew the glass from the trapezoid, ask someone to hold it, or fix it.
Next, take a new lift and perform the installation in reverse order
we screw everything into place, the only thing is that the old nuts for screwing the motor will not fit, they were turnkey for 8 and now they are 10, you will have to add 6 new nuts.3. Wiring: Right door we will have 5 wires in total
3 from the button: we hook the central wire of the button to ground, I hooked it right next to it, because it doesn’t carry a load, it just controls the relay, here it has enough ground. We pull 2 wires of the button to the electrical package unit in the cabin
2 from the motor: we attach one wire right there to the central locking wire, red with a black stripe (it is common throughout the entire board, so you connect to it near the passenger door in the feet, there is no difference, and there is no need to pull the extra wire. If after connecting the motor goes in the opposite direction, swap the wires in the motor chip and that’s it.
on the left side the situation is slightly different, there you will need to pull 2 wires from the motor, one to the driver’s feet, there in the driver’s door bundle connect to the red-blue wire, and the second also to the electrical package unit.
Next, we connect to the blockout, we will need 2 terminals from the car radio connector, 2 terminals from the same connector of the floppy drive, we will keep them. Don’t forget to remove the connection lock before installing the terminals in the connector:
We connect one wire from the buttons to the pink wire, it is common for them
To be honest, I don’t remember exactly which is which, well, if you confuse left with right, it’s not difficult to change. Well, lastly, we put plugs in the doors
I hope I made it clear, if you have any questions please ask.
How to remove the front window lift mechanism assembly
The first step is to perform a procedure such as removing the front door trim. After this, unscrew the two bolts securing the glass to the bracket on the lift. The bolts will only be accessible when the glass is raised up. This is clearly shown in the photo below.
To prevent the glass from falling down during this repair, it is necessary to fix it by placing something between it and the inside of the door. Next, you can unscrew all the power window mounting nuts.
This mechanism is attached in several places:
- from above, in the place where the glass is fixed, and also a little higher in the very corner of the structure
- below also in the corner
- and closer to the center of the door where the motor is installed - there are three nuts
Then disconnect the plug with the power wires by simply pulling both ends to the sides with a little force.
Next, we lower the structure so that the motor appears in a special opening:
It is through this that the entire structure should be removed from the door, which will be clearly shown in the photo.
And we remove it completely out so that further manipulations can be carried out.
Replacing the front door window regulator on a VAZ 2170 2171 2172 Lada Priora
Operations carried out when replacing the front door window lifter on a VAZ 2170 2171 2172 Lada Priora
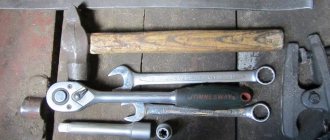
Tools necessary to replace the window regulator on a VAZ 2170 2171 2172 Lada Priora.
You will need: a 10mm wrench, wooden or plastic wedges. Wedges are needed to fix the glass in the closed position without the participation of a window lifter.
The sequence of replacing the window regulator on a VAZ 2170 2171 2172 Lada Priora.
1. Disconnect the wire from the negative terminal of the battery.
2. Remove the front door trim (see “Removing and installing the front door trim on a VAZ 2170 2171 2172 Lada Priora”).
3. Lower or raise the glass so that you can access the glass frame mounting bolts through the top hole of the door. Remove the two bolts securing the glass frame to the window lifter slider.
4. Lift the glass with your hands until it stops and secure it with wooden or plastic wedges. 5. Disconnect the power window wiring harness connector.
6. Unscrew the three nuts securing the window regulator motor.
7. Unscrew the four nuts securing the window lift mechanism guide...
8. ...and remove the window regulator from the door through the service window.
This is what the Lada Priora front door window lifter mechanism removed from the car looks like.
Pay attention to the markings of the window regulator so that you can purchase exactly the same one for replacement.
9. Install the window regulator in the reverse order of removal. After installation, check that the glass closes tightly and without distortion. If this is not the case, loosen the screws securing the glass frame to the slider and adjust it to the desired position using the oval holes in the slider.
Add a comment
Replacing the window regulator and its motor
This article will consider this type of Priora repair, such as replacing the electric window mechanism assembled with the motor. Of course, if your electric motor has failed, then there is no need to change the entire mechanism. Regarding the motor, it will be shown below how to change
and him.
Necessary tool for replacing window regulator
on Priora
- 10 mm head
- Extension
- Ratchet or crank
Leave a reply Cancel reply
You must be logged in to post a comment.
Lada Priora Hatchback “Robin Hood” › Logbook › Window lifters, do it once and forget it
WITH
Window lifters are a sore subject for the prior driver. And all because such guano is supplied from the factory. Apparently, during the development of the Priora, in order to reduce the cost of the model, a fragile part was specially installed. Well, the 10th family had normal power windows. Yes, they were buzzing. Yes, the gearboxes crunched. But they worked! And there was no need to disassemble the doors every six months to fix a broken cable or replace a trapezoid. And most likely they specially installed a fragile spare part so that it would break more often. After all, as you know, in Russia the spare parts market brings in much more profit than the car market.
Removing the heater fan
We remove the heater fan if it fails. We remove the throttle assembly and move it to the side without disconnecting the hoses from it (see “Removing the throttle assembly”). We remove the wind window trims (see “Removing the wind window trims”). Remove the front panel upholstery (see “Removing the front panel upholstery”). Bend upward the end of the brake pedal bracket (see “Removing the micromotor-reducer of the heater damper”).
Unfasten or cut the clamp securing the fan motor wire block. Having released the latch...
...disconnect the wiring harness block from the electric motor block. Disconnect the wire block from the additional resistor (see “Removing the additional heater fan resistor”). Having unscrewed the self-tapping screw and nuts securing the heater, we move it forward so that the fan can be removed (see “Removing the heater”).
Disconnect the electric motor ventilation hose from the pipe.
Using a Phillips screwdriver, unscrew the three screws securing the fan. Using a screwdriver, pry off the fan flange...
...we remove the electric motor with the impeller from the heater housing. The fan flange is attached to the heater through rubber pads. To replace them, remove the plastic bushings and then remove the cushions from the holes in the fan flange. Install the heater fan in reverse order.
When installing the fan, we orient it so that the electric motor pipe is opposite the electric motor ventilation hose.
Replacing the Priora stove motor with PanSonyk air conditioning
This replacement method may not be correct, but it’s fast!
According to the repair manual, I had a very difficult job ahead of me.
with the removal of the vacuum and the halving of the entire stove together with the evaporator and subsequent
refilling with freon. In short, only with freon for 2 rubles is not enough work for 5-6 hours.
Naturally, my hand didn’t rise to shred and cut my car, but what can you do.
There is no way without this. Priora ept)) Thanks to AvtoVAZ for their foresight in the next repair. All that was necessary was to make the upper part of the heater in the area of the motor removable. But no, we are not looking for easy ways; the right way is to remove everything))
Therefore, I did it much simpler and first cut off the upper part of the heater motor casing with a hacksaw blade. So that nothing would interfere with its removal. Cut only as shown in my photo so as not to disturb the rigidity of the entire casing. And it is this half that I cut off that only plays the role of an anther.
READ How to change the muffler on a VAZ 2112
But this turned out to be not enough... The motor rested against the place where the engine mount was mounted on the glass. This was done specifically so that no one could remove the motor in this way without completely disassembling the heater. But we move on))
In general, we cut the fan casing itself, but so that the 2 motor fasteners are outside the cut (this will not affect its rigidity). You can see in the photo where to cut.
Well, now that the engine is in front of us, we see its Chinese origin and the savory price for it. But in terms of mounting, it is completely identical to the 10 Mu and Kalinovsky. It only differs in the location of the breather, but this is not a hindrance for us.
We put the motor in place and check everything works. This means we can assemble it.
I then coated the incision sites with Poxypol and everything was fine. The integrity was not compromised and the appearance was not damaged at all; it is not visible there.
But it made it easier for me to disassemble and maintain this unit in the future.
Procedure for removing rear power windows
First of all, you need to figure out how to remove the trim from the car doors and do it. Also prepare keys with heads “10” and “8”. Now you can begin the process of disassembling the rear windows.
- Fix the rear door glass and gain access to the glass mounting bolts. Using a 10mm wrench, remove these bolts.
- Using a key with an “8” head, unscrew the three elements securing the ESP to the door.
- Using a “10” wrench, unscrew the two nuts securing the window lifter guide.
- Remove the ESP itself.
Installation of the rear window regulators is carried out strictly in the reverse order.
Mechanisms for rear windows
When reassembling, it is necessary to take into account that when placing rivets on the door trim, you need to ensure its reliability and protection. The dust and moisture protective film should not have folds or tears. Everything that is installed must be in perfect condition. The ground wire must be connected to the battery. After this, the electronic system should be fully initiated.
Installing or replacing a window regulator is not difficult for any Priora car owner, but to install this unit correctly, you need to be patient and prepare the required set of keys.
The ESP kit always has a manual available, which describes in detail the sequence of work for installing the device.
It is important to know how to remove the terminals from the battery. The existing set of wires must be assembled into a common harness to connect to the machine’s network
On the back of the fuse box, find the standard hole and insert the wiring harness block into it. Then everything goes according to plan.
How to replace the heater fan on a VAZ 2170-VAZ 2172?
Removal: 1) There are two ways by which you can remove the stove fan, we will tell you both, but before we start describing them, let’s talk about them briefly, and which one you will use during the work is up to you to decide, the first method is in removing the throttle assembly, in removing the front panel upholstery and in removing the cooling expansion tank, the second method does not imply this; when choosing the second method, you will only need to unscrew the screws and nuts securing the fan and then remove it from the car.
Note! It would seem that the second method is much more convenient and faster, in fact it is, it is done much faster but is very inconvenient, because in this case you will have to get to hard-to-reach nuts, as well as hard-to-reach screws, etc. etc., while when carrying out the second method, you will no longer need to crawl to hard-to-reach places, all the nuts and screws will be before your eyes, but you will still spend more time, because you will remove other parts that are in the first way and you won’t need to touch it!
2) After you have decided and made your choice, go to work; at the beginning of the operation, in any case, you will need to remove the windshield lining (How to remove the lining, read the article: “Replacing the cabin filter on a LADA Priore”), then the block Disconnect the wires and the connector from each other (They are indicated by a red arrow) and remove the wire block from the additional resistor (It is connected to it, this block is indicated in both photographs by a blue arrow), these are all general operations and will need to be carried out in any case.
3) Read this point only if you are carrying out the second method, but if you don’t want to remove anything unnecessary and if you are not going to do the work using the second method, then in this case go straight to point 4, so about the second method, if it First, you will need to remove the throttle assembly (How to do this, read the article: “Replacing the throttle assembly on a car”), but only when you remove it, do not disconnect any hoses, but simply unscrew the nuts that secure the assembly to the receiver and then remove it, and as soon as the assembly is removed, proceed to removing the dashboard upholstery, to do this, use a screwdriver to loosen the screw that secures the steam removal hose to the cooling expansion tank (This is the tank into which coolant needs to be poured, you will immediately find it), loosening the screw, disconnect the hose from the tank and lead it through the hole in the upholstery (see photo 1), then lift the expansion tank and without disconnecting any other hoses from it, carefully move it, otherwise it will interfere with removing the upholstery, then again, use a screwdriver to unscrew it but this once the lower screw, which secures the upholstery (see. photo 2) and the left part of the upholstery (look as the car is moving) remove from the car, then find three clamps that are attached to the clamps and secure the vacuum brake booster hose so that it does not dangle, and so, overcoming the force of the clamps, remove them from the brackets ( see photo 3), immediately after which, using a socket wrench or wrench, unscrew the nut that secures the steering rack screen in the upper part (see photo 4), as soon as the nut is unscrewed, pull this metal screen and remove it from the top the studs and finally the right (last part) of the upholstery (see photo 5) from the car and bend up the end of the brake pedal bracket (see photo 6).
4) Now unscrew the three screws and one side nut securing the heater on the right; if your upholstery has been removed, then it will be very convenient for you, after unscrewing, pull the heater out of the place where it is installed outward so that you can remove the heater fan.
5) After the heater has been removed a sufficient distance, unscrew the three screws securing the fan (Two of them are indicated by red arrows in the photo and they are already almost unscrewed), disconnect the electric motor ventilation hose from it (Indicated by a blue arrow) and then remove the fan (If if necessary, then use a flat screwdriver to pry it up from the bottom), as shown in the small photo, but just keep in mind one fact: when you put a new or old (It doesn’t matter) fan in its place, install it in such a way that the ventilation hose of the electric motor which is indicated by the blue arrow, looked towards the branch pipe that is present on the stove fan; if you install the fan on the wrong side, then simply do not connect this hose to the branch pipe, but it must be put on the stove fan branch pipe.
Note! If you have not removed the throttle assembly and the front panel upholstery, then it will simply not be very convenient for you to unscrew the screws and nuts securing the heater and you will also have to work hard to remove the heater to a sufficient distance, thanks to which you can replace the fan, but this is possible for some people So they replace the stove fan with a new one!
Installation: Reinstallation is carried out in the reverse order of removal, do not forget about the cabin filter, if it is too dirty, replace it with a new one.
Additionally It’s better to watch it so that all unnecessary doubts and questions disappear.
Replacing the heater radiator on a LADA Priora (with and without air conditioning)
One of the reasons why the heater does not work well is the heater radiator. During the operation of the car, it begins to leak and is no longer able to transfer the required amount of heat to the interior. Depending on the year of manufacture and configuration of the LADA Priora, the process of removing the heater (radiator) can vary greatly.
Removing and installing the Priora stove motor.
how to remove the interior heater motor Priora 217230 1 part.
READ How to remove the window lifter handle of a VAZ 2110
The whole procedure took several hours. This is shown in more detail in
There is another way to replace it. To gain access to the heater radiator, instead of the heater housing, it is necessary to remove the vacuum brake booster along with the brake pedal. This allows access to the left side of the heater (in the direction of travel) and to the radiator itself.
Replacing the Priora stove motor
Replacing the heater fan on a VAZ Priora with your own hands.
Replacement of the electric window regulator of the front right LADA Priora. Illustrated report
This illustrated report on the installation of a front right electric window on a LADA Priora was prepared by our buyer Ivan Igorevich Fokin from Moscow, as part of participation in our promotion.
There was a problem in our Priora, specifically - the glass of the front right door stopped opening. All that was left was the sound of the motor running. It was decided to order a new window regulator and replace the old assembly.
Let's start step by step:
LADA Priora
Window lifter-donor JSC "Lepse" for VAZ-2110 front right.
Tools and more: shaped screwdriver, star screwdriver, 10mm head, plastic tool, tape, electrical tape, scissors.
We unscrew the screws according to the numbering - black arrow. Take a tool for plastic and also according to the numbering - red arrow.
Using tools, pry the sockets and door lights in the direction of the same arrow, turn off the chips, and put them aside. Again, use this tool to remove the door panel, starting from the lower right corner, moving in a counterclockwise direction, unfasten the panel clips - the blue arrow is where the clips are.
Unfasten the panel with clips and lift it up. The panel has been removed.
Unscrew the two screws and remove the handle.
We connect the donor to the chip and check the operation of the window regulator.
We remove all the insulation so that it does not interfere. Unscrew the nuts.
We lower the glass a little in order to remove the rail from the door body mounted on the bolt.
Raise the glass to its highest position and secure it with tape.
We remove the engine bolts and racks from their mounted places and pull out the window regulator through the upper right corner.
Don’t forget to remove the engine holder from the original and place it on the donor.
In the reverse order, we insert the window regulator (donor) and, first of all, install the engine onto the bolts with the nuts.
Perform subsequent manipulations strictly in reverse order.
Thank you, Ivan Igorevich, for the prepared photo report. We will transfer the promised prize to your mobile phone account.
Buy
steklopodem.ru
How to change the heater motor on a Priora
I didn’t like the situation with the fan, I wanted to change it, but I didn’t get around to it before winter. Then the frosts came, I really didn’t want to get into the car (garage without heating =), so I had to suffer and warm up the interior at 1st speed =
Now that it’s warmer, I finally got around to it and below I’ll write a short epic of what happened and how it happened))
I couldn’t find any clear instructions on the Internet without understanding the gender of the muzzle, so I acted “according to circumstances,” i.e. I unscrewed everything that was in the way and tried to get it out)) By the way, a lot of leaves were clogged in the air intake, the stove was not blowing from all the holes, so I also bought a cabin filter and went to change it)
I replaced the stove fan on a Priora with a minimum of disassembly and without draining anything)). By the way, my car is 2007. no air conditioning.
I have a lot of foliage accumulated there. I saw on the drive that they attach a fine mesh to the air intake, but unfortunately I didn’t have one, so I couldn’t implement this idea.
First, as usual, I unscrewed the filter grille
I removed everything else, everything is extremely simple and clear
LADA Priora Hatchback KOSMOSS › Logbook › Replacing the heater motor with air conditioning panSonyk
I drove for the last month and suffered with my air conditioning.
The symptoms were bleak; the air conditioner either worked or didn’t.
In other words, the air conditioner worked properly, but the heater motor
He was obviously shirking his own work.
Especially when you drive on smooth Russian roads))
Symptoms: the motor refuses to operate in all positions of the rotation speed control handle.
At first there were floating speeds, later it completely died out, and from time to time it came to life on bumps.
I thought there was a bad contact in the connector. I got to the connector, everything is ok.
If you lightly hit the fan body, it comes to life and continues to work normally, which means the reason is in the motor itself, and not in the control unit or connector contacts
I was completely fed up with this and now I dared to change
…
It turns out this is very difficult to do and spare parts
To be honest, it got me, it’s either the original regulator or the motor (((
Replacing a Priora heater fan
Let us remind you that quite recently we looked at why the stove on a Priora does not work and how to repair it yourself.
Removing the window regulator Lada Priora
How to remove the LADA fan of the Priora heater
— remove the throttle assembly and move it to the side.
— remove the sound insulation and frill of the engine shield.
- Prepare a Phillips and flathead screwdriver.
Bend the end of the brake bracket pedal upward.
Unfasten and cut the fastening clamp of the heater fan wire block.
Disconnect the block with the wires from the heater fan by pressing Disconnect.
clamp block with wires from an additional resistor. Unscrew then the self-tapping screw and the heater mounting nuts so that you can move it. Disconnect.
forward the fan ventilation hose from the pipe.
self-tapping screw 3 Unscrew the heater fan fastenings using a Phillips screwdriver.
Remove the Priora heater fan with the impeller from the heater housing by prying it off the flange with a flat-head screwdriver.
The fan flange is attached to the heater via rubber cushions. To replace them, take out the plastic bushings, and then remove the cushions from the flange of the fan holes.
Let us remind you that in the previous article we looked at how to install a net in a bumper on a Priora LADA with your own hands. After such modifications, the radiator on your car will last longer when dirt, gravel and feathers become clogged with it.
Installing a Priora interior fan
Catalog number of the electric heater fan Priora 2111-Pri. 8118020 When installing the fan, turn it so that its hose pipe is opposite the ventilation of the electric motor. The rest of the assembly is reversed in sequence.
Replacing the heater motor on a Lada Priora with Pan Sonyk air conditioning
Replacing the heater motor on a Lada Priora with Pan Sonyk air conditioning.
How to replace the heater fan on a VAZ 2170-VAZ 2172?
Removal: 1) There are two ways by which you can remove the stove fan, we will tell you both, but before we start describing them, let’s talk about them briefly, and which one you will use during the work is up to you to decide, the first method is in removing the throttle assembly, in removing the front panel upholstery and in removing the cooling expansion tank, the second method does not imply this; when choosing the second method, you will only need to unscrew the screws and nuts securing the fan and then remove it from the car.
Note! It would seem that the second method is much more convenient and faster, in fact it is, it is done much faster but is very inconvenient, because in this case you will have to get to hard-to-reach nuts, as well as hard-to-reach screws, etc. etc., while when carrying out the second method, you will no longer need to crawl to hard-to-reach places, all the nuts and screws will be before your eyes, but you will still spend more time, because you will remove other parts that are in the first way and you won’t need to touch it!
2) After you have decided and made your choice, go to work; at the beginning of the operation, in any case, you will need to remove the windshield lining (How to remove the lining, read the article: “Replacing the cabin filter on a LADA Priore”), then the block Disconnect the wires and the connector from each other (They are indicated by a red arrow) and remove the wire block from the additional resistor (It is connected to it, this block is indicated in both photographs by a blue arrow), these are all general operations and will need to be carried out in any case.
3) Read this point only if you are carrying out the second method, but if you don’t want to remove anything unnecessary and if you are not going to do the work using the second method, then in this case go straight to point 4, so about the second method, if it First, you will need to remove the throttle assembly (How to do this, read the article: “Replacing the throttle assembly on a car”), but only when you remove it, do not disconnect any hoses, but simply unscrew the nuts that secure the assembly to the receiver and then remove it, and as soon as the assembly is removed, proceed to removing the dashboard upholstery, to do this, use a screwdriver to loosen the screw that secures the steam removal hose to the cooling expansion tank (This is the tank into which coolant needs to be poured, you will immediately find it), loosening the screw, disconnect the hose from the tank and lead it through the hole in the upholstery (see photo 1), then lift the expansion tank and without disconnecting any other hoses from it, carefully move it, otherwise it will interfere with removing the upholstery, then again, use a screwdriver to unscrew it but this once the lower screw, which secures the upholstery (see. photo 2) and the left part of the upholstery (look as the car is moving) remove from the car, then find three clamps that are attached to the clamps and secure the vacuum brake booster hose so that it does not dangle, and so, overcoming the force of the clamps, remove them from the brackets ( see photo 3), immediately after which, using a socket wrench or wrench, unscrew the nut that secures the steering rack screen in the upper part (see photo 4), as soon as the nut is unscrewed, pull this metal screen and remove it from the top the studs and finally the right (last part) of the upholstery (see photo 5) from the car and bend up the end of the brake pedal bracket (see photo 6).
READ What oil to fill in Priora 16
4) Now unscrew the three screws and one side nut securing the heater on the right; if your upholstery has been removed, then it will be very convenient for you, after unscrewing, pull the heater out of the place where it is installed outward so that you can remove the heater fan.
5) After the heater has been removed a sufficient distance, unscrew the three screws securing the fan (Two of them are indicated by red arrows in the photo and they are already almost unscrewed), disconnect the electric motor ventilation hose from it (Indicated by a blue arrow) and then remove the fan (If if necessary, then use a flat screwdriver to pry it up from the bottom), as shown in the small photo, but just keep in mind one fact: when you put a new or old (It doesn’t matter) fan in its place, install it in such a way that the ventilation hose of the electric motor which is indicated by the blue arrow, looked towards the branch pipe that is present on the stove fan; if you install the fan on the wrong side, then simply do not connect this hose to the branch pipe, but it must be put on the stove fan branch pipe.
Note! If you have not removed the throttle assembly and the front panel upholstery, then it will simply not be very convenient for you to unscrew the screws and nuts securing the heater and you will also have to work hard to remove the heater to a sufficient distance, thanks to which you can replace the fan, but this is possible for some people So they replace the stove fan with a new one!
Installation: Reinstallation is carried out in the reverse order of removal, do not forget about the cabin filter, if it is too dirty, replace it with a new one.
Additionally It’s better to watch it so that all unnecessary doubts and questions disappear.
AutoNews / Reviews / Tests
Replacing the heater motor on a Lada Priora with Pan Sonyk air conditioning
Replacing the heater motor on a Lada Priora with Pan Sonyk air conditioning.
Results
The Lada Priora car is reliable and unpretentious. However, the power windows of this model often fail. Perhaps the matter lies in the imperfection of the mechanism, perhaps in the harsh operating conditions of the vehicle. These include low and high temperatures, high intensity of use, problems with CBKE.
If the window regulator breaks down, you need to immediately repair it. Repair work begins with diagnostics, which is carried out using a number of instruments. If diagnostics at home is not possible, then you should contact a car service.
A number of breakdowns can be repaired yourself. Such breakdowns include mechanical malfunctions of the window regulator, for example, a broken motor or a broken cable. Often, the glass lift is unstable due to poorly lubricated surfaces. If the window lifts operate separately, then most likely the problem lies in the electronics. If such problems arise, you should contact a specialist. Self-repair of car electronic systems is impossible.
Of course, electric window lifts are superior to mechanical ones, mainly due to practicality. However, electric lifts fail much more often. For their stable operation, it is necessary to follow the recommendations of the car manufacturer and regularly carry out technical inspections of the vehicle.
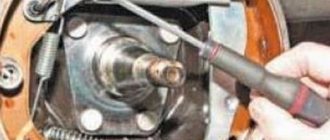
The front ESP on the driver's side stopped working, at first I thought it was a button, but then I listened closely - the relay clicks, there are sounds, but it doesn't work. It was decided to disassemble. Step by step:
We unscrew the door closing pin, unscrew the self-tapping screw of the door opening handle:
Unscrew the 3 screws from the bottom of the upholstery.
We secure the glass with tape (I only had double tape)
Carefully unscrew the 2 bolts securing the glass (the last bolt shoots =)) Unscrew the nuts of the entire ESP mechanism
We pull it out through the hole.
Unscrew the large fasteners (I easily unscrewed them by hand)
Carefully remove the cable mechanism.
Using a 6 or 7 wrench, unscrew the 2 bolts securing the motor. And carefully pull it out. At the same time you need to relax the 2 wires that go to the plug.
Watch out for brushes and springs, they pop out.
Having disassembled the mechanism, I looked at the brushes - they flew out. Placed it neatly in place. We insert the spring from the brush inside the brush seat, and immediately poke the brush there. We fix it with a wire that comes out on the other side, simply bending it around the corner of the plastic.
We put it back together in the same sequence. Personally, I lubricated the pin of the mechanism with lithol (it won’t hurt).
Removing the Priora heater fan
Required. remove the throttle assembly and move it to the side, remove the frill and sound insulation of the engine shield. Prepare a Phillips and flathead screwdriver.
- Bend the end of the brake pedal bracket upward.
- Unfasten and cut the clamp securing the heater fan wire block.
- Disconnect the block with wires from the heater fan by pressing the lock.
- Disconnect the block with wires from the additional resistor. Then unscrew the self-tapping screw and nuts securing the heater so that you can move it forward (see “Removing the heater heater”).
- Disconnect the fan ventilation hose from the nozzle.
- Unscrew the 3 self-tapping screws securing the heater fan using a Phillips screwdriver.
- Remove the Priora heater fan together with the impeller from the heater housing by prying it off the flange with a flat-head screwdriver.
The fan flange is attached to the heater through rubber pads. To replace them, remove the plastic bushings and then remove the cushions from the holes in the fan flange.
Troubleshooting control buttons
A fairly common malfunction is the failure of the window lift control buttons. Most often, the Priora power window buttons become oxidized, or their contacts begin to come off. To eliminate faults of this kind, you will need to clean the contacts from oxide or re-solder the buttons. When re-soldering, the contacts will fit snugly against each other, thereby ensuring uninterrupted operation of the power window.
Replacing a Priora heater fan
If you notice that the heater fan does not work, or there is a rustling or additional noise while the heater is operating, then most likely it’s time to replace the interior fan on your LADA Priora.
Let us remind you that quite recently we looked at why the stove on a Priora does not work and how to repair it yourself.
How to remove the heater fan LADA Priora
– remove the throttle assembly and move it to the side.
– remove the frill and sound insulation of the engine shield.
– Prepare Phillips and flathead screwdrivers.
Bend the end of the brake pedal bracket upward.
Unfasten and cut the clamp securing the heater fan wire block.
Disconnect the block with wires from the heater fan by pressing the lock.
Disconnect the block with wires from the additional resistor. Then unscrew the screw and nuts securing the heater so that you can move it forward.
Disconnect the fan ventilation hose from the nozzle.
Unscrew the 3 self-tapping screws securing the heater fan using a Phillips screwdriver.
Remove the Priora heater fan together with the impeller from the heater housing by prying it off the flange with a flat-head screwdriver.
The fan flange is attached to the heater through rubber pads. To replace them, remove the plastic bushings and then remove the cushions from the holes in the fan flange.
Let us remind you that in the previous article we looked at how to install a mesh in the bumper on a LADA Priora with your own hands. After such modification, your car radiator will last longer than when dirt, feathers and gravel are clogged into it.
Installing a Priora interior fan
The catalog number of the electric heater fan of the Priora is 2111-8118020. When installing the fan, turn it so that its branch pipe is opposite the motor ventilation hose. The rest of the assembly is done in reverse order.
Mechanical window lift
In order for the mechanical window regulator to work properly, it is recommended to carry out preventive maintenance of its mechanisms once a year.
The first step is to dismantle the door trim to gain access to the mechanism. After this, using a rag soaked in gasoline, thoroughly clean all mechanical elements from old grease and dirt that has gotten inside. Then you need to visually inspect the mechanical window regulator for defects.
The most common types of defects are:
1. The metal cable has stretched; 2. The surfaces of the gear wheels are heavily worn out;|| 3. The intermediate rollers are worn out or deformed;|| 4. The fastening elements are loose;|| 5. The glass guides are damaged;|| 6. The splines on the drive handle are licked;|| 7. The glass fastenings are faulty.
Damaged or worn elements must be replaced with known good ones.
After inspecting the condition of the mechanisms, you need to completely lower and raise the glass several times, thus checking the functionality of the unit.
The glass should lower and rise smoothly and evenly, the force applied to the handle should be small
In addition, it is very important that the glass rises completely and is securely fixed in any position. Regardless of its position, there should be no transverse or longitudinal play
There should be no slipping or jerking when rotating the handle.
If the mechanical window regulator does not function properly, and the malfunction has already been eliminated, it should be adjusted. Only fully functional mechanisms should be adjusted, otherwise a positive result will not be achieved.
The procedure for adjusting the mechanical window regulator is as follows:
1. Raise the glass completely and fix it in this position and adjust the location of the metal cables
It is very important that when the glass is completely closed, there is still a small amount of travel left for the handle, since the cables stretch a little during operation;|| 2. Secure the cable clamps;|| 3
Adjust the position of the rollers that are responsible for tension. The tension should be reasonable. A cable that is too loose will jump off the rollers and will not secure the glass properly. And excessive tension will negatively affect the performance of the gear pair; the force to rotate the handle will be too great;|| 4. Apply grease to the gear mechanisms and lubricate the cables and rollers;|| 5. Treat the glass seals with silicone grease;|| 6. Raise and lower the window several times, checking the functionality of the mechanism.
How to remove the heater radiator on a Priora without air conditioning
Since its release, AvtoVAZ has installed a heater from the “ten” on the Priora (catalog number: 21110-8101012). The drawback of this design was that the heater radiator is removed towards the vacuum brake booster, which allows this to be done. For this reason, the heater assembly has to be dismantled.
- Remove the wipers.
- Remove the frill (wind flap).
- Remove the soundproofing of the engine shield.
- Disconnect a bunch of connectors with wires.
- Unscrew the heater mountings.
- Divide the heater into two parts (left and right).
- Remove the right side of the heater (in the direction of travel).
- Move the left side to the side to gain access to the heater radiator.
- Drain the antifreeze.
- Replace
the heater radiator.
Sources:
https://priora-remont.ru/zamena-steklopodemnika-v-sbore/ https://foreXS-online.ru/vaz/kak-pomenyat-motorchik-pechki-na-priore.html https://avtoshkolak.ru /ustrojsTVo/kak-snyat-motorchik-pechki-na-lada-priora.html