Moskvich 412 - distributor (ignition distributor)
A distributor (ignition distributor) is a device that determines the moment of formation of high-voltage pulses in the ignition system and distributes them among the cylinders of the internal combustion engine.
Content
1. Possible malfunctions of the distributor (ignition distributor)
2. Disassembling the ignition distributor of Moskvich 412
3. Installation of the distributor on the AZLK (IZH) 412 internal combustion engine
4. Checking and adjusting the distributor on Moskvich 412
5. Checking the ignition timing of Moskvich 412
6. Links to our forum - ask questions
1. Possible malfunctions of the distributor (ignition distributor)
| 1). Cracks in the distributor cap | Replace the cover. |
| 2). Dirty or wet distributor cap contacts or wires | Clean and dry contacts or wires. |
| 3). Broken contact in the ignition power supply circuit (distributor circuit, coil circuit, ignition switch) | Inspect the contact points of the wires. |
2. Disassembling the ignition distributor of Moskvich 411
1. Remove the cover and slider.
2. Unscrew the screws securing the vacuum regulator and remove it.
3. Unscrew the screw securing the low voltage terminal insulator and remove the terminal.
4. Unscrew the screws securing the lower plate of the breaker to the distributor body and remove it.
5. Unscrew the two bolts securing the breaker stand and remove the stand.
6. Remove the lock washer from the axis of the breaker lever, disconnect the wire from the contact post by pressing on the insulating sleeve, and, overcoming the force of the lever spring, remove the breaker lever with the wire and the low voltage terminal.
7. Separate the movable and fixed breaker plates.
8. Remove the felt seal from the hole in the cam and unscrew the screw securing the cam.
9. Disconnect the springs from the cam plate and remove the cam along with the plate.
10. Remove the springs and weights of the centrifugal regulator.
11. To remove the drive shaft, remove the snap ring, knock out the pin and remove the dog clutch.
12. Press out the bearings if they need to be replaced.
After disassembly, check the condition of the working surface of the breaker contacts. In case of large transfer of metal from one contact to another, clean them with a thin (about 1 mm thick) piece of an abrasive grinding wheel or fine sandpaper.
When stripping, remove the bump on the breaker post contact. It is not recommended to completely remove the crater (indentation) on the contact of the breaker lever.
After cleaning, rinse the breaker contacts with gasoline and wipe with a dry, clean cloth that does not leave fibers.
Assemble the distributor in sequence.
3. Installation of the ignition distributor on the AZLK (IZH) 412 engine
1. Check the correct installation of the roller in the housing of the ignition distributor.
2. Remove the distributor cover. Insert the distributor shank into the distributor drive housing on the engine.
3. Rotate the distributor shaft by the slider until the floating clutch pins align with the shaft groove in the distributor drive housing.
4. Set ignition timing:
- connect the test lamp to the low voltage terminal of the distributor, turn the housing counterclockwise until the breaker contacts close (the lamp should go out);
- press the slider clockwise with your finger and slowly turn the distributor body in the same direction until the warning light comes on;
- check the accuracy of setting the breaker contacts to open by turning the cam clockwise and at the same time lightly pressing the lever against it with your finger. In this case, the control lamp will either go out or the glow of its filament will decrease;
- tighten the nut securing the distributor shank to the drive housing;
- install the plastic cover on the distributor;
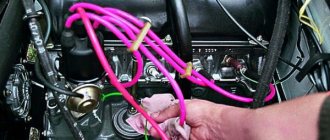
- insert the high-voltage wires coming from the spark plugs in accordance with the operating sequence of the engine cylinders (1-3-4-2), taking into account the direction of rotation of the distributor rotor. Install the tip of the high-voltage wire from the spark plug of the first cylinder into the terminal socket of the distributor cover, located above the low-voltage terminal in the housing;
- insert the high-voltage wire coming from the ignition coil into the central socket of the cover until it stops;
- connect the wire coming from the low-voltage terminal of the ignition coil to the low-voltage terminal of the distributor;
- connect the vacuum regulator tube.
Moskvich 2140 Back to the USSR ☭ › Logbook › Note No. 160 “Trumbler of the Moskvich-412 car”
Perhaps BSZ and other ignition systems are better, I don’t argue.
I think that if you install a original, working Soviet item, you can also live well. Moreover, as many people know, I do not want to deviate from the factory configuration. With each replacement of parts with non-original parts, the car becomes less valuable. Everyone knows this, I think. I have been looking for a new 118th distributor for a long time, first I bought this TRAMBER, Evgeniy Yolkin-igolkin sent it to me from Moscow. But as far as I understand, it is oriented to the 1.8 volume, but it is also Soviet and new, so let it lie there. If you put it in a “one and a half” without preliminary “rebuilding”, the engine will most likely become dull.
Nowadays, such distributors often pop up all over Russia. They sent it to me from Saratov. Sent by a good person, I found the ad on Avito, as always. The asking price is the same as in the store - 1 ruble, but this is the USSR, and 118s have not been sold for a long time. Only 147s are sold, and they are of dubious quality - I picked one up in the store, and it immediately had a shaft with side play, and for this late distributor I need to change the drive, and change the vacuum tube to a hose.
The seller did not pay me for the “advertising”, this is my initiative as a sign of gratitude for a good product and prompt delivery, as well as high-quality packaging. Here is one of this man’s advertisements, MOSKVICH AVITO SPARE PARTS, he still has a lot of spare parts, both new and used. The person seemed to have already been tested by me, she didn’t cheat, the product is worthy, I recommend it!
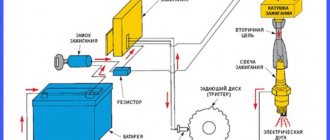
The Moskvich-412 car is equipped with an ignition distributor (breaker-distributor) P118, consisting of a high-voltage current distributor, a vacuum and centrifugal ignition timing regulator, and a low-voltage current breaker.
A centrifugal ignition timing regulator is used to change the ignition timing depending on the crankshaft speed of the car engine.
To change the ignition timing depending on the engine load, a vacuum regulator is used. By manually turning the distributor body, the ignition timing is adjusted. To do this, you need to loosen the nut holding the corrector plates in advance and, using the scale with the “+” and “-” signs, adjust the increase or decrease in the advance angle.
The distributor of the Moskvich-412 car is disassembled in the following order: Remove the cover and distributor rotor; Remove the vacuum regulator, breaker plate, low voltage clamp, washer from the axis of the breaker lever and lever with spring, stand with fixed contact, washers from the limiter and clamp; Disconnect the fixed breaker plate from the movable one; Remove the oil seal from the cam bushing, unscrew the screw securing the cam and remove it together with the plate; Remove the weights and springs of the centrifugal ignition timing device; In order to remove the drive shaft, it is necessary to dismantle the spring ring, knock out the pin and remove the cam clutch. If necessary, replace the liners by pressing them out with a puller. New liners are pressed in using a pneumatic or manual press. Assembling the distributor of the Moskvich-412 car occurs in the reverse order. During assembly, it is necessary to lubricate all rubbing surfaces.
source
Error-free and quick do-it-yourself ignition installation on a Moskvich
The owner of a classic model of the Russian automobile industry needs to know how to set the ignition on a Moskvich-412. This is a fairly elementary process, which nevertheless can create difficulties if you do not know the procedure. It is how the ignition is installed on the Moskvich 2140 and other models of the brand that will be discussed in this article.
Installation instructions
To work, you will need tools such as a set of keys and a test lamp.
The procedure for setting the ignition of the Moskvich-412 is as follows:
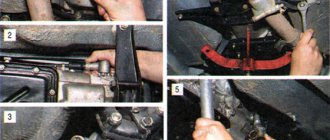
- First, remove the valve cover. Next, use the starting handle and crank the crankshaft. Continue until the mark on it matches the point of the pin on the block, and the mark on the sprocket also matches the mark on the cylinder head.
- Release the latches and remove the tumbler cover. Using a “10” wrench, unscrew the two nuts and lift the tumbler. The slider must be placed opposite the wire of the first cylinder.
- Now place the tumbler in place and tighten it. Start the engine. Using a "12" key, you need to loosen the hexagon at the bottom of the distributor. With the engine running, you will need to turn the distributor until you hear the engine running smoothly. This is a method of setting the ignition by ear.
- Adjustment can also be carried out through a control lamp. After you align the marks and direct the slider, you need to loosen the distributor. One wire of the control lamp must be connected to the low voltage terminal, the other to ground. Turn on the ignition. While holding the slider, turn the breaker until the light comes on, this will be the ignition moment.
IZh Moskvich 412 › Logbook › Centrifugal distributor regulator. It's decided.
And I greet you again, dear friends. But unfortunately, the post is not about how work is going on the car (and it is going on, I assure you, I’m in the garage 6 evenings (or even days) a week), but about a small nuisance that worries me extremely.
It all started with an oil change and valve adjustment.
Shortly before this, there were problems with oil pressure and there was an extraneous sound similar to a misadjusted valve
.
After replacing the oil and filter with a Zhiguli filter (there will be an article about this very soon), the pressure returned to normal. But after adjusting the valves, the sound did not disappear, and the clearances were normal on 6 out of 8. I started looking for the source of the sound.
To my surprise it turned out to be a distributor .
When I changed the filter, I took it off (because it was in the way), and when I turned the shaft I was surprised that it was rattling inside like stones in a beer can. At first I didn’t attach any importance to this, but then after listening to him with a stethoscope I almost went deaf. When I started to disassemble it, the first thing I came across was a spring, or rather, what was left of it - an elongated wire that got tangled in the curtain and miraculously did not tear the hall sensor to hell. Having tried to pull the curtain towards me, I was surprised that it came off when it should have been connected to the weight by a spring, and there I found a second spring in the form of a wire, entangled in one of the weights. In summary, we have: the springs are destroyed, the weights are not pulled together by them and are hammering against the distributor body (there is already a lot of exhaust there), the play in the weights is crazy. At the same time, the engine is running, but if you press the pedal smoothly, strong detonation is observed. If you give the gas sharply, then the vacuum corrector apparently comes in and there is no detonation. I couldn’t disassemble the distributor because...
do not know how. I tried to knock out the pin that holds the part that goes into the motor itself, but it sits dead. Did I do the right thing? As I understand it, you need to pull out the shaft to have direct access to the weights? I also understand that you can’t put springs there at random; you need a certain stiffness. Are there any repair kits for weights with springs? If yes, then from which distributor? Perhaps it is possible to abolish the centrifugal system altogether? If so, how and how can this affect the operation of the motor? I hope for your help, fellow Muscovite drivers! Today I was at the car market and found a repair kit for the VAZ 2108 distributor, like this:
It has springs. One of these days I will disassemble the distributor, inspect the weights, install springs and return the UOS centrifugal regulator to operation. Let's see what happens.
Yesterday I disassembled the distributor. The pin came out easily, the main thing is to apply the necessary force and not be afraid. The shaft came out without any problems, the main thing is to remember the order of the washers that are installed on the shaft. The play of the weights was reduced by crimping the retaining rings. I installed new springs and adjusted their tension by bending the ears to which they are attached. Installed. The distributor noise disappeared and the engine began to run quietly again. The test drive didn't work out because... ran out of gas. I set the ignition according to MD-1, the angle changed noticeably (previously I had a mark for the desired angle on the distributor relative to the engine, now the angle has become smaller).
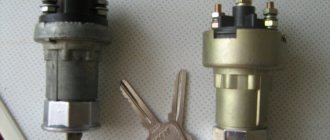
Ignition switch connection diagram
To install a new ZZ, your action plan should be as follows:
- disconnect the ground wire from the battery;
- set the key to position “0” of the ignition switch;
- Now you need to disconnect the electrical wiring from the terminals of the lock contact device;
- unscrew the four bolts securing the lock bracket on the steering column and remove its cover, and then the entire bracket with the lock;
- now remove the 3 screws securing the lock from the bracket, then remove the spring washers of the screws and the rubber bushing;
- using a screwdriver, press in the flat spring and unscrew the lock from the bracket;
- Installing a new device is done in the reverse order.
Photo gallery “Replacing the ignition switch and its device”
Tumblr installation and repair
The tumbler, also known as the ignition drive, may have various malfunctions: cracks in the cover, dirty or wet contact, or broken contact in the power circuit. You can solve them all or just replace the part.
To connect a new part, you will need to check that the roller is installed correctly in the housing. Then, after removing the tumbler cover, insert the shank into the distributor drive housing on the engine. Turn it until the floating clutch pins align.
Next, tighten the nut securing the distributor shank to the drive housing. Install the cover. Then, insert the high-voltage wires from the spark plugs in cylinder firing order 1-3-4-2, taking into account the rotation of the distributor rotor.
The tip of the high-voltage wire from the spark plug of the first cylinder is installed in the terminal socket above the low-voltage terminal in the housing. Next, the wire coming from the ignition coil is inserted into the central socket of the cover. All that remains is to connect the wire coming from the same one on the coil to the low-voltage terminal.
Now connect the vacuum regulator tube. Installation completed.
How to set the ignition on a Muscovite 412 video - Avtomaster
Unique and quick installation of ignition on Muscovites with your own hands
The owner of a classic model of the Russian automobile industry should know how to install the ignition on the Moskva-412. This is a fairly basic process, but can still be difficult if you don't know the procedure. We are talking about how the ignition is installed on the Moskvich 2140 and other models of the brand and will be discussed in this article.
Why turn on the ignition?
If you set the ignition timing correctly, it will directly affect the dynamics of the car. This will also save fuel. If the ignition is too late, the engine overheats and the mixture does not burn completely, which also reduces power.
If the engine is started too quickly, it can cause knocking knock in the engine. Because of this, valves and pistons can even burn out.
How to set the ignition on a Moskvich using a light bulb. And some thoughts about the future
How to display
contact
ignition
on
Moskvich
.
How to set the ignition on a Moskvich 2140
Carburetor workers on the World Map. close to you! Buy from Nail.
In the video below you will learn how the cam gap opens (the author of the clip is “Garage in the USSR”).
Check installation
The most accurate method for checking the ignition setting should be demonstrated by a drive test. To do this, you need to accelerate on a flat road to 55-60 km/h, and then give full throttle. Acceleration is performed in fourth gear. If knocking occurs after the fuel is suddenly applied, you need to retard the ignition. Make sure you only hear 1-2 lungs.
Ignition switch connection diagram
To install a new software, your action plan should be as follows:
- disconnect the battery ground cable;
- set the key to position “0” of the ignition switch;
- Now you need to disconnect the wiring from the locking device terminals;
- Unscrew the four bolts securing the lock bracket on the steering column and remove its cover, and then the entire arm with the lock;
- Now remove the 3 screws securing the lock from the bracket, then remove the spring washers with the screws and rubber bushing;
- using a screwdriver, thin the flat spring and unscrew the lock from the bracket;
- Installing a new device is performed in reverse order.
THIS IS INTERESTING: How to remove a Mazda 3 battery
Toggle switch installation and repair
The toggle switch, which is also the ignition motor, may have various malfunctions: cracks in the cover, dirty or wet contact, breakdown of the contact in the power circuit. You can solve them all, just replace the part.
To connect a new part, you need to check that the roller is installed correctly in the housing. Then, with the toggle switch cover removed, insert the shank into the timing gear housing on the engine. Rotate it until the floating clutch pins are aligned.
Then tighten the distributor shank nut to the drive housing. Replace the cover. Then insert the high voltage wires from the spark plugs in cylinder order 1-3-4-2, taking into account the rotation of the distributor rotor.
The tip of the high-voltage wire from the spark plug of the first cylinder is installed in the terminal socket above the low-voltage terminal in the housing. In addition, the wire from the ignition coil is inserted into the central socket of the cover. All that remains is to connect the wire coming from it on the coil to the low-voltage terminal.
Now connect the vacuum regulator tube. Installation completed.
“How to properly install the ignition on a Moskvich 2140”
This video demonstrates how adjustments are made on one of the most popular Moskvich models (the author of the video is Maxim Mitin)
- Features of servicing electrical equipment of the legendary Moskvich
and reviews
UNDERSTOOD ! BUT I DO NOT ACCEPT NORMAL OPERATION OF THE ENGINE, ISSUES ONLY WITH THE GAS PEDAL DIRECTED AND SUPPORTED BY THE AIR BAR. WHAT TO DO?
Source: https://kip-pribor.ru/obsluzhivanie/kak-vystavit-zazhiganie-na-moskviche-412-video.html
Error-free and quick do-it-yourself ignition installation on a Moskvich
The owner of a classic model of the Russian automobile industry needs to know how to set the ignition on a Moskvich-412. This is a fairly elementary process, which nevertheless can create difficulties if you do not know the procedure. It is how the ignition is installed on the Moskvich 2140 and other models of the brand that will be discussed in this article.
Ignition switch connection diagram
To install a new ZZ, your action plan should be as follows:
- disconnect the ground wire from the battery;
- set the key to position “0” of the ignition switch;
- Now you need to disconnect the electrical wiring from the terminals of the lock contact device;
- unscrew the four bolts securing the lock bracket on the steering column and remove its cover, and then the entire bracket with the lock;
- now remove the 3 screws securing the lock from the bracket, then remove the spring washers of the screws and the rubber bushing;
- using a screwdriver, press in the flat spring and unscrew the lock from the bracket;
- Installing a new device is done in the reverse order.
Photo gallery “Replacing the ignition switch and its device”
Tumblr installation and repair
The tumbler, also known as the ignition drive, may have various malfunctions: cracks in the cover, dirty or wet contact, or broken contact in the power circuit. You can solve them all or just replace the part.
To connect a new part, you will need to check that the roller is installed correctly in the housing. Then, after removing the tumbler cover, insert the shank into the distributor drive housing on the engine. Turn it until the floating clutch pins align.
Next, tighten the nut securing the distributor shank to the drive housing. Install the cover. Then, insert the high-voltage wires from the spark plugs in cylinder firing order 1-3-4-2, taking into account the rotation of the distributor rotor.
The tip of the high-voltage wire from the spark plug of the first cylinder is installed in the terminal socket above the low-voltage terminal in the housing. Next, the wire coming from the ignition coil is inserted into the central socket of the cover. All that remains is to connect the wire coming from the same one on the coil to the low-voltage terminal.
Now connect the vacuum regulator tube. Installation completed.
IZh Moskvich 412 IE Time Machine › Logbook › Contactless ignition system
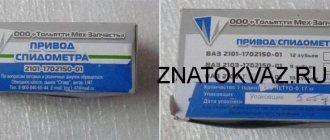
Well, I finally got a contactless ignition system. Because I was already tired of shaking up the contact - the distributor was completely rebuilt, the rotten additional resistor on the coil was replaced, and the coil itself, it seemed, was no longer quite among the living. So. These contacts have already been published online, but I will repeat them anyway. To confirm their relevance, at least. Order BSZ directly from. Contact person: Ekaterina Khrisman, [email protected] [email protected] 8(495)646-23-97 8(915)177-60-18 ICQ 639-225-119.
The price of the set for M-412 (coil, breaker, switch, wires) cost me 2720 rubles. Actually, here it is:
Shipping TC “Business Lines” from Moscow to Nizhny Novgorod cost 525 rubles. This is without delivery within the city (pickup from the TK terminal - another 40 rubles for round trip travel).
I also had to look for the distributor mount. I couldn’t find the silumin plate-clamp that everyone buys. But in my favorite store they sold me the latest P147 distributor drive. They gave it away for an inexpensive price - only 250 rubles. Plus search trips - 80 rubles.
The installation of all this beauty was carried out today. Replacing the drive took an annoyingly large amount of time... The fact is that in addition to the external teeth, the drive gear also has internal teeth - for the oil pump. For the old and new drives, these internal teeth are cut in antiphase - where the old one has a “teeth” and the new one has a “pit”. I had to change it like this: 1) I turned the crankshaft to set the drive to a clear position (let’s call it POLOZHENIE), and memorized it; 2) Unscrewed and took out the old drive; 3) Set the new drive to POLOZHENIE, taking into account the helical gear; 4) Inserted the new drive all the way (it didn’t work all the way), made sure that the gear engaged with the crankshaft; 5) Slowly rotated the crankshaft so that the drive rotated with it (since the drive is already engaged with the crankshaft, the ignition should not go astray), while simultaneously trying to put it on the drive shaft of the oil pump. I had to turn it almost a full turn, but I got it on. Then everything is simple. Replacing a coil, installing a distributor, installing a switch - without any problems. The switch was simply screwed onto two self-tapping screws between the washer fluid reservoirs and the antifreeze expansion tank. Connection according to the diagram: