12.03.2020
| (Votes: 1, Rating: 5) |
Issues discussed in the material:
- What is a clutch cable?
- Signs of a faulty clutch cable
- How to adjust the clutch cable
- How to change the clutch cable
- What to do if it is not possible to change the clutch cable on site
- Which, according to car owners, is it better to buy clutch cables - original or not?
On vehicles with a manual gearbox, a clutch cable is installed as standard. This is a relatively simple device whose task is to ensure smooth contact of the car with the road surface.
However, there are cases when contact is lost as a result of a break in the specified cable, and then the corresponding pedal simply fails. In such situations, the main thing is to remain calm and get to the nearest parking lot, and you will learn how to change the clutch cable by reading to the end of this article.
DIY motorcycle clutch cable repair
Clutch failure and drive failure is an unpleasant thing, but it can be repaired efficiently with your own hands. For repairs, a set of soldering iron, rosin and tin is required. Old axe, hammer, pliers and screwdriver. Some pure gasoline.
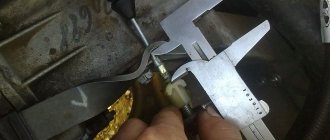
Preparation for repair. Quality repairs depend on preparation. Usually the end of the cable after a break is not straight, it needs to be cut off. We measure the shell, substituting a piece, then shorten it. Remove the tip from the scrap, after heating it with a soldering iron.
For trimming we use an old ax (or a sharp chisel). We fix the ax or chisel with the blade to the top. We place the part on the blade and with one sharp blow of the hammer we cut off the cable (straighten). The edge turns out smooth and not splayed. Then rinse with clean gasoline. It can be made even simpler. Solder the cutting area with tin, and then use pliers or wire cutters to bite it off.
Before soldering, do not forget to install all the parts. The last thing to install is the tip. It is important to pick out the tip sticking out of the tip with a screwdriver and pliers so that the veins stick out in different directions. To ensure that the tip is held firmly after soldering. We treat it with rosin, soak it together with the heated tip, dipping it in rosin.
Soldering. We melt the tin with a soldering iron and pick it up or place a piece of tin on the part that has been picked apart. Heat until the tin flows into the tip. Remove excess tin and protruding veins using a file.
Repairs can be changed. Do not shorten the shell, but leave it the same or you can lengthen it. Instead of a broken drive string, pick up one strand from a thicker cable, first straighten the string and cut it to the required length. Solder both ends
The last option is suitable for those involved in tuning. By changing the shape of the steering wheel, you have to increase the length of the cables yourself. Soldering in this way is of high quality and lasts a long time.
Motorcycle cable repair.
Repair of cables, both the clutch cable and the throttle cable (or brake cable), may be required after a certain mileage of any motorcycle. This article, more aimed at beginner motorcyclists, will describe several options for repairing (both on the road and in your favorite garage) a clutch or gas cable, as well as the tools and materials needed in this matter.
Of course, a clutch or throttle cable is not expensive compared to other motorcycle parts that gradually wear out, and many motorcyclists simply throw away the old cable and buy a new one. But a cable break can happen at any time, far from your home garage or store, so every motorcyclist, but especially those who like to travel, should be able to repair the cable. In addition, some types of damage are so minor and so easy to fix that there is no point in buying a new cable. After all, a properly repaired cable will last no less than a new one.
Any cable consists of two main parts: the Bowden sheath and the cable itself. There are a few more small parts (cap ends of the shell and cable ends - bosses), but there are only two main parts. The Bowdoin sheath is twisted into a spiral (turn to turn) from very elastic and thin steel wire and covered with plastic insulation that protects against dust and moisture getting into the cable. The cable itself is twisted from very thin steel threads (much thinner than Bowden sheath wire), which are secured and soldered at the ends of the cable using cable lugs, which prevent the steel threads from unraveling.
Basic faults and repairs of cables.
The main cable malfunctions and their elimination will be discussed below. The most common malfunction, especially with the clutch or brake cable (which experiences significantly greater loads than the throttle cable), is the cable breaking at the tip (especially at the point of friction at the bend) or the tip simply popping out.
Often there is chafing of one or more steel threads, for example, if the cable had a significant bend during operation and was not lubricated (it was worked dry) and the cable quite quickly, as they say, “fluffs up”.
As for the Bowden sheath, unlike the cable itself, it almost never fails (although it still wears out at the bends), of course, unless it experiences a strong shock, for example in an accident. Therefore, cable repair consists precisely in restoring the cable itself or its tips (bosses), which will be described below.
The cable end pops out. The simplest malfunction is the tip popping out, for example, if it was poorly prepared and soldered. Of course, in a garage, everything can be done much more reliably, using tin, soldering acid and a soldering iron. But here, too, there is one nuance that some beginners do not know and which will make the installation of the tip very reliable and will not allow it to jump out, even under significant loads, which is very important for a clutch or brake cable. And the whole point is in the correct preparation of the cable itself and its correct installation in the tip before soldering.
We put the tip (by the way, I use the head from a bicycle spoke as a tip) onto the twisted end of the cable and make sure that the tip of the cable protrudes from the tip by about 3 mm. Next, we bend the steel threads of the cable, protruding 3 mm from the tip, in different directions, as if making a tassel from the threads.
Next, all that remains is to fill this brush with solder using a soldering iron, of course, before doing this, treating the steel wires and tip with soldering acid. As a result, a brush made of steel threads filled with tin will not be able to jump out of the tip under any load; rather, the cable will break.
Well, as for restoring the cable tip on the road, then, of course, most motorcyclists do not have the opportunity to solder on the road (I carry a 12-volt soldering iron when traveling, since I installed a 1000-watt generator and a 61-amp battery on my cruiser). Therefore, you can restore the cable end (at least to get to your home or store) in simpler ways.
Of course, the tip of the cable, when it comes off the cable, is lost, and the easiest way to repair the cable is to carry with you a boss (it is indicated by a red arrow in the photo) in which two perpendicularly located holes are drilled, in one of which a thread is cut and a screw is screwed in . And you just need to twist the threads of the cable at its tip, then put the boss on the cable and tighten the screw thoroughly.
This method is not particularly reliable, but it is quite possible to get home (even at a considerable distance). It is also useful to carry with you a crimping boss, which is indicated in the photo with a green arrow. Its reliability is much higher, since the cable first bifurcates before crimping and half of the threads are bent (through the slot) in one direction, and half of the threads in the other direction. After this, we crimp the boss using pliers and this connection is almost as strong as a soldered connection.
If there is no threaded boss or crimp boss in the glove compartment, then you can use a regular nut as a tip to get home. For the throttle cable of most motorcycles, an M4 or M5 nut is suitable, but for a clutch cable that experiences greater loads, it is advisable to use an M6 nut.
We put the nut on the end of the cable and compress it with large pliers or a hand (watch) vice. For M4IM5 nuts, the compression force is sufficient, but for M6 it is better to use the impact method of flattening (for example, on a curb stone with a hammer). Again, in order to further prevent the cable from jumping out of it after flattening the nut, it is useful to bend the threads at the end of the cable (which protrude about 3 mm from the nut) to the sides until a tassel of threads is formed.
A cable break occurs more often when its tip is reliably soldered, and the cable works with a bend or rubs against something.
Fixing such a malfunction is a little more difficult, since you will have to shorten the Bowden shell. Moreover, it will need to be shortened by the same distance in mm as the cable was torn and cut.
After a break, the cable usually has crooked (fluffy) threads - see the photo just above, which are not so easy to straighten and should be trimmed a little using wire cutters, a file or a sharply sharpened chisel (you can also use a thin cutting wheel on a grinder , if we carry out repairs in the garage).
After trimming, we twist the cable at the end and pull it out of the Bowden sheath. Next, as mentioned above, you should use sharp pliers to cut the sheath to the same distance by which the cable itself has become shorter. Well, then you should round off the end of the shell using a grinder (if on the way, then with a file), and then go a little from the inside with a thin round file to remove the burr on the cut wire of the shell. This will guarantee that the cable will not rub against the burrs of the sheath.
All that remains is to remove the cap tip with the hole from the trimmed shell (to remove the rolled tip, it is useful to heat it to melt the plastic shell compressed by it) and then put the tip on the shortened shell, and then insert the cable into it.
After this, we solder its tip onto the cable, as described above (having previously unsoldered the tip from the cable cut) and after soldering, round off the soldering area with a file (or grinder).
If the repair takes place on the road and there is no soldering iron, then we make a tip from a boss with a screw, or from a crimp boss, or from a suitable nut.
A break in one or more cable strands somewhere in the middle. This happens when the cable has a significant bend and due to increased friction in one place at the bend, one or more threads fray, fluff up and the cable begins to jam. In general, fixing such a malfunction is a thankless task and it is better to buy a new cable.
But if this happens on the way, you will have to unsolder (you can use a powerful lighter) or cut off one of the cable tips, then pull the cable out of the Bowden sheath and unravel the broken thread (or threads) from the cable and cut off these threads at the end at the second tip.
Next, we insert the cable, with the threads removed, into place in the shell and solder or flatten the new tip (you can use the old one if you have something to unsolder). Of course, a cable without several threads will become less strong, but driving is quite possible, and even more so getting home.
And finally, a few tips that will help to significantly increase the life of the cable.
On a motorcycle that has an automatic transmission (for example, Java, Dnepr, and many foreign cars), when changing gears, you don’t have to press the clutch lever at all. Since the automatic machine (of course, serviceable and tuned) is designed in such a way that it automatically disconnects the clutch discs from the action of the shift foot.
You have to change gears in city traffic very often, and if you constantly squeeze the clutch lever, the cable will not last long. Therefore, on motorcycles with an automatic transmission, I do not recommend touching the clutch lever at all when changing gears.
When installing (laying along the frame or fork) any cable, I advise you to completely avoid bending it, so it will last longer. If the cable is too long and this causes kinks, then it is better to shorten it. Well, I advise you to wash the cables on your motorcycle (car) with gasoline after two or three seasons and then lubricate them using the device shown in the photo and figure below.
After all, without lubrication, the cable will not last long, so when working dry, friction increases several times, and the veins quickly fray. After washing, be sure to lubricate the cable with fresh oil (preferably transmission oil). With such care, the cables will work for a very long time (on my Dnieper they have been working for 10 years without repair).
The photo shows a factory-made lubrication device, and the picture shows a homemade one. The factory device compresses the cable sheath using two screws (through a rubber gasket) and then a special lubricant is supplied into the hole indicated by the red arrow through a tube from a spray can.
But the homemade device shown in the figure below lubricates the cables much faster, since the lubricant is supplied under decent pressure. In addition, using a homemade device, you can not only lubricate the cable, but also wash it with gasoline to remove old grease.
As can be seen from the figure, a device for washing and lubricating cables is not at all difficult to make yourself. The body of the device (cylinder) can be made from a piece of water pipe, approximately 80 - 100 mm long and 40 - 70 mm in diameter. A cap with a hole in the center is welded to one side of the cylinder (pipe), and a valve from the car camera is glued around the hole (or screwed through a flange).
On the other side of the pipe, a thread is cut and plug 5 is screwed in through rubber ring 3 (gasket). In the center of the plug, we drill a hole with a diameter of 14 - 16 mm, into which a rubber plug 4 is inserted. A hole should also be drilled in the plug, but one millimeter less than the outer diameter of the cable, so that it fits tightly into the plug.
We fill the cylinder with gasoline (for flushing) or oil (for lubrication), then insert a rubber plug, insert a cable into the plug and, turning the cylinder over with the plug down, begin to supply air into the cylinder using a pump (or compressor) until oil flows from the bottom end of the cable. Lubrication of the cable using such a device occurs very quickly.
If you don’t want to bother with such a device, you can lubricate the cable using a rubber fuel hose, about 20 cm long, which is tightly placed on the cable and tightened (in the place where the cable is inserted) using a wire or a suitable clamp. Then, using a large medical syringe, oil is pumped into the other end of the hose until it flows out of the other end of the Bowden sheath of the cable. In this case, of course, we hang the cable vertically.
I hope that after reading this article, any new motorcyclist will be able to repair cables on their own, no matter where, in the garage or on the road, good luck to everyone.
If this article is useful to you, please share it on social media. networks by clicking the buttons below. Thank you.
RќСЂР°РІРёС‚СЃСЏ
A few words about the clutch cable drive
Foreign automakers extremely rarely equip their cars with such a clutch drive, preferring more reliable hydraulics that rarely fail. But on vehicles of Russian manufacturers, cable clutch mechanisms are standard. And this despite the fact that they have a lot of real shortcomings, which are well known to owners of domestic cars.
The clutch cable needs constant adjustment during operation, which is due to the natural operating wear of the clutch drive. It quickly becomes covered with rust, breaks off at the most unexpected moments, and so on. It is for this reason that every driver driving a car with a manual transmission is simply obliged to know what to do if the cable that interests us fails.
We will talk further about how to change and adjust the cable mechanism. Now let’s describe it in a few words. The cable is connected to the clutch pedal using screws, its other end is also fixed with a screw, but to a special bushing in the shield. In this case, the cable is screwed to the pedal as tightly and reliably as possible, and to the bushing more freely, due to which the described mechanism rotates on the axis without any serious difficulties. In addition, a stop must be installed under the pedal, which protects the cable from breaking.
Clutch cable is faulty, signs of malfunction
If the clutch cable fails, the movement of the car becomes significantly more difficult, namely:
- The clutch pedal falls.
- When the engine is on, the gears do not engage.
- The free play of the clutch pedal increases.
Adjusting the cable drive - how to do it?
If you depress the clutch when changing gears, but the pedal goes to the floor instead, there is a problem with the clutch cable. In such a situation, you should drive as carefully as possible to a safe place on the road (for example, to a parking channel), stop the car and find out the reason for the failure of the mechanism we are considering.
Some car enthusiasts are sure that the cable cannot be adjusted; in their opinion, only replacing the mechanism can help, which is not entirely true. The car manufacturers themselves strongly recommend not to rush to install a new cable until the cause of its failure is determined. Often, a simple design adjustment solves all problems. It is performed using two 17 keys according to the following scheme:
- the locknut is slightly loosened so that the adjusting (tension) nut has sufficient distance to move;
- After this, the tension nut is manipulated until the required level of cable tension is achieved.
The results of the process are monitored by pressing the clutch pedal to determine the ease of its movement. In cases where, after tightening the cable, you do not notice any changes in the “behavior” of the pedal, you need to repeat the manipulations with the tension and lock nut again. And then press the pedal again. You may have to perform the stretching procedure several times. Until you achieve proper clutch pedal travel.
The main thing here is not to overdo it. If the cable is overtightened, it will immediately burst. And if the tightening is insufficient, the mechanism will not be able to effectively perform its function. Separately, we note that some cars are equipped with self-adjusting ratchet cable mechanisms. There is no need to manually adjust them, since their length is adjusted automatically when they wear out during use. It is enough just to regularly check the clutch pedal travel.
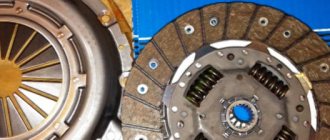
Clutch replacement operation
If the clutch cable on your car breaks, or its adjustment described above does not bring the expected results, you will have to install a new cable drive. Experienced drivers always have a spare cable in the trunk, having learned from the bitter experience of its breaking.
You can make a “spare wheel” yourself, but experts do not recommend doing it yourself in this matter. Firstly, because a homemade cable breaks quickly. Secondly, the process of making it yourself requires a lot of time, as well as the availability of tools and additional devices (machinery vice, grinder saw and others). Believe me, it’s easier to buy a reliable cable than to make it yourself.
To replace the clutch drive, you will need to remove part of the floor under the pedals in the car interior (otherwise you will not be able to get to the area where the clutch pedal and the cable connect). After this, they find the place where the mechanism is attached to the clutch block or directly to the gearbox and disconnect it (the exact diagram of the process is given below). Moreover, the cable should be pulled into the cabin.
Note! Before dismantling a failed cable, it is necessary to accurately measure its free part (located near the gearbox near the lower tip).
The sequence of actions for removing the drive is as follows:
- the cable is removed from the damper of its sheath located on the gearbox housing;
- in the car interior, the mechanism is disconnected from the pedal;
- pull the cable through the engine compartment.
Now you can install the new drive. First, it is connected to the pedal, then pulled in the opposite direction (to the clutch unit or manual transmission). After replacement, it is necessary to adjust the installed mechanism. In addition, it is advisable to lubricate it in three places:
- at the site of its entry into the shell;
- in the area of the clutch fork;
- in the area where the cable is fixed to the pedal (from the passenger compartment).
The clutch drive is usually lubricated with a graphite compound. Silicone grease can also be used. In general, it would be great if the motorist periodically serviced the cable clutch mechanism - to do this, it simply needs to be lubricated once every 6-12 months. Such simple maintenance perfectly prevents cable breaks and chafing.
How to change the clutch cable
To learn how to change the clutch cable, you need to carefully study the instructions and follow them. Before work, prepare the necessary tools and materials, namely:
- a new copy of the cable (individual for each specific model);
- a jack for lifting the car (it’s better if you find an inspection hole);
- a set of different-sized wrenches;
- Screwdriver Set;
- To finish the drive, lubricant or graphite compound is needed.
To change the clutch drive cable, you will need pliers.
- Before dismantling the damaged mechanism, measure its free part at the lower tip, located near the gearbox.
- Push the cable forward. Then remove its tip from the hole in the clutch release fork.
- Remove the cable sheath damper located on the surface of the gearbox housing from the mounting bracket.
- Directly inside the car, disconnect the cable end and the clutch pedal.
- Remove the device towards the engine compartment.
- Manipulations for installing a new mechanism are similar to those at the dismantling stages and are carried out in the reverse order.
At the end of the cable installation work, its initial adjustment is made. You need to do the following:
- measure the distance from the clutch release fork to the end of the damper (the distance should be as specified in the instructions);
- determine the size of the interval between the tip of the cable and the end part of the damper (we check the resulting distance with the recommended manual);
- if the dimensions do not match, adjust the device using the adjusting nut;
- check the adjustment (you need to press the clutch pedal several times, then take measurements again: if the results obtained do not correspond to those indicated in the instructions, make the adjustment again);
- When finished, tighten the locknut firmly.
The time you will spend on all operations will not exceed 15 minutes. Be sure, before changing or adjusting the mechanism, read the car manufacturer's tips and recommendations regarding clutch repair. In addition, it is necessary to find out information about the parameters for adjustment.
As a rule, cars made mainly in Russia are equipped with a clutch cable. Foreign companies prefer hydraulics. Of course, there are foreign cars equipped with a clutch cable. However, such machines are rare.
How much does it cost to replace a clutch cable? Taking into account the price of a new spare part, you will have to pay about 2 thousand rubles for the work.
Features of setting up the new clutch drive
To check the correct installation of the mechanism, measure the distance between the end of the damper and the clutch fork (or cable tip). In the first case, the length (distance to the fork) should be from 86 to 91 millimeters, in the second (to the tip) - from 60 to 65 millimeters. The distances shown are valid for most vehicles. But in some cases they can have other meanings. Then you will have to adjust the mechanism using the tension nut manually (according to the diagram given earlier).
Then a final check of the clutch cable's functionality is performed. To do this, press the pedal 2-3 times, measure again and make sure the resulting distance corresponds to the recommended values. If there is no match, we set up the mechanism again. When the required values are achieved, be sure to tighten the locknut. Now you can safely hit the road!
Source
Clutch cable - how to change it yourself?
12.03.2020
| (Votes: 1, Rating: 5) |
Issues discussed in the material:
- What is a clutch cable?
- Signs of a faulty clutch cable
- How to adjust the clutch cable
- How to change the clutch cable
- What to do if it is not possible to change the clutch cable on site
- Which, according to car owners, is it better to buy clutch cables - original or not?
On vehicles with a manual gearbox, a clutch cable is installed as standard. This is a relatively simple device whose task is to ensure smooth contact of the car with the road surface.
However, there are cases when contact is lost as a result of a break in the specified cable, and then the corresponding pedal simply fails. In such situations, the main thing is to remain calm and get to the nearest parking lot, and you will learn how to change the clutch cable by reading to the end of this article.
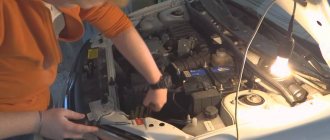
Important points when replacing the cable
Unscrewing the fastener
- As practice shows, the procedure for replacing a cable on a “ten” begins in the engine compartment. You are required to hold the fork and at the same time pull the cable that is removed from the fork.
- Then the cable fastener is removed from the bracket, which is located on the gearbox. Having completed this procedure, we go into the interior and dismantle the damaged element, that is, the cable.
- The result of the repair is influenced not only by the quality of the new cable, but also by the correctness of the entire replacement procedure.
- If you are dealing with a “ten” from an experimental industrial batch, then the bracket will be presented as a bolt with a Phillips-head screwdriver. To dismantle such a fastening element, you cannot use a regular screwdriver. A special shortened tool will be required.
- If the cable breaks while driving, you can unscrew the bracket with a handy tool, but through the safety block.
- It is strongly recommended to replace the non-standard bolt with a regular one, which can be unscrewed with a simple wrench.
- Be sure to keep a set of tools in your car, since it is extremely rare for a cable to break at the right moment. There is hardly a right moment for any kind of machine breakdown.
Advice!
The clutch pedal should be installed at the level of the other two, otherwise there is a chance that the reverse gear simply will not engage.
If all the manipulations to lubricate all rubbing parts and mechanisms did not help you, and the problem remains unresolved, then in such a situation the best option would be to contact a specialized service center for diagnostic analysis.
Because solving problems with the gearbox and clutch in advance can prevent you from unexpected breakdowns and further expensive repairs.
- For lubricants in hard-to-reach areas, it is best to use WD-40 or a silicone lubricant in spray form. Thus, the material will be better distributed on the surface and will reach all places that are difficult to reach manually.
- It is recommended to lubricate the clutch pedal and fork cable fastenings with graphite lubricant, which has a beneficial effect on such mechanisms and holds well on devices subject to constant load.
Replacing the clutch cable on a VAZ 2110
Why does the clutch pedal squeak? In most cases, a breakdown of the manual transmission on a “ten” is not associated with any serious problems in the box itself. The most frequently broken component in a tens manual transmission is the clutch cable, which can be replaced on your own. Therefore, next we will talk about how to properly replace the clutch cable (see the video “How to remove and adjust the clutch cable on a VAZ 2110, 2111, 2112” below).
Why does the clutch pedal fail?
On a “ten” that has a solid mileage, the clutch pedal often begins to fail, and there may be two reasons for this:
- Broken clutch cable;
- Malfunction of the clutch fork.
Clutch cable rupture on a VAZ-2110 occurs when the vehicle is not used properly for a long time, for example, in extreme conditions. This part cannot be repaired, and therefore it is simply replaced. How to open the hood if the cable is broken? At the same time, even if the clutch cable breaks, you can get to the desired location without towing. To do this, you need to set the first gear, start the car and start driving. The transition from one gear to another, in this case, occurs when the gear is set to neutral. Having reached the desired location, it will be possible to replace the clutch cable without removing the gearbox.
If the clutch fork malfunctions, then dismantling the manual transmission will be required.
Clutch cable replacement process
Even an inexperienced car enthusiast can replace the clutch cable on a “ten”. However, if you carefully study the repair manual that came with the car, there is a clear indication that you should first dismantle the windshield wiper and remove the panel under the wipers (the so-called frill). Once these parts are removed, you can proceed to the clutch cable replacement procedure.
- Using two 19mm wrenches, the broken cable is removed from the bracket located on the gearbox by unscrewing the nut holding it;
- After the cable tension is loosened, it is pulled out of the fastening;
- Fix the clutch fork with one hand, and pull out the cable with the other.
UNLOCK THE CABLE FROM THE CLUTCH PEDAL
If the panel under the wipers and the windshield wiper were removed in advance, then further removal of the cable will occur only in the engine compartment. This is due to the fact that access to the casing protecting the clutch pedal is open. This casing is located next to the hydraulic brake booster.
- We unscrew, using a Phillips screwdriver, the fastening screws of the casing, and dismantle it;
- Using the same screwdriver, you need to hook and pull out the locking bracket that secures the cable head to the pedal bushing;
- We dismantle the cable.
If the panel under the wipers and the windshield wiper were not previously removed, the retaining bracket will have to be removed directly from the car interior, and not from the engine compartment. This work is very inconvenient, but, nevertheless, it is done like this:
- Raise the clutch pedal to the highest point of its trajectory, after which the bracket is dismantled, and then the cable itself;
- Using the “8” key, twist the support plate and pull the cable into the car interior.
INSTALLING A NEW CLUTCH CABLE
- Dismantle the bushing located on the clutch pedal pin - the old cable was put on it (if the bushing is very worn, it should be replaced);
- Using lithol, lubricate the cable guide and clutch pedal pin;
- The end of the clutch cable is threaded from the car interior into the engine compartment;
- Attach the cable to the pedal;
- Hook the cable and clutch fork;
- Secure the cable in the bracket on the gearbox.
How to adjust the clutch cable
After the clutch cable has been replaced on a VAZ 2110, it is necessary to adjust it. The point of this procedure is to set the correct pedal stroke. The free play of the pedal, which is measured by the distance from the floor of the car to its top point, should be in the range of 12.5 - 13 cm. If such measurements are not very convenient, then it is recommended to simply adjust the clutch pedal so that it is level with the other pedals.
- Slightly unscrew the nuts securing the cable (they are located on the gearbox bracket);
- Using adjusting nuts, adjust the location of the cable tip, fixing it and checking the trajectory and position of the clutch pedal;
- After the pedal is adjusted, tighten the fastening nuts.
How to remove and change the clutch cable
VAZ 2109
- Initially, the work itself takes place under the hood of the car.
- In a VAZ 2109 car, the cable is fixed to the box using a metal bracket. To remove this part from it, it is necessary to reduce the fastening element.
- Then you need to remove the bottom end of the cable from the clutch.
- In order to carry out this work further, you need to go into the car interior. Disconnect the cable from the pedal. To do this, remove the rubber mat and move the carpet aside.
- Then we pull out the stopper bracket using a screwdriver, and then remove the pin; it is connected to the pedal bracket cable.
- In the next method we simply take it out.
- We pass the new part through the hole under the bottom and secure its end to the finger thanks to the bracket.
- Next, we fix the vehicle in the box so that the rubber bushing fits in the bracket.
- Then we put the tip on the fork.
- We install a new cable and check the operation, if necessary, we also adjust the entire process of the mechanism.
VAZ 2110
- At the very beginning, we remove the old vehicle, pull it out of the bracket, it is located in the box.
- It needs to be loosened.
- Then take it out.
- We remove it from the engagement in the fork. We hold it and remove it.
- You need to disconnect the part from the pedal.
- We take out the casing.
- Using a screwdriver, pry up the stopper bracket that supports the cable head on the pedal pin.
- Let's take her out.
- It is necessary that the pedal is raised all the way up.
- Remove the bracket.
- After removing it, you need to unscrew the support plate and then insert it into the car interior.
- At this point the whole process can be considered complete. If you did everything correctly, then you will succeed.
We recommend:
Replacing the fuel filter on a Lada Granta
VAZ 2114
- First you need to open the hood of the car and disconnect the battery terminal.
- Next, you need to find the clutch cable, then disconnect it. After this, pull the part out of the bracket and remove it from the clutch fork.
- We remove the carpet on the driver's side and remove the carpet in the pedals.
- After you have done this, you will see where the cable is located, it is also attached to the pedal. You just need to turn it off. It is fitted with the eye of one end on a hook.
- When you have disconnected all the parts of the mechanism, we pull it out. To do this, we push it away from us under the hood of the car.
- Finally, the old cable is completely removed, we put a new one in this place. Remember that before installation you need to remove the bushing that is located on the pedal; the cable is attached to it.
Priora
- First you need to remove the boot from the rubber; it covers the hole where the cable comes out. Thus, dust, dirt and moisture do not get into it. Remove the stop from the bracket.
- Now you need to look at the place where the tip of the clutch cable is connected; it is installed on the pedal pin and secured to it using a fixing part. To pull it out, this can be done using pliers or a screwdriver.
- We go under the hood of the car and are there, disconnect the clutch cable from the power fork, to do this, just pull its end.
Kalina
- First you need to remove the clutch cable sheath stop. To do this, under the panel we need to find the nut securing the cable sheath stop to the bracket and unscrew it.
- Next, using a flat-head screwdriver, pry up and remove the spring bracket.
- Then we remove the snoring mechanism part and adjust the tension of the cable.
- Remove the plastic bushing.
- In order to get to the cable, you need to pull out the air filter.
- Next we follow, pull the end of the cable and pull the leash out of the lever.
- Then remove the rubber cover protection from the tip.
- It is necessary to remove the cable from the pedal assembly bracket.
- We take out the cable seal cover from the front panel, then you need to pull out the cable.
We recommend:
How to properly treat a car with anticorrosive?
Granta
- unscrew the nuts that are attached to the cable on the pedal bracket
- remove the stop from the cable sheath studs
- dismantle the stopper bracket, hold the clutch pedal axis
- pull out the axle
- remove the clutch pedal
- disconnect the springs from the bracket
- pull out and remove the cable end stopper
- remove the dense part of the vehicle shell, which is located in the engine compartment
- pull the tip out of the fork groove
- unscrew the cable lead
- remove the braid guide bushing
- remove the clutch cable
Renault Logan
- You need to move the driver's seat as far as possible.
- Then you need to remove the carpet that covers the pedal from the pistons.
- Then you need to remove the hook-shaped part from the top of the clutch pedal. To do this, you need to feel it with your hand and press the pedal towards yourself, thereby moving the cable upward.
- It is necessary to remove the large pipe separately.
- In the end, all that remains is to remove the bracket cable jacket near the clutch fork, then remove it from it.
Signs of breakdown
Maintenance of the VAZ 2110 clutch cable must be carried out as soon as the first signs of wear are detected. This is necessary so that the malfunction does not take the driver by surprise. If the clutch cable of a VAZ 2110 car breaks, then the following signs will indicate this.
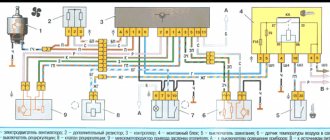
Mechanism for automatic adjustment of cable length: 1 - spacer sleeve; 2 - plastic body; 3 — clamps; 4 — toothed cable tip.
Clutch cable: 1 — leash; 2 — threaded cable end; 3 — cable protective cover; 4 - nut; 5 — rubber bushing; 6 — washer; 7 — front tip of the cable sheath; 8 - seal; 9 — rear tip of the cable sheath; 10 — cable sheath bracket; 11 — spacer sleeve; 12 — mechanism for automatically adjusting the length of the cable.
- Stiff pedal. If the driver feels that it has become more difficult to press the pedal, then you should contact a service station. Otherwise, the cable will burst, the pedal will fail and will not return to its original position. As a result, it is impossible to operate transport.
- Slipping. In other words, independent gear shifting. If the cable is faulty, this is quite likely. If the car is in neutral gear, it can move away.
- No switching. If the cable is broken, the clutch will not engage, which means the gears will not shift.
- Other symptoms. For example, there is a leak, then you need to inspect the cable, it is probably torn or disconnected. There may also be jerking, the car jerking forward.
Knowledge of such symptoms of a malfunction will protect the driver from possible emergency situations while driving and will allow you to quickly replace the VAZ 2110 clutch cable with your own hands.
Why do you need to replace the clutch cable on a VAZ 2110 car: causes and signs of breakdown
Intensive wear of the cable occurs due to daily movement in urban conditions, and if you also have an aggressive driving style, then breakage occurs even with low mileage. So the time factor plays virtually no role here. At the same time, a hard start at high speeds and constantly placing your foot on the pedal cause increased dynamic loads not only on the clutch elements, but also on the cable.
Before changing the clutch cable on a VAZ 2110, you need to observe the behavior of the car while driving. The presence of the following factors indicates the need to repair the clutch drive mechanism:
- A drop in power indicates incomplete sealing of the clutch components due to defects in the control system.
- After pressing, the pedal does not lock in its original position.
- Extraneous sounds and vibration of the pedal while driving.
Improvement of the clutch cable, reducing the howl of the VAZ gearbox
| Many owners of domestic cars are faced with extraneous transmission noise (hum, howl, rattling, etc.). There can be many reasons for this ailment, and one of them is related to the clutch cable. Let's figure out how to improve the design and reduce the noise of the gearbox on VAZ cars. |
Experiment
- front wheels raised
- engaged first gear
- The speed was raised to 4500-5000 rpm
- use the brake to reduce the speed to 1500 rpm without releasing the gas pedal
Finalization
Instructions VAZ-2110 2111, 2112. Replacing the clutch release cable
You will need: porous rubber 5-6 mm thick and electrical tape.
- Remove the cable end from the clutch fork.
- We unscrew the cable end, having previously measured the length of the free turns of the thread.
- Remove the cable boot.
- We remove the rubber insert from the cable stop (photo No. 1) and replace it.
- We cut out a circle (32-35 mm) from porous rubber and make a hole (12-13 mm) in it (photo 2).
- We cut off a piece of rubber (20x70 mm), reduce its thickness (to 2.5-3 mm) (photo 3).
- We apply this piece around the perimeter to the plastic cable stop, measure out how much is needed per revolution.
- We fasten it with 1.5 turns of electrical tape (photo 4).
- We put the parts from photo 2 and photo 4 on the cable stop.
- The rubber band in photo No. 4 must be glued (for example, with Moment glue) to the plastic cable stop, otherwise it will come out from under the bracket.
- We insert the cable into the bracket on the gearbox (photo 5). We make sure that the cable is not pinched, but swings freely in the bracket.
- We put on the boot and screw on the tip.
- We leave a couple of millimeters less free turns of thread on the stud, because Our gasket is slightly thicker than the factory part.
- Place a 2 mm foam rubber spacer between the cable tip and the fork lever.
- Adjusting the clutch pedal.
We record the sounds of the gearbox in the engine acceleration-braking mode at 1500-2000 rpm in 3rd gear.
By the way, you can try to reduce the vibration of the clutch cable in another way. For example, wrap a ball of bitumen with foil on the cable sheath (STP vibration isolation) or install a weight, like the Renault Logan.
Let us remind you that we previously talked about gearbox malfunctions and how to solve them, as well as what to do if the clutch pedal squeaks.
| Will you be modifying the clutch cable on the VAZ? |
On one of the forums where I get information on repairing my new horse Honda CRM250AR, I wrote a post about how I dealt with problem cables and perhaps I’ll write it here in case it’s useful to someone. Of course, there is a sufficient amount of information on the Internet that bosses can be soldered, screwed, pressed and ground, but nowhere have I found an option for making bosses from brake pipes, which are available in any auto store. And it seemed to me that this option is quite simple, reliable and can be done by anyone who has a soldering iron and a drill.
For those who are interested, I ask under the cat... In general, I found damage on the throttle return cable and on one of the servo cables on a freshly purchased CRM250AR. Since I already had an unsuccessful experience in repairing a cable using a Biltema repair kit and a screw boss, which broke at the most inopportune moment, I decided to solder.
I started by looking for a cable with a diameter of 1.5 mm. At first, I bought the first cable I came across with a suitable cross-section, but after comparing its flexibility with the original one, it was decided to look further. Reading the Internet, I learned that the flexibility of the cable depends on the number of strands and the weaving option.
What I bought at first was 1x19, and what I found in another store was 6x7+1 (10 rubles/m in the Hardware store). The second cable turned out to be similar in flexibility to the original, so I settled on it. For clarity, a photo with the original at the bottom, 6x7 in the middle and 1x19 at the top:
Then I started looking for the boss, and since I work in the car market, it didn’t take much time. It was decided to use a brake copper tube with a diameter of 6 mm and 5 mm, which is sold by the meter per piece, as a boss. The diameter of the original bosses floated around the numbers 5.6-5.9 for the throttle cable and 4.9 for the servo cable. At first I cut it with a grinder - it turned out crooked, it was not always the right length and the edges had to be processed additionally. Then he shot the device that cuts these same tubes and literally in 2 minutes he cut himself 5 years worth of bosses and immediately pierced them
Then, using a 1.6 mm drill, I drilled through the workpieces and on one side expanded the hole to 3 mm, also with a drill, of course. Then a couple of strokes with a file and you can move directly to the cable.
Before cutting or inserting a cable into holes such as a boss or a cable sheath, it is necessary to tin it so that it does not “fluff”. Rosin is not suitable for processing the cable soldering area in its various forms and varieties, and for this it is necessary to use soldering acid for ferrous metal.
We lower half a centimeter of the cable into it, wait 30 seconds for bubbles to appear and apply the tin with a well-heated soldering iron. By the way, for some reason it didn’t work out for me with a regular 65-watt soldering iron and I carried out further actions with a soldering iron as part of a soldering station turned on to the maximum (480 degrees). Perhaps that soldering iron was just tired or not powerful enough. The end that was dipped in acid turns black
Then we pass the cable through a small hole in the boss and bend the tip 2-3 mm 180 degrees. For this purpose I used small platypuses. After bending it, we apply a little more solder to fix it and pull it into the boss.
For the convenience of soldering and fixing, I took a plate supposedly made of PCB, made a cut to insert the cable and clamped it in a vice at an angle “toward itself” so that when filling the cavities of the boss with tin, it would not flow along the cable beyond its limits. Otherwise, the cable becomes unbending after leaving the boss.
Well, we lean the soldering iron against the boss, wait for it to warm up to a sufficient temperature and feed tin into it. I used tin with rosin in the form of 1mm wire on a spool. Something like that:
When the voids are filled and a tin drop hangs from the bottom of the boss, you can let it cool and finally process it with a file.
To check the reliability, I thought for a long time about what to hang something like this on it, but since there were only two hands, and you have to hang something heavy - one holds it, the other ties it, etc. In general, I couldn’t think of anything other than how to hang myself B) result - 70 kg of load, the boss did not come off.
UPD . I missed the point about neutralizing the acid, it was well suggested in the comments, thank you. I rinsed mine with water because... on the bottle the manufacturer states that it is “washed off with water” and sprayed with vedehoy because... displaces moisture and lubricates. In the comment, madcrokodile recommends neutralizing with a soda solution.
Contacting the service station
The vehicle can be driven by inexperienced drivers who do not know how to change the clutch cable on a VAZ 2110, in which case it is necessary to contact a technical service. You will have to pay for the service, but this has its advantages:
- As for the cost, most service stations have reasonable pricing;
- all manipulations are carried out by highly qualified craftsmen with long experience;
- the process uses modern equipment and tools;
- Only new spare parts are installed;
- fast service times;
- quality assurance.
All these advantages indicate that you should not save money on car repairs if the driver does not know how to change the clutch cable on a VAZ 2110 car yourself.
How to Change the Clutch Cable on a VAZ 2114 ~ SIS26.RU
How to replace the clutch cable on a VAZ 2114
Maxim Markov
Hello, dear readers, in this article I will tell you how to change the clutch cable on a VAZ 2114. Most Russian car owners are accustomed to performing simple repairs on their own car, rather than using the services of car repair shops and garage technicians. If you have had to perform repairs on your car that are more difficult than replacing a flat tire, then this case will be on your shoulder.
When the time comes
It should be noted that the clutch cable on the VAZ 2114 is a consumable item, and its wear is quite common on cars of this series. Condensed moisture leads to corrosion and rapid wear, and crushed steel threads cause the cable to get stuck in the jacket.
Replacing the clutch cable on a VAZ 2110, 2111, 2112
1). Using a 13mm wrench, unscrew the locknut and the adjusting nut on the end of the cable at the fork.
2). Using a 17mm wrench, unscrew the nuts securing the cable to the bracket. Remove the cable end from the bracket fork.
3). Using a Phillips screwdriver, unscrew the screw of the clutch pedal protective cover and remove it.
4). Using a slotted screwdriver, pry up the locking bracket on the drive pin and remove it.
5). Remove the clutch tip from the finger.
6). Using an “8” wrench inside the car, unscrew the bolt securing the clamp to the pedal bracket and pull out the cable.
7). Inspect the pedal bushing. It consists of two parts, which is not a sign of its breakdown. A heavily worn bushing must be replaced.
8). Lubricate the pedal pin and the new cable lead with Litol-24 grease.
9). To install a new cable, we perform the same steps, only in reverse order.
10). Perform drive adjustment.
The essence of the problem
Regardless of the mileage of the car, the problem with the appearance of a terrible squeaking clutch pedal has already bothered or will continue to worry, according to statistics, every 3rd owner of this car. Does not depend on the oil level in the gearbox and its condition.
Everyone decides to fight this scourge on their own, using their own resources (using the “scientific” method) or uses the advice of experienced “logan breeders” who have conquered this terrible “melody”. In this article you will learn about where this squeak comes from and how to cure it with your own hands.
| 2112 2110 | 04:57, 15 96 |
| 06:47, 14 78 | |
| + | |
| 2110 (1380) | 18:55, |
| 2110 2110-1602210 | 16:51, 2 AUTOOPORA |
| 2110 00000003891 | 23:05, AUTOPROGRESS.MSK |
| 2110 () 21100160221000 | 20:43, AUTOPROGRESS.MSK |
| 2110 . ( ) | 07:51, 21 MGM |
| 2110 (AT) (10) | 07:49, 21 MGM |
| 2110 (-) (10) | 07:46, 21 MGM |
| 2110 () (10) | 07:44, 21 MGM |
| lada carlota (2108, 2109, 2115) 110 TRW/Lucas. GCC3123 | 13:37, —… |
| 2110 () Belmag. BM1380 | 07:25, —… |
| 2110. RR05751 | 01:44, —… |
| 2110 () LADA. 21100160221000 | 01:32, —… |
| 2110 ( ) . 21100160221000 | 01:26, —… |
| 2110 . 00000003891 | 23:16, —… |
| 2110 ( ) LADA 21100160221000 | 11:54, 21 Jc-Market |
| 2110 () (20) | 22:31, 17 Autoclub02 |
| 2110 () (10) | 22:31, 17 Autoclub02 |
| 2110 (-) (10) | 22:31, 17 Autoclub02 |
| 2110 (AT) (10) | 22:31, 17 Autoclub02 |
| 2110 21101602210 | 19:09, 174 |
| 2110-1602210 2110 21101602210 | 19:09, 174 |
| 2110RR05751 | 03:11, 22 -PN1 — … |
| 2110 ( ) 21100-1602210-00 | 03:10, 22 -PN1 — … |
| 2110 () BM.1380 | 03:08, 22 -PN1 — … |
| 2110 3891 | 03:07, 22 -PN1 — … |
| 2110 () 21100-1602210-00 | 02:37, 22 -PN1 — … |
| 2110 | 19:51, Autoko - ... |
| 2110 | 19:33, Autoko - ... |
| 2110 21101602210 (132321) | 20:56, «… |
| 2110 21101602210 (132318) | 20:56, «… |
| 2110 21101602210 (132320) | 20:56, «… |
| 2110 21101602210 (132319) | 20:56, «… |
| 2110 | 07:55, |
| 2110 | 07:55, |
| 2110 () | 07:55, |
| 2110 (-) (10) | 08:13, 21 Arfacar |
| 2110 . ( ) | 08:13, 21 Arfacar |
| 2110 (AT) (10) | 08:13, 21 Arfacar |
| 2110 () (10) | 08:13, 21 Arfacar |
| 2110 () BM1380 | 02:19, 38 |
| 2110 LADA 21100160221000 | 02:01, 38 |
| 2110 "" LADA 21101602210 | 00:26, -TODUX |
| 2110 () LADA 21100160221000 | 23:12, -TODUX |
| 2110 00000003891 | 22:55, -TODUX |
| 2110 ( ) 21100160221000 | 22:53, -TODUX |
| -2110. LADA 21101602210 | 22:49, -TODUX |