When to change the gasket
Thoughts about replacing the cylinder head gasket do not arise out of nowhere, most likely something has already happened, namely:
- The replacement interval is 50 - 80 thousand kilometers, this is how long a gasket of good quality and installed without violations lasts.
- Oil leaks on the engine block; sometimes oil can escape through the cylinder head gasket
- Antifreeze leak. At the junction of the block where the gasket is installed, antifreeze can also leak over time
- The gasket is broken and antifreeze gets into the cylinders.
The last option is the saddest, since the ingress of excess liquids into the cylinders - antifreeze and excess oil - has a detrimental effect on the engine's service life and affects its operation.
Tightening process and torque
The reasons why it is necessary to remove the cylinder head have been established and further it is worth considering the process itself and the tightening torque of the cylinder head. After installing the new gasket between the head and the block, we begin to tighten the bolts. The bolts must be tightened in a certain sequence so that the cylinder head is pressed tightly against the block through the gasket. Tightening is carried out in five stages, which are known to most Gentra owners:
- We tighten the bolts to a torque of 2.5 kgf, found in any Gentra manual.
- We turn it 60 degrees, as a result we get a torque of 4.5-5 kgf
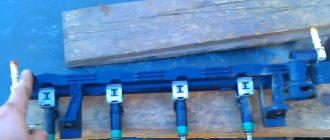
- We turn it 60 degrees, as a result we get a torque of 6-6.5 kgf
- We turn it 60 degrees, as a result we get a torque of 7.0-8.0 kgf (this run-up occurs due to the weakening of the central bolts, since we turn all the bolts to the same sector)
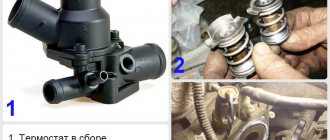
- We turn it 10 degrees, as a result we get a torque of 8.3-8.7 kgf
- We start the engine, let it warm up (during this time you can bleed the power steering system)
- We turn it by 30-50 degrees, we get a torque in the region of 8.5-9 kgf. I finally tightened all the bolts to 8.7 kgf, (the maximum torque with our thread size is 10-11 kgf.) After tightening all the bolts in order from the manual, do not forget to return to the middle ones and tighten them to the desired value.
Preparatory work for replacing the cylinder head gasket on Nexia
You can make the replacement yourself, but if your hands are okay. In some cases, it is better to grind the head before installing a new gasket by taking it to a turner or to a car service center that offers a cylinder head grinding service.
Replacement work will take from 2 hours of free time, and a big need is a garage or closed space so that nothing gets into the opened engine.
The tool that will be useful for the job is the same as for replacing the timing belt on a Nexia, plus a set of socket wrenches from 10-13 or more. Also containers for draining liquids and rags.
Well, and the new cylinder head gasket itself:
Tools used
The equipment you need is a torque wrench with force calibration for a specific car (on different cars, the tightening torque of fasteners can differ significantly), a socket head of the required size, which is suitable for a specific type of fastener.
So, torque wrenches come in several types:
Snap key
A click (also limit or spring) wrench is used to quickly tighten threaded connections with a given torque. When the required force is reached, a spring mechanism inside the key is activated, resulting in a click being heard, indicating the need to stop tightening with the current torque (force). The error of such a key does not exceed 4% (subject to correct storage and use).
Arrow key
An arrow (torsion) wrench is a lever with an arrow and a force scale (or a dial indicator), which makes it the easiest to use. When using such a wrench, the arrow indicates the current tightening torque when turning the lever. Among the disadvantages of such keys, it is worth noting a rather large error (from 5 to 20%), and over time the steel loses its elasticity, which makes it impossible to adjust it.
Digital key
The digital key (or digital adapter) is the most accurate tool in its category - its accuracy is only 1%. Therefore, such wrenches are often used when installing “critical” threaded connections.
Other devices
Homemade torque wrenches are used when there are no other devices at hand - usually these are homemade mechanisms consisting of a ratchet and old spring scales or modern digital ones. But the error of such devices is much higher than factory keys - this is due to incorrect force calibration.
Replacing the cylinder head gasket of Nexia
1. Place the car strictly horizontally and secure it with a hand brake and supports under the rear and front wheels. 2. Disconnect the battery (battery) by unscrewing the ground from the minus terminal or completely removing the battery from the Nexia. 3. Drain the coolant completely. At the bottom of the radiator, unscrew the drain plug. (at least 5 liters should drain) 4. Set the first cylinder to the TDC (top dead center) position. 5. Next, remove the timing belt (gas distribution mechanism) and unscrew the camshaft pulleys 6. Remove the rear timing cover. 7. Disconnect the exhaust pipe flange from the exhaust manifold. 8. Next, you can remove the valve cover (see Replacing the Nexia valve cover gasket) 9. Disconnect everything from the throttle assembly - coolant hoses and wiring harnesses from the sensors on the throttle (idle speed sensor and throttle position sensor), then remove the cable from the throttle , which controls its position 10. Remove the hoses from the crankcase gas recirculation (USR), in Nexia on F16D3 engines (16 valve 1.6) there is a USR valve sensor, you need to unhook the harness from this sensor. 11. Next, disconnect the harnesses from all sensors around the engine, as well as the power supply to the injectors on the fuel rail. 12. Disconnect the gasoline supply and drain hoses from the ramp, as well as all fittings and pipes from the engine. 13. Also disconnect the hose from the radiator that goes to the thermostat. 14. Unscrew the 10 bolts securing the cylinder head (cylinder head in the sequence) shown in the photo in three stages : 1st - unscrew the bolts 1/4 turn; 2nd – unscrew the bolts another 3/4 turn; 3rd – finally remove the bolts.
Sequence of unscrewing bolts.
ATTENTION The cylinder head (cylinder head) mounting bolts can only be removed when the engine is cold.
15. Carefully lift the cylinder head. It is heavy, so it is better to lift it together. 16. After you lift the cylinder head, you will see the condition of the gasket. Delete her. 17. Clean everything you can, but without mechanical impact. Surfaces must be oil-free and absolutely clean and dry.
Maintenance schedule G15MF 1.5 l/75 l. With.
Despite the declared service life of 250,000 km, the manufacturer recommends servicing the G15MF engine during maintenance according to the following schedule:
| Consumable item or service step | Time (year) or mileage (1000 km), whichever comes first |
| Timing drive | 7/100 |
| Battery | 2,5/40 |
| Adjusting the thermal clearance of valves | 2/15 |
| Checking and cleaning the crankcase ventilation | 2/35 |
| Attachment belts | 4/50 |
| Inspection and cleaning of the fuel line | 2/40 |
| Motor oil | 1/10 |
| Oil filter | 2/20 |
| Air filter cartridge | 2/40 |
| Fuel filter | 4/40 |
| Checking and replacing heating/cooling hoses | 3/30 |
| Antifreeze | 2/40 |
| CO and oxygen sensor | 10/100 |
| Spark plug | 1 – 2/20 |
| Exhaust tract | 1/20 |
The classic internal combustion engine design allows you to reduce operating costs and the cost of overhauls.
When to change the gasket
Thoughts about replacing the cylinder head gasket do not arise out of nowhere, most likely something has already happened, namely:
- The replacement interval is 50 - 80 thousand kilometers, this is how long a gasket of good quality and installed without violations lasts.
- Oil leaks on the engine block; sometimes oil can escape through the cylinder head gasket
- Antifreeze leak. At the junction of the block where the gasket is installed, antifreeze can also leak over time
- The gasket is broken and antifreeze gets into the cylinders.
The last option is the saddest, since the ingress of excess liquids into the cylinders - antifreeze and excess oil - has a detrimental effect on the engine's service life and affects its operation.
Preparatory work for replacing the cylinder head gasket on Nexia
You can make the replacement yourself, but if your hands are okay. In some cases, it is better to grind the head before installing a new gasket by taking it to a turner or to a car service center that offers a cylinder head grinding service.
Replacement work will take from 2 hours of free time, and a big need is a garage or closed space so that nothing gets into the opened engine.
The tool that will be useful for the job is the same as for replacing the timing belt on a Nexia, plus a set of socket wrenches from 10-13 or more. Also containers for draining liquids and rags.
Well, and the new cylinder head gasket itself:
Required tools and materials for DIY replacement
Before you begin replacing the timing belt, it is recommended to check the availability of the tools that are presented in the table below.
Table - Tools and materials required to replace the timing belt
| Name | Note |
| Jack | To lift the car |
| Jack | For hanging the engine |
| Screwdriver | With flat and cross blade |
| Socket wrench | “at 10”, “at 12”, “at 13”, “at 14”, “at 17” |
| open-end wrench | Set |
| Socket wrench | “at 10”, “at 12”, “at 13”, “at 14”, “at 17” |
| Head | Kit |
| Kardanchik | To access some fasteners |
| Vorotok | With ratchet and extension |
| Torque wrench | To control the tightening torque of threaded connections |
| Special tools | Key “41” for unscrewing the pump. You can make it yourself from available materials. |
| Retainer | Pulley holder |
| Pliers | Several types |
| Hexagon | "at 8" |
| Wire brush, rags and carburetor cleaner | For cleaning work surfaces |
| Penetrating lubricant | For example, WD-40 |
Replacing the cylinder head gasket of Nexia
1. Place the car strictly horizontally and secure it with a hand brake and supports under the rear and front wheels. 2. Disconnect the battery (battery) by unscrewing the ground from the minus terminal or completely removing the battery from the Nexia. 3. Drain the coolant completely. At the bottom of the radiator, unscrew the drain plug. (at least 5 liters should drain) 4. Set the first cylinder to the TDC (top dead center) position. 5. Next, remove the timing belt (gas distribution mechanism) and unscrew the camshaft pulleys 6. Remove the rear timing cover. 7. Disconnect the exhaust pipe flange from the exhaust manifold. 8. Next, you can remove the valve cover (see Replacing the Nexia valve cover gasket) 9. Disconnect everything from the throttle assembly - coolant hoses and wiring harnesses from the sensors on the throttle (idle speed sensor and throttle position sensor), then remove the cable from the throttle , which controls its position 10. Remove the hoses from the crankcase gas recirculation (USR), in Nexia on F16D3 engines (16 valve 1.6) there is a USR valve sensor, you need to unhook the harness from this sensor. 11. Next, disconnect the harnesses from all sensors around the engine, as well as the power supply to the injectors on the fuel rail. 12. Disconnect the gasoline supply and drain hoses from the ramp, as well as all fittings and pipes from the engine. 13. Also disconnect the hose from the radiator that goes to the thermostat. 14. Unscrew the 10 bolts securing the cylinder head (cylinder head in the sequence) shown in the photo in three stages : 1st - unscrew the bolts 1/4 turn; 2nd – unscrew the bolts another 3/4 turn; 3rd – finally remove the bolts.
Auto repair online
"DAEWOO NEXIA from 1994 to 2008 release with engines 1.5 SOHC (G15MF), 1.5 DOHC (A15MF) and 1.6 DOHC (F16D3). Operation, maintenance and repair manual with step-by-step description of operations and color photo illustrations.
Cylinder head.
Replacing the gasket.
To replace the gasket, it is advisable to remove the cylinder head assembly with timing belt, exhaust manifold and intake manifold.
Execution Sequence
1. We prepare the car for work.
2. Drain the engine oil and coolant.
3. Remove the rear timing belt cover.
4. We finally unscrew the top bolt securing the generator.
5. We remove the high-voltage wires.
7. We disconnect the wiring harness block of the control oxygen concentration sensor.
8. 12 mm wrench , unscrew the nut securing the tip of the ground wires to the cylinder head.
9. Disconnect the three vacuum tubes from the intake manifold.
Warning!
When disconnecting, mark the tubes in any way possible to ensure they are correctly connected during reassembly.
10. 17 mm wrench, we hold the fitting from turning, and with a 19 mm , we unscrew the tip of the brake booster hose from the intake manifold.
11. Disconnect the throttle drive cable from the throttle assembly and move it to the side.
12. Disconnect the fuel lines from the fuel rail.
13. Using pliers, loosen the clamp and disconnect the heater radiator hose from the cooling system tee.
14. 12 mm wrench, unscrew the two upper bolts of the intake manifold bracket.
15. 14 mm wrench , unscrew the lower bolt of the intake manifold bracket and remove the bracket.
16. Disconnect the main catalytic converter from the exhaust manifold.
17. Removing the cylinder head cover
18. Using pliers, loosen the clamp and disconnect the cooling system hose from the thermostat cover.
19. We cut the clamp and disconnect the crankcase ventilation system hose (you will need a new clamp during assembly).
20. 13 mm wrench , remove the ten cylinder head bolts in the order shown.
21. Separate it from the cylinder head and remove the camshaft housing assembly with the ignition module and camshaft position sensor.
Comment
To replace the cylinder head gasket, it is not necessary to perform steps 22, 23 and 24; you can remove the cylinder head assembly.
22. We remove the valve rockers and arrange them in such a way that when reassembling, install them in their original places.
23. We remove hydraulic compensators from the wells. If old hydraulic compensators are to be installed, then we lay them out in such a way that they can be installed in their original places during reassembly.
24. We remove the rocker thrust washers and arrange them in such a way that when reassembling, install them in their original places.
25. We remove the cylinder head assembly with the intake manifold, exhaust manifold, throttle assembly and elements of the engine control system.
Recommendation
It is better to perform the operation with an assistant.
Recommendation
To prevent foreign objects from entering the catalytic converter, cover it with any suitable material.
26. Remove the cylinder head gasket (if necessary, separate it from the cylinder block using a sharp knife).
27. We clean the mating surfaces of the cylinder block and cylinder head, as well as the cylinder head mounting bolts and their mounting holes.
Warning!
Make sure that dirt does not get into the oil passages, cooling system jacket or engine cylinders.
28. We carefully inspect the mating surfaces of the cylinder head and cylinder block for damage, especially in the area where the head gasket is damaged.
29. Install a new head gasket.
30. We clean the mating surface of the camshaft bearing housing...
...and cylinder heads.
31. We apply flange sealant intended for vehicles with oxygen concentration sensors to the mating surface of the camshaft housing.
32. We install the cylinder head and camshaft bearing housing.
Tighten their fastening bolts to a torque of 25 Nm in the specified sequence.
33. In the same sequence, we tighten the cylinder head mounting bolts to an angle of 70°, and then to an angle of 30°.
34. If they were removed, we install the hydraulic compensators, rocker thrust washers and the rockers themselves in their original places.
Recommendation
Before installing new hydraulic compensators, lower the hydraulic compensator into a container with fresh engine oil. Press the compensator valve several times until air bubbles stop escaping to fill its internal cavity with oil.
35. Install the remaining parts in reverse order.
Daewoo Nexia cylinder head tightening torque
| Rating: 6 112 |
| Reputation: +16 |
Thanked: 26 times Thanked: 25 times
Post by daskatzchen » 13 Oct 2013, 20:01
Messages: 603 Registered: Sep 27, 2010, 00:00 Experience: 2009 Car: VAZ 21213 Niva
| Rating: 895 |
| Reputation: +1 |
Thanked: 5 times Thanked: 2 times
Post by Evgen_gaz » 13 Oct 2013, 21:16
Messages: 476 Registered: Dec 28, 2011, 00:00 From: Tyumen Experience: decent
| Rating: 626 |
| Reputation: +1 |
Thanked: 11 times Thanked: 1 time
Posted by courier » Oct 13, 2013, 10:09 pm
Messages: 338 Registered: March 30, 2013, 00:00 From: Tyumen Experience: Since 2012 Car: Zaz Chance 1.3, Zaz 1102
| Rating: 798 |
| Reputation: +3 |
Thanked: 1 time Thanked: 3 times
Post by Sensych » Oct 13, 2013, 10:16 pm
The engine is German, Opel Cadet. I saw somewhere on Lanos forums how the cylinder head was removed.
Added after 8 minutes 47 seconds:
Messages: 2365 Registered: Jan 08, 2008, 00:00 From: Tyumen Experience: since childhood =) Car: Many cars))) :
Awards: 1
| Rating: 3 871 |
| Reputation: +11 |
Thanked: 7 times Thanked: 8 times
Post by kotorap » Oct 13, 2013, 11:19 pm
Racing is a lifestyle. Adrenaline is a small part of the style.
I repair engines, cylinder heads, and gearboxes.
| Rating: 6 112 |
| Reputation: +16 |
Thanked: 26 times Thanked: 25 times
Post by daskatzchen » Oct 14, 2013, 00:02
Evgen_gaz, those ancient Nexias are Korean or Russian) I saw, externally there was nothing supernatural about 8 valves on the Nexia)
Instructions for tightening cylinder head bolts
The next tightening of the cylinder head must be carried out during each routine repair or maintenance of the power unit (change of oil or consumables). It is mandatory to carry out the procedure after intervention in the internal combustion engine structure, and additional tightening after 500-700 kilometers. It is not recommended and there is no need to climb into the mechanism anymore.
After full tightening, the bolts sit firmly in their sockets and do not loosen due to vibration. Otherwise, leaks or burnout of the cylinder head gasket may occur, which can lead to major repairs.
Modern motors manufactured after 2010 do not require periodic tightening of the studs due to the updating of the device and mechanism.
Cylinder head bolt tightening torque
An important factor is the cleanliness of the operation. Before repairs, you need to clarify how many tightening bolts are designed for in a specific engine model. Some automakers make the elements disposable. This situation is justified by the risk of reuse - the bolts may simply not withstand the second application of load.
Next, before installation, it is imperative to remove all dirt, grease or dust residues from the threaded channels and the screws themselves. Otherwise, debris may clog the bottom of the well, which will prevent the part from being tightened completely.
Table of tightening torques for threaded connections
Among the most common cars, the following group stands out:
- KAMAZ;
- 8 valve Daewoo Nexia;
- Lada Granta;
- Hyundai Accent;
- Chevrolet Niva;
- Hino Ranger;
- UAZ Patriot;
- Toyota Rav-4.
These cars are considered the most popular guests of service stations, therefore, it is logical to make a list specifically based on the power units of the cars.
Pulling torque N*m
Daewoo Nexia 8 grade.
40-50 + 90° turn
Granta all engines
Tightening torque for gearbox parts
Manual transmission manual transmission Daewoo Nexia
| Name of the unit, parts | Tightening torque, Nm |
| Intermediate housing bolt | 15 |
| Transmission bottom cover bolt | 30 |
| Transmission housing rear cover bolt (short) | 15 |
| Transmission housing rear cover bolt (long) | 20 |
| Shift Mechanism Bolt | 15 |
| Differential bearing adjusting nut retainer bolt | 22 |
Daewoo Nexia gearbox diagram:
Tightening procedure for cylinder head bolts
The standard tightening pattern starts from the central screws to the edges. This rule must be strictly adhered to in order to avoid distortion or cracking of the aluminum “motor head”.
Typically the sequence of actions for a four-cylinder model looks like this:
The following motors can be classified as standard row engines:
Since these units are similar in design, the general system is applicable to them. This category includes the Lada Priora with 8/16 valves Chery Tiggo, and the VAZ 2108. Only Japanese engines of Mazda cars, some Toyotas, Hondas and Mitsubishi raise doubts. Due to the high-tech, complex design, the sequence of actions may vary.
How to tighten cylinder head bolts without a torque wrench
The price of a professional instrument with acceptable accuracy reaches $200, which is beyond the means of the average person. However, physics gives users the right to independently manufacture a “likeness” of this instrument for a reasonable fee.
For this you will need:
- standard key;
- lever (pipe or other object);
- tape measure or ruler;
- standard scales (canter).
To tighten bolts without a torque wrench, you need to remember a little physics. The tightening torque is the applied force to the meter lever (kgf.m). Therefore, you need to measure the length of the key and divide 1 by the resulting number. Next, the result is multiplied by the tightening torque and the answer will be the required indicator on the scales.
For example, you can simulate the situation:
- nut with a required force of 3 kgf*m;
- open-end wrench 25 cm long;
- scales with an indicator of up to 20 kg.
Thus, if you attach a scale to the key, you need to pull the hook with a force of 12 kg. If it is necessary to tighten a bolt marked in Newtons, the force is calculated using the standard ratio here too.
Tightening torque for steering parts
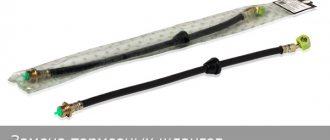
Power steering pump Daewoo Nexia
| Name of the unit, parts | Tightening torque, Nm |
| Adjustment plug lock nut | 70 |
| Steering shaft coupling pinch bolt | 25 |
| Bolt securing the tie rod to the rack | 90 |
| Nut securing the ball joint pin of the outer rod end | 60 |
| Pinch bolt of the terminal connection between the tie rod and the tie rod end | 22 |
| Steering gear nut (power steering) | 30 |
| Pipe fastening nut (with hydraulic booster) | 27 |
| Steering column bracket fastening nut | 22 |
| Steering Column Bolt | 22 |
| Power steering pump mounting bolt | 25 |
| Pump pulley bolt | 27 |
| Steering wheel nut | 17 |