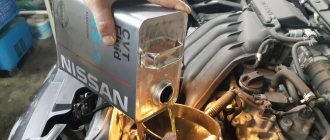
Brake hose VAZ 2109 rear
Brake hoses have to be changed quite often; according to the “garage guys”, this consumable part often does not last even six months.
But, if you use the car carefully, it will require replacement in a year, or even two. To extend their service life, wipe them with special additives, for example, Roil Platinum™ and wrap them with textile tape. At the same time, you need to remember that from time to time you need to check the condition under the electrical tape.
The worst thing is when the hose breaks on the road. The first sign of a breakdown is that the pedal “goes to the floor.” At the same time, it is impossible to brake quickly. In this case, you need to plug the torn end, for example, with a bolt. When one of the circuits does not work, the ABS also stops working, and during sharp braking the car turns around. The following is step-by-step instructions for replacing them with new ones.
Preparing for replacement
To change the coolant in your car yourself, you should choose a suitable place where it will be convenient to drain the old coolant. The best options are to place the machine on an inspection pit, overpass or lift. You can also leave the car in its normal position if the ground clearance allows you to install a basin, cut-off plastic canister or other container underneath for draining used antifreeze.
Before replacing, you should carefully inspect the condition of the main elements of the cooling system. If there are traces of coolant on the radiator, pipes, pump or other components, the cause of the leak must be eliminated before adding fresh fluid.
Pipes and hoses VAZ 2108-21099
Engine pipes 21082 reinforced rubber red for VAZ 2108-21099, 2113-2115 injector
Heater pipes reinforced rubber blue 21082 for VAZ 2108-21099, 2113-2115 injector
Blue silicone radiator pipes for VAZ 2108-21099, 2113-2115 injector
Blue silicone stove pipes for VAZ 2108-21099, 2113-2115 injector
Silicone blue expansion tank pipe for VAZ 2108-21099, 2113-2115 injector
Blue silicone breather pipe for VAZ 2108-21099, 2113-2115
Radiator pipes reinforced rubber red for VAZ 2108-21099, 2113-2115 injector
Crankcase ventilation hose (breather) silicone blue for VAZ 2108-21099, 2113-2115
Radiator pipes reinforced rubber red for VAZ 2108-21099 carburetor
Throttle pipe heating hose for VAZ 2108-21099, 2110-2112, 2113-2115 injector
Heater pipes reinforced blue rubber for VAZ 2108-21099 carburetor
Heater pipes reinforced red rubber for VAZ 2108 carburetor
Expansion tank hose (from tank to radiator) for 2108-2115
Thermostat pipe injector corner for VAZ 2108-21099, 2110-2112, 2113-2115, Priora
Blue silicone hose 1 meter diameter 20 mm
Heater pipes 21082 reinforced rubber red for VAZ 2108-21099, 2113-2115 injector
Silicone blue expansion tank pipe for VAZ 2108-21099, 2113-2115 carburetor
Blue silicone radiator pipes for VAZ 2108-21099 carburetor
Blue silicone hose 1 meter diameter 8 mm
Blue silicone stove pipes for VAZ 2108-21099 carburetor
Carburetor outlet hose for VAZ 2108-21099
Set of engine pipes silicone blue cs20 profi for VAZ 2108-21099, 2113-2115
Thin breather hose (pipe) for VAZ 2108-21099
Rear heater supply hose (pipe) for VAZ 2108-21099, 2113-2115
Radiator drain hose (pipe) for VAZ 2108-21099 injector
Thermostat connecting pipe (short) for VAZ 2108-21099, 2113-2115
Breather pipe Forward Auto parts for VAZ 2108-21099, 2113-2115
Upper crankcase exhaust ventilation hose Forward Auto parts for VAZ 2108-21099, 2110, 2113-2115, Lada Kalina
Set of engine pipes silicone blue cs20 profi for VAZ 2108-21099, 2113-2115 with engine 21082
Cooling system filling hose for VAZ 2108-21099, 2113-2115
Upper (small) crankcase exhaust ventilation breather hose (pipe) for VAZ 2108-21099
Radiator supply hose for VAZ 2108-21099, 2113-2115
Exhaust cooling system pipe without hole for temperature sensor on VAZ 2108-21099
Rear heater outlet hose (pipe) for VAZ 2108-21099, 2113-2115
Radiator supply hose (pipe) for VAZ 2108-21099 injector
Heater heater outlet hose (pipe) front VAZ 2108-21099, 2113-2115
Heater pipe (engine compartment, small) 2108-8101208R for VAZ 2108-21099
Heater heater supply hose (pipe) front Forward Auto spare part for VAZ 2108-21099, 2113-2115
Hose (pipe) of the lower crankcase exhaust ventilation breather on VAZ 2108-21099
Hose outlet fitting for VAZ 2108-21099, 2113-2115
Front supply hose (pipe) for the heater heater on VAZ 2108-21099, 2113-2115
Water pump outlet pipe with hole for temperature sensor on VAZ 2108, 2110-2112
Radiator outlet hose (pipe) Forward Auto spare part for VAZ 2108-21099 injector
Set of heater system pipes for VAZ 2108-21099
Set of heater system pipes for VAZ 2108-21099 (injector)
Replacing the front brake hose on a "tag" - step-by-step guide
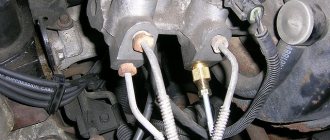
- The first step is to determine the location of the damage and decide which hose you need. In this case, the front brake hose burst. Next, we buy everything we need and get to work. The photo shows the location of the rupture (damage).
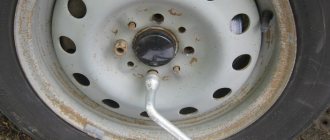
- We begin the work by tearing off the wheel bolts while the car is standing on four wheels, then jack up the side we need, unscrew the bolts and remove the wheel.
- We treat the bolts with WD-40 and wait until the liquid eats away the rust and allows you to easily unscrew the connection.
- Next, unscrew the hose connected to the metal brake pipe. Using a wrench set to “15”, hold the tip of the hose, and with another wrench set to “10”, carefully unscrew the brake pipe fitting. It is important to be as careful as possible here, since it is very easy to tear off or “lick” the edges. If the nut does not budge, use a special brake hose wrench. This wrench allows you to tighten it, making the connection between the wrench and the threaded connection stronger.
- After the connection is unscrewed, the tube should be plugged with something of a suitable diameter, this is necessary in order to avoid leakage of the fuel fluid.
- Now, using a key set to “15”, unscrew the hose fitting connected to the brake cylinder. There is a copper ring installed between the cylinder and the fitting, which it is advisable to replace, but if it is in order, then you can do without it.
Then we reassemble in reverse order. However, it is too early to put an end to this. Before you enjoy the work done, you need to bleed the brake system to remove all the air that has entered the vehicle. I won’t tell you how to bleed the brake system, you can read about this in one of my previous articles - here is a link to this article
After bleeding the brake system, check the tightness of the connections and the level of fuel fluid in the system. Next, let's check how everything works. I warn you, do not rush to accelerate too much to test the brakes, anything can happen, if the brakes fail, you can cause an accident and damage your or someone else’s car. First, check how everything works somewhere in a sparsely populated place at low speed; if everything is ok, check how the car behaves on an empty highway.
That's all for me, thank you for your attention, see you again at VAZ Repair. If you liked this report, share the link to the publication with your loved ones on social networks, this will help the development of our project.
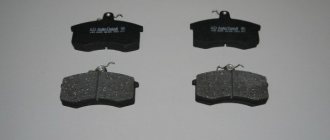
Replacing front brake pads on VAZ 2108, VAZ 2109, VAZ 21099
Front brake pads - thanks to them the car stops, at the moment a lot of different manufacturers have already appeared on the market that produce these products, and this is all typical because the pads (Especially the front ones) are essentially consumables and people replace them quite often if the pads are not very well made, and if you take expensive pads and don’t also run into a fake, then you can drive on them for a really long time, but still, to save the life of the pads, just remember one simple thing when driving in the city (Especially in winter) it is recommended to use brakes only in extreme cases, otherwise, as many are already accustomed to, they drive up to a traffic light and press the brakes, then after 30,000-50,000 thousand kilometers they go to the store and buy new pads and change them, so it’s best to in the city, brake as little as possible (This means braking with the brake pedal), and instead of using a pedal, we recommend that you learn to brake with a gearbox, at first it will be inconvenient, but then you will get used to it and you will change the pads much less often and in winter it will not take the car off the road, because when braking sharply it can easily be carried and thrown either into a ditch or into the oncoming lane.
In order to replace the front pads in a car, stock up on: Two wrenches and a screwdriver, and we also recommend that you take some rags with you, because the brake mechanism can be very dirty and needs to be cleaned of dirt!
Where are the front brake pads located?
The pads can be easily seen only if you remove the wheel from the car, but if you want to see them in full, then you will need to unscrew the top bolt of the brake caliper bracket, then fold back the brackets and you can easily remove and look at the pads (We will remove the pads for you we will teach you a little lower), but why take them out if you can look at them (namely, their thickness) only by removing the wheel from the car, for this, accordingly, first remove the wheel you need from the car and then through the long rectangular hole in the bracket (Indicated in red arrow) you can see the pads (indicated by blue arrows) and the thickness that remains on the friction linings.
Friction linings are one of the parts of the pad itself, as the pad consists of two parts, namely the body, which is made of metal (the body is indicated by two red arrows) and the friction lining, which is indicated by blue arrows; this lining also brakes the car, which what else, you know that the brake pad needs to be checked for its thickness and if the thickness is less than 1.5 mm, such a pad will need to be changed immediately, so the measurement should be made only on the friction lining and the body of the pad itself does not count here, therefore keep this in mind!
When do you need to change brake pads?
The pads must be replaced, as mentioned a little earlier, if the thickness of the friction lining has become less than 1.
5 mm, and also if the lining has become deformed (for example, cracks or deep chips have appeared on it), has moved away from the body of the pad itself, or if traces of oil have appeared on the lining, then such a pad also needs to be changed and under no circumstances should it be slowing down, applying the brakes is the most important thing in a car!
How to replace brake pads on a VAZ 2108-VAZ 21099?
Remember once and for all, if you want to change the pads in the brake mechanism, for example, the front wheels, then be sure to change them on both wheels (the same with the rear wheels), because if you change the pads only on one side and on the other side you have the old pads will remain standing, then during sharp braking the car will pull to the side 100%, thereby you will put yourself and other people at risk, so if you decide to replace the pads, be sure to do it on both sides of the car!
1) At the beginning of the operation, hang up the wheel you need and remove it after that; you only need to hang up the wheel on which the brake pads will be replaced. (For information on how to remove a wheel, see the article entitled: “Properly replacing wheels on a car”)
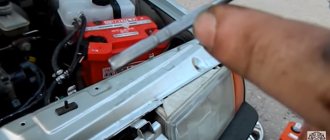
2) Then open the hood of the car and see how much brake fluid you have in the reservoir (the reservoir is indicated by an arrow), if there is a lot of fluid and it reaches the MAX mark, then you will need to pump it out of this reservoir using a medical syringe or a rubber bulb, but just pump out just a little bit, literally a little bit, and pump out only if there is initially a lot of liquid.
This is done so that when you press the piston into the brake cylinder, brake fluid does not start pouring out of this reservoir, since when you press the piston, the fluid will return accordingly, thereby the volume of liquid in the reservoir will increase slightly!
3) Further, we will not explain to you how to remove and install the pads in this article, because if you take the entire family of VAZ cars, then almost all of them have a similar brake system, so for further removal of brake pads and their installation, see the article entitled : “Replacing front pads on a Priora”, paragraphs 3-6 and also in the article to which the link is given, also read the “Installation” section.
Installation, as noted earlier, is carried out according to the article the link to which is given just above.
When you install new pads, for some time it will seem to you that your car will slow down as if the pads were purchased defective or simply of very poor quality, since the car will stop poorly and therefore you need to drive extremely carefully at first, but this all happens because The fact is that new pads need time to get used to, and only after they get used to (after about 50-100 km they will get used to, and if you constantly brake, they will get used to much faster) the car will start to slow down normally!
To learn more about how to replace pads on cars of the Samara family, watch a video that explains and clearly shows the process of replacing them.
Hello, tomorrow I’ll go buy two new pairs of front brake pads for the VAZ 21099, which ones do you recommend?
I highly recommend “ATE” or “Allied Nippon”, but there are a lot of fakes on them, so be careful when choosing!
The braking system is your safety on the road.
If the engine breaks down, then you simply won’t go any further, but if the brakes break down, on the contrary, you won’t be able to stop and the consequences can be different (hardly good).
The cost of the pads is low and anyone can replace them, so you should not save on the vital “organs” of the car when replacing pads on a VAZ 2109 and other similar car models.
Why, of course, is a rhetorical question. No motorist wants to be left without brakes. Possible complications will only lead to higher repair costs:
- one of the wheels will jam while driving;
- due to extreme wear, brake fluid will leak;
- the caliper will break.
Rear wheel brake mechanism: 1 - brake shield, 2 - wheel cylinder, 3 - upper tension spring of the pads, 4 - brake pad, 5 - pad lining, 6 - brake drum, 7 - dowel pin, 8 - guide spring, 9 - lower tension spring
The question of “when” is directly affected by driving style and the quality of the pads. There are average indicators: for the front axle - 15-20 thousand km, for the rear axle (drum) - up to 100 thousand km. But this does not exempt you from regular checks.
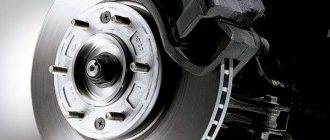
Front wheel brake mechanism: 1 - brake disc, 2 - pad guide, 3 - caliper, 4 - brake pads, 5 - cylinder, 6 - piston, 7 - pad wear indicator (inspection window), 8 - o-ring, 9 - protective guide pin cover, 10 - guide pin, 11 - protective cover
If the following symptoms occur, replacement should not be delayed:
- friction clutch thickness is less than 1.5–2 mm;
- a loud squeak when braking (the sensor is triggered - a special plate that squeaks unpleasantly when rubbed);
- obvious cracks or chips on the pads;
- increase in braking distance.
Make it a rule to have your brake system inspected at least once a month.
You will need radically different tool sets for the front and rear axles. Let's start with something simple. To replace the front disc brake pads you will need:
- flat screwdriver;
- open-end wrenches for 13 and 17;
- metal brush.
If you don't have WD-40, you can use kerosene. Spray it from a disposable spray bottle
The following list for replacing the rear linings of a VAZ 2109 (21099) may not be all you need, but you need to be prepared for difficulties. Full recommended list:
- hammer (preferably a larger one);
- pliers;
- flat screwdriver and metal brush;
- WD-40 lubricant;
- wooden block or board;
- two open-end wrenches for 13;
- 13mm head with extensions.
We put on gloves and get to work.
- If you have tightened the handbrake cable at least once, you will have to loosen the tension before replacing it. This is not as easy to do as we would like. We need an inspection hole or lift because we need to gain access to the center of the car's underbody. This “cunning” design is located behind the muffler (work with a cold car to avoid getting burned). In extreme cases, you will have to dismantle it, but usually wrenches with an extension are sufficient. Use a pair of wrenches for work. When you get to the mechanism, completely unscrew the lock nut and loosen the main one as much as possible. Extended heads are more convenient for work
- Remove the wheel and place it under the bottom of the car (for peace of mind). First, the most difficult part awaits us - removing the brake drum. When braking, it constantly heats up and cools down (sometimes sharply if you drive hot into a puddle), so the drum “sticks” very tightly. By standard means, dismantling is provided using two M8 bolts. You immediately need to unscrew the two guides (photo below) and screw the bolts in their place. Remove the guides and replace them with bolts. Then slowly and one by one screw them in further (do not allow them to skew) until the drum leaves its “home” place. Continue dismantling the drum
- If the threads in the holes are torn and the disc does not give in, then move on to another option. Spray WD-40 on all contact points (especially in the hub area) and begin to firmly but carefully tap the drum with a hammer. Be sure to use a block of wood or board as a spacer to avoid damaging the disc.
- Immediately connect the pads with the intermediate strip and the upper spring, and then install them in place.
- The upper part should fit into special grooves on the brake cylinder.
- Fix the lower part in the provided places and tighten it with the lower spring.
- Connect the middle springs (they prevent the pads from moving up and down).
- Don't forget to attach the end of the handbrake cable to the drive.
- Press the brake cylinders using a pry bar (only carefully so as not to crumble the lining).
- Install the brake drum (after unscrewing the bolts if you used the standard removal method).
- Tighten the handbrake cable (the norm is from 2 to 5 clicks when turned on). It is better if the handbrake cable is securely tightened. Check the functionality of the design
- There is a single bolt at the top of the caliper, held in place by a lock washer. It is necessary to straighten it using a flat screwdriver.
Use a long, thin, flat-blade screwdriver. If there is resistance, use a hammer. The bolt should be unscrewed while holding the guide with another wrench.Secure the mechanism with the second anti-rotation key
- The brake hose must be released from its mounting.
- To ensure that the new linings fit neatly into place, it is better to thoroughly clean all points of contact. This is where a metal brush comes in handy
- Naturally, the new clutches are thicker than the old ones and it will not be possible to put the caliper back. Therefore, it is necessary to depress the brake cylinder. To do this you will need a large screwdriver. Close the brake mechanism without pads and press the screwdriver, like a lever, against the cylinder. It will take some effort, so be careful not to let the screwdriver come off. Then install new linings, close the caliper and tighten the mounting bolt.
- If you cannot depress the brake cylinders, open the cap of the brake fluid reservoir to reduce the pressure.
- If the pads wear unevenly, pay attention to the caliper. Most likely it will need repairs.
- When replacing the rear pads, change all the springs as well. They are inexpensive, but they will protect you from possible failures until the next replacement.
- The front caliper guides can be lubricated with graphite grease for smoother operation.
Installation occurs in the reverse order and should not cause any difficulties. Checklist for proper assembly:
Tips for working on video
Compared to the previous procedure, replacing the front pads will seem very easy. The wheel, of course, will also have to be removed. After which you can verify the need for repairs through a special “window”. The thickness of the friction material should not be less than 2 mm, otherwise you risk being left without brakes at any time.
Measure the thickness with a ruler; it’s better not to do such calculations by eye.
Remove the Brake Hose You can now “open” the caliper by moving it to the side. Remove old pads. Remove worn pads
How experienced car owners do it (video)
Replacing the pads on the front axle will not cause problems even for “dummies” of automotive repair. But from the back it’s not so simple.
Assess your strengths and capabilities in advance: can you reach the handbrake cable and cope with a stuck brake drum? If yes, then everything will definitely work out.
On a VAZ-2109 car, brake pads have a service life of approximately 50-60 thousand kilometers, after which they wear out and are no longer so effective. At the same time, the brake discs last three times longer, so they do not have to be changed every time. To see wear, remove the wheel and look under the caliper, you can see the thickness of the pad. If there is a lot of wear, we disassemble it and replace it.
To unscrew the caliper, you need to flare the lock washer that secures the bolt. Using a regular flat screwdriver, bend it in the desired direction, and you can tap it with a hammer.
Then unscrew the top bolt. We only need to completely unscrew it, since we will not completely remove the caliper, but only fold it back.
And just loosen the bottom bolt a couple of turns and that’s it, the caliper will open. Do not use open-end wrenches.
Now, in order to fold back the caliper, you need to release the brake hose by sticking it out of its seat.
That's it, now the caliper will open up freely and we will have free access to the pads. You can take a closer look at everything.
We take out the pads. The photo shows that they were still fine, almost unused, but they made an outrageous noise, they had to be replaced, most likely they got some kind of fake.
Before installing new pads, clean the guide along which the pad will run; you can use a metal brush, sandpaper, or a regular screwdriver to remove dirt and oxides. Then you can lubricate it with grease to prevent it from oxidizing, or you don’t have to lubricate it.
Now we install new pads. It’s better to take something normal, an original or a trusted manufacturer like Ferodo. Chinese crafts tend to creak and are not as effective.
Now you need to press the caliper cylinder, otherwise the caliper will not fit onto the pads, since the thickness of the new pads is greater than the old ones.
When he presses in, he dresses normally.
Now we screw everything back, lock the bolts and fix the brake hose in its place.
Replacing brake pads VAZ-2109 video instructions
The nines have drum brakes at the rear, which is another hemorrhoid. Firstly, you will never know how worn the pads are without removing the drum, and secondly, removing the drum is the biggest problem on all cars. We unscrew the bolts that secure the drum and then the fun begins.
The drum won’t just come off, the pads make indentations in it, which it then clings to when you pull it off. This is true on all cars, not only on Zhiguli.
To remove it, knock it down, take a heavier hammer and knock on the drum from the back side through the spacer so that the edge of the drum does not break off.
Yes, this is a problem with all drums, the longer you don't change the pads, the more pieces of the edge are missing.
If you are lucky and the drum comes off, then your view will be of the pads, tightened by some kind of springs. We remove the springs and the pads will come out without any problems.
There is an expansion plate installed between the pads at the top, which may fall out if the pads are suddenly removed.
And the handbrake cable is attached to one of the blocks, but the block can be easily pulled out of the groove and it will come out easily.
Now we install new pads in the same way. It is best to tighten the springs with a screwdriver; they glide over it perfectly and easily fit into the mounting holes.
How does the brake master cylinder work?
The brake master cylinder is the very heart of the braking system. It changes the pressure in the brake system when you press the brake pedal. It creates increased brake fluid pressure, causing the cylinder pistons to extend and press the pads against the drums and brake discs.
The brake cylinder body contains two pistons with sealing rings that follow each other. The first cylinder is driven by the brake pedal, the second moves due to the movement of the first. Springs ensure that the pistons return to their place after the brake pedal is released.
When control sensors indicate a breakdown of the brake system
- The “breakdown” symbol appears on the control panel if there is a low level of brake fluid in the reservoir, then you need to plan to bleed the system and decide how to replace the brake hoses on a VAZ 2114 yourself or with the help of a specialist.
- There is also a sign on the panel that the parking brake is engaged. It must be turned off at the moment you start moving, otherwise damage cannot be avoided, and then all the problems will follow each other, and a situation will arise with a solution to the question of how to replace brake hoses on a VAZ 2114.
Thus, vigilance and vigilance again are the main things that the driver must remember when entering the garage and while driving along the route every day and every second. It’s better to sit down and figure out how to replace brake hoses on a VAZ 2114 than to experience stress at speed when the brake pedal simply falls under your foot and the car does not stop on demand.
How to change a brake hose
As a rule, the brake system of any car must be in working condition at all times . To prevent cracking and breaking of rubber brake hoses, it is necessary to periodically lubricate them with silicone grease.
Note! If there is even the slightest suspicion of a defect, such elements must be replaced immediately, since the safety of both the driver and passengers will depend on this.
To carry out repairs, it is recommended to buy or acquire:
VAZ 2109 brake pipes
Fastening brake pipes VAZ 2109
Note! It is advisable to immediately change the copper sealing washers.
Upon completion of the replacement, it is necessary to bleed the brake system:
Note! Bleeding must be repeated until all the air is released. In addition, you need to monitor the level of brake fluid in the reservoir.
With the help of a detailed video and photo, even a non-professional can change the rear brake pipe or hose with his own hands. In this case, detailed replacement instructions, as well as tips and recommendations from experienced craftsmen, will not be superfluous. If the repair is being carried out for the first time, you need to carefully unscrew and tighten the bolts so as not to damage the threads. In order for tubes and hoses to last as long as possible, you should buy products only from high-quality materials, so it is appropriate to note that the price should correspond to the quality.
Brake hoses Lada Granta
Removing, replacing, installing brake hoses of the front wheel of Lada Granta
Symptoms: the front wheel does not brake, the front wheel brakes poorly, traces of brake fluid on the inside of the wheel.
Possible cause: front wheel brake hoses are damaged.
Tools: set of sockets, set of wrenches.
1. Remove the wheel from the leak side.
2. Unscrew the brake pipe from the hose using a 10mm wrench; hold the hexagon of the hose using a 15mm wrench.
Note: If the tube retaining nut is soured, cut the hose and then unscrew the hose end from the tube.
3. Remove the hose nozzle from the hole in the bracket located on the car body.
4. Remove the brake hose sealing element from the bracket located on the rack.
5. Remove the hose tip from the front wheel brake working cylinder by unscrewing it using a 15mm wrench.
6. Remove the brake hose.
7. Remove the copper O-ring from the brake hose end. When installing a new hose, the ring must be replaced.
8. Apply a colored stripe along the new hose (this is necessary to prevent the hose from twisting during installation).
9. Install the new brake hose in the reverse order of removal.
10. Bleed the hydraulic drive of the brake system.
Bleeding the hydraulic brake system for Lada Granta
Symptoms: the braking efficiency of the brake circuit has decreased, the wheel does not brake well, the wheel brakes intermittently.
Possible cause: air has entered the hydraulic drive of the brake system.
Tools: jack, wheel chocks, flathead screwdriver.
Note: Bleed the brakes in the following sequence:
1. Check the brake fluid level and, if necessary, add it to the brake master cylinder to about.
Note. The brand of brake fluid added to the brake cylinder reservoir must match that already filled.
2. Raise the vehicle using a lift or place it on an inspection ditch.
3. Hang up the rear wheels, then unlock the pressure regulator of the rear wheel brakes by inserting a screwdriver between the plate and the piston (do not forget to remove the screwdriver upon completion of work).
4. Remove dirt and dust from the air release valve on the brake mechanism that you will bleed.
5. Remove the air outlet valve protection cap.
6. Connect the rubber hose to the bleeder valve head and place the other end of the hose in a clean, clear container partially filled with brake fluid so that the hose is submerged in the fluid.
7. An assistant should press the brake pedal all the way 4–5 times with an interval between presses of 1–2 seconds. After the last press on the pedal, keep it in its lowest position (pressed all the way).
8. Unscrew the exhaust valve 1/2 to 3/4 turn. Please note that there will be air bubbles in the liquid flowing from the hose.
9. Wait for the brake fluid to flow out of the hose, then fully tighten the air release valve. After the valve is tightened, the assistant must release the brake pedal.
10. Repeat the steps described in paragraphs 7, 8 and 9 until there are no gas bubbles in the leaking brake fluid.
Note .
When performing operations to pump the hydraulic drives of the brake system, you should pay attention to the level of the working fluid in the reservoir of the main brake cylinder, preventing its level from falling below o.
11. Disconnect the rubber hose from the air release valve, then wipe the valve fitting dry with a clean rag.
12. Place the protective cap on the air release valve.
Note .
The brake fluid drained during bleeding should not be reused.
13. Check the thorough bleeding of the hydraulic drive of the brake system by pressing the brake pedal all the way. If the hydraulic drive is not pumped properly, at the end of the pedal stroke you will feel increased “softness”.
VUT Lada Granta
Removing the vacuum brake booster, replacing the check valve in Lada Granta VUT repair
Work procedure
Rear brake pipes VAZ 2109
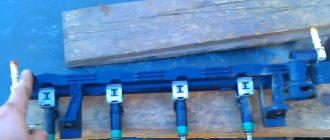
Before you take action, you need to prepare first. During the preparatory work, it is necessary to clean the surface of the fitting tubes from contamination. You also need to apply a special compound to all threaded connections, this will make it much easier to unscrew the nuts. In addition, you need to prepare a wrench, spare brake fluid for topping up, a small container to drain the remaining fluid from the system and a suitable vinyl tube. For convenient repairs, it is recommended to install the machine either on an overpass or on a pit for inspection:
- First, use a Phillips screwdriver to unscrew two self-tapping screws that secure the tube to the body of the vase.
- Using a suitable wrench, unscrew the 2 fittings through which the tubes are attached to the hose with the regulator.
- The tube is removed.
- After all necessary work has been carried out, the tubes are installed in the opposite order to dismantling.
- Add brake fluid.
- The quality of repaired brakes is checked.
On newer VAZ models, the tubes are first unscrewed from the main cylinder and brake hose, only after that the holes are plugged. In this case, you will have to unscrew the 3 fastening nuts and remove the plastic covering. Next, dismantle the metal plates and disconnect the necessary tubes from the clamps; if they are damaged, they will need to be replaced.
Note! New elements must be secured in the opposite order. To check the quality of work, it is necessary to bleed the system. It must be done to eliminate excess air.
Replace the rear brake pipe of a VAZ 2109
Signs of air penetration into the system are considered to be increased travel and softened sagging of the brake pedal when pressed. It is necessary to follow a certain sequence of bleeding the brakes:
- rear right;
- front left;
- rear left;
- front right.
In addition to changing the brake line, the brake hose may also need to be replaced.
Features of replacing brake hoses
When replacing brake pipes on a VAZ 2110, it is a good idea to check the condition of the elastic hoses. If you notice even minor cracks and mechanical damage on them, replace them. Also install new hoses if the service life of the old ones has already exceeded the required limit.
The elastic hose replacement scheme consists of the following steps:
- Clean the cylinder well with a wire brush, treating it with rust remover if necessary;
- Using a “14” wrench, unscrew the wheel caliper fitting;
- Plug the caliper hole to prevent dirt from getting into it;
- Using wrenches “17” and “10”, unscrew the fitting and disconnect the hose from the tube;
- Remove the elastic hose holder;
- Install the new hose in sequence from tube to caliper.
Replacing the brake system elements described above is not a very pleasant matter. However, if you are going to replace the piping and hoses, be glad that you won't have to do it anytime soon.
Why do you need a pressure regulator?
Not every owner of a domestic “ten” will understand why the brake pressure regulator on a VAZ 2110 needs to be replaced. Simply, this name is not familiar to everyone. A popular designation for a regulator is a sorcerer.
This very sorcerer is located on the rear suspension of your car. It has a lever with a movable position. Depending on the moment of load on the spring, its position changes.
In order for the unit to function efficiently and without errors, it is necessary to adjust the brake pressure regulator on your VAZ 2110. This way you can prevent untimely wheel locking.
Simple step-by-step instructions for installing rear disc brakes
Step 1
We loosen the tension of the cables and bring the rear pads together, then use a 12mm wrench to unscrew the guide pins. Use a metal brush to clean the seat and carefully knock down the brake drum. I recommend using a rubber mallet to avoid damaging anything. Truly super tuning of a VAZ 2114 car requires patience and strength. Using a screwdriver, pry up the spring that tightens the pads and remove it. We pull out the spacer bar and take out the upper tension spring. After this, remove the brake pad, first lowering the handbrake lever.
Step 2
When all the old parts have been removed, you can begin installing the HCD. Decide how you want the caliper to be placed - behind or in front of the axle. The effectiveness of the brakes will not change in any way from this operation. I put the axles behind. This is more symmetrical and the weight of the brake mechanism will help with braking. Now you need to join the hub and faceplate into one piece. This operation should be taken seriously. It will be useful to watch a video on this issue, where domestic masters show their tuning of Russian cars in order to share their experience and show some of the intricacies of performing this work. The centering process must be carried out very carefully.
Step 3
Now you can straighten the corners of the beam before placing the hub combined with the faceplate on the beam. This must be done so that the corners do not interfere with the caliper. Personally, I flattened them with a hammer. This work can also be done using a grinder. You should not install a grinder under the left hub bolt, otherwise you will have to work with the grinder again and file the head of the bolt. The brake caliper bracket may rest against it.
Step 4
Well, now the most important thing. We install the bracket on the faceplate and put the brake disc on the hub. Place spacers at the connection points. This must be done at connection points. It happens that the size of the washers may differ, then you need to buy them for a specific car, in our case it is tuning a 14 model car. We tighten the faceplates and the connection of the brackets (I recommend doing this with a force of 3-4 N.M). We screw the hose to the caliper, install the pads, and you can close the tube sealing line. Now we seal the brake line. We check the line for leaks by pumping up the pressure with the pedal. If everything works as it should, then you can begin installing the HCD on the other side.
How to repair brake pipes
This process requires the car enthusiast to have extensive locksmith skills and the ability to use special tools. Repairs are carried out in cases where it is not possible to replace the damaged line; it involves saving money on the purchase of a new pipe system and extends the service life of the old one.
To carry out repairs you must:
1. Unscrew the damaged tube from the cylinder or brake caliper.
2. After disconnecting, it is necessary to cut off the damaged area using a pipe cutter.
3. Clamp the tube 50 millimeters from the edge of the cut and chamfer the edge of the tube using a drill.
4. Remove all that remains of the chips and insert a fitting intended for connecting the tube to the brake operating mechanism into the cut area.
5. Insert the end of the tube into the special equipment and flare it. The main line that has undergone repairs must be purged with compressed air. And only after this is it installed with a working mechanism or another pipeline system using an adapter.
As for the length of the tube, this parameter depends on the car model. On some cars, the brake pipes have a reserve that allows you to shorten the pipe and reconnect it to the working mechanism. The metal from which the brake tube is made is flexible, so there should not be any difficulties with its position.
Some tips on how to replace brake hoses on a VAZ 2110
- An old copper ring can be cleaned with sandpaper and all its surfaces can be leveled.
- When installing a new hose, understand its scope. Firstly, it should not twist when the car makes a turn. Secondly, when maneuvering the car, the hose should not touch the car’s suspension elements, otherwise it will very quickly become unusable.
- If you changed one or two hoses, you can partially bleed the system according to a certain pattern.
- The VAZ 2110 has one feature - to dismantle the rear hose, you need to use the correct keys. For a 10 fitting, use a 15 key.
- Bleeding scheme for the VAZ 2110: the rear left wheel, followed by the front right, the second stage - the rear right, and finally the front left.
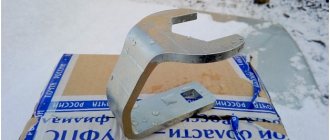
- If possible, buy a special wrench for the brake pipe fittings. It may be necessary to make the work easier, especially if the machine is old and requires major repairs.
Brake pipe wrenches
Thus, the scheme for replacing brake hoses on a VAZ 2110 is carried out according to a standard scheme, taking into account safety precautions and the structure and contents of the vehicle. There is a difficulty that often arises - the brake hose fastenings cannot always be removed.
How do you deal with such a problem? Do you have experience in repair work and a win-win option for dismantling a brake hose? Share your experience.
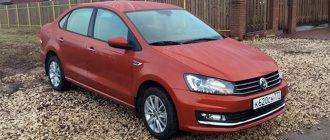
What are the best brake hoses for the VAZ 2110
Replacing brake hoses for VAZ 2109, 2110. Detailed instructions for drivers
For safety reasons, it is necessary to regularly replace the brake hoses of the VAZ 2109, 2110, because when owning a domestic car, you need to carefully monitor its condition, especially the brake system. As practice shows, compared to foreign cars, brake hoses on VAZ cars have a significantly shorter service life. Therefore, such a part as brake hoses can rightfully be considered a consumable that needs to be changed every few years or more often.