Thanks to air suspension, driving becomes easier and smoother when compared with shock absorbers. How does this element of the car work and does it have any disadvantages? Do-it-yourself air suspension: how to make it, what is the difference between installing the front and rear suspension.
The air suspension allows you to adjust the ride height semi-automatically or completely without the use of physical effort. We are talking about replacing springs, springs and torsion bars with pneumatic cylinders, in which compressed air pumped from the system acts as an elastic element. Despite all the advantages of this element, a do-it-yourself air suspension can only be created if you have basic car repair skills. The process is fraught with certain difficulties and a beginner clearly cannot cope with it.
Air suspension device
The design of each air suspension consists of a receiver, a control unit, an air distribution system and a compressor. To improve driver comfort, the suspensions can be automatically or manually controlled.
- Automatic air suspension involves independently selecting the ride height electronically, taking into account factors such as acceleration, speed, and inclination. The focus in this case is on high aerodynamic performance. The center of gravity is reduced, so the car's controllability is significantly increased.
- Manual control requires the driver's initiative when choosing the height of the ground clearance relative to the road. Manual adjustment is also possible in relation to the stiffness of the suspension if its design involves the presence of shock absorber pneumatic struts.
Types of installation
Depending on the type of system, you can install the suspension:
- Fully automatic (to increase driving comfort and safety).
- Reinforced (used to increase the carrying capacity of a car).
- Auxiliary (improves controllability, safety of the machine, increases resistance to loads).
Depending on who is doing the work, the installation can be:
- Professional service station specialists.
- Independent.
- Private master.
Depending on the type of pneumatics, the installation is distinguished:
- Self-created device.
- Factory system with intelligent control.
Depending on the number of circuits to be adjusted, the setting is:
- Dual-circuit systems.
- Four-circuit.
Modifications
There are three modifications of air suspension:
- Single-circuit options are designed for installation on one axle and provide the same pressure in both cushions on it, since the compressor and cylinders are located on the same circuit.
- Double-circuit modifications are also installed on one axle, but in essence these are two single-circuit suspensions, thanks to which it is possible to adjust the height of the front and rear of the car relative to each other. The main disadvantage is the roll of the car, since there is a pressure difference between the two wheels that run along the outer radius.
- Four-circuit options are considered the best because they use four separate valves for each wheel, pressure sensors and a microcomputer for control. Consequently, the problem with roll is eliminated in this case, since the pillow steadily holds the required pressure.
Approximate prices
Russian auto service centers offer to install air suspension for approximately the same cost:
- Installation of the kit on a leaf spring suspension (one axle) with a pump outlet in the bumper (body or trunk) - about 10,000 rubles.
- Installation on a spring suspension (one axle) with installation of a pressure gauge, compressor, inflation button, line, electrical connection - from 11,000 rubles.
- Installation of a kit (two axles) equipped with a pumping button, compressor, release valve, pressure gauge, line, electrics - from 15,000 rubles.
The price of air suspension is approximately this:
- Auxiliary type - from 13,000 rubles .
- Automatic – 28,000 rubles .
- Reinforced - from 20,000 rubles .
On average, equipping commercial vehicles with air suspension costs 15,000 rubles . If you install high-quality components, the price can rise to 120,000 rubles .
Advantages and disadvantages of air suspension
Due to the positive properties of air suspension, there is a tendency to install it on both trailers and trucks, as well as passenger cars. The advantages of tuning a car with air suspension are represented by the following possibilities:
- Ride height control. This improves handling under all road conditions. In this case, the springs do not need to be changed to softer and longer ones or shorter and harder ones.
- Under heavy loads, sagging can be avoided, as the height and stiffness adjustments ensure consistent ride quality.
- Handling is significantly improved, and the air suspension compensates for the difference between hard and soft springs by adjusting the pressure.
- When driving on uneven roads, body vibrations are smoothed out.
- It is possible to install air suspension on any car.
This is interesting: Prices for Chevrolet Cruze front shock absorber struts: how to buy cheaper, selection tips
The advantages are significant and there are many of them, however, it is worth knowing about the disadvantages:
- Poor resistance to road agents and frost, which significantly reduce the service life of the suspension.
- The level of maintainability tends to zero, so failure of one of the elements requires a complete replacement of the suspension.
- The cost is much higher compared to traditional shock absorbers.
Air suspension assembly
Since a do-it-yourself pneumatic device is only a subtype, installation is possible on an existing car suspension. The essence of the installation is to replace elastic elements with pneumatic cylinders, therefore, such a modernization scheme can be carried out on any machine. All that remains is to find out how to make an air suspension with your own hands and how to install it.
Necessary tools, materials and equipment
The equipment in this case is standard and every driver has it if he periodically encounters the need for repairs:
- sealant;
- knife;
- hammer;
- metal brush;
- Bulgarian.
Do-it-yourself air suspension consists of the following components:
- a set of racks, even if the ones currently installed are reliable;
- receiver (you can make it for air suspension with your own hands and not buy it);
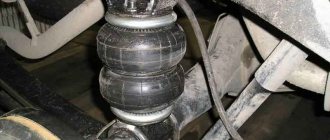
- air suspension cushions;
- compressor;
- several different fittings and PVC pipes with a diameter of 6 and 8 mm;
- two pairs of solenoid valves;
- Any oil and moisture separator will do;
- pressure gauge;
- Control block.
Front suspension assembly
It is worth considering separately the technology for installing the rear and front suspension, since in the case of the latter the scheme is more complex.
- Knock the cap off the stand and clean off the paint layer using an angle grinder.
- Press the adapter onto the post and add spacers underneath to increase the softness.
- Select small diameter fittings or tubing and place them near the air holes in the adapter.
- Install the air spring onto the strut. The height of the bump stop should be calculated in advance, otherwise the spring may fail after the first strong impact on the road.
- Use caulk and a copper press washer to seal the connection.
- Secure the support bearing to the strut so that the rod does not rotate inside the shock absorber when the steering wheel is turned.
- Connect the air tube to the pillow socket.
- Now you can install the finished structure.
This is interesting: CASCO car insurance in 2021: 3 ways to reduce the cost
Rear suspension assembly
The step-by-step procedure for assembling the rear suspension is as follows:
- Trim the spring cup a little and remove the paint coating.
- To the end of the rack rod it is necessary to cut a thread for pneumatics.
- To seal, install a press washer and then put the air spring on the rod.
- To achieve particularly smooth movement, you can not install a bump stop, which will result in a strong lowering of the rear of the car.
- Press the air spring to the end of the shock absorber.
- Apply air supply.
Air suspension selection options
Stand diameter
When choosing cushions to complement the suspension of your car, you should pay attention to the type of mounting.
Elastic elements can be mounted in three ways:
1. On top of standard racks,
2. Next to them on a separate mount
3. Instead of springs.
In the case of the first option, you need to look for a cuff size identical to the diameter of the stand.
For domestic passenger cars (VAZ of any series), cushions with a parameter of 52 mm are most often suitable.
For foreign cars, the diameter of the pillars can vary from 43 to 45 mm, which means looking for exactly these indicators on the cuffs.
Dimensions for installation
1. For small passenger cars (“Matiz”, “Daewoo”, “VAZ”) it is better to look for pillows with parameters in an uninflated state of a diameter of 120 mm and a length of 190, which will allow them to be compactly placed between the axle and the upper supports.
2. For large sedans and jeeps, you can select diameters up to 135 mm and height 205 mm.
3. Minibuses and small trucks are equipped with cushions from 150 mm in diameter and 245 mm in length or more.
Height of air struts in inflated and compressed form
This indicator is important for determining clearance adjustment. If air suspension is installed in order to unload the rear of the car when there is a large mass of luggage or a third row of seats and additional passengers, then you need to pay attention to the maximum size of the airbag/strut when inflated. The larger it is, the better for the car.
1. Minibuses and jeeps will need an indicator of 280-320 mm, which will ensure good portability of a loaded trunk and high ground clearance for cross-country use in rural areas.
2. Small trucks should have the cushions installed at 380-420 mm in the inflated position.
3. Station wagons and minivans can be mounted with 230-250 mm.
4. To lower the car in accordance with tuning, you need to look at the minimum compressed length of the airbag. They are usually used for mounting on sedans and here you should look for indicators of 80-100 mm.
Which axis?
Air suspension can be installed on any axle, but different solutions have their own advantages.
1. Sleeve type can be mounted from both front and back. Most often, a four-circuit version is used to ensure complete comfort or adjust ground clearance. We allow installation only on the front axle to give the car a sporty look with a low nose and raised trunk.
2. Cushions with covers are more suitable for placing on the rear axle to facilitate the transportation of goods and the level position of the body. They are not placed in front. This is an option for minibuses and small trucks.
Selection by weight
Each air suspension kit has a maximum weight rating for the vehicle it will interact with.
1. For small passenger cars, there are enough pillows for a total weight of 1200 kg.
2. Large sedans and jeeps are equipped with devices with a capacity of 2000 kg.
3. Executive class and minibuses require elements designed for 3000 kg.
4. Small trucks require 5000kg air mounts.
Compressor compatibility
Air suspension is not always sold assembled, so some elements must be purchased separately.
When choosing pillows, it is important to ensure compatibility with the compressor in terms of operating pressure. Most rubber parts with an air chamber start working at a pressure of 1 bar and there should be no problems here. But everyone’s maximum values are different.
It is optimal to purchase a compressor with a small margin (5 bar more) relative to the pillows, so that it has time to pump excess air into the receiver, since it cannot work constantly and will shut down due to overheating.
1. For most cars, the airbags should have a maximum pressure of 15 bar, and the compressor should have a maximum pressure of 20 bar.
2. With a single-circuit system, 7 bar in the elastic elements is sufficient.
Receiver capacity
The availability of a sufficient supply of air to supply it to the racks and lift the car depends on this parameter. When the engine is turned off, the system leaks and the suspension can change the position of the body.
1. For passenger cars, a receiver volume of 8 liters is enough;
2. Minibuses and jeeps will require 12 liters;
3. Small trucks from 15 to 20 liters.
Installing air suspension on a car
Before installing the air suspension yourself, remove the struts from the car. A beginner's skills will be enough in this case - just lift the car with a jack and follow the step-by-step process:
- Use existing holes to install the stand or make new ones if necessary.
- Remove the rubber bands and stretch the tubes to ensure air supply; then they must be secured in relation to the body using clamps.
- Attach the receiver to a special bracket near the gas tank.
- Lead the tubes from the airbags along the steering rods and lead them into the engine compartment. Make the wiring in two directions - to the receiver valve and the relief valve.
- Connect the pneumatics to the control unit toggle switches.
Bleeding the suspension and lowering the body level
To release air from the suspension, the valves of the pneumatic elements and the exhaust valve 1 are opened, the winding of which is supplied with voltage. In this case, the air from the elastic elements enters the pneumatic exhaust valve 2 and is directed further through the dryer, limit valve 15 and the intake noise muffler with a filter into the car trunk niche intended to accommodate the spare wheel.
Do-it-yourself air suspension is quite practical and stable in everyday use under different road conditions. The ride of the car will be soft and smooth, regardless of the quality and type of road surface. As for installation, a beginner is unlikely to be able to cope with all the stages of pre-manufacturing the air suspension on his own. Even if you have the relevant knowledge and experience, it is better to enlist the support of a partner and give preference only to reliable components.
Suspension control
A control unit with 8 buttons is responsible for controlling the air suspension. Each button is responsible for a specific strut or shock absorbers in the complex. To receive data from each airbag, be sure to install the controller in the car interior. Based on the road situation, you can reduce or increase the air pressure in the airbag to reduce or, accordingly, increase ground clearance.
The corresponding button on the controller will allow you to disable the air suspension if necessary. The ride height indicators will immediately become average and the cushions will activate the standard spring shock absorbers.