07/18/2021 43,846 Ignition system
Author: Ivan Baranov
The ZMZ 402 engine is one of the products of the Russian automotive industry, widely used in the automotive industry. These power units were equipped with certain models of Volga, UAZ, and Gazelle cars. To ensure normal engine operation, the machine must have the ignition set correctly. In this article we will tell you how to install a distributor on a 402 engine and what should be taken into account when performing the task.
[Hide]
How to set the ignition on a ZMZ 402 carburetor
The ZMZ0-402 type engine is equipped with an ignition distributor sensor (1908.3706) - non-contact, with a control pulse sensor (generator) and built-in vacuum and centrifugal ignition timing regulators.
The distribution sensor performs two functions: it sets the moment of sparking and distributes high voltage pulses among the cylinders in accordance with the order of their operation. For this purpose, a slider mounted on the shaft of the sensor-distributor is used.
A noise suppression resistor is installed in the slider.
The switch (1313734) opens the power supply circuit of the primary winding of the ignition coil, converting the sensor control pulses into current pulses in the ignition coil.
Tags: correct ignition adjustment ZMZ 402
Comments 21
A lot of words but no information on the case. Let's look in other posts.
Dancing with a tambourine in general(((
TODAY I SET THE IGNITION! THE CAR STARTED WITH ALMOST HALF A KICK! BUT there is a problem when the slider is on the first cylinder, unscrew the rear bolt and align the marks on the distributor under the slider, BUT! the slider has free movement, I turned it clockwise all the way and aligned the marks. DID I DO IT RIGHT? OR maybe you need to turn it counterclockwise all the way?
THANKS TO ALL! A LOT OF INFORMATION, I WILL TRY TO DO IT TODAY IF I HAVE TIME.
Everything they said was true. MVT, slider for the first cylinder... Then I’ll tell you how I did it. I started it up and adjusted the ignition angle by ear (so that the engine would run smoothly and confidently). Afterwards I went for a ride with the key set to 10. And as I moved, I identified failures, hesitations, etc. So I set it up empirically. And the +/- account is crap. Everything needs to be done properly. If it’s too early, there’s excess consumption, if it’s too late, it’s overheating (or vice versa) and there’s also detonation. Good luck
Here it is, but they say by ear that you need to set it by turning the distributor until the engine reaches maximum speed! I’ll tell you the same thing - nonsense! It all depends on the quality of the mixture, that is, rich or lean, and the speed changes from this. It’s better to contact Prof. for the marks and ending. .
I'm telling you how I did it. Before this, I visited a carburetor specialist, that is, I was sure of the quality of the mixture. But he didn’t turn on the ignition for me, because he said that his eyes were already weak and he wouldn’t be able to see the devil =)
That's when I installed a dual-circuit ignition for myself, set everything up by ear and in terms of driving characteristics, everything seemed to be normal, in cold weather I started the first time))) Twist it, drive it, turn it some more and you'll find the middle)))
The best and most accurate way to set the ignition is by spark and by bulb. It’s more difficult for a light bulb on Volga distributors. For this reason, I’ll tell you how to use a spark to set the piston position at TDC (top dead center). In this case, the slider should be directed to the 1st cylinder (there is also a bolt for a screwdriver), then remove the armor wire from the first cylinder and, turning on the ignition, turn the distributor until a spark occurs. If nothing happens when turning smoothly, turn sharper. That is, at the moment of compression, the mixture ignites. And listen less to the fact that + - the ignition is adjusted on your finger. Consumption depends very much on ignition; there is an interesting article that with a deviation of 10 degrees + 3-3.5 liters fuel is consumed. It’s not for nothing that devices were invented
I did this: unscrew the first spark plug and insert a paper cone into the hole, and turn the shaft in the direction of travel, only the plug shoots out, adjust it to the 2nd mark on the pulley, TDC is caught. go further, remove the distributor cover, there are also marks on the body on the inside, like arrows, and under the slider there is a red mark, they should fit, everything fits exactly, if not, then do the following, loosen the ignition angle adjustment bolt with a key of 10, then under the distributor there is a nut like 8, being on the opposite side from the top it is not visible because It's under the distributor housing. you loosen it and join the marks. and tighten it, then you need to catch the place when the slider is looking at cylinder 1, the distributor cap comes to the rescue (on an electronic one everything is simpler, you put the cap on, turn on the ignition and turn the distributor left to right, and you catch a spark, the most reliable and sure way, but that’s not about it) catch the first cylinder, fix the ignition angle adjustment bolt. you put the cover on and that’s it, it should start, but if all the elements of the circuit are working (switch, coil, wires, spark plugs, the connection diagram itself) with this setting it should start and the control setting can already be done on site. good luck with your work, if you ask me anything, I’ll tell you what I know))
The ZMZ 402 engine is one of the products of the Russian automotive industry, widely used in the automotive industry. These power units were equipped with certain models of Volga, UAZ, and Gazelle cars. To ensure normal engine operation, the machine must have the ignition set correctly. In this article we will tell you how to install a distributor on a 402 engine and what should be taken into account when performing the task.
The order of operation of the ZMZ 402 engine cylinders
Skip to content
Greetings, Friends. Due to the fact that I consider it necessary to pass on the accumulated knowledge to the younger generation, and mechanics now do not want to learn, but only earn money by doing stupid maintenance and changing filters, I will leave some things here.
So. Today we’ll talk about the operating order of the cylinders of internal combustion engines. One of my favorite topics. Otherwise it’s all women, humor, psychology, aphorisms... It’s time to know the honor))
We start, of course, with the simplest thing, that is, with an inline four. Everything is simple here. The order is 1-3-4-2, or 1-2-4-3, as on ZMZ-402 (Volga Gas)
But there are also V-shaped and opposed quads, however, this does not change the essence of the operating procedure.
Next up is the straight six. The order is as follows: 1-5-3-6-2-4, or as experienced drivers used to say, 15 bottles at 3.62 for four))) This is hard to forget)))
Next comes the V-shaped six with the operating order: 1-4-2-5-3-6. One of the most unbalanced engines, if you do not take into account 5, 3 and 2 cylinder four-stroke engines.
Well, now my favorite, namely the good old and inimitable V-8!
At first glance, it has two operating orders: 1-5-4-2-6-3-7-8 or 1-8-4-3-6-5-7-2. You might ask why? But because America and Europe count cylinders differently. For Americans, the first cylinder (in the direction of travel of the A/M) is on the front left. Next, the cylinders are counted from left to right, front to back, in a checkerboard order: 1 23 45 67 8 For Europeans, the first cylinder is on the front right in the direction of travel of the vehicle, then in a row, also from front to back: 5 16 27 38 4
Thus, if you draw two diagrams and superimpose one on top of the other, you get the same thing.
And finally the V-12 engine. Order: 1-12-5-8-3-10-6-7-2-11-4-9
That's all for now. If anyone wants to add or correct, you are welcome. I hope it will be useful to someone))) All the best.
Maxim Markov
During the operation of the car, the need for adjustment work periodically arises, be it correcting the ignition angle or adjusting valve clearances. And the 402 engine needs to perform a valve adjustment procedure every 15 thousand kilometers, since if the thermal clearances are broken, the internal combustion engine (ICE) will lose power and fuel consumption will increase. This article will discuss exactly this.
Frequency of adjustment work
Despite the fact that the ZMZ 402 engine has been discontinued, it remains quite popular among Russian motorists. This is due to the fact that it does not consume much fuel and is easy to maintain.
The frequency of adjustment directly depends on driving style, vehicle load, and the correct use of a particular brand of gasoline. If the car is operated without harsh driving and is not heavily loaded, then the adjustment period is 15 thousand km; if the vehicle is used for cargo transportation, then 10 thousand km. Well, if the wrong type of fuel is used for the cylinder head (cylinder head), regardless of the settings of the ignition system, the valve clearances are adjusted after 5-6 thousand kilometers.
The GAZ family of cars is equipped with the following internal combustion engine models: 402, 405 and 406 engines. The 402 engine is installed on both the Volga and GAZelle. Now it’s worth moving on to the indicators of acceptable standards.
Permissible clearance standards
Why is valve adjustment done at all, and what happens if it is not done on time? The consequences can lead to cylinder burnout and, as a result, to expensive and time-consuming repairs of the 402 engine. In other words, this procedure allows you to maintain internal combustion engine parts in working condition.
There are several clear signs that it is time for an adjustment procedure:
- knocking of valves in the engine;
- unstable work ;
- power drop;
- increased fuel consumption.
Acceptable standards are presented below:
- 1 and 4 cylinders. For these cylinders, the tolerance values on the suction valves will be in the range of 0.40-0.45 mm, and for the exhaust valves 0.35-0.40 mm.
- 2 and 3 cylinders. Here the indicators at both the intake and exhaust will be in the range of 0.40-0.45 mm.
The order of operation of the cylinders in the GAZ 402 engine is as follows: 1-2-4-3. The full operating cycle for a four-stroke engine is two revolutions of the crankshaft, which in degrees will mean 720°, and for a two-stroke engine - 360°.
Preparatory process
Before you begin adjustment work with your own hands, you need to prepare the necessary tools and consumables, which include:
- set of measurement probes;
- a set of wrenches (socket or ring);
- new valve cover gasket;
- crankshaft ratchet key;
- spark plug wrench Needed to remove spark plugs;
- Phillips and flathead screwdrivers;
- clean rags.
Upon completion of preparation, when all the required tools are prepared, you can proceed directly to the adjustment work.
The process of adjusting the angles of thermal gaps
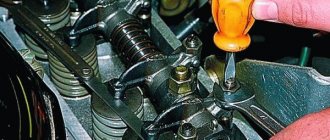
For those who are wondering how to adjust the valves on a car with a 402 engine, the entire process will be presented in detail below. It is important to remember that the process itself should be performed on a cold engine, since on a warm engine the combustible mixture can burn the motorist.
Valve adjustment on a 402 engine is performed in the following way:
- Disconnecting the hose. The first step is to disconnect all the hoses going to the valve cover, as well as the accelerator cable.
- Removing the air filter and valve cover. Then you should remove the air filter with the housing, and unscrew the 6 bolts securing the valve cover.
- Removing the spark plugs.
- Installing the first cylinder at TDC. The next step in the adjustment process is to set the first cylinder to the top dead center (TDC) position. To do this, it is necessary that the third mark on the crankshaft pulley coincides with the mark on the engine block housing. This is done by turning the crankshaft.
- Sequence of valve adjustment. The order of adjusting the valves is as follows: 1, 2, 4, 6, the next step is to turn the crankshaft one full turn clockwise until the marks coincide. Next, 3, 5, 7, 8 valves are adjusted.
- Adjustment process. Using an 11-mm socket or a screwdriver, you need to hold the adjusting screw, and at this moment unscrew the nut securing it. Using a probe of the required size, take a measurement (the probe should move with little effort); if the measurement of the thermal gap is normal, then you can move on to the next valve.
- Installation work. The next step is to assemble in reverse order, i.e. the spark plugs, valve cover with a new gasket are installed back, but the bolts must be tightened according to the recommended tightening torques (this indicator is 0.5-0.8 N.m (kg.m)), the air filter and hoses.
- Check with the engine running. Now you should start the internal combustion engine and let it run for a while until it warms up completely, then listen to its operation. If there is no metallic ringing or dull clattering sound, this will mean that the thermal clearance adjustment has been performed correctly.
This is the way to adjust the valves and set up the correct operation of the internal combustion engine. This procedure is suitable for all cars with a 402 engine, be it a GAZ 3110 (Volga) or a GAZelle.
Summarizing
It's time to draw some conclusions. Timely adjustment of valves on cars with a 402 carburetor engine allows you to extend the life of the components included in the internal combustion engine, and is also responsible for the correct and trouble-free operation of the internal combustion engine itself. As you can see, the process itself does not take much time, but at the same time, when adjusting the thermal clearances of the valves, you should be careful to do everything correctly.
How to install the ignition yourself?
How is the ignition installed on the ZMZ 402? The crankshaft must be placed in a position that corresponds to an advance angle of 5 degrees.
You need to set the moment like this:
- On the power unit, we combine the average mark on its shaft on the cylinder head cover, that is, at the end of the compression stroke on cylinder 1.
- If the distributor has not been removed from the power unit, the compression stroke on cylinder 1 can be detected by opening its cover. It is necessary that the slider be installed opposite the internal contact, which is connected via a cable to the spark plug. If it is not possible to determine the compression in this way, you can dismantle the SZ installed in the first cylinder. After this, the hole will need to be covered with a rag, or better yet, with paper. The crankshaft needs to start rotating, and at the moment when the paper plug is knocked out by the air flow, the compression stroke begins.
- Now you will need a 10mm wrench - with its help you need to slightly loosen the octane corrector bolt, but you do not need to unscrew the screw itself.
- Next, you should set its scale to zero, this is approximately the middle of the scale.
- After completing these steps, using a 10mm wrench, you need to loosen the bolt that secures the octane corrector plates.
- Now you need to rotate the distributor body so that the marks are aligned. In particular, we are talking about the red mark located on the rotor, as well as the risk on the stator. When the installation of the device drive is completed, the distributor must be held in this position with one hand, and the bolt must be tightened with the other hand.
Many people set the ignition to a strobe light. Sometimes setting the ignition timing does not produce results - the engine continues to rev and not operate at full power. The reason is the inoperability of the distributor as a whole. The problem can be solved by replacing or repairing the distributor.
Procedure for adjusting the ignition system
Label matching
To begin setting the correct ignition timing, you need to turn the crankshaft to a position that indicates 5 degrees. This is done as follows - you need to set the first cylinder at top dead center (end of the compression stroke). To do this, you need to align the middle mark on the crankshaft pulley with the mark on the cylinder head.
ATTENTION. The compression stroke on the first cylinder can be set if the distributor has not been removed before - by opening its cover, the slider will stand opposite the internal contact of the wire connecting to the spark plugs of the first cylinder.
If it is not possible to determine the compression stroke in this way, then it is necessary to unscrew the spark plug from the first cylinder and plug the hole with a rag or paper. Then you should start cranking the crankshaft until the paper-shaped plug is removed with the help of air created inside the cylinder. This will be the moment of compression.
Advance angle adjustment
Next, you need to loosen the octane corrector bolt, which is located on the distributor. A 10mm wrench will come in handy here. Then the advance angle is set approximately in the middle of the scale (this will be zero). Next, using the same 10mm wrench, you need to loosen the bolt securing the octane corrector plates. The next step is to rotate the distributor housing so that both marks coincide - the red mark on the rotor head and the mark on the stator. When the housing is installed in the desired position, it is necessary to fix the distributor housing with one hand and tighten the bolt with the other.
Checking the correct installation of the ignition
The correctness of the set ignition timing is checked while the car is moving - at a speed of 50-60 km/h, the gas pedal is sharply pressed, a short-term detonation should follow (1-3 seconds). If detonation disappears after this time, then the moment was chosen correctly. You can set the ignition more accurately using a strobe light.
This short guide will help you set the ignition yourself without resorting to the help of specialists at home.
Adjusting and installing the ignition ZMZ 402: secrets and tips
The ZMZ 402 engine is one of the products of the Russian automotive industry, widely used in the automotive industry. These power units were equipped with certain models of Volga, UAZ, and Gazelle cars. To ensure normal engine operation, the machine must have the ignition set correctly. In this article we will tell you how to install a distributor on a 402 engine and what should be taken into account when performing the task.
- 1 What you need to know
- 2 How to install the ignition yourself?
- 3 Video “Step-by-step installation of distributor on ZMZ 402”
- * Comments and Reviews
Brief history of the car
The Volga was the dream of every Soviet family, but the average resident could not afford it. This car became the next generation of the GAZ-21 brand. Many developments and prototypes were made from 1960 to 1967.
Many engine options were considered, including a V-8 engine for gas 24, but in the end, only two options remained: an in-line four-cylinder with V = 2.5 liters and a 4-speed manual transmission and a 5.5 with a 3-automatic transmission. The body design was based on the American school and the car became similar to its American counterparts, such as: Plimutee Volare, Dodge Dart, Chevrolet Nova.
This is what the gearbox looks like for Volga GAZ 24
Over time, this model became widespread in taxi companies, medical institutions, police, and the famous “Black Volga” was used by officials and law enforcement services.
Return to contents
What you need to know
In order to properly configure and adjust the ignition of the ZMZ 402, you need to know some nuances about the operation of the power unit. Such motors have a non-contact distributor installed, supplemented by a control signal generator and mounted advance regulators - vacuum and centrifugal (video author - smotri Vidik).
The distributor is designed to perform certain functions:
- determines the moment of spark occurrence;
- transmits high voltage signals through the cylinders of the power unit, taking into account the order of their operation.
For the correct distribution of impulses, a slider mounted on the mechanism pulley is used. The slider is equipped with a resistor and is designed to suppress interference. The switching device performs the function of opening the ignition coil winding circuit, converting control signals from the regulator into short-circuit current signals.
To correctly install the ignition on a 402 engine, it is necessary to take into account the system characteristics presented below:
- the order of operation of the cylinders is first the first, then the second, then the fourth and third;
- the rotor of the distribution element rotates counterclockwise;
- on a centrifugal device the advance angle is from 15 to 18 degrees;
- on a vacuum device this indicator is from 8 to 10 degrees;
- the play on the NW should be no more than 0.8 mm;
- the resistor resistance value should be from 5 to 8 kOhm;
- the SZ resistance parameter should vary around 4-7 kOhm;
- in the stator winding the resistance level should be no more than 0.45 and no less than 0.5 kOhm.
Disassembled distributor for ZMZ
How to install the ignition yourself?
How is the ignition installed on the ZMZ 402? The crankshaft must be placed in a position that corresponds to an advance angle of 5 degrees.
You need to set the moment like this:
- On the power unit, we combine the average mark on its shaft on the cylinder head cover, that is, at the end of the compression stroke on cylinder 1.
- If the distributor has not been removed from the power unit, the compression stroke on cylinder 1 can be detected by opening its cover. It is necessary that the slider be installed opposite the internal contact, which is connected via a cable to the spark plug. If it is not possible to determine the compression in this way, you can dismantle the SZ installed in the first cylinder. After this, the hole will need to be covered with a rag, or better yet, with paper. The crankshaft needs to start rotating, and at the moment when the paper plug is knocked out by the air flow, the compression stroke begins.
- Now you will need a 10mm wrench - with its help you need to slightly loosen the octane corrector bolt, but you do not need to unscrew the screw itself.
- Next, you should set its scale to zero, this is approximately the middle of the scale.
- After completing these steps, using a 10mm wrench, you need to loosen the bolt that secures the octane corrector plates.
- Now you need to rotate the distributor body so that the marks are aligned. In particular, we are talking about the red mark located on the rotor, as well as the risk on the stator. When the installation of the device drive is completed, the distributor must be held in this position with one hand, and the bolt must be tightened with the other hand.
1. Place marks.
2. Set the scale to zero.
3. Align the distributor marks.
Many people set the ignition to a strobe light. Sometimes setting the ignition timing does not produce results - the engine continues to stall and not operate at full power. The reason is the inoperability of the distributor as a whole. The problem can be solved by replacing or repairing the distributor.
Do you know how to set the ignition?
installing a distributor with a drive – The best videos
Setting the ignition timing on the UAZ distributor sensor Using the starting handle (from the car tool kit), set the crankshaft to the position corresponding to the ignition timing angle of 5°. To do this... ...align the middle mark on the crankshaft pulley with the boss on the block cover at the end of the compression stroke in the first cylinder.
If the distributor sensor is not removed from the engine, then the compression stroke of the first cylinder is determined ... by removing the distributor cap. The slider should stand against the internal contact of the cover, connected by a wire to the spark plug of the first cylinder. Or we turn out the spark plug of the first cylinder. Closing the hole with a paper stopper, rotate the crankshaft.
The moment the plug comes out corresponds to the beginning of the compression stroke. Using a “10” wrench, loosen the octane corrector bolt... ...and set its scale to zero division (middle of the scale). Using a “10” wrench, loosen the bolt securing the octane corrector plate... ...and, turning the sensor-distributor housing, align the marks (red mark on the rotor and arrow on the stator).
Holding the sensor in this position, tighten the bolt. Make sure that the slider is located against the contact of the cover of the first cylinder and check that the high-voltage wires of the remaining cylinders are connected correctly - counting counterclockwise from the first cylinder in the order 1-2-4-3. We recommend that you additionally check the correct ignition timing while the vehicle is moving.
To do this, moving in fourth gear at a constant speed of 50–60 km/h, sharply press the gas pedal. If in this case detonation (the sound is similar to the knocking of valves) appears briefly - for 1-3 s, then the ignition timing is chosen correctly. Prolonged detonation indicates excessive ignition timing. We reduce it with an octane corrector by one division.
The absence of detonation requires an increase in the ignition timing, after which the test must be repeated.
How to find the right video - about it here https://www.youtube.com/watch?v=fL6pXklM0s4 Support the project! CARD (SBERBANK) – 4276540029873811 YANDEX WALLET – 410014734041983
Angry video about the quality of UAZ welding. Music: RJD2 – Smoke & Mirrors The Afghan Whigs – Demon In Profile 21 pilots – Car Radio Rising Gael – Tam Lin Quantic – Not So Blue
And today the Niva stalled and will not rise. Nail Poroshin tells and shows how to look for the cause of the malfunction...Where to dig?! Find the answer in this video. Enjoy watching everyone. ˜ Dear subscribers! We recommend that you visit the website – https://minibk.ru.
Here you will find information about a multifunctional device that allows you to measure fuel consumption, including gas, if the car is equipped with an LPG system, measures temperature and on-board voltage, and can answer the question “What time is it now?”
The developer of the device is our friend Alexey Tretyakov, an excellent specialist in the field of microelectronics and just a good person.
in this video we are looking for an efficient electric turbine for a car.
Operation depends on correct ignition
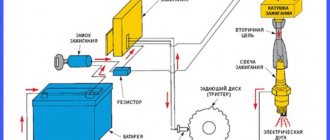
Automotive power units work productively if the ignition system is adjusted to 402 fuel-air mixture. The carburetor forms the fuel composition and supplies the prepared mixture to the engine cylinders.
At the moment of the highest position of the pistons, the spark plugs generate a spark that ignites the fuel mixture in the combustion chamber. A mini explosion of fuel with the resulting gases presses on the pistons, turning their forward motion into torque of the crankshaft.
The algorithm for igniting the mixture highlights one important point in the sequence of events. Will the engine work fully if the mixture is ignited at the beginning of the piston lifting or lowering? The correct answer is no.
Any internal combustion engine works like a clock, provided the fuel is properly ignited. The power of the power plant increases, approaching the established standards. To do this, it is necessary to fix the correct spatial position of the distributor, which alternately closes the electrical circuit from the high voltage coil to the car spark plugs.
Features of fuel ignition
Before installing and correctly setting the ignition order on the 402 engine, it is important to understand the design features of the distributor. This engine was equipped with an electric flow distributor without traditional metal contacts. The innovation is that the complex process is controlled together with the generator by a vacuum advance regulator.
The distributor sets the order in which the spark appears and the sequence in which the fuel is ignited in the cylinders. A mechanical slider helps to correctly “catch” the moments of the spark discharge. It is mounted directly on the pulley. Has a resistor to help mix noise. The switching device disconnects the circuit in the first coil. Subsequently, it converts electrical impulses emanating from the node into an intermittent short-circuit current.
Features of electrical equipment
Electrical diagram for connecting devices
The electrical equipment of the machine consists of the following systems:
- engine starting system;
- ignition system, including spark plugs, ignition switch, distributor, etc.;
- internal and external lighting;
- dashboard;
- heating system;
- glass cleaning system;
- headlights corrector;
- mounting block with fuses.
Finding the ignition moment in the ignition
On engine 402, ignition adjustment occurs according to the following algorithm and order:
- The crankshaft occupies a spatial position corresponding to 5 degrees of advance in ignition of the fuel mixture;
- This position can be easily achieved by aligning the mark on the pulley with the recess on the motor block;
- The coincidence means that the power plant has marked the end of a full piston stroke.
With the distribution sensor removed, adjustments are made as follows:
- I remove the spark plug from the head of the combustion chamber of the cylinder, which is listed as No. 1 in the order of fuel ignition;
- I cover it with a sheet of paper and turn the engine crankshaft;
- The air pushed out by the piston blows off the sheet, which indicates that it has reached the vertical maximum, from which the stroke begins;
- Then, using the keys, I set the octane corrector scale to 0.
Adjusting the ignition timing
We install the crankshaft in a position corresponding to the ignition timing angle of 5°.
To do this, on the ZMZ-402 engine (Fig. 1), we combine the middle mark on its pulley with the tide on the block cover (the end of the compression stroke of the first cylinder).
The operation of the engine, its efficiency and reliability directly depend on the correct settings of the ignition system. In this article we will look at the design and components of the ZMZ 402 ignition system, as well as the procedure for setting the ignition timing
Checking for correct installation
If the order is followed without errors in the ignition of the 402 engine, then the next task will be to check the power plant while the car is moving:
- We go out onto the highway and, when driving 60 km/h, turn on fourth gear. We are accelerating. The appearance of short-term detonation knocks indicates that the ignition is installed correctly.
- Prolonged detonation knocks are confirmation of incorrect setting of the advance angle.
In this case, you should reduce it with an octane corrector, moving it to one notch. If detonation cannot be heard at all, then the advanced ignition angle of the fuel mixture should be increased. And check again for correct installation by accelerating the car to 60 km/h and shifting to fourth gear.
How to set the distributor drive 402 video
Hello! Please help me push this thing in.
I twisted my knee and looked at the pulley: my TDC was clearly at the 3rd mark on the right. One book advises to put 1 mark at a time (13″) and hold the slider, the second - to disassemble, put on the second, the slot in the roller should be parallel to the block. Having crossed a fly with a crocodile, I placed the bare drive at 1 mark - the slot turned out to be at a slight angle. Right or wrong?
I'm repairing the boot on the fork - do I need foam rubber behind the release bearing, how to lubricate the shaft and its splines.
The ZMZ 402 engine is one of the products of the Russian automotive industry, widely used in the automotive industry. These power units were equipped with certain models of Volga, UAZ, and Gazelle cars. To ensure normal engine operation, the machine must have the ignition set correctly. In this article we will tell you how to install a distributor on a 402 engine and what should be taken into account when performing the task.
Technical characteristics of the Volga
The engine is an in-line four, an eight-valve mechanism. Many parts of the gas 24 engine were made of aluminum-zinc alloy: the internal combustion engine block, the cylinder head, the intake manifold. The body was produced in two versions - sedan and station wagon.
The volume of the fuel tank was 55 liters, since the consumption was relatively large, the tank had to be not small. It was located under the bottom of the trunk. Another feature of the tank was two sensors for measuring the amount of fuel. Manually, by placing the car on a flat surface, you could unscrew the plate with divisions from the tank, which showed the remaining fuel on the instrument panel.
The latter often failed and car owners often used a manual one. Fuel consumption ranged from 10-13 liters per 100 km. Transmission - 4-speed with synchronizers for all gears, single disc clutch, dry with hydraulic drive. Chassis: front independent, multi-link, pivot type. Rear: dependent, spring. Shock absorbers are telescopic, double-sided. Braking system: drum, installed on all 4 wheels. Parking brake with rear wheel drive.
Return to contents
What you need to know
In order to properly configure and adjust the ignition of the ZMZ 402, you need to know some nuances about the operation of the power unit. Such motors have a non-contact distributor installed, supplemented by a control signal generator and mounted advance regulators - vacuum and centrifugal (video author - smotri Vidik).
The distributor is designed to perform certain functions:
- determines the moment of spark occurrence;
- transmits high voltage signals through the cylinders of the power unit, taking into account the order of their operation.
For the correct distribution of impulses, a slider mounted on the mechanism pulley is used. The slider is equipped with a resistor and is designed to suppress interference. The switching device performs the function of opening the ignition coil winding circuit, converting control signals from the regulator into short-circuit current signals.
To correctly install the ignition on a 402 engine, it is necessary to take into account the system characteristics presented below:
- the order of operation of the cylinders is first the first, then the second, then the fourth and third;
- the rotor of the distribution element rotates counterclockwise;
- on a centrifugal device the advance angle is from 15 to 18 degrees;
- on a vacuum device this indicator is from 8 to 10 degrees;
- the play on the NW should be no more than 0.8 mm;
- the resistor resistance value should be from 5 to 8 kOhm;
- the SZ resistance parameter should vary around 4-7 kOhm;
- in the stator winding the resistance level should be no more than 0.45 and no less than 0.5 kOhm.
Disassembled distributor for ZMZ
How to install the ignition yourself?
How is the ignition installed on the ZMZ 402? The crankshaft must be placed in a position that corresponds to an advance angle of 5 degrees.
You need to set the moment like this:
- On the power unit, we combine the average mark on its shaft on the cylinder head cover, that is, at the end of the compression stroke on cylinder 1.
- If the distributor has not been removed from the power unit, the compression stroke on cylinder 1 can be detected by opening its cover. It is necessary that the slider be installed opposite the internal contact, which is connected via a cable to the spark plug. If it is not possible to determine the compression in this way, you can dismantle the SZ installed in the first cylinder. After this, the hole will need to be covered with a rag, or better yet, with paper. The crankshaft needs to start rotating, and at the moment when the paper plug is knocked out by the air flow, the compression stroke begins.
- Now you will need a 10mm wrench - with its help you need to slightly loosen the octane corrector bolt, but you do not need to unscrew the screw itself.
- Next, you should set its scale to zero, this is approximately the middle of the scale.
- After completing these steps, using a 10mm wrench, you need to loosen the bolt that secures the octane corrector plates.
- Now you need to rotate the distributor body so that the marks are aligned. In particular, we are talking about the red mark located on the rotor, as well as the risk on the stator. When the installation of the device drive is completed, the distributor must be held in this position with one hand, and the bolt must be tightened with the other hand.
Many people set the ignition to a strobe light. Sometimes setting the ignition timing does not produce results - the engine continues to rev and not operate at full power. The reason is the inoperability of the distributor as a whole. The problem can be solved by replacing or repairing the distributor.
ZMZ-402: replacement of the oil pump sensor-distributor drive. If the engine is idling unsteadily, “sneezes” and “coughs”, jerks when the gas is sharply pressed, or detonates, then these are signs indicating a drive malfunction - wear of the engagement gear with the camshaft or significant wear of the plain bearings in it. This is especially noticeable with a contactless ignition system.
Any garage or flat area is suitable for carrying out work on replacing the drive. From the tool we will need open-end wrenches s=10 and 13 mm, a large flat-head screwdriver and a crank.
We start by inserting the crank into the ratchet and setting the first piston to top dead center on the compression stroke by aligning the two marks on the crankshaft pulley with the marks on the engine cylinder block. And to make sure that this is really a compression stroke, remove the cover of the sensor-distributor and make sure that the slider is opposite the contact in the cover with the high-voltage wire coming from the spark plug of the first cylinder. If they do not match, turn the crankshaft one more revolution.
But what if the sensor-distributor drive is turned and you are not sure of its correct position? The easiest way to ensure that the piston is at TDC on the compression stroke is to unscrew the spark plug and plug the hole in the cylinder head with a plug that can be rolled out of newspaper. Just don't try to plug it too hard. When turning the crankshaft, before aligning the marks, this plug must be squeezed out, since both valves are closed on the compression stroke.
The order of operation of the cylinders of the 402 engine - The order of operation of the cylinders of the 402 engine
Many people remember the 402 engines and the operation of the cylinders installed on the Volga and Gazelle cars. Despite the cessation of production, some vehicles are used as a power unit.
articles
402 Engine
The power unit is unpretentious; it does not contain complex technical components or parts. The problem is that after every fifteen thousand mileage of a vehicle, it is necessary to adjust the cylinder valves.
- After 10 thousand kilometers, adjustment is required if the vehicle was used to transport goods.
- Intervention is required after 6,000 kilometers, provided that the 402 engine was running on a different brand of gasoline.
In the above cases, the clearances of the valve chamfers and cylinder seats are violated.
Parameter mismatch disrupts engine operation, causing:
- the appearance of knocking in the cylinder head;
- increased fuel consumption;
- power reduction;
- increased pollution of the environment by exhaust gases.
The appearance of characteristic signs is the moment for the driver to begin eliminating defects.
Cylinder operating order
Success is achieved if the driver knows the order of operation of the cylinders in the 402 engine of a given power plant.
- In 402 engines, the order is as follows: first the first cylinder works, then the second, then the fourth, and the third cylinder completes the cycle.
This is the order of operation of the cylinders of the universal 402 engine. The gap on the first and fourth cylinders on the valves responsible for the admission of the combustible mixture into the combustion chamber, according to regulatory requirements, is 0.40-0.45 millimeters. Valves that utilize exhaust gases have a gap of 0.35-0.40 millimeters.
For four-stroke engines, the working process is completed by cranking the crankshaft 720 degrees. A two-stroke has half as much.
Tool for the job
The work of adjusting valve clearances requires preparation. Place tools and materials for measurements in a convenient position.
The toolkit must include:
- note styli;
- socket, open-end, ring wrenches;
- keys for removing spark plugs;
- purchased gaskets to replace used analogues;
- devices for turning the crankshaft;
- a set of negative and positive screwdrivers.
- previously unused rags.
Having the necessary material allows you to begin adjustment work.
Sequencing
First let the engine cool. Then the various hoses, pipelines, and gas pedal cable are disconnected. Remove the air purification filter and the cover covering the valve mechanism.
Start with the first cylinder. Set the piston to the top dead position by rotating the crankshaft. The accuracy of the action is checked by matching the marks on the crankshaft belt drive with the mark on the engine block.
There is a sequence for adjusting valve clearances. First, the first, second, fourth, sixth valves are brought back to normal. Then rotate the crankshaft 360 degrees clockwise. The third, fifth, seventh, eighth are subject to adjustment.
It's done like this. Use a screwdriver to hold the control screw while unscrewing the nut, with which it is installed in the desired position. Measurements are taken using a feeler gauge of the required thickness. It should fit into the gap with little effort. The remaining valve clearances should be checked in a similar way.
Reassembly
When the eight cylinder valves of the 402 engine are “probed”, installation work begins to reassemble the power unit.
Install the spark plugs and set the engine ignition 402 in their places, securely fasten the valve cover. At the same time, do not forget to replace the old gasket with a new analogue. The bolts are tightened by matching the efforts with the regulatory instructions. They require the bolts to be tightened using a force equal to 0.5 Nm at a minimum and 0.8 at a maximum.
Then install the air filter, attach the accelerator cable and hoses.
Control check
When the work is completed, its quality is checked. The engine is started until completely warmed up. When the temperature regime of the engine cooler and cylinder operation reaches the required temperature parameters, the driver or service station mechanic listens to the operation of the power unit.
The absence of a clattering sound or metallic ringing indicates a high-quality adjustment of the suction and exhaust valves.
Important Features
Subsequently, the engine underwent some changes in the fuel supply system to the combustion chambers. Instead of a traditional carburetor, an injection circuit was used. The design update led to gasoline savings and improved fuel injection. The main positive point, according to motorists, is that the implementation of the injection circuit eliminated the problems that arose with the carburetor unit.
The rest was used from the old 402 engine. Nothing has changed in the operating standards of the power unit. The same technical specifications and maintenance standards remain the same. For example, the instructions for changing the filter oil remain in the same edition. It was prescribed to be changed after the car's ten-thousandth kilometer run. After 8 thousand it was necessary to change the spark plugs to new sets.
Conclusion
Drivers of vehicles equipped with 402 internal combustion engines, despite some shortcomings, positively characterize the power plant for its simplicity of design, easy maintenance, and long service life.
avtotehnar.ru
Adjusting the ignition system ZMZ 402 - Do-it-yourself repair
The operation of the engine, its efficiency and reliability directly depend on the correct settings of the ignition system. In this article we will look at the design and components of the ZMZ 402 ignition system, as well as the procedure for setting the ignition timing
Ignition system elements
One of the main systems necessary for a successful engine start is the ignition system. For gasoline engines, the fundamental design of ignition systems differs very slightly - there are two types: • Contact system • Contactless system
Source: https://24premier.ru/dvigatel/poryadok-raboty-cilindrov-402-dvigatelya-poryadok-raboty-cilindrov-402-dvigatelya.html
Ignition Installation on 402 Engine Alignment by Marks
Setting the ignition timing on ZMZ 402 GAZ, UAZ (contactless)
We set the ignition timing on the ZMZ 402 Volga, UAZ engine. (contactless)
There is no compression ZMZ-402 (UMZ-4216,4215, Evotech, timing mark) is one of the reasons.
Ignition on a 402 engine. We set the distributor drive.
We set the distributor drive correctly. Adjusting the ignition, video for people without car skills. It's simple.
IGNITION ON 402 ENGINE. WE INSTALL THE TRANSMBLER DRIVE.
A very simple procedure, watch and repair your car with your own hands. Set the ignition.
TDC setting
THE EASIEST INSTALLATION OF TDC using the example of the 402nd engine of a UAZ car.
Umz part 1 gas distribution mechanism
Umz part 1 gas distribution mechanism.
ZMZ-53, 511. Aligning the camshaft with marks – GAZ ROD Garage
Video on setting the camshaft of the ZMZ V8 line of engines according to factory marks. VK group: https://vk.com/gazrodgarage.
How to find the TDC of the 1st cylinder. The most accurate method to find top dead center.
My channels: “LifeHack & Experiment” – https://www.youtube.com/channel/UCLdeRnukfHeugr5nJSKoPwQ?sub_confirmation=1 “Korch & Custom”.
GAZELLE Replacement of camshaft gear 4216, 402
Detailed video tutorial on replacing the timing gear on a gazelle business without removing the pan, engine 4216, UMZ.
installation of distributor with drive
correct installation of a distributor with a drive on a UAZ vehicle.
Setting the ignition timing on the UAZ distributor sensor distributor
Setting the ignition timing on the UAZ distributor sensor using the starting handle (from the car.
Adjusting the ignition with a strobe light (how-to guide)
In this video I will tell you in detail how to adjust the ignition on a UMZ-421 carburetor engine, as well as.
Installing the camshaft with gear according to the marks on the Gazelle UAZ Volga 4215, 4216, 417, 402 engine
This video describes completely how to install and install the camshaft and camshaft gear on the engine.
TDC Top dead center and BDC in an internal combustion engine
What is TDC and BDC and how to put the pistons (crankshaft) in a safe position.
Installing timing belt without marks.
Installation of ignition by Bulb.
Another way to set the ignition on your favorite car. For those who are new to our channel, we also.
Replacing the timing gear. Displacement per tooth. UMZ 4216.
This is the second time I'm being towed due to a sheared timing gear. The gear only covered 34,000 km. We remove the front one.
GAZELLE - installing camshafts according to marks
New method with modification Engine repair https://www.youtube.com/watch?v=iGaudr3L_mY&list=PLm6qNJEyYV76Cyf8xLL34nCTgPD9nVHki. Repair .
Replacing the gear. Setting the ignition. UMZ 4216 engine
Ignition timing
Crimping tool for an auto electrician – https://got.by/3790cx Tired of a bunch of keys? – https://got.by/37926n Don’t ask for a light – https://got.by/37.
Gazelle engine repair business. Replacing the camshaft gear. Ignition installation.
We repaired a Gazelle business engine. In principle, the same “Ulyanovets”, but with an injector. Both pros and cons.
Timing timing phases - how to check and set TDC, marks. ZMZ 405 euro 2, euro 3
Here is a fresh video about timing marks and timing timing:
https://youtu.be/wBMMuWsiq1g
how to change the stove motor on a Gazelle.
Installation of ignition 406 car engine
The old man is a true master)))))))))))
how to set the ignition correctly on a GAZ 53
Ignition installation according to any requirement. cylinder (with plug)
Ignition installation according to any requirement. cylinder (with plug) –
Camshaft mark at the bottom at the top with the correct crankshaft mark Chance Sense
This video was processed in the YouTube Video Editor (https://www.youtube.com/editor)
timing marks 405,405 gazelle
Ideal phase
Ideal phase. In this video I will tell you how to set the ignition according to the marks. Subscribe to my channel https://www.youtube.
Distributor for ZMZ 402
Installation of the ignition distributor on the ZMZ 402 engine “on the knee”
ADJUSTING VALVES 402 MOTOR.
https://prom-city.com.ua/services/stogazele.html we regulate valves on a 402 engine in two strokes, video with work in real mode.
Detailed disassembly of the 402 engine (Volga) and determination of repairs
Contacts for communication. Emel VK https://vk.com/id511176354 Wallets if you want to thank for.
Lower timing chain marks 405 406 409 GAZelle Volga UAZ
donation for channel development: Yandex wallet 41001282828877.
Gazelle Timing marks 405-406 engine (Euro 3), camshaft phase sensor error
setting timing marks 406 Euro 3 engine.
Is the factory TDC mark correct on the 406 ZMZ engine?
Start here. https://www.youtube.com/AeXBn0-zhY8 Contacts for communication. Emel VK https://vk.com/id511176354 Wallets if .
How to set camshafts on a 406 engine.
We set the camshafts on the 406 engine. To do this, you must have a special protractor (available for free sale.
Adjusting the contact group of the VOLGA GAZ 24 distributor
Scheduled maintenance of the VOLGA GAZ-24 distributor.
How the camshaft gear knocks and stalls on a hot UMZ-4216.
YOU ARE CONFUSED. ICE 406-405
there is a mark on the 15th tooth.
more precisely between 15 and 16. link. train robbery. https://youtu.be/ND61lHotpss
.
Ignition for ZMZ-402 with Hall sensor
How to convert a 402 distributor for a Hall sensor and a VAZ 2108 switch.
Ignition adjustment. Tag matches.
Ignition installation. It is so simple
Dear subscribers I bow deeply to Sergei, aka KORSUN STUDIO, for his selfless help in the layout of mine.
ICE theory: How to set the timing belt without marks? (example on an 8 cl engine)
For those who want to support financially: https://secure.wayforpay.com/payment/sd220a7d8de75 OR .
Installation of injection pump OM 422
Installation of the injection pump (high pressure fuel pump) of the Mercedes-Benz OM 422 engine. It is installed in the same way.
Adjustment of engine valves ZMZ 402 (ZMZ 410, ZMZ 511, ZMZ 5233)
Setting timing marks ZMZ 406-409
Even installing a new timing belt does not mean that the engine will work well and correctly (especially.
GAS 53, REPLACEMENT OF BUCKET, ADJUSTMENT OF VALVES.
GAZ car - 53, there is no camshaft rotation, we are replacing the bakelite, and also adjusting the valves. Other
Camshaft position without marks how to find
The marks on the timing gear and the VALVE OVERLOOK moment do not match
My channels: “LifeHack & Experiment” – https://www.youtube.com/channel/UCLdeRnukfHeugr5nJSKoPwQ?sub_confirmation=1 “Korch & Custom”.
Installation of timing marks ZMZ 405-409 UAZ
Setting timing timing.
GAZ-3110 ICE 402-1. Replacing the crankshaft oil seal.
Communication, commercial inquiries: Channel assistance: PrivatBank 5168 7556 3188 1725, WMZ Z318291300563, WMU.