Replacing rear brake pads on a Chevrolet Lanos
Safety comes first.
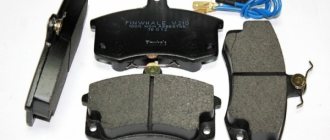
Motorists should drive with this motto. For Chevrolet Lanos, the rear brake pads are replaced if they have been damaged for several reasons. The choice of pads should be made carefully, and according to the catalog numbers given by the manufacturer. Video
The video will tell you how to change brake pads on a car.
Replacement process
To replace the rear brake pads of a Chevrolet Lanos, you need to prepare tools. For work you will need: a jack, a wheel wrench, pliers and a flat-head screwdriver. When everything is prepared, you can proceed directly to the process:
- Engage 1st or 3rd gear at the gearbox.
- Place wheel chocks under the front wheels.
- Raise the rear of the car, where the pad will be changed, using a jack.
- We dismantle the wheel.
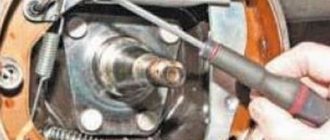
We remove the wheel. Using a chisel and hammer...
Remove the cap from the brake reservoir.
...press out the protective cap of the wheel bearing.
We dismantle the top cover of the brake drum.
Use a screwdriver to straighten the cotter pin...
We move the working piston inward and fix it in this position.
...and use pliers to remove it from the trunnion hole.
We squeeze the sliding parking brake levers inward.
Using a 24mm socket, unscrew the castle nut of the hub bearing.
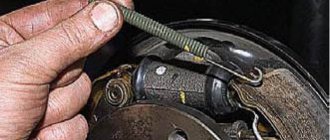
Compress the spring and unhook the handbrake cable.
Remove the lock washer. Before removing the brake drum, lower the parking brake lever all the way - the car must be released.
Turn the pressure spring a quarter. In this case, it is worth holding the support stand.
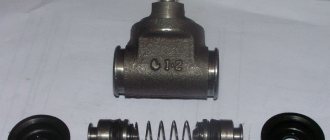
Remove the brake drum assembly with bearing. Do not press the brake pedal after removing the brake drum, as the pistons may come completely out of the wheel cylinder. We clean the brake mechanism parts from dirt. Do not use gasoline or diesel fuel to clean brake parts.
Now, you can remove the cup, spring and support post.
Remove the brake drum assembly with bearing. Do not press the brake pedal after removing the brake drum, as the pistons may come completely out of the wheel cylinder. We clean the brake mechanism parts from dirt. Do not use gasoline or diesel fuel to clean brake parts.
All operations described below must be done with the second block in the same drum.
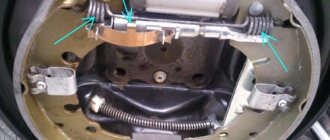
Using a screwdriver, disconnect the front end of the upper tension spring from the lash adjuster lever earring and remove the spring. We move the upper stops of the brake pads away from the pistons of the wheel cylinder.
By stretching the upper spring, we remove the pads from the slots.
Remove the shackle of the clearance adjuster lever.
Now, stretch the lower spring and remove the pads from the restrictor plate.
Remove the slack adjuster lever along with the spring.
Next, we dismantle the pads along with the springs.
Remove the spacer bar assembly.
We unhook the springs from the pads, first the upper one, and then the lower one.
Please note that the ratchet nut of the spacer bar, the shackle and the adjuster lever of the right brake mechanism are silver, and the left mechanism is black. The threaded tip of the spacer bar is marked: RH - for the right mechanism; LH - for the left mechanism. Before installing new pads, it is necessary to reduce the length of the spacer bar by screwing the ratchet nut all the way onto the threaded end. After installing the brake drum, tighten the rear wheel bearing nut and adjust the bearings. Adjust the position of the brake pads. To do this, press the brake pedal 10–15 times.
- If necessary, add fluid to the brake reservoir.
- Wear of the friction part. It can only be seen if you take the drum apart. According to the manufacturer's recommendations, the friction part should not be less than 2 mm.
- If brake fluid gets on the linings, it also leads to replacing the pads.
- The friction part is cracked, chipped or chipped. This indicates that the pad needs to be replaced.
Before using the handbrake, right in the garage, it must be gently pulled and released several times. This will help the new pads adjust.
Causes of malfunction
The causes of rear brake pad failure are no different from the front ones. But it’s worth dwelling on them to know them:
All these reasons become decisive in the decision to replace the rear brake pads.
Pad selection
The choice of rear brake pads for Lanos should be approached carefully, because not only braking while driving, but also how the parking brake will work depends on them.
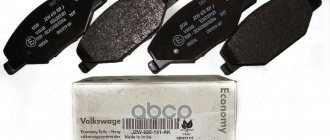
96226110 – this is the original catalog number of the Chevrolet Lanos rear brake pads. The average cost in the Russian Federation is 2000 per set.
There are quite a lot of manufacturers that produce analogues, but we will consider only those that, based on experience, are installed by car owners.
| Manufacturer's name | vendor code | Average price in rubles in the Russian Federation |
| Denckermann | B120077 | 1000 |
| Pilenga | BS-P 8835 | 1500 |
| Mando | MLD04 | 1500 |
| Koreastar | KBSD-003 | 1500 |
| NiBK | FN11622 | 1500 |
| Jurid/Bendix | 362218J | 1800 |
| TRW | GS8543 | 1800 |
| Delphi | LS1622 | 1800 |
| Brembo | S 59 513 | 1800 |
| Goodwill | 2115 RB | 2000 |
| Nipparts | J3500900 | 2000 |
| Valeo | 562078 | 2000 |
| Textar | 91044900 | 2000 |
| Blue Print | ADG04116 | 2000 |
| Ferodo | FSB4017 | 2000 |
| Sangsin | SA055-N | 3000 |
All the manufacturers presented in the table produce high-quality spare parts that fit perfectly into the standard Lanos seats.
Tuning
Many car enthusiasts want to improve the rear brake; to do this, they replace the standard drums with ventilated disc brakes. This operation is done quite simply, but in frequent cases, the hub needs to be replaced.
The old rear drums are thrown out and replaced with brake discs, calipers and front pads. This significantly improves the car's braking. These and Sparko offer a full set of rear ventilated brake discs.
As practice shows, disc brakes are 30% more efficient in use, and replacement is carried out in the same way as front brakes. In this case, you do not need to buy separate pads for the rear and front parts. It is enough to buy 4 sets of front pads (each set contains 2 pads).
Conclusion
Replacing the rear brake pads of a Chevrolet Lanos is a little more difficult than replacing the front ones. But at the same time, it is more than possible to change the elements yourself. Particular attention should be paid to the choice of pads, because braking efficiency depends on them.
Pad selection
The choice of rear brake pads for Lanos should be approached carefully, because not only braking while driving, but also how the parking brake will work depends on them.
96226110 – this is the original catalog number of the Chevrolet Lanos rear brake pads. The average cost in the Russian Federation is 2000 per set.
There are quite a lot of manufacturers that produce analogues, but we will consider only those that, based on experience, are installed by car owners.
| Manufacturer's name | vendor code | Average price in rubles in the Russian Federation |
| Denckermann | B120077 | 1000 |
| Pilenga | BS-P 8835 | 1500 |
| Mando | MLD04 | 1500 |
| Koreastar | KBSD-003 | 1500 |
| NiBK | FN11622 | 1500 |
| Jurid/Bendix | 362218J | 1800 |
| TRW | GS8543 | 1800 |
| Delphi | LS1622 | 1800 |
| Brembo | S 59 513 | 1800 |
| Goodwill | 2115 RB | 2000 |
| Nipparts | J3500900 | 2000 |
| Valeo | 562078 | 2000 |
| Textar | 91044900 | 2000 |
| Blue Print | ADG04116 | 2000 |
| Ferodo | FSB4017 | 2000 |
| Sangsin | SA055-N | 3000 |
All the manufacturers presented in the table produce high-quality spare parts that fit perfectly into the standard Lanos seats.
Chevrolet Lanos Manual
Replacing brake pads on the rear wheels of a Chevrolet Lanos
We replace the pads in case of maximum permissible wear of their linings or the rear wheel brake drum. The pads also need to be replaced if the linings are oily, have deep grooves and chips on them, or if the linings are detached from the base of the pads. The minimum permissible thickness of the overlays is 0.5 mm. The maximum permissible inner diameter of the drum is 201 mm. The brake pads of the rear wheels must be replaced only as a set - all four pads. Replacing the pads of only one brake mechanism can lead to the car pulling to the side when braking. We show replacing the pads on the left rear wheel. The brake pads of the right rear wheel are replaced in the same way. We remove the wheel.
Using a chisel and hammer...
...press out the protective cap of the wheel bearing.
Use a screwdriver to straighten the cotter pin...
...and use pliers to remove it from the trunnion hole.
Using a 24mm socket, unscrew the castle nut of the hub bearing.
Remove the lock washer. Before removing the brake drum, lower the parking brake lever all the way - the car must be released.
Remove the brake drum assembly with bearing.
Do not press the brake pedal after removing the brake drum, as the pistons may come completely out of the wheel cylinder.
We clean the brake mechanism parts from dirt.
Do not use gasoline or diesel fuel to clean brake parts.
Using a screwdriver, disconnect the front end of the upper tension spring from the lash adjuster lever earring and remove the spring. We move the upper stops of the brake pads away from the pistons of the wheel cylinder.
Remove the shackle of the clearance adjuster lever.
Remove the slack adjuster lever along with the spring.
Remove the spacer bar assembly.
Using pliers, turn the spring cup of the block support post until the groove in the cup aligns with the shank of the strut.
Remove the cup with the spring and remove the support post from the hole in the brake mechanism shield.
We disconnect the tip of the parking brake cable from the drive lever and, having disconnected the end of the lower tension spring from the block, remove the rear block with the lever assembly. Remove the lower tension spring. We remove the cup with the spring of the front pad support strut in the same way as the rear one...
...and remove the front block. We check the technical condition of the parts and clean them.
If a collar has formed on the inner diameter of the brake drum... ...remove it with a scraper.
Using a caliper we measure the internal diameter of the brake drum, the value of which should not be more than 201 mm. Before installing new pads, clean the threads of the tip of the spacer bar and ratchet nut and apply a thin layer of grease to the threads. Install new rear wheel brake pads in reverse order. Note…
...that the spacer bar ratchet nut, shackle and adjuster lever for the right brake mechanism are silver, and the left brake mechanism is black. The threaded tip of the spacer bar is marked: RH - for the right mechanism; LH - for the left mechanism. Before installing new pads, it is necessary to reduce the length of the spacer bar by screwing the ratchet nut all the way onto the threaded end. This must be done in order to install the brake drum. After installing the brake drum, tighten the rear wheel bearing nut and adjust the bearings (see Adjusting the rear wheel bearings of a Chevrolet Lanos). Adjust the position of the brake pads. To do this, press the brake pedal 10–15 times. In this case, clicks will be heard in the brake mechanisms of the rear wheels from the operation of the mechanism for automatically adjusting the gaps between the pads and brake drums. When the clicking stops, the adjustment is complete. We adjust the parking brake (see Adjusting the parking brake of a Chevrolet Lanos). We check the ease of rotation of the suspended wheels with the parking brake lever fully lowered. We check the fluid level in the tank and, if necessary, bring it up to normal.
Diagnostics of the brake system on ZAZ Lanos
Improper operation of the brakes immediately makes itself felt. The consequences of a faulty brake system are:
- Extraneous noise from wheels when squeezing the brakes at speed
- Inadequate response of the brake system to brake pedal efforts
In addition, periodically you need to visually inspect the brake calipers and discs for excessive wear. Most often, brake pads wear out; changing them will be discussed in this review.
TIP: It is best to change brake pads on all calipers that use a pad system.
As a rule, a planned change of brake pads on a ZAZ Lanos 1.5/1.6 should be carried out at intervals of at least 40 thousand km.
Chevrolet Lanos Good bye may love › Logbook › Replacing rear brake pads
Hello to all readers of my blog!
It turns out that I changed the ignition coil, the car didn’t start for a week and a half, and all this time it was parked on the handbrake. Have you already understood what happened?)))) Yes, that’s right)))) The pads at the back stuck/stuck/attached/something else to the drums))) I discovered this when I was getting ready for work in the morning. So, I start the car, wait until it warms up a little, stick the rear pedal in, lower the handbrake and... And nothing)))) I only managed to drag the car 25-30 centimeters. I walked to work and bought new pads on the way back.
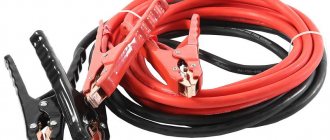
It also so happened that my nephew needed to tighten the pedals on his bicycle, and a suitable bit was found in my set of sockets and other things. Well, I “On small, cool!” And this is where I needed my kit. And the little one drove off to the dacha... Okay, I bought another 24mm head and a knob from the store
Why a wrench for 300 rubles, and not just a ratchet wrench for 140? The salesman at the store assured me that I would screw the hub nut just like that. The most massive thing in stock was the wrench... Having returned home, putting on shorts and flip-flops, taking with me a bunch of screwdrivers, a hammer, a piece of wood and what I had recently bought, I went to the car. Why a tablet? Well, on the Internet I found several ways to break the pads: 1) Try to go first and then back, maybe it will break 2) Remove the wheel, tap the drum with a hammer through a piece of wood, maybe it will come off 3) Warm it up with a soldering iron 4) Put people in the back seat and try get started The first - it was not possible, the second - that's what the board is for, I forgot about the soldering iron, people all disappeared somewhere
Well, to the point: how it was
The process of replacing the pads is presented quite well and in detail in this video (probably every Lanos/Chance/Sensovod has already seen it))))
But you shouldn’t forget any instructions like this one. I advise you to immediately buy new cotter pins that hold the nut - I took 5 rubles apiece from a VAZ-2101. Having reached the nut, remembering the words of the salesman from the store, I was ready to put all my strength on the knob, but I didn’t have time - the nut unscrewed without strain)))) Having taken out the washer and bearing, in attempts to remove the drum, I was stunned: it didn’t filmed. I started hitting it with a hammer through a piece of wood - nothing. I tapped it with a hammer from the back side - the top came off, but the bottom did not. In a fit of thought processes, the ass came up with a brilliant idea: attach a wheel and tug it))) We fasten it with 2 bolts and shake it so that it can be felt in the capital of our Motherland. BUT! We don’t get carried away so that the car doesn’t fall off the jack)))) Having removed the drum, the following picture appeared before me (which was very useful to me in the future)
I did it as in the instructions in the video. Having removed the pressure springs and hitting something, everything scattered in different directions (((I had to put it back together using a photo I had taken earlier. And everything seemed clear, but... I couldn’t install the thrust bar... I tried everything, tried for about 40 minutes to understand - I couldn’t( ((And the laptop with the open mana, as if out of spite, sat down(((( He spat, collected the drum and went home. The next day, after reading, I installed it in 5 minutes. I went to another wheel - there I changed the pads in half an hour following the instructions NOT according to video. Now the most interesting part: 1) Point 24 of the instructions reads: "24. Adjust the gap between the brake pads and the drum by pressing the brake pedal 10-15 times. With each press, you should hear a click from the adjuster. If the clicks stop, the gap is set." I pressed and pressed the brake pedal - silence. I went and looked - the thrust bar was in place. I put it back. I went to press it again - silence... I pressed harder - I heard clicks, I was happy)))) And again the bar fell off, in a tricky position)) ) Something was clicking, but it wasn’t doing any good))) In the end, having gathered my strength and spirit, I brought the whole thing together to a seemingly working state. Having put the car on the handbrake, it rolled away... I looked at how to tighten the handbrake - tighten the nut all the way, the handbrake all the way up - oh, the car is standing. I thought about trying to go for a ride, but it’s kind of boring, I didn’t dare. Today I signed up for a debriefing service and arrived. The master quickly disassembled the drum, asked me again about the clicks, and began to set the gap. He twisted and twisted the nut, put on the drum - grinding, take two. He did something to the drum with a grinder, put it back in place, and decided that everything was good. He filled the litola, spun everything and went to the second reel.
Having unscrewed the nut, taken out the thrust washer and bearing... the latter fell apart... And a terrible rain and thunderstorm began outside... I, of course, am an ardent lover of thunderstorms, but I am more inclined to watch than to run under it. There is no choice - on the way to the store... I run to the first one - no. Nothing even like it... I get ready before the second - the rain subsides and stops altogether. I dig around and buy a set of wheel bearings + a bag of lubricant + an oil seal for 240 rubles and kopecks.
The fact that the bearing fell apart is even better. Even in winter, it began to hum madly at a speed of 50 km/h and with increasing speed the volume of the hum increased. Then it seemed to stop. Then he started again, but either I was already used to it, or he did it very quietly. I was going to change it, but then it coincided - I won’t have to pay twice to remove the drum. Well, so, the old one was pressed out, the new one was pressed in, generously smeared with lithol, assembled, and rolled))))
First impressions: the handbrake needs to be loosened, because when standing still, when you try to move, the car’s ass sags, the face rises, and the car stands still. Give it a little gas and we're off, but the speed is not the same as it was before. I was driving and heard a knock on the right - I went back to the service center. I approached the master, I said, he knocks. He replied that this was normal and the pad would wear in. What about the handbrake? Slightly unscrew the nut that regulates the tension of the handbrake.
How to replace rear brake pads on a Chevrolet Lanos
When a car requires repairs, it is always expensive. Therefore, many car enthusiasts try to figure out the problem on their own first. This requires special knowledge, and skills will not hurt at all. Never do anything at random. Please read the main rules thoroughly.
No brakes anywhere
Undoubtedly, driving without brake pads is quite dangerous and difficult. There are several reasons when you should immediately replace your brake pads.
- If your brake pad lining has broken. This can happen anywhere, even on the road. In such a situation, the rear wheels may jam a little while driving or completely jam, and the car will no longer move.
- When the rear brake pad lining has worn out. If the thickness is less than 1.5 mm, then it can no longer be used. This is difficult to find out, since the provided hole in the support disk is not very conveniently located, and its parameters do not provide a 100% guarantee of correct measurement. Therefore, most drivers monitor the sound to know when the Chevrolet Lanos rear brake pads need to be replaced. It's easy to recognize when you start to slow down. If wear is observed, a specific sound will be heard from the rear axle as metal rubs against metal. This indicates that an urgent replacement is needed.
- If the pads are contaminated with brake fluid or lubricants. But many may disagree with this. At the same time, you don’t want to replace the pads due to a faulty brake cylinder. So, when working with pads, do not forget to check the general condition of the brake cylinder using simple manipulations.
Repair features
So, we have decided on the problem. Now let’s figure out how to replace the rear brake pads of a Chevrolet Lanos with your own hands. You don't even have to go to a service station for this.
- Before starting, treat the parking brake cable tension nut with the universal product VD-40. Let a little time pass, and then you can start unscrewing.
- Next, you need to loosen the wheel bolts and remove the wheel after installing the jack. Then remove the hub cap and remove the cotter pin.
- Removing the drum is quite inconvenient due to internal wear. This problem can be solved with a hammer and light blows on the drum. It is important to remember all the locations of small parts so that there are no unnecessary ones left later.
- Using a hook or pliers, remove the upper tension spring. Behind it is a flag and its spring. To make it easier for you to remove all other parts, you can simply press the release spring washer and turn it so that the slot in the washer coincides with the tail of the strut.
- Before starting the replacement, you need to clean and process the threads on the adjustable strips. Do not confuse their sides under any circumstances. The same goes for checkboxes. Use a knife or brush to remove dirt from the support disk. Next, you should treat with a special lubricant the places where the pads touch the disc.
- We attach the handbrake cable to the lever on the brake shoe. Using a spring, we put the block in place. The second one changes according to the same principle. After this, the adjustable bar, earring and flag are installed.
- We tighten it with a tension spring at the top. After this, it’s easy to figure out how to install the bottom.
- Attach the drum, adjust the handbrake bar and tension. We put the wheel in place.
That's all. Now you can enjoy good brakes and not worry about your wheels getting stuck on the road. Regardless of the configuration of the Chevrolet Lanos, the replacement is carried out in the same way. The good news is that you can buy brake pads for this model at any car store.
Replacement tool
On Lanos, pads can be replaced directly on the ground, without jacking up the car.
- Screwdrivers (flat and Phillips).
- Pliers.
- Metal brush.
- Hammer.
- The key is "24".
- Wrench for removing the handbrake tension nut.
- WD-40.
Rear brake pad replacement process
- Unscrew the nut that secures the parking brake cable.
- Unscrew the wheel bolts.
- Remove the wheel.
- Unscrew the hub nut.
- Remove the drum. Here it may be necessary to drill out the mounting bolts, since they are often welded during operation.
We dismantle the brake drum.
We got to the blocks.
After the initial inspection, we dismantle the pads with a screwdriver.
When inspecting the brake drum, grooves were found; it is better to replace it.
The rear pads are in place. Let's go get the drum.
We put the drum back.
At this point, the work of replacing the rear brake pads on a Chevrolet Lanos can be considered complete.
Articles
This company has earned a good reputation!
In this case, it is recommended to purchase the HI-Q set.
It is affordable. You can buy it at any spare parts store or market. But it is also important to pay attention to small details that may be useful when replacing pads.
Article number for finding brake pads - 2736540 .
Cotter pins for the rear wheel brake mechanism.
These are springs, strips, flags and others. It is not necessary to replace them every time the pads are replaced, but you need to check the condition. If such parts are worn out, then they should be replaced with new ones. It is recommended to buy branded kits.
Chevrolet Lanos rear pads and their replacement
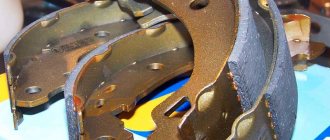
The rear pads of a Chevrolet Lanos are directly responsible for how well the car will brake. Pad wear plays a huge role during emergency braking. If during a smooth stop the difference is small, then in the case when you need to stop quickly, the braking force is colossally lacking! From this we can only draw one conclusion - you need to change your brake pads on time!
Replacing the rear pads of a Chevrolet Lanos should be carried out when:
- Chips and grooves appeared on the linings.
- The friction lining does not fit tightly to the base.
- The thickness of the friction lining has been reduced to 0.5 millimeters or lower.
- Oil stains appeared on the surface of the lining.