Pneumatic tires on car wheels appeared in 1895. Tires with tubes have been used for a long time. At the end of the 20th century, tubeless tires, which have a number of advantages, became widespread. Currently, manufacturers install just such tires on the wheels of their cars.
Modern automobile tires have high strength and a number of other positive qualities that increase the stability and controllability of the car on the road. However, as a result of wear or puncture, they become unusable and then tire repair is needed.
Design features
The technology for restoring tires depends on the design features of the tires. They differ in many ways, but the main differences are as follows:
- tires, inside of which a car rubber tube is placed;
- tires without a rubber tube inside, this design is both a tire and a tube.
In addition, tires are distinguished:
- cars,
- trucks,
- tractors and special equipment.
Tires are also divided into:
- radial and diagonal;
- winter, summer and all-season;
- wide-profile and low-profile;
- road, cross-country, universal and quarry.
How to use the set
Repairing tubeless tires yourself will allow you to save on services. Removing a nail from a wheel and sealing the resulting fistula is not difficult. It is advisable to watch a video of the work being carried out, which will allow you to get an idea of all stages of the repair. What are the stages of self-repair of a tire?
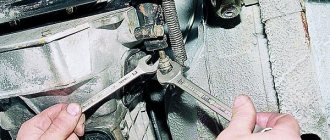
One of the first tasks is to completely remove the sharp object from the rubber of the wheel. This can be done using ordinary wire cutters. The repair kit does not have such a tool, but every driver can definitely find one in his garage. Why pull out the nail? Completing this stage of work will allow you to simplify subsequent repairs using a rasp and applying a tourniquet to the puncture site.
To eliminate the puncture site, you need to insert a tourniquet on which glue is applied. To do this, you need to prepare a hole in the rubber. Before removing a metal object from the tire, prepare a rasp. Apply glue from a tube to the metal pin of the tool. Only after this can you begin to remove the nail or screw.
One of the important points is the sequence of actions. As soon as you pull out the nail, you need to immediately insert the rasp, which is included in the repair kit, into the resulting hole. This is necessary for the tire to go flat.
After installing the tool on which the glue was applied, it is necessary to develop a hole. After watching a few videos, you will be able to understand the best way to do this. The ribbed surface of the metal base of the tool smoothes the edges of the hole in the rubber. How is tire integrity restored? The harness on which the glue is applied is securely fixed to the rubber of the wheel, which leads to sealing of the puncture. The videos will allow you to clearly see the process of sealing a tire puncture with a tourniquet.
To seal your tires you need:
- Pass the special harness included in the tool kit through the hole in the awl. This is easy to do because the material of the tourniquet is soft.
- Apply glue to the harness.
- After preparation, remove the rasp and insert a tourniquet into the puncture site. Pull the awl so that the material fills the entire volume of the hole.
- Pull the awl out of the tire slowly, while the tourniquet remains in place.
After completing all these steps, you will secure the special material to the tire. The tourniquet is securely fixed with glue to the inner cavity of the puncture. After this, you just need to cut off the excess material with a knife. In the video provided you will see how to correctly install the tourniquet and remove the awl from the rubber.
Peculiarities
It is advisable for every driver to have in his arsenal a special kit for repairing tires in case of a puncture. Due to their ease of use and low price, these sets have proven themselves well on the market. The kit is designed to work in various conditions.
The advantages of using such a kit are quick and high-quality repairs of tires with your own hands. This kit can be used both in the garage and in emergency situations when a tire gets punctured on the road. Practical use of this method has shown that it takes approximately 10–15 minutes to complete the entire job. After this, the wheel can be inflated with air to the desired pressure.
Despite the sufficient reliability of this repair method, we recommend, if possible, disassembling the wheel in order to apply a patch. Such repairs can be carried out at every tire station. This repair method is considered more reliable.
Tire retreading
Repairs on the road
If the failure of tires is not associated with increased tire wear, then damage to tires on cars mainly occurs due to punctures and cuts. Less commonly, due to manufacturing defects, a “hernia”—a swelling in the side of the tire—may form.
Most often, car tire repair is done in special auto repair shops, which have a common name - “tire fitting”.
However, there are situations in which repairs are only possible with your own hands. This is especially true for drivers making long intercity trips.
Experts recommend that car owners always keep a kit for repairing tubeless tires in the trunk, which, in addition to tools, includes special glue and harnesses.
This kit allows you to quickly repair tubeless tires on the track with your own hands, with the exception of a severe side cut or repair of a hernia on the wheel. In addition, the practice of operating cars over long distances suggests that when traveling intercity, especially in deserted areas, it is good to have one, or even better, two cameras of the required size.
There are situations when the kit does not save you and there is no other option but to re-flare the tires on your wheels yourself, installing tubes in them.
Tire repair
The technology for restoring car tires from a puncture or side cut in a tire shop has long been developed and can be done in different ways, among which the most famous are:
- express repair;
- one-step method with hot vulcanization of the patch;
- two-stage - with cold vulcanization of the plaster;
- repair of hot vulcanization chambers.
A tire cannot be repaired if:
- it has severe damage beyond acceptable parameters;
- cord threads are visible, and they are torn or otherwise deformed;
- there are cracks on the tread or side part up to the cord;
- There is noticeable wear on the side down to the cord.
You can repair a tire with your own hands; the technology for this process has also been proven.
Puncture or small cut - we repair it ourselves
In order to repair a puncture or side cut no larger than 3 mm, you need a special kit for repairing tubeless tires. If such a kit is not at hand, then you can get by with special glue and strands.
- Before you begin repairing a tire side cut or puncture, you must bleed the air from the wheel.
- Determine the location and nature of the cut or puncture and remove the foreign object from the hole.
- Take an awl from the kit to prepare the hole. Apply glue from the same kit to it.
- Rotating as the clock progresses, insert it into the puncture hole with a smooth movement.
- The tool must enter with force into a puncture or side cut of the tire. You also need to remove it by rotating in the same direction. Repeat entry and exit several times, ensuring that the glue covers the inner surface of the cut or puncture.
- Before installing the harnesses, leave the awl in the damaged area so that the glue is able to secure the harness well.
- Remove the protective film from the harness to the length required for routine repair of the tubeless tire. Place the end without film into the insertion awl, making a short end 20 mm long. Apply glue to the awl and the harness at the junction.
- Rotating, pull the spiral awl out of the hole and, without allowing the walls to close, quickly insert a tourniquet lubricated with glue into it, not allowing the short end to fall into the hole. Its edge should be fixed at the level of the tread.
- Yank the opening awl from the area being repaired and evaluate the tightness of the repaired damage. To do this, inflate the tire. After checking, cut off the long protruding end of the harness, leaving two millimeters above the tread.
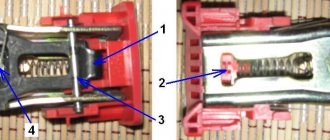
As an illustration of the correct installation of the harness, you can consider this diagram:
Large tire cut on the side
To repair side cuts of tires, an extended kit is usually used, which contains various tools, patches, glue and various chemicals for treating the damaged area of the tire.
- If urgent temporary repair of damage is required, then repair of side cuts larger than six millimeters in an emergency situation can be done without a patch using several strands on which glue is generously applied.
- For major repairs, the wheel must be removed and the tires removed. Cut the edges of the damaged area with pliers, clean it with a drill and treat it with special cement.
- Cut raw rubber into thin strips and stretch. Then place it inside the side cut of the tire.
- The next step is vulcanization.
- After vulcanization, markings are made for installing the patch, this area is cleaned, degreased and lubricated with cement from the repair kit.
- After the cement has dried, a reinforced patch is applied, onto which glue is applied. The edges of the patch are treated with sealant.
- The patch is pressed in a vice for 1–2 hours.
Instructions for the tire repair kit
One of the problems that can take a driver by surprise is a tire puncture on the road. Such unpleasant moments can be created by an ordinary small nail or self-tapping screw that can pierce tires. What to do in this case? You shouldn’t immediately look for a service station or buy new tires. You can easily repair your wheel yourself using a tubeless tire repair kit.
Having a special set of tools and supplies in your trunk will save you time and money. The tubeless tire repair kit is easy to use, so you don't even need to have hands-on experience repairing your vehicle. The repair kit contains all the necessary elements needed for quick and high-quality wheel repair. The small set can easily fit into your glove compartment or trunk, allowing you to use it if necessary even on the road. On the Internet you can find various videos about what this set of tools is and how to use it.
Repair with sealant
You can seal a tubeless tube puncture or repair side cuts on your tires using an aerosol sealant. To do this, you need to jack up the wheel and pump sealant from a can into the nipple.
Spin the wheel several times so that the substance spreads throughout the inside of the tire. Remove the jack and drive three hundred meters. After this, check the tightness of the damaged tubeless tube.
We recommend watching videos on the topic:
Related publications:
- Alloy wheels - polishing yourself
- We repair alloy wheels ourselves
- How to paint car rims with your own hands?
Technology and features of car tire repair
Pneumatic tires on car wheels appeared in 1895. Tires with tubes have been used for a long time. At the end of the 20th century, tubeless tires, which have a number of advantages, became widespread. Currently, manufacturers install just such tires on the wheels of their cars. Modern automobile tires have high strength and a number of other positive qualities that increase the stability and controllability of the car on the road. However, as a result of wear or puncture, they become unusable and then tire repair is needed.
How to determine the type of tire and puncture location
Tubeless tires can be repaired using the method described below. You can determine what type of tires are installed on your car by the shape of the nipple. Structurally, in products with a chamber, the nipple has the shape of a cone or cylinder. Tubeless tires are equipped with a nipple, the base of which has a rubber seal with a small side so that air does not escape from the wheel.
It is possible to check the presence of a camera in the wheel by pressing the spool inward; if this procedure can be completed, there is a camera inside the product.
It can be difficult to determine the puncture site of a tubeless tire: air escapes slowly through the hole formed. A soap solution will help determine where exactly the tire is damaged. To make it, dilute any foaming product in a small amount of water. Then apply the soap solution to the surface of the tire; bubbles will form where the air leaks.
There are situations when, after treating the surface of a tire, the puncture site is not found: bubbles do not appear anywhere. Apply a soapy solution around the nipple and along the rim where the tire meets the rim. Causes of air leakage:
- lack of tightness at the points of contact between the side of the disc and the tires;
- spool is damaged;
- mechanical damage to tires.
We recommend watching a video about repairing tires with a harness: