Liquid rubber for cars, plastidip (from Plasti DipTM), liquid vinyl, rubber paint - these are all names for a special coating that is an alternative to traditional car enamels and vinyl films. And, as usual, simultaneously with the appearance of liquid rubber for car painting on our market, many disputes and discussions arose.
Some car enthusiasts believe that it is not worth spending money on painting a car with liquid rubber, since such a coating flies around very quickly, and the cost of work and materials is not at all small. To which their opponents claim that liquid rubber, if the application technology is followed, on the contrary, is a very durable thing, and that people even apply it to wheels.
Below we have put together all the information about liquid rubber for cars, the pros and cons of such a coating, described the painting technology, and also added an interesting video with reviews from car owners after six months of using a car coated with rubber paint.
For those readers who are new to our website, the following materials may be of interest:
- Instructions for painting a car yourself;
- Do-it-yourself car wrapping;
- Automotive paint codes and colors.
Now let's find out what exactly liquid rubber is and what properties and characteristics it has.
What is liquid rubber?
First of all, it’s worth understanding what liquid rubber is. Many hobbyists want to change their car, but without radically repainting it. For this purpose, they came up with vinyl and other methods of quick transformation. One of these is liquid rubber paint. We are talking specifically about rubber-based paint. This structure makes it easy to apply it to the surface, as well as easily remove it, if necessary.
Liquid rubber for cars
This type of coating is used as protection and to quickly change the style and color of a car. The rubber in the composition ensures long-term operation compared to film. Rubber paint is used for cars when completely repainting and changing some parts.
Depending on the application method, you should buy in aerosols and canisters. The price fluctuates depending on the manufacturer and quality.
The colors that liquid vinyl offers do not represent a wide range; there are 6 popular varieties:
- Neon (advantage of an unusually bright color).
- Metallic (impeccable style).
- Chameleon (the color scheme changes depending on the point of view).
- Mother of pearl (shine and play of colors).
- Transparent (the coating does not hide the factory color of the car).
- Thermal (color changes depending on temperature).
We apply varnish. Transition “over varnish”
Before applying the varnish, be sure to use an antistatic wipe to remove any spray that could (and probably did) get into the transition zone of the varnish during the application of the base. If this is not done, the notorious border may form during further polishing of the transition zone.
After making sure that the base enamel has dried sufficiently (15-20 minutes at 20°C), you can begin to apply the varnish.
If the part is completely varnished, we work according to the standard scheme: we apply MS varnish in two full layers, HS in one and a half layers. Working with varnishes is described in more detail here.
But we need to make a smooth transition, which means the varnish must be applied in a special way: with a smooth release and gradual reduction of the varnish film to “nothing.” Again, you should avoid applying the varnish in one thick border, since it will then be problematic to “blur” (especially on highly filled varnishes).
Therefore, we work as follows: we apply the first layer of varnish (prepared in a standard proportion) only to the area of painting, with a small margin, and after curing we apply the second - slightly expanding the area of application. In this case, the second layer must be smoothly “torn off” at the beginning of the zone that we matted for the transition with copper Scotch-Brite, in no case reaching the edge of the prepared surface.
When applying varnish, be careful not to reach the edge of the matted surface. There should always be some space left to make the transition!
Reducing the varnish film to nothing. Turn the hand to loosen the trigger
After the standard one and a half to two “covering” layers of varnish have been applied, we will form the transition itself on the resulting dust and the remainder of the matted surface. A special miracle material will help us with this - transition solvent. Its task is to “blur” and make invisible the transition boundary between the old and new coating.
To do this, a strictly defined quantity of transition solvent is added to the working varnish mixture, the mixture is thoroughly mixed and applied to the transition zone. This is usually done in two stages: we apply the first layer, and after a short exposure (literally 1-2 minutes) - the second, expanding the application area and almost reaching the matting border.
Remember that the viscosity of the resulting mixture will be much lower than the viscosity of regular varnish, so you need to apply it carefully, in a thin layer, to avoid smudges. In fact, the transition is already almost complete
If the edge of the varnish is not blurred well enough, some manufacturers recommend increasing the amount of thinner and repeating the “blurring” of the border. Others recommend using pure transition thinner for this purpose. Here you can see the instructions
In fact, the transition is almost complete. If the edge of the varnish is not blurred well enough, some manufacturers recommend increasing the amount of thinner and repeating the “blurring” of the border. Others recommend using pure transition thinner for this purpose. Here you can see the instructions.
If you use a solvent in its pure form, you need to apply it very carefully, in 1 or 2 thin layers with an exposure of 15-30 seconds, and strictly on the border of the old and new paintwork, on the area of dry dust formed from the previous stage.
All operations to perform the transition must be carried out strictly within the matted surface, and even the solvent itself must not come into contact with the gloss!
The transition has been completed, but here's the problem: there is a small deposit left at the border of the repair. You can eliminate it and thereby make the fact of repair completely unnoticeable using a polishing machine and paste or even manually (literally a few circular movements with a napkin with polish). Naturally, this can only be done after the varnish has completely dried.
Polishing under-dried varnish will lead to stretching the boundaries of the repair, and all our efforts will be “naked.”
Remember that at 20°C most varnishes cannot be polished until after 24 hours. So you will have to either wait or resort to artificial drying (IR lamps or heating in a chamber). Or, when painting locally, use a quick-drying varnish.
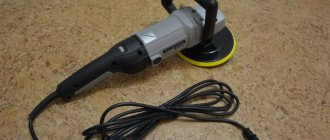
It is undesirable to use sandpaper when polishing the repair area: for this, the layer of material at the boundary is too thin and its grinding can lead to the appearance of the repair boundary. Therefore, try to use only abrasive paste. For polishing, you can use an orange 3M wheel, and polish at low speeds without overheating the surface.
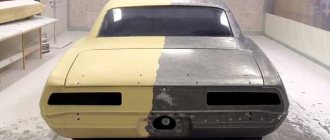
Liquid rubber for cars: pros and cons of painting a car with the substance
Of course, the main advantage of covering a car with liquid paint is its protective effect. Vinyl is significantly inferior; liquid film for cars not only hides some defects, but also prevents the formation of cracks, scratches and other damage.
The main advantage of covering a car with liquid paint is its protective effect.
The undoubted advantages include the following properties:
- Creates a protective layer, the paintwork remains intact.
- It has several texture solutions, creating a matte or glossy effect.
- Can be used on the entire body or on individual parts.
- High waterproofness and elasticity.
- Shows resistance to ultraviolet radiation.
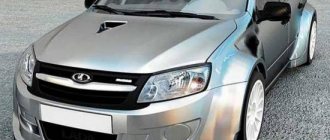
- Gives the car impeccable style and status.
- Painting with liquid vinyl is applied to hard-to-reach areas. For example, a tire will look like new after painting.
- There is no need for additional requirements, the complete technology is much simpler.
There are also disadvantages. The main disadvantage is that the service life is maximum 2 years; the first signs of wear appear after a year. In addition, the rubber layer can leave sticky marks and can only be removed by polishing. Another drawback, or rather feature, is the monotony of color. It is impossible to create a drawing or three-dimensional figure.
The main disadvantage is that the service life is maximum 2 years, the first signs of wear appear after a year
Technology of coating a car body with liquid rubber
The complete painting process takes several hours, followed by a day of drying. It all depends on where the liquid rubber is used, whether the entire car will be covered or only parts of it. The technology is not complicated and consists of several stages:
- Preparing the car. Talk about washing, cleaning and priming, if necessary. It is worth understanding that complete rubber coverage completely hides all defects.
- Hiding elements that will not be painted. They must be removed or sealed with tape.
- Rubber application. How long it will last depends on the method of application.
- Drying. It takes at least a day. Until this time, the machine cannot be used - it may disrupt the entire process.
It is important to adhere to safety rules when carrying out painting work. A respirator, gloves and no open fire are required.
You can actually do the painting yourself or use the services of specialists. This requires additional funds, but the result will be impeccable.
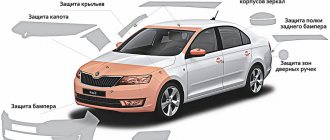
Preparing a car for painting with liquid rubber
One of the main points is preparing the car for painting. First, it must be cleaned, washed, and when drying has occurred, a mandatory step is degreasing. A similar process is necessary so that the material lays evenly on the car and bubbles do not appear.
Preparing a car for painting with liquid rubber
If there is serious damage, it must be hidden with a primer. An important point: after applying it, it is not advisable to paint it. All defects will be hidden under the rubber.
The next stage of preparation is to dismantle the parts that will not be painted. First you need to remove the license plates, windows and headlights. If paint will not be applied to some parts, but they are difficult to remove, they should be sealed with a special film. But it needs to be done very carefully. Place special emphasis on windows.
Let's move on to the wheels, if painting them is in the plans, then masking tape should be used on the brake drums. If the discs will not be painted, they need to be wrapped in a tight film or painted in the removed position.
Preparing the car. the washing up
Like any other work, covering with liquid rubber requires special preparation of the car before work.
We wash the car like for a wedding, even better
You need to wash the car very well and dry it completely. To do this you need to at least use compressed air and a hair dryer.
Drying is very important, as any moisture that remains on the surface of the body will interfere with the uniform application of the rubber.
In addition, adhesion to the surface may not be as good, or small bubbles will appear on the surface of the liquid rubber. And, over time, they will turn into spots. So, you need to dry everything with a hairdryer with special care.
Pay attention to the places under the handles and rubber bands, on the mirrors, under the hood, doorways, and so on.
In addition, if you plan to also paint doorways, then the procedure must be repeated again with greater care in the areas of the inner door space. Everything there should be well washed, degreased, and dirt should be completely removed.
Protecting the interior from paint exposure
After all the procedures described above, the doorway is carefully sealed so that the paint does not penetrate into the interior. In addition, you will also have to seal the door, along with the glass and cards. In short, protect all areas that are not going to be painted.
Preparing liquid rubber and spray for painting
In order for the painting to be successful and the result to be impeccable, it is worth choosing the right equipment. An important element is the choice of paint itself - the basis of the entire process. You can buy it ready-made, but the thick consistency is not suitable when applied to a surface. Additional solvent required. It can also be purchased complete with paint. It is very simple to prepare the solution: you need to mix the paint with the solvent in a 1:1 ratio and stir until a homogeneous mass is obtained. All necessary instructions are indicated on the packaging.
A special automotive spray gun is used for painting. Fill the prepared solution only up to half. Particular attention should be paid to the filter.
Spray gun for liquid rubber DeVilbiss PRi Pro Lite
Applying liquid rubber to a car
Any type of painting can leave marks on human skin, so be sure to use protective clothing. Moreover, all areas of the body must be covered. Wear wide glasses and a respirator. Only people wearing such equipment should be in the room.
Painting starts with the big details. First the hood, roof, doors, then difficult areas. The technology involves parallel application of paint to the car in layers, the distance should be 15 cm. In order to improve fixation, it is better to make the first layer thin. There are only 10 layers, there are options for applying less, but then the quality suffers.
The layers must be applied slowly, after each layer drying is required for 20 minutes. After applying the last coat, leave the car to dry indoors for 24 hours. The temperature is not so important, but it is better not to be very hot. The temperature is often maintained at 18-20 degrees in the absence of drafts. Remove protective stickers only after complete drying. Carefully remove the film and tape, cutting at the joints with a knife.
Advantages and disadvantages of rubber paint
The innovative coating has many advantages and only a small number of disadvantages, which mainly come down to a lack of experience in handling liquid rubber.
The main advantages of rubber paint:
- can be applied without completely disassembling the car using spraying;
- applied to any material, including plastic, paint, chrome;
- to apply liquid rubber, there is no need to clean and prime body parts before painting;
- minor damage can be removed by applying an additional layer of rubber paint;
- the ability to select any color (if necessary, tinting standard shades) and type of coating;
- painting the entire body takes 12-14 hours;
- drying time of the coating - from half an hour to an hour;
- rubber paint is applied and removed without leaving any marks on the old surface, liquid vinyl is removed in one layer without leaving any marks on the car body;
- You can apply plastidip either to one part of the car or to the entire body and rims;
- the cost of material and work is acceptable for regularly updating the appearance of the car;
- seamless coating unlike vinyl film;
- You can apply liquid rubber yourself;
- protects the paintwork from cracks and delamination;
- after plastidip it is easy to return the car to its original appearance;
- after applying the second layer, the coating becomes uniform and durable;
- protects the body when hit by small stones, sand and salt;
- Liquid vinyl can be used to treat even the smallest and most textured surfaces.
Article on the topic: How to find the right alarm connection points
This coating has few disadvantages, you can get used to them and avoid them, then the rubber paint will last a long time.
Disadvantages of liquid rubber:
- difficulty in applying it yourself, especially for the first time;
- it is necessary to avoid getting asphalt and bitumen on the surface during road work;
- at the car wash, it is advisable to warn about the presence of a coating on the body so that they do not show excessive zeal and damage the rubber paint;
- difficulty in washing off dirt from the coating; it is necessary to check after each soaping whether there are any streaks left;
- avoid contact with chemicals, as some of them can dissolve the rubber coating;
- It is undesirable to apply wax and other substances containing it on top of liquid rubber;
- It is necessary to be careful not only when washing, but also when getting out of the car, and to warn passengers, since damage to the plastidip layer on the thresholds is possible.
Approximate consumption of liquid rubber when painting
This paint is a very expensive material, so car enthusiasts are interested in the cost of painting and how much it costs. It all depends on the type of paint chosen and the specific car. Consumption is indicated on the packaging for full coverage, but not more than 7 layers. Usually this is not enough, so the dose should be slightly exaggerated.
You can fully calculate the consumption with the help of specialists. You will need the characteristics of the car.
Applying liquid rubber to a car
What is the paint consumption?
Here is a table of the approximate consumption of Plasti Dip when painting car parts. Calculations were made taking into account the fact that each layer requires 50-80 grams of emulsion per 1 square meter. meter. One aerosol can contains 400 g of paint.
The table below shows the consumption data when the concentrate is diluted with solvent. It should also be taken into account that saturated colors are expensive; in such cases, consumption can double.
Among car enthusiasts, the trend is to treat the car with liquid rubber. Using a two-component mastic, you can improve the appearance of your vehicle.
When asked by car owners how much it costs to coat a car with liquid rubber, experts answer that this technology reduces the price of conventional painting several times. Such tuning is a practical way that allows you to make your car stand out from the crowd. At the same time, the car is reliably protected from chips and damage on the highway.
Consumption of liquid rubber in aerosol cans
As for liquid rubber in aerosols, the consumption will depend on the scale and area of painting. It is worth mentioning that spray cans are rarely used in case of complete painting; they are convenient for finishing small parts, for example, tires. But there are cases when aerosols are used over the entire area of the car.
The calculation occurs according to the following scheme:
- Large elements such as the hood, roof and trunk each have 2 cans.
- Smaller parts, for example, doors are best painted using 1 aerosol.
Thus, a complete painting requires approximately 15 cans.
Consumption of liquid rubber concentrate for car painting
If you use a concentrate, painting is done using a spray gun. A car of class A and B - you will need from 3 to 5 liters, class C and D - up to 7 liters, class E, F, S - up to 12 liters. These are approximate figures, they are indicated based on the application of no more than 7 layers of rubber. In addition, there is a difference depending on the radicalness of the repainting. If the factory color is dark and dark rubber is applied, then less paint will be needed. In case of a radical change in color, additional layers are required, and therefore more paint.
Liquid rubber in a can
Is it possible to paint a car in a garage?
Is it worth the risk and start painting? Considering the disadvantages of garage conditions, truly high-quality coating can only be done with good experience. Painting in a garage has many differences from carrying out the procedure in a special chamber, where all conditions are provided. Professionals do not advise beginners to take on such a complex task or to first study in detail all the features and specifics of the work.
Differences between painting in a garage and painting in a special chamber
The differences between the two types of painting are primarily in cramped conditions. In a regular garage box there is no space for conveniently laying out materials and tools. The time for preparing the room and the painting procedure itself will be longer, therefore, there is a higher risk of disrupting one of the stages. It is difficult to create a constant temperature in the garage - there is a draft from the door, the heat is distributed unevenly, so car paint dries unevenly quickly.
Another important difference: it is not possible to maintain perfect cleanliness in the garage - dirt, dust, hairs, and other particles can get on the painted parts. You will have to first remove from the room everything that could harm the paint.
It will take even longer.
The lighting problem is no less important. Garages rarely have high-quality lighting installed, so in one part the lamps shine stronger, in others there is a shadow, and visibility is worse. Making an even, high-quality coloring will not be easy. You will have to bring additional lighting sources, otherwise the quality will suffer.
The lack of an exhaust hood is no less unpleasant, since in winter a cloud of paint and varnish will irritate the respiratory tract. Microdroplets will not allow you to see well; they will settle on the surface and spoil it. The same sediment settles on the painted parts of the car; they will have to be additionally sanded. To create a high-quality coating, you need supply and exhaust ventilation in the room.
Review of car painting with Plasti Dip liquid rubber
On popular Internet pages, you can find many reviews about Plasti Dip liquid rubber. Luxury car lovers are happy to share their impressions.
Egor: “This paint is a wonderful thing, the pros and cons are visible the first time you use it. It is worth saying that there are more advantages. I decided to start small and applied paint to the rim grilles. The car was immediately transformed. The paint is very easy to apply. The only downside is the rather high cost.”
Karina: “I wanted my swallow to stand out from the cars in the crowd, so I chose liquid vinyl. I was completely satisfied with the result. Just a day later I received a completely new car, I chose the bright Plasti Dip color. The native red is not visible. The only negative I can say is that after a year, namely in the middle of summer, the color began to lose its brightness.”
Valentin: “Plasti Dip was recommended at the salon. They assured that the material is durable, the coating is stylish and unique. I chose a metallic color with a glossy structure. The car came out great. I think that everyone can choose their own individual style. After 20 months, I removed the coating on my own without any extra effort. There were no marks or scratches left on the car.”