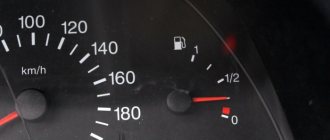
Car : VAZ-2112. Asks : Petrov Viktor. The essence of the question : It incorrectly shows the fuel level in the gas tank or does not show anything at all, it sits at zero.
Hello! I have a problem that the arrow does not correctly show the level of fuel that is in the gas tank. It happens that the arrow either increases or decreases the actual availability of gasoline, and recently it even started pointing to an empty tank, although I know for sure that there is still more than half there. What to do?
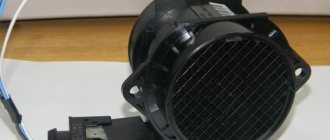
Purpose, principle of operation of the fuel sensor
Fuel level sensor resistor
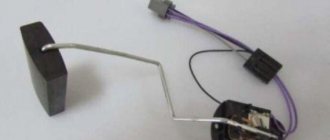
On the VAZ 2114, 2110, as well as Kalina, the fuel level sensor is a potentiometer in the form of a resistor, on the plane of which lines are drawn from a nichrome conductor. The device has a lever that, on one side, contacts and moves along a plane with the stripes, and on the other side there is a float, which ensures its movement depending on the level of flammable liquid in the gas tank. The fuel sensor works by creating a different resistance in a resistor as an electric current passes through its circuit. When the fuel level in the gas tank is at a minimum, the lever comes into contact with a special contact, which ensures that the warning light on the instrument panel in the cabin lights up. Thus, the driver is warned that there are 4...6 liters of gasoline remaining.
The hatch under which the fuel module is installed
This is interesting: Gas equipment for a diesel engine - savings on every trip
Main malfunctions in the sensor operation
If the sensor does not display the fuel level correctly, you can judge that a certain breakdown has occurred and needs to be repaired. Modern sensors that record the fuel level, like all vehicle parts, fail from time to time. In this case, it is necessary to repair the fuel level sensor.
Malfunction in indicators
The main sign of a sensor failure is the display of false data displayed on the pointer. Based on its “behavior,” certain conclusions can be drawn regarding the resulting breakdown. Here are the most basic types of breakdowns and their causes:
- The indicator is at zero, regardless of the fuel level. The problem is that the float stop is broken.
- The pointer moves, but still drops to the zero mark. In this case, you need to pay attention to the general condition of the device winding, as well as the reliability of the contact between the sensor and the current collector.
- Fluctuations in fuel quantity indicators. This malfunction indicates sufficient wear on the contacts.
- When starting the engine, the fuel gauge does not rise above the zero mark. Such a malfunction is directly related to the electronics of the vehicle. Here it is important to check the wires for possible breaks and the degree of reliability of the connection. It is important to ensure the overall integrity of the fuse.
- The low fuel light does not come on. This problem is often associated with device failure.
- The fuel level sensor is lying. In such a situation, it will be necessary to check the float for the level of tightness.
According to modern traffic regulations, operating a car with a faulty indicator is strictly prohibited. Problems that arise with sensors must be eliminated as promptly as possible.
Mechanical and functional malfunction
Along with problems that are expressed in incorrect indicators, sensor failure can manifest itself in the following malfunctions:
- loss of tightness of the built-in float;
- strong bending of the wire holder;
- violation of the general tightness of the housing and the resulting decrease in the level of resistance;
- mechanical break of the variable resistor;
- loss of tightness at the point where the device is attached to the fuel tank.
After the float loses proper tightness, the control device, with a full tank, will indicate an incomplete fuel level. If there is a sufficiently strong loss of tightness, the indicator will immediately show the minimum fuel level. In this case, the actual quantity will not matter. To fix this problem, you will need to remove the sensor and replace the float. If it is not possible to purchase a float, you will need to completely replace the entire device.
Quite often, the sensor fails due to long-term movement over rough or uneven terrain. Repeated impacts on the tank will cause serious damage to the wire holder of the built-in float.
With such bends, the behavior of the indicator will directly depend on where the holder was bent. If the bend is directed upward, the parameters will always be increased, if downward, the parameters will be underestimated. If the breakdown involves such a bend, you just need to straighten the wire holder and give it its original shape.
Often the seal of the sensor housing is broken. This happens after an accident has occurred, as well as after long-term use of low quality fuel. If gasoline gets into the device, it will malfunction and, as a result, cause incorrect sensor readings. These malfunctions can only be eliminated by completely replacing the device.
We recommend: Why does the engine take a long time to warm up?
If the variable resistor breaks, this will cause the sensor to always show a full or completely empty tank. Similar signs can be observed in the process of a break in the signal wire running from the sensor to the display unit. Before removing the sensor, you will need to connect a variable resistor with a resistance level of 100 - 200 Ohms to the car body and to the signal contact. As you rotate the knob, you need to make sure that the sensor readings change. In this case, the malfunction can only be eliminated by completely replacing the device.
The main sign of a complete loss of tightness at the installation site of the device is the appearance of the smell of gasoline in the cabin.
Fuel level indicator and its malfunctions
The measurement system in question operates using a rheostat with a resistor made from nichrome particles. The moving part of the rheostat, which is immersed in gasoline, moves under the influence of a lever with a float. The other side of the lever is an additional contact. If it is placed in a specific position, the circuit for regulating the process of replenishing reserve fuel is closed.
In this case, from 4 to 6.5 liters of fuel are allocated for reserve. Despite the importance of the device, on VAZ 2110 cars the fuel sensor quite often becomes faulty. But not all situations require mandatory replacement. All you need is a small adjustment that will return the fuel level indicator to a working state.
If you notice a sharp change in the values of the fuel consumption indicator, most likely the contact track has become heavily worn under the influence of the slider. In case of minor wear, this can be corrected in a simple way. It is necessary to bend the slider mount so that it is located slightly above the problem area. Of course, if the contact track is significantly worn, it is better to replace it completely.
The next common pointer malfunction is incorrect readings, that is, the sensor indicates a value that does not correspond to reality. In this case, the device needs proper adjustment. In order to fix this problem, you need to disconnect the sensor from the VAZ 2110 gas tank, and then adjust the gasoline consumption indicator. The position of the arrow is adjusted manually; it must be moved from the stuck position to the original position, that is, to zero.
If the pointer is difficult to move and does not reach the desired position, you will need to bend the tab slightly to make adjustments, increasing the pointer's travel interval. It often happens that the fuel tank is more than half full, but the indicator indicates that it is completely empty. In such a situation, you will need to examine all pointer contacts for breaks or movement. The first thing you need to do is check the wiring under the dashboard.
There is a possibility that the fasteners holding the wires are loose and need to be tightened. If the instrument panel is completely intact, it is necessary to examine the intermediate paths for short circuits. It is important to check all the wiring, starting from the dashboard and ending with the connections of the ground wires and the handbrake handle. The absence of any results will indicate that the gasoline sensor needs to be replaced.
When purchasing a new device, you need to check its serial number and model in order to choose an identical one. This information can be found in your vehicle's manual. The VAZ 2110 is equipped with sensors with different resistances, so it is impossible to name a specific model that will suit your car.
Doesn't show fuel level AT ALL
When the arrow points to “0” with a full tank, then attention should be paid to all contacts and connections:
- First of all, this concerns the bolts located on the back side of the instrument panel, since they are the ones who create contact by fixing on the indicators.
- It is possible that the fuel level needle has lost its position and needs to be adjusted.
- The instrument panel itself may also be faulty. Since its mechanical parts are very susceptible to wear.
- We test all the “negative” wires, especially the one located near the handbrake. Because often it is he who is promoted.
- The float or the FLS itself is jammed.
Having analyzed all of the above, we can come to the conclusion that this whole problem lies entirely in the power supply system and the mechanical part of the fuel level sensor.
Please note that if you have an on-board computer (not older models - approx.), it is possible to control the fuel level electronically. You just need to enter the readings after each refueling of the car and the faulty FLS needle will no longer bother you.
Welcome! Fuel level sensor - thanks to it, you can find out at any time how much fuel you have left in the gas tank; if you didn’t have it or if it had become unusable, then checking the fuel in the tank becomes much more difficult and inconvenient; you would have to live without it you would have to unscrew the cap of the gas tank and poke some kind of stick into it to find out how much gasoline is left in it, but on modern cars the gas tank generally goes to the very bottom (all front-wheel drive cars do this) and gasoline is poured into it through a tube that comes from the top and connects to the tank.
Note! In order to replace the fuel level sensor, you will need tools, namely: Wrenches to unscrew the nuts securing the fuel pipes, you will also need a screwdriver, and we also recommend stocking up with a rag to wipe off gasoline that gets on you and we do not recommend that you smoke while working or use fire (a lighter, for example)!
Where is the fuel level sensor located? It is located in the gas tank itself, or rather, it is one piece with the gas pumps and therefore you won’t be able to see it so easily, let’s start first with the fact that, as we said earlier, the gas tank is located at the bottom, it is located on front-wheel drive cars immediately under the rear airbag seats, so in order for you to be able to see the fuel pump inside of which the sensor itself is located, you will have to first fold back the rear seat cushion and only after that unscrew the two screws that secure the cover (This cover will be discussed in another article to which a link will be given as you read) you will see the location of the fuel pump (It is circled in red), and you will need to remove it.
When do you need to change the fuel level sensor? It must be replaced when the fuel level readings become incorrect, that is, if the fuel level arrow does not show (Although there is gasoline in the tank), and also if the arrow shows completely incorrect readings (Although this can be corrected, in this case the sensor is most likely bent the lever that holds the sensor float is in the wrong direction) and even if ringing the wiring does not give you anything (we will tell you how to test the sensor wiring in the same article, so stock up on ohmmeters in advance) then the sensor also needs to be replaced.
Purpose and location of FLS
The FLS is located in the fuel module, which also includes a fuel pump and fuel filter.
Its main purpose is to monitor the fuel level in the gas tank.
The design of the device includes:
- float;
- dielectric plate with a located rheostat;
- the rod on which the contact slider is located.
Replacing the fuel level sensor (detailed test)
As we already know, the sensor is mounted in the fuel module, which, in addition to the sensor, includes a fuel pump and filters. To dismantle we do the following :
- Remove the negative terminal of the battery.
- Remove the rear seat cushion.
The fuel pump hatch is located under the pillow. - We bend the floor covering and clean the fuel module hatch from dirt and dust.
It's better to vacuum everything. - We remove the hatch.
- Disconnect the contact blocks from the power module.
We disconnect the terminal block and take up the vacuum cleaner again - as a rule, there is enough dust here. - We disconnect the fuel line - two fittings using a 17 key, and move the tubes to the side.
The pressure washer is fixed with small diameter pins. Try not to strip the threads both when unscrewing and when installing parts in place. - Using a 7 socket and a ratchet wrench, unscrew the pressure washer.
- All that remains is to carefully remove the entire fuel module assembly from the tank.
We take out the fuel pump and carry out an external inspection. - Using a Phillips screwdriver, unscrew the screws securing the sensor from the module body.
We unclip the sensor connectors with a thin screwdriver, and with a Phillips screwdriver we unscrew the fastening screws. - Bend the clamps with a screwdriver and remove the guides.
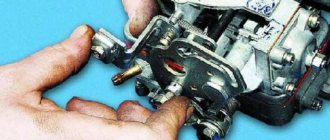
- Unscrew the nuts (key size 5) securing the cover and separate the sensor from the pump.
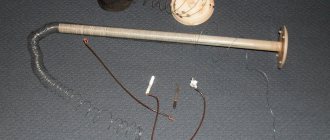
This is what the fuel pump looks like without a fuel level indicator.
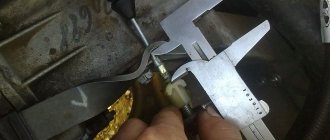
Now you can test the sensor in more detail. The working device must have a resistance of 270 to 320 Ohms at the lowest point (the float hangs). At the highest point, the sensor resistance should be in the range 7–19 Ohms . We take this data using a multimeter in resistance measurement mode.
If, when moving the float, the resistance value does not change or changes abruptly, the sensor must be replaced.
When the level of gasoline in the tank is equal to half its volume, the resistance should be about 118 Ohms.
Assembling the fuel module with a new sensor is carried out in the reverse order. During assembly, it is advisable to lubricate the sealing ring of the pressure washer with petrol-resistant sealant.
Of course, we must remember that we work in close proximity to gasoline fumes, so there should be no hint of a spark, open fire or electrical appliances plugged into the network.
Diagnostics and repair methods
To check and identify a malfunction, perform a number of preparatory work:
- Find a service hatch in the car that gives access to the electric fuel pump and float mechanism unit. Usually located under the rear sofa, where the fuel tank is installed.
- Unscrew the pressure flange and pull the assembly out through the hole. Clean all contacts and the rheostat plate, reinstall the unit.
- Prepare a “control” with a light bulb and a multimeter.
The first step is to accurately determine the “culprit” - check the sensor and pointer separately. The performance of the device is diagnosed as follows:
- Turn on the ignition and connect one terminal of the multimeter or test light to the ground of the car.
- Connect the second contact to the positive terminal of the wire going into the technological opening. The meter should show the voltage of the on-board network.
- Remove the positive terminal and short it to ground. If the instrument on the panel is working properly, the arrow will show a full tank. This means the fuel level sensor is not working.
- If there are 2 wires coming to the gas tank, connect them alternately to the vehicle ground. From one the control lamp should light up, from the second the pointer should move to maximum. If the listed symptoms are observed, change the sensor.
In the case when there is a voltage of 12 volts on the wires, but after a short to ground the pointer indicator does not respond, you will have to disassemble the dashboard and remove the device. Similar actions are taken when the minimum gasoline remaining indicator is not working.
Thorough cleaning of the slider and rheostat turns helps in cases where the fuel level sensor simply lies. The moving contact can be carefully bent so that it passes along the unworn part of the turns. Clean the current-carrying strips of the potentiometer with a soft cloth soaked in alcohol to avoid damaging the surface of the element.
Some gasoline sensor malfunctions can be eliminated in a garage:
- a “sunken” float with a crack is replaced as an assembly with a lever or separately (depending on the make of the car);
- the torn conductors are connected using a conventional soldering iron;
- the damaged rheostat plate is replaced with a new one, provided that the spare part for your car is on sale.
At the moment, repairing the fuel level sensor is becoming irrelevant. Considering the cost of a new element, it is easier and more reliable to replace a non-working part.
If the indicator and the gas remaining meter are working properly, but the arrow of the device is lying, try making adjustments. Carefully bend the float rod in the desired direction and check the readings again. To achieve maximum accuracy, the operation will probably have to be repeated several times.
This is interesting: Self-replacement of the pump of an Opel Astra
Fuel level surges
When the fuel level readings “jump”, showing one value or another, the malfunction may lie in the “abrasion” of the circuit board tracks on the fuel level sensor (located on the fuel pump in the gas tank - approx.). They are most often erased due to the impact of the slider on them. This problem can be solved by bending its base to the track, but if they are worn out too much, you will have to replace them together with the float.
Some of the tracks on the board have been erased.
Please note that if you are going to replace the FLS (fuel level sensor - approx.), be sure to look at its markings. Since there are many analogues for the VAZ-2112 sold, and the resistance values for them are all different. And if the sensor differs from the previous one, the problem will not disappear, since the readings will also be incorrect.
How to remove the fuel pump on Kalina
| If you notice that the fuel pump on the Lada Kalina does not work, or the pressure in the fuel system has become low, then you will have to remove the fuel pump and then check it and the filter. |
You will need : relieve pressure in the fuel system (see “replacing the fuel filter”), prepare Phillips and flat-head screwdrivers, a hammer and a cloth.
Procedure for removing the fuel module :
- Fold the rear seat forward and lift the cut out parts of the carpet. Remove the 4 screws securing the cover using a Phillips screwdriver.
- Disconnect the block with wires from the fuel pump.
- Disconnect the fuel hoses from the fuel pump.
- Unscrew the fuel pump pressure ring (1118-1101178-10) counterclockwise using a flat-head screwdriver and a hammer, and then remove it.
Remove the Kalina fuel pump, tilting it to the side so as not to bend the fuel gauge sensor lever and rotate the float on the lever.
Otherwise, the fuel level reading will be incorrect. Place a cloth under the fuel pump, because... Gasoline may leak from the module glass. Installation of the fuel pump is carried out in the reverse order, having first replaced the rubber o-ring (1118-1101138-10), otherwise it will leak and there will be a smell of gasoline in the cabin. Make sure that the arrow on the fuel module cover is directed towards the rear of the vehicle. And when connecting fuel lines, follow the arrows on the fittings indicating the direction of fuel supply. The service manual states that replacing the Kalina fuel pump will take at least 2 hours, however, in practice this operation is completed in less than 1 hour.
If after replacing the fuel pump it does not work, then check the fuse and relay of the Kalina fuel pump, which are located in the mounting block. By the way, many people don’t know how much a fuel pump for Kalina costs, its catalog number is 1118-1139009-10, and the approximate price at the moment is 2300 rubles.
How to replace the fuel level sensor and how to check it on a VAZ 2110-VAZ 2112?
Note! When replacing an old sensor with a new one, try to buy the same type that was installed, the thing is that the sensors all look similar to each other, but they are different, and if you buy with the wrong marking, then there is a chance that it will work for you it won’t, or it won’t be as it should be!
Removal: 1) Essentially, this sensor is changing and is not so difficult, but the first thing you need to do is remove the fuel pump from the car, you can read more about how to do this in the article entitled: “Replacing the fuel pump with "VAZ".
2) When you have removed the fuel pump, proceed to disassembling it and removing the sensor. To do this, use a screwdriver (Thin screwdriver) to move the retaining ring (Indicated by the red arrow) from the upper groove to the lower one, which is indicated by the blue arrow, thereby giving yourself the opportunity lift the cover of the fuel pump, and after it is lifted, disconnect the wiring from the fuel pressure regulator terminal as shown in photo 2.
Note! This locking ring is located on only one guide; there are essentially two guides in total, but on one of them there is a spring and a locking ring, so when the locking ring is moved to the very bottom, lift the cover to the highest level!
3) Now you will need to deal with the wires, namely, disconnect all of them so that they do not interfere with the removal of the sensor, we proceed to disconnect the first block of wires, to do this, simply squeeze out the latch that secures it (It is indicated by the arrow) and then disconnect the block and make sure that she hung.
4) Then move on to the second block of wires, it is attached a little differently, but disconnecting it will also not be difficult, to do this, use a screwdriver to press the latch (It is indicated by an arrow) and then disconnect the block as shown in the small picture.
5) And finally, you will need to slide the sensor along the grooves (It moves in them) and releasing the two clamps that secure it (see photo 1), completely remove the sensor from the fuel pump as shown in photo 2. Installation: The new sensor is installed exactly like this It’s the same as removing it, only you’ll need to do all this in the reverse order of removal.
Detailed description of the functions of the standard Lada Kalina computer:
- Current time in 24-hour format.
- Fuel consumed during the last trip. This parameter must be reset before starting the journey.
- The average speed of the last trip also requires resetting. Basically, you will see small numbers on the display, since in the city the average speed can be no more than 30-40 km/h, depending on traffic density and traffic jams.
- The power reserve shows how much longer you can drive in this mode with the remaining fuel in the tank.
- Instant fuel consumption.
- Average fuel consumption, you can reset the indicators at any time using the RESET button.
- Travel time since this parameter was last reset.
- Outside air temperature.
Well, we've sorted out the functions, now a little about the controls. There is nothing complicated about this; to switch between indicators, there is a button on the right steering column switch that can be pressed both up and down, and the modes will change on the display. To reset parameters such as average fuel consumption, travel time, mileage since the last start, as well as current time settings, use the RESET button, which is located on the same switch below. The pictures below show everything clearly.
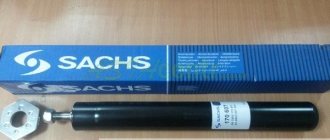
Selecting a new sensor
Replacing a fuel level sensor on a VAZ 2112 is not such a difficult process, however, it is more difficult to choose the right controller to replace the old one. So:
Interchangeability of gasoline level controllers
For VAZ 2112 cars, there are two most common types of fuel level controllers:
- For the so-called Vladimir combination of units (devices) and for Kursk (from JSC Schetmash).
- For VDO.
Experts say that only the first digits are the most significant in the controller’s markings, and the numbers following them are insignificant modifications by the plant. Therefore, DUT-1-01 and DUT-1-02 are interchangeable, as well as DUT-2-01 and DUT-2-02, etc. If for any reason you remove the fuel pump, immediately replace its strainer at the same time.
Preparing the car for changing consumables
Any manipulations with the elements of the fuel line are carried out after comparing the pressure in the line with atmospheric pressure. After stopping the engine, the fuel in the line is still under pressure. It can be bled only after de-energizing the power supply circuit of the fuel pump module. This procedure is carried out as follows:
- turn off the ignition;
- remove the cover of the central tunnel lining using a flat screwdriver (forms the bottom of a niche for small items near the cigarette lighter);
- remove the 15 A fuse responsible for power supply to the fuel pump (second from right to left) from the fuse box located under the removed cover of the power supply and engine control system;
- turn on the ignition (there will be no usual buzzing from under the rear seat) and start the engine;
- After the engine stops spontaneously, crank the starter for 5 seconds.
You can prepare the Kalina fuel system for filter replacement in an alternative way:
- remove (on a sedan) or fold down (hatchback and station wagon) the rear seat;
- remove the fuel pump hatch, which is attached to the bottom with two self-tapping screws;
- disconnect the wiring block from the fuel pump module with the ignition off;
- start the engine;
- After running out of fuel, crank the starter for 5 seconds.
What's the result?
Taking into account the above, it becomes clear that although the fuel level sensor is structurally simple, various breakdowns (both mechanical and electrical) can disable this element or cause malfunctions in its operation.
One way or another, the problem needs to be solved, otherwise the driver will have to constantly separately record data on how many kilometers have been traveled since the last refueling, how much more can be driven and when to refuel.
Finally, we note that often the best option is to replace the FLS with a new one; at the same time, it may also be necessary to change the fuel level sensor float. Less often it is possible to carry out repairs by removing oxides, moving to working sectors, etc.
It will be useful: Model range and characteristics of Varta batteries, battery features
At the same time, the most serious nuisance that leads to incorrect fuel level readings is considered to be a damaged gas tank. In order for the fuel sensor to work normally, in this case it is necessary to repair or replace the fuel tank.
What is the FLS fuel level sensor intended for: the design of the fuel sensor, types of fuel sensors and features, the operating principle of the FLS.
Why is it necessary to clean the fuel pump mesh? When is it better to change and how to clean the fuel pump mesh? How to properly remove the fuel pump, subtleties and nuances.
How to change a fuel pump. Location of the fuel pump, releasing pressure in the system, unscrewing the fuel lines, removing the pump, reassembling.
How to determine why the fuel pump does not pump or works poorly. Fuel rail pressure, pump diagnostics. Wiring, relays, fuel pump fuses.
The causes of whistling and increased noise during operation of the fuel pump are overheating of the pump. How to diagnose and fix the problem yourself. Tips and tricks.
Why does the fuel pump grid need to be changed? How to remove the fuel pump yourself to replace the filter. Features of reassembly after replacing the fuel pump mesh.
Article: 9P5.139., additional articles: DUT-K
Order code: 116283
- Buy with this product
- show more
Fuel level sensor 9P5.139.031 (DUT-K)
The fuel level sensor (FLS) is used as part of the electric fuel pump module and is designed to determine the fuel level and signal the minimum fuel level in the car’s gas tank.
- Operating ambient temperature: −40°C…+80°C
- Working environment, motor gasoline: Premium-95 GOST R51105 or AI-95 GOST 2084
- Float movement cycles with full amplitude: 2·10 6
- Supply voltage (constant) of the sensor through the fuel level indicator, nominal: 13.5 V
- Supply voltage (constant) of the sensor through the fuel level indicator, operating: 6…15 V
- EBN module: 1118-1139009-10
- Applicability: VAZ "Kalina" for pump 1118-1139009-10
Information used: JSC "Utes"
- There are no reviews for this product yet.
The series of articles “Crystal VAZs, or typical breakdowns of domestic cars” talks about typical problems and malfunctions of cars produced by the Volzhsky Automobile Plant. Today we will talk about the front-wheel drive Samara family, as well as its modern analogues.
The operation of the fuel sensor does not directly affect the safe operation of the vehicle. However, its incorrect readings can indirectly contribute to the creation of not only unpleasant moments on the road, but even an emergency situation. A faulty sensor must be replaced.
Possible malfunctions and ways to eliminate them
Sensor readings jump
Tip: The most common malfunction of the gasoline level controller is associated with operational wear of the contact parts of its rheostat. You can verify this by measuring its resistance with an ohmmeter, smoothly moving the lever with the float on it from the left extreme position to the right (or vice versa). A faulty controller must be replaced
The cause of this problem lies in the erased tracks on the sensor rheostat board. They wear out under the influence of the runner. Sometimes bending the runner helps for a while; it becomes slightly higher than the worn parts of the tracks. If the abrasions are too great, then replacement is recommended.
The controller gives incorrect readings of the gasoline level
If the arrow on the dashboard of your VAZ 2112 car shows an incorrect level of gasoline, there are many reasons for such an ailment, as well as a number of ways to resolve them. If the fuel level readings are constantly lying (they either underestimate or overestimate the values), then adjusting the fuel controller will help you.
Adjusting the fuel level on the dashboard
- Turn off the ignition and disassemble the dashboard.
- Remove the arrow indicating the gasoline level from the pin and connect all the wires to the instrument connection.
- We unscrew the fuel pump and take it out along with the sensor.
- Turn on the ignition and wait about ten minutes.
- Then we move the sensor spoke to the extreme position that would correspond to a full tank.
- We set the pointer arrow so that it points exactly to the “1” mark and fix it.
- We move the float spoke from the initial extreme position to the other.
- The arrow readings on the instrument panel should also change from zero (corresponding to an empty tank) to o (corresponding to a full tank).
- The indicator arrow shows the wrong amount of gasoline, then we slightly bend the right or left adjusting tabs so that the spoke can move beyond its left or right extreme location.
If the indicator arrow on the instrument panel shows that the tank is empty, but in fact the tank is half full
- You need to check the contacts located on the back of the instrument panel itself.
- We remove the instrument panel, tighten the small nuts on its back side, which are screwed to the indicators, to create contact.
- We check all ground wires, especially the one located under the handbrake.
- If the instrument panel itself is faulty, then it is quite possible to repair it, provided that the panel is of an old model.
- If the arrow indicating the fuel level is off, press the daily mileage indicator button and turn on the ignition.
- Perhaps the float in the car's gas tank is jammed.
- The fuel level sensor (controller) itself may be faulty.
Why does the fuel level sensor show incorrectly or the fuel level does not work?
Let's start with the fact that many people mistakenly believe that if the fuel level sensor does not work, this does not affect the overall functionality of the engine and its systems. In fact, in such a case, there is not only a great risk of being left without fuel at the most inopportune moment (for example, far from a gas station on the highway), but also of causing certain vehicle devices to fail.
More precisely, we are talking about the fuel pump. In a nutshell, the fuel pump in the power supply system of injection engines is submersible, constantly in the fuel, and is cooled by the fuel.
It is for this reason that a normally working fuel level sensor indicates that there is no fuel and refueling is needed. When the level is reduced to the limit, the warning lamp lights up. At the same time, at least 3-5 liters of fuel still remain in the tank itself, which allows you to partially cool the pump, avoid debris and dirt from getting into the fuel supply system from the bottom of the tank, and also drive a few more kilometers if necessary.
If the sensor shows incorrectly or does not work, the driver often has to drive with the level light on, there is always too little fuel in the tank, the pump overheats (especially in hot weather) and quickly fails. Also, dirt from the bottom of the tank can prematurely clog the fuel pump filter (mesh filter), as well as the fuel filter itself, etc.
In other words, if the fuel sensor in the car does not work, this can cause not only inconvenience, but also a number of other troubles. In order not to have to clean the fuel system, as well as to increase the service life of the fuel pump or avoid replacing it, it is recommended to troubleshoot the FLS as soon as possible.
DIY diagnostics
To find the reason why the fuel level sensor does not work, you will need a multimeter (we recommend reading,) and a control. The first step is to determine whether the cause of the breakdown is in the sensor located in the tank or in the indicator. To do this, remove the connector connected to the fuel section (located at the gas tank flap, which in most cases is accessible from the passenger compartment). Using the wiring diagram of your car model, determine which wire goes to the dashboard indicator. Turn on the ignition, then apply negative potential to the corresponding pin of the connector through the test lamp. If the pointer arrow quickly points upward, then the problem is in the sensor. For further diagnostics it is necessary to remove the fuel section. A multimeter will measure the resistance of the potentiometer.
Connection diagram for the instrument panel of VAZ 2110, VAZ 2111, VAZ 2112 (view from the back):
- Fuel reserve indicator lamp;
- Instrument cluster lighting lamps;
- Right turn indicator lamp;
- Left turn indicator lamp;
- Reserve warning lamp;
- Coolant temperature gauge;
- External lighting indicator lamp;
- Carburetor air damper warning lamp;
- Oil pressure warning lamp;
- Parking brake warning lamp;
- Battery charge indicator lamp;
- Tachometer;
- “CHECK ENGINE” indicator lamp;
- Speedometer;
- Brake fluid level warning lamp;
- Hazard warning lamp;
- Headlight high beam warning lamp;
- Fuel level indicator. Plugs 2, 3, 8, 9 in block X2 are speedometer pins 14
Temperature:
When the gauge needle is constantly at the beginning of the scale, with the ignition on, disconnect the wire from the temperature gauge sensor and connect the tip of the wire to ground. If the arrow deviates, then, consequently, the temperature sensor of the VAZ 2110, VAZ 2111, VAZ 2112 is faulty and must be replaced. If the arrow does not deviate, remove the dashboard of the VAZ 2110, VAZ 2111, VAZ 2112 and, without disconnecting the wires from the panel, turn on the ignition and connect to ground the left terminal of the temperature indicator, which is connected to plug 5 (see Fig. 7-49 ) white block (X1). The deviation of the arrow in this case will indicate the serviceability of the device and damage to the wire connecting the sensor and the pointer. When the pointer needle is constantly in the red zone, with the ignition on, disconnect the wire from the temperature sensor of the VAZ 2110, VAZ 2111, VAZ 2112. If the arrow returns to the beginning of the scale, then the sensor is faulty. If the arrow remains in the red zone, then either the wire has a short to ground or the device is damaged. The serviceability of the device can be checked by disconnecting the white block (X1) of wires from the vehicle instrument cluster and connecting plug 1 to ground and connector 10 of the white block of the instrument cluster VAZ 2110, - 2111, - 2112 to the plus terminal of the battery. In this case For a working device, when the ignition is turned on, the arrow should be at the beginning of the scale.
Fuel:
The verification procedure is similar to that described above. When the pointer needle of a VAZ 2110 - 2112 is constantly at the beginning of the scale and does not deviate after the tip of the pink wire disconnected from the fuel level sensor of the VAZ 2110, VAZ 2111, VAZ 2112 is shorted to ground, then it is necessary to check the device. To do this, remove the instrument cluster of the VAZ 2110, VAZ 2111, VAZ 2112 and, without disconnecting the wires from it, turn on the ignition and connect to ground the right terminal of the indicator, which is connected to plug 10 of the red block (X2) of the wires. If the device is working properly, the needle should deflect to the end of the scale. If the arrow of the fuel level indicator is constantly against o, then the serviceability of the device can be checked by disconnecting the red (X2) wire block from the dashboard of the VAZ 2110, VAZ 2111, VAZ 2112. In this case, with a working device, when the ignition is turned on, the arrow should be against the o.
(2 ratings, average 5 out of 5)