GAZ 31 105, Princess of the road. › Logbook › Replacing DPKV. The first signs of DPKV failure.
Now it's time to change the DPKV. In theory, there is no particular point in making such an entry, but the Internet is replete with a lot of “symptoms”, at the same time, for some reason I have never seen the symptoms that manifested themselves in me anywhere. Everything described below will be based on simple facts about the operation of the machine, the maximum that will be used from the equipment is the BC (On-Board Computer). Inside I will insert simple little things in italics, they are needed for reference in order to avoid unnecessary questions.
Brief information
. DPKV is the most important sensor in the system. You simply won't eat without it. When it finally fails, you will have no spark at all. It is thanks to this sensor that the ECU “knows” what position the engine crankshaft is in. Based on this, injection and ignition are calculated. For example. Without a mass air flow sensor, the car will barely drive, it will stall, the idle will disappear, but the car will drive. No temperature sensor either. The motor stalls, not really working. Etc. and so on. But without DPKV it will not work at all. That's why I always have this sensor with me.
Over the entire life of the car, which is almost 11 years and almost 56,000 km. I changed the DPKV 2 times. So I came 3 times. All these replacements were combined with common symptoms. And like a carbon copy. I will try to describe them in as much detail as possible. I will describe them in the order of their appearance, i.e. in the beginning the one that appeared first.
Symptom No. 1
Occasionally, error No. 53 is stored in the ECU memory, the status is accumulated. Visible only by entry in BC.
Symptom No. 2
The error appears more and more often. After starting the engine, the error lamp may light up, but this does not affect the operation of the car in any way. Error 53 is still present and has accumulated status.
Symptom No. 3
The car takes a little longer to start. Those. You have to turn the starter longer, literally 1-2 turns. After startup, error No. 53 is consistently recorded in the ECU. Over time, the symptom progresses.
Symptom No. 4
The car may not start at some point. After an unsuccessful start, error No. 53 is still accumulated in the ECU memory. The symptom also progresses over time.
Symptom No. 5
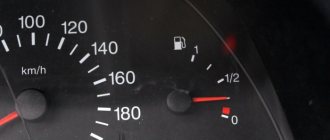
During operation, the engine may begin to shake, rare “misunderstandings” occur, and the engine loses speed. At this moment, CHEK lights up and goes out (the ECU again indicates error No. 53).
To sum it up. DPKV simply starts to work unstable. And during startup, when the speed is low and the voltage on the DPKV magnet is minimal, its malfunction more often manifests itself. No matter how you look at the DPKV magnet, its characteristics deteriorate over time, the readings have a large error, and the DPKV mark, like the rest of the teeth, has instability (clearly visible on an oscilloscope).
I didn't want to wait. And because I noticed that starting the car was accompanied by the inclusion of CHEK and the appearance of a DPKV error, I immediately decided to replace it.
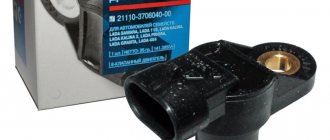
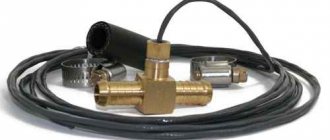
Basically, I had a new DPKV in the trunk. I bought it a relatively long time ago. I don’t remember where and how, I remember that the manufacturer and the DPKV itself arranged for me. But still, I thought that I needed to buy a new one, put it in the trunk, and put the one that was riding with me. But while going shopping I saw the following. DPKV made with a sledgehammer. A lot of sloppy smelting, the wire going into the DPKV is not filled in and moisture can get into the DPKV itself. There is nothing really indicated on the packaging. The magnet is roughly processed and weakly magnetizes. In fact, it should hold the metal very tightly. The pull-out force should be noticeable. In the end, due to lack of time, I decided to install the one that was in the trunk. Here he is.
Source
Tags: error 053
Comments 30
I solved my problem. Well, at the same time, I think I’ll tell you in more detail about the hemorrhoids that I encountered, in case it’s useful to someone. So, for starters, because the errors included fault 053—faulty crankshaft position sensor (CPS). I tried to find a sensor in stores that would meet the recommended characteristics of the ZMZ 406 engine manufacturer, namely, the sensor should have a winding resistance of 890 to 900 Ohms. After driving around a bunch of stores, I came to the conclusion that such sensors simply do not exist. The maximum that I was able to find showed 740 Ohms. But here we need to make a reservation. I found sensors with the same characteristics, but they turned out to be from 405 engines and differed from mine in a special rubber seal. I purchased this sensor but its installation did not bring the desired result. With this seal present on it, the gap between the synchronization disk and the sensor turned out to be too large, about a couple of mm, and without it it was small, about 0.1 mm. And the car refused to start. Of course, I tried to set the required gap by installing additional washers, but I didn’t achieve anything. Next, I took and installed a sensor from ZMZ 406 with a reading of 740 Ohms and additionally changed the main engine relay. And oh, miraculously, the car started. It warmed up and then started with half a turn. True, the behavior of the electromagnetic clutch of the cooling fan immediately seemed strange to me, which immediately turned on the fan. But no errors popped up. Well, I think there’s probably a short somewhere. Anyway…
Air temperature sensor ZMZ 406 - where it is located and what it is responsible for
On GAZelle cars with a ZMZ 406 engine, several sensors are used that monitor the performance of the system. One of these sensors is the DTVV or air temperature sensor.
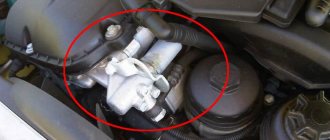
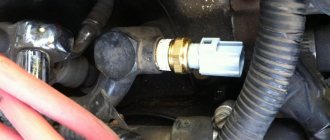
As I already noticed above, the DTVV is installed behind the air filter in the intake manifold.
Air temperature sensor ZMZ 406
Its role in the operation of the car is small; it adjusts the flow of the fuel-air mixture depending on the intake air temperature. That is, it measures the temperature of the air that passes through the air filter box.
Since our air is more rarefied (warm air) in summer, and cold air is denser in winter, the ECU reads the readings of this sensor and makes small changes in the amount of fuel supplied to the internal combustion engine.
Symptoms of a faulty crankshaft sensor
The crankshaft of an internal combustion engine is a crankshaft element that serves to convert the reciprocating motion of the pistons into rotational motion. On injection cars with an ECM, a so-called crankshaft position sensor (CPS, synchronization sensor, crankshaft sensor, TDC sensor, sometimes called a phase sensor in everyday life) is used, which is necessary for precise synchronization of the operation of the ignition system and the power system.
As you know, the electronic engine control system has a large number of different elements. If there is a malfunction of any link, the ECU puts the engine into emergency mode, the engine may stall, have difficulty starting, a “check” lights up on the dashboard, etc. In this case, the unit will still work, albeit unstably, if air and fuel are supplied to it and there is a spark on the spark plugs. A special feature of the DPKV is that malfunctions or malfunctions in its operation usually lead to engine shutdown. Next, we will look at what signs of a malfunctioning crankshaft sensor indicate problems with this element.
Step-by-step instructions for replacing the crankshaft sensor ZMZ 405 - 406
And so we proceed to replacing the crankshaft ZMZ 405.406 and the first thing we need to do is dismantle the old one:
- Removing the engine mudguard
- Press the spring clamp of the engine management system wiring harness block
- Next, disconnect the wiring harness block from the sensor wiring block.
- We remove the sensor wire block from the holder attached to the intake manifold receiver
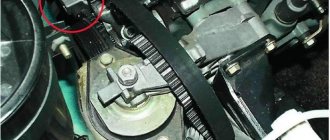
- Using a slotted screwdriver, unscrew the screw securing the phase sensor to the timing cover
- We remove the sensor from the socket in the cover.
We put everything back together in reverse order. Well, that’s all I wanted to tell you about replacing the crankshaft sensor ZMZ 405 - 406. See you soon.
At the very end of the article you will find a selection of video checks!
Today in the automotive industry there are 3 types of DPKV: optical, induction and based on the Hall effect. In this article we will tell you how to check the crankshaft sensor, using the most popular induction type as an example.
Regardless of the type, any DPKV sensor is designed to transmit 2 parameters to the ECU.
READ Mazda 3 what kind of automatic transmission oil
The received data is sent to the ECU, after which the following indicators are adjusted.
Depending on the technical complexity of the engine, the tasks for the ECU can vary dramatically, but none of the currently existing control units is capable of working without a crankshaft !
If the crankshaft sensor is faulty, there may be malfunctions in the operation of the internal combustion engine in the form of: delayed spark formation, advanced ignition angle, lean air-fuel mixture, all this leads to unstable engine operation or even failure to start.
Depending on the year of manufacture of the car, the technical complexity of the engine and electronics, the symptoms of one malfunction may manifest themselves differently. There are situations when all the signs point to a certain breakdown, and as a result, a completely different unit must be replaced. We tried to describe in as much detail as possible all the signs of a faulty crankshaft sensor so that you can determine the breakdown as accurately as possible.
As a rule, the signs of a malfunction are not isolated, they are combined and progress quickly. Items. and as a rule, they arise at one moment with the appearance of an error, and subsequently unstable speed appears both at idle and while driving.
We will cover 4 ways to test an inductive sensor, since it is the most common. Removal is accompanied by a mandatory visual inspection!
Before removing the sensor, be sure to mark its original position!
The general technical condition (including the crankshaft sensor) of the car can be checked using a diagnostic scanner. Of those on the market, we can recommend Scan Tool Pro Black Edition.
This device is compatible with most old and new cars from 1993 onwards, with an ODB2 connector. The advantages of this model include diagnostics of not only the engine, but also related vehicle systems. Connection occurs via bluetooth (for Android) and wi-fi (for iOS). All information about the general condition of the car and a description of existing problems is displayed on the phone/tablet screen in Russian.
This method is the most accurate, however, not every car owner has experience working with an oscilloscope and not everyone has the device itself at hand. If you do not have experience and the device itself, you can immediately proceed to the next instructions.
What is the advantage of using an oscilloscope? It allows you to see and record the process of signal formation itself and see the process of their formation!
Signal generation may vary! Only an experienced technician can say with 100% confidence that the sensor is working properly.
To test the inductance of the DPKV coil, you will need the following equipment:
To obtain the most correct data, the test should be performed in a room with an air temperature of 21-23 degrees Celsius!
You should focus on inductance results in the range of 200 - 400 mH.
The multimeter supports the function, you need to connect the 2 probes of the multimeter to the 2 leads of the coil, the polarity does not matter.
The multimeter does not support the required function; we use an inductance meter to check.
You will need a megohmmeter set to an output voltage of 500 V. Check the insulation resistance between the coil wires at least 2 times! The insulation resistance value should not be lower than 0.5 MOhm.
At this step, magnetization of the coil “interturn short circuit” may occur, as a result of which the data will be incorrect. It is necessary to use a network transformer, then repeat the step
This method is the most common of all listed. Despite its simplicity, it has one significant drawback: it has serious errors and is not able to provide a 100% guarantee of fault detection.
The method involves measuring the resistance of the inductor; for this you will need a regular multimeter that has an “ohmmeter” resistance measurement function. It is necessary to connect 2 multimeter probes to the coil terminals, polarity does not matter.
A working sensor should have a resistance in the range of 530 - 730 Ohms. At the very beginning, you need to look at the documentation of your sensor or search on the Internet what resistance is considered normal.
The Chrysler company was founded by Walter Percy Chrysler, he was a businessman and engineer, founded in 1924. The company itself arose as a result of the reorganization of Maxwell Motor. Maxwell Motor in turn absorbed two and Chalmers Motor.
Chrysler released its first car in 1924, its engine had 6 cylinders. The purchase was very profitable; as a result of the purchase in 1928, it immediately became one of the leading automobile companies in America.
In 1955, Chrysler began producing its first premium cars, the lineup was called Imperial. From 1955 the Chrysler Imperial was the start of a new stand-alone mowing line, they were reliable cars and Chrysler repairs were rare.
Afterwards, the company began to actively buy European auto companies: in 1963, 40% of the shares of Barreiros Diesel were purchased, in 1964, 30% of the shares of Rootes Group were purchased, about 80% were purchased in 1966-67. After the purchase, these companies were united into a single European Chrysler auto center.
Today Chrysler is technically bankrupt. After all debts were paid, some of Chrysler's shares were sold to Fiat.
Sources:
https://piter-at.ru/raznoe/datchik-kolenvala-gazel.html https://mad-wheels.ru/chrysler-remont/dvigatel-kraysler-na-gazel-gde-stoit-datchik-kolenvala/ https https://etlib.ru/auto/chrysler-11
Crankshaft sensor functions
As already mentioned, one of the obvious signs of DPKV problems is a complete engine stop. This happens as a result of the fact that malfunctions in its operation do not allow the power system to supply fuel in a timely manner, and the ignition system is not capable of igniting the fuel-air mixture at a given moment. Now let's look at why this happens.
The crankshaft sensor sends signals to the ECU indicating the position of the crankshaft at a certain moment, and also reports the direction of rotation of the shaft and indicates the rotation speed. Please note that on different cars, both the device itself and some functions of the DPKV may differ. This depends on the type of element installed. Devices can be:
Main functions
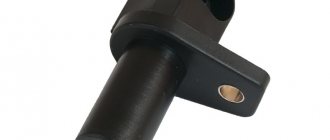
The design consists of the sensor itself, which is located in a special housing (made of plastic or aluminum) and a drive disk. There is also a standard connector through which the device is connected to the control system.
Designed to monitor and record the operating characteristics of motors (position and rotation speed). The obtained data is transmitted to the electronic control unit (ECU) and allows you to solve a wide range of problems: from determining the position of the pistons to monitoring the fuel system.
Despite its fairly simple design, the ZMZ 406 DPKV is a critical element of any engine.
Crankshaft position sensor: signs of malfunction and checking the DPKV
If the cause of the problem is the crankshaft sensor, symptoms of a malfunction may be as follows:
Please note that these symptoms may also appear as a result of other malfunctions. For this reason, before starting manipulations with DPKV, other possible problems should be excluded. It should also be added that malfunctions of the crankshaft sensor may not occur all the time. In other words, unstable operation of the internal combustion engine or problems with starting may not always appear, although the “check” lights up. In this situation, it is recommended to perform computer diagnostics of the car engine to more accurately determine the cause.
You can also check the crankshaft position sensor yourself. For such a test, there are several available methods that allow you to determine the performance of the element with relative accuracy. The device is enclosed in a plastic case, which is usually mounted on a bracket at the location of the generator drive pulley. A longer wire can also be connected to the element. The use of such a wire is due to the fact that the installation site of the DPKV is quite remote.
If a visual inspection reveals nothing, then the synchronization sensor will need to be removed, after which you can proceed to the test. The element should be inspected again, which helps determine damage to the housing, core, and terminal block. It should be added that quite often, after simply cleaning the contacts and cores from dirt, the DPKV begins to work normally.
In the case where no visible defects were noticed, you should proceed to diagnosing the sensor using a multimeter. The device is switched to ohmmeter mode to measure the resistance on the DPKV winding. Normally, readings should be 550-750 Ohms. There is also a method by which the inductance of the synchronization sensor is recorded, but such diagnostics are more difficult to implement in a garage environment and require additional equipment (voltmeter, network transformer).
It should be noted that one quick way to check is to install a known-good or new timing sensor. If the engine starts and runs normally after replacement, then the cause is obvious. You also need to take into account that when installing the crankshaft sensor, you should correctly set the gap that is present between the toothed pulley and the DPKV. A qualified sensor installation assumes that the gap between the sensor core and the timing disk is 0.5 - 1.5 mm. Adjustment of the specified gap is possible by installing additional washers at the location of the crankshaft sensor mounting socket.
Checking the timing sensor
Turn off the ignition and disconnect the negative terminal of the battery.
Using a thin screwdriver or awl, remove the spring clamp of the block.
Disconnect the synchronization sensor connector.
We connect an ohmmeter to the central and one side terminal.
We measure the resistance of the sensor winding, which should be in the range of 700-900 Ohms.
To further check the serviceability of the sensor, remove it from the engine.
You can verify the functionality of the sensor by connecting a voltmeter to its terminals.
We quickly bring the metal rod to the sensor core - if it is working properly, voltage surges are observed on the device.
We replace the faulty sensor.