Removing the grille separately from the bumper
The difficulty is that the grille will have to be folded back. And this risks breaking the “plastic horns”. If you're willing to take the risk, read on.
We will need a flexible Torx screwdriver with a T20 tip. Using a Torx T30 wrench, unscrew the four screws on top. Everything is simple here, but the grille will need to be bent forward.
Operation not according to regulations
Use a flexible screwdriver to get to the screws on the side. They are fixed at the same level with the central point of the emblem.
When the screws are unscrewed, try to remove the grille from the grooves (see figure). Each “horn” ends in a groove in which the lattice protrusion is placed.
Plastic fasteners
If you have dealt with the side fastenings, then with the “central spur” everything will work out quickly. It is necessary to move the plastic protrusion upward, then tilt the grille forward. The fastener should snap off immediately.
The bumper and grille are “sewn” together with plastic tabs. They go in one row, 5 on each side. And you can remove the Renault Duster radiator grille, and not break it, only by snapping off all 10 tabs.
The bottom grill can also be removed
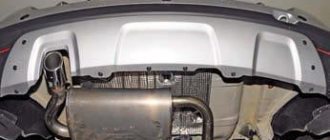
You cannot get to the bottom grate from the outside. Therefore, you will have to remove the bumper. The entire assembly is placed on a flat surface, and then the plastic tabs are snapped off with a screwdriver. First, of course, you need to remove the shields (see figure).
Access to the grille is blocked by a shield
No self-tapping screws or screws are used in the design - only plastic fasteners. We list them here:
- Each shield is secured with 5 separate tabs;
- 9 tongues hold the grille itself (4 at the bottom and 5 at the top).
Tuning the radiator grille in the Cherokee style
Of the many solutions for tuning, “Cherokee” is the most popular option. Renault Duster owners transform their cars, achieving an external resemblance to a jeep. To do this, you have to dismantle and replace the standard radiator grilles.
When choosing a color, we are guided by the final objectives. If the design of the vehicle is planned in a militaristic style, the front bumper protection is painted in colors reminiscent of chrome. In other cases, choose tones that match the body. The cells are coated with black paint for contrast.
Trade organizations offer car enthusiasts ready-made radiator grilles made in different styles. When purchasing a product, the first thing you pay attention to is the placement of the fasteners. The holes must match the factory specifications. Otherwise, it is impossible to install the part on the Renault Duster without a set of additional measures.
How much does it cost to replace a part?
The radiator grille on the Duster can be installed using several methods:
- specialists in the official center;
- at the nearest service station;
- owner of the car.
Installing a radiator grille on a Duster
The first method is the simplest, most effective, but also the most expensive. Thus, replacing a radiator grille at official Renault centers ranges from 3,000 rubles and more. For this money, the owner of a Duster, for example, can install a spectacular spoiler on his car.
Spectacular car spoiler
To perform tuning, service station specialists will have to purchase a new radiator grill themselves. Non-original metal parts can be purchased for 1–2 thousand rubles. The quality of work on replacing the grille will directly depend on the experience of the technician. The third option is the cheapest. Of course, tuning yourself will take some time, but this goal is quite achievable. All you need is maximum attention and patience.
Let's sum it up
Tuning solutions for the Renault Duster radiator grille allow you to save on repairs and significantly change the appearance of the car. A detailed study of photo and video instructions for carrying out these works will allow you not to spend extra money on the service, but to do the tuning yourself. This will allow you to insulate and protect from dirt everything that is hidden by the grille. This publication revealed the questions step by step: how to remove, install, gave an explanation regarding the summer mesh and the protective shell for the cold period. It also presents the sequence of operations for installing the mesh and insulating the radiator.
It cannot be said that French cars are characterized by low-quality assembly, but such an element as the Renault Duster radiator grill will remain a black spot in the history of the automotive industry of this country for a long time. It would seem that such an important element, on which the cleanliness and serviceability of many parts under the hood of Renault depends, should be given maximum attention. But the French manufacturer decided differently, installing a coarse mesh grille on the Duster, through which even small stones can penetrate.
New radiator element is the best solution
Many people want to install a new one with an innovative design and in a different color. The installation process on Renault Duster is completely identical to the removal procedure and is performed in the reverse order. But, there is a nuance - the mounting channels must be similar to the corresponding fasteners on the bumper frame. If the requirement is not met, the installation will fail.
In most cases, the radiator grille is tuned and this involves changing its optional part. This is due to the increased level of clogging of the radiator with dirt and insects in the summer. To prevent this condition, a protective mesh or insulating material is installed. It can be purchased at auto stores or made independently from a standard mesh.
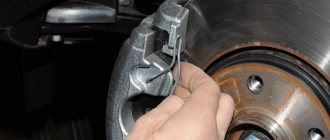
Do you need to replace your front brake pads? see instructions in this material https://zamenarenault.ru/duster/tormoznaya-sistema/menyaem-tormoznye-kolodki.html
To hide it against the background of the Renault Duster radiator grille, the mesh is painted black or tinted to match the body color. This upgrade will keep the radiator clean and keep it running without boiling. And the radiator grill itself looks neat.
Many car owners want to insulate their cars for the winter. For this purpose, the radiator grille is removed; you have already learned how to remove it. So, in order to provide insulation for the winter, a special insulation material is not installed under the grille, rather than a mesh to protect against dirt.
Let us add that you can insulate a car in this way with your own hands, the main thing is to choose high-quality insulation, which is not expensive, and also know how to remove the grille; you will also need the appropriate tools. With this tuning, the radiator grille does not change in appearance.
Replacement methods
The lower grille can also be removed without removing the bumper. Installing the grille in this case is easier. To do this you will need:
- Remove the 4 radiator grille mounting bolts located on top (note that the chrome plating of the part is quite fragile, so you need to work carefully).
- After this, the mesh can be pulled out and a new one of the same size installed in its place.
- In order to secure it, you will need to adjust the parameters.
- Assembly requires putting the mesh in place and screwing the grille fasteners back.
The main thing when choosing a grille is to maintain its size; if you prefer a mesh for windows, it can be attached to the car with clamps, but the appearance will be unaesthetic.
Unscrew the indicated 4 bolts
Raise the edge of the grille fastening and lower it towards you
Unscrew the mounting bolts
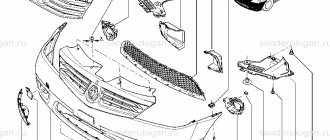
Carefully remove the radiator grille from the Renault Duster
This is what it looks like in front of Duster without a radiator grille
The second method is to remove the front bumper along with the grille. Below we will show how easy it is to remove the Duster bumper and install a protective mesh in the second step.
Renault Duster Removing the radiator Renault Duster
Renault Duster > Cooling system > Removing the Renault Duster radiator
Renault Duster Radiator removal
We remove the radiator to check for leaks (if a leak is suspected) or to replace it if it is damaged. We carry out the work on an inspection ditch or overpass.
Remove the front bumper (see “Removing the front bumper”) and the radiator fan (see Removing the radiator fan).
To access the radiator mountings, it is necessary to remove the plastic deflector of the radiator and condenser of the air conditioning system.
The deflector is attached to each side of the car using three pistons.
Using a Torx T-30 wrench, unscrew the piston retainer for the right mounting of the deflector to the upper cross member of the radiator frame.
Using the same tool, we unscrew the fasteners of the two pistons of the right fastening of the deflector to the front bumper beam. Similarly, we unscrew the fasteners of the three pistons of the left deflector mounting.
We take out the pistons with clamps...
...and remove the radiator and condenser deflector. We place a container under the lower radiator hose to drain the coolant.
Using sliding pliers, we compress the ends of the clamp securing the radiator outlet hose and slide the clamp along the hose. At the factory, the hoses are installed on the radiator pipes using sealant.
Therefore, if it is difficult to remove the hose from the radiator pipe...
...carefully (so as not to damage the hose) insert a slotted screwdriver into the gap between the pipe and the hose. Moving the screwdriver around the circumference of the pipe, pry up the hose...
...and remove it from the lower radiator pipe, draining the coolant into a substitute container.
Using sliding pliers, we compress the ends of the clamp securing the radiator supply hose and slide the clamp along the hose. Remove the radiator supply hose from the upper radiator pipe.
If it was not possible to disconnect the hose from the nozzle (since the nozzle is located in a hard-to-reach place), then you can disconnect the upper end of the hose from the thermostat cover nozzle.
Using the “8” head, unscrew the four self-tapping screws securing the air conditioning system condenser to the radiator. Without disconnecting the refrigerant inlet and outlet tubes from the condenser, we lift it...
...by removing the bracket for its upper right mount from the holder on the radiator.
Similarly, remove the bracket for the upper left condenser mount from the holder on the radiator.
We tie the capacitor to the upper cross member of the radiator frame.
We remove the radiator from the engine compartment. We check the tightness of the radiator in a bath of water.
Having plugged the radiator pipes with wooden plugs, we supply compressed air to it through one of the plugs at a pressure of about 1 bar (1 kgf/cm2) and lower the radiator into a bath of water for at least 30 s.
In this case, no air bubbles should appear. We replace the leaking radiator with a new one. Install the radiator in reverse order.
We pour coolant into the cooling system and bring the liquid level in the tank to normal (see Replacing the coolant).
Removing the Renault Duster radiator
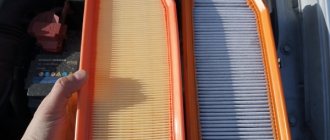
How to replace the mesh yourself
First, you will need the radiator protective mesh itself, which is chosen by the car owner himself. The large factory protection needs to be removed, and a smaller one installed in its place, but not so large that the cells are not visible to the eye at all. Otherwise, they will immediately disappear under a layer of dust.
Then follow the instructions:
- Carefully remove the bumper, being careful not to damage the chrome coating.
- We move away the clamps on which the radiator grille is attached.
- We remove the factory mesh.
- We adjust the new mesh to the dimensions and complete the process in reverse order.
Video of installation of mesh on the radiator grille from Russian Artel LLC
- From an official dealer. It is also quite an expensive undertaking, but everything will be done efficiently and with a guarantee.
- Self-revision. Everything is clear here, the replacement is done with your own hands, but at the same time you will have to tinker quite a bit
- Self-replacement
Before dismantling, you need to prepare the mesh itself, which you choose to your taste. Then we do the following:
- Carefully remove the front bumper
- Unclench the clamps that secure the radiator grille, unscrew the four screws
- We take out the mesh
- Installing a new part
It is advisable that a grille with small cells be installed on the Renault Duster; this will help protect the radiator and engine compartment from dirt and various insects in the summer. Also, the mesh on the Renault Duster can be insulated for the winter; for this, insulation is installed under the grille; you can do this yourself; the cost of such insulation is low. If you don’t want to dismantle the bumper, you can install a mesh outside and secure it with zip ties.
ESSENTIAL TOOLS FOR INSTALLING THE RADIATOR GRILLE ON A RENAU DASTER
Screwdriver with asterisk T25 and T30
We dismantle the radiator grille from Renault Duster using a screwdriver with a T30 attachment. Remove the top screws of the radiator grille.
We separate the grille vertically upward, thereby separating it from the fixation of the hood stops.
Unscrew two side and one central grille fastening screws using a T25 socket.
We unclip the fasteners on the sides and in the center of the Duster radiator grille.
We remove the Duster radiator grille from its seats, pulling it horizontally forward from the hood.
The standard radiator grille has been removed from the vehicle. We install the radiator grille in the reverse order.
All-Russian recognition
During its presence on the Russian market, Renault DUSTER was awarded many prestigious awards. We are rightfully proud to be recognized for the excellent off-road performance and reliability of the Renault DUSTER.
Nominee in the residual value rating of Autostat research “Residual value - 2020”
The study “Residual value” (preservation of the residual value of the car) is carried out annually at the end of the year. In 2021, Renault DUSTER took second place in the SUB (B) category, with a residual value index of 81.93%.
No. 1 in sales in Russia²
Renault DUSTER has been the best-selling all-wheel drive car in Russia since 2013, as well as the most affordable diesel car
The best among multi-purpose vehicles
Renault DUSTER is the winner in the “Multi-purpose vehicles” segment up to RUB 1,400,000. according to the annual all-Russian study “Ratings of Cars of the Year 2019”
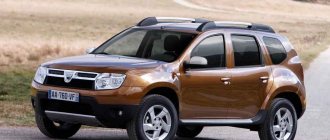
Buy a new Renault Duster in Ivanovo
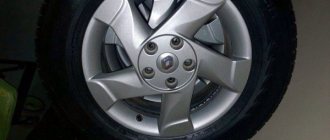
Stylish Renault Duster
Renault Duster – exterior design
The new design attracts the attention of all car enthusiasts. The massive chrome radiator grille, roof rails and bumpers have also changed their shape. Headlights with dual optics and built-in running lights look very stylish. The taillights have the same shape, which makes the car recognizable. All models have 16-diameter alloy wheels. In addition to all the classic colors, you can choose the new Renault Duster in khaki color.
The new chrome grille features an enlarged Renault logo. Both parts of the grille have small cells that protect the radiator and make it resistant to various damage and dirt.
Bumpers and roof rails
The new shape of the front and rear bumpers makes the appearance of the Renault Duster even more brutal. They protect the body from damage during extreme driving. The roof rails have become more massive, but remain just as functional.
Renault Duster has 16-diameter alloy wheels. By purchasing the Privilege version, you will receive Aconit wheels (new). As an additional option, you can purchase Black Thema - new alloy wheels.
The updated Renault Duster has headlights with dual optics and daytime running lights. And now it is part of the basic package. As soon as you turn on the ignition, they will automatically light up. The rear headlights remain the same shape, but have a new light pattern, thanks to which the Renault Duster can be recognized even in large traffic.
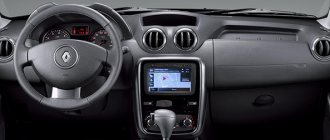
The interior of Renault Duster meets the highest requirements. It emphasizes the status of its owner. Everything here meets two main parameters: comfort and functionality. What has been updated here: the center console, finishing materials, the shape of the front seats, steering wheel and instrument panel.
Updated front panel and ergonomic steering wheel
The instrument panel has even more conveniently located keys, as well as a new shield that is easy to read even at night. Here you can view information about the outside temperature, see the cruise control mode and an indicator that shows gear shifting. The steering wheel has an ergonomic shape, now even during long driving the driver will experience comfort and his hands will not get tired. There are also buttons on the steering wheel that allow you to control speed and cruise control.
The stylish upholstery looks very expensive thanks to the latest wear-resistant materials. The Luxe Privilege model also has leather trim.
The front seats have become more comfortable and safer. In the event of an accident, they have a programmed deformation so that the driver and passenger suffer the least amount of damage. The new seats have increased lateral support and a longer cushion and backrest. This allows the driver to feel comfortable while sitting behind the wheel, even for a long time. The position of the chair can be easily changed by turning the convenient handle.
Advantages of Renault Duster
The Renault Duster SUV conquers any roads and those places where there are no roads. The vehicle's ground clearance is 210 mm. Together, short overhangs and wide wheel arches, additional suspension protection and large obstacle-overcoming angles make the Duster a dream for any travel driver, as well as for those who love extreme off-road driving. The suspension is built to last, can handle huge obstacles, and has an improved, more reliable design. The driver will be comfortable no matter where exactly he is driving.
The all-wheel drive of the Renault Duster has three modes. Each of them is needed for different situations. Together they provide unlimited possibilities for the car and the driver.
- In 2WD mode, the engine torque is located only between the front wheels. The car's fuel consumption is much more optimized.
- In AUTO mode, torque is independently distributed between the rear and front wheels. This depends on the road conditions and the speed at which the car is currently traveling.
- In LOCK mode, torque is distributed equally among all wheels. Unlike many other similar SUVs, Renault Duster in LOCK mode is capable of reaching speeds of almost 80 km/h. In this mode, even difficult obstacles can be overcome at this speed.
It is worth noting that Renault Duster with all-wheel drive is equipped not only with a manual transmission with a short first gear. There are versions of the car with an automatic transmission. The automatic transmission is specially adapted to Russian roads and has torque control and cooling systems. All this makes driving on and off-road completely ideal. With such data it is easy to start uphill, even if the car is fully loaded.