Replacing lamps on an Opel Corsa C 2004 may be necessary either due to a simply burned out light bulb, or in case of replacement with a different type of lamp. In any case, replacing lamps with your own hands on Corsa is not difficult; changing them is very simple.
What lamps are installed on the Opel Corsa C:
- low and high beam - lamps;
- direction indicators - PY21 lamps;
- turn signal indicators and parking lights - W5W lamps;
- side lights and brake lights - P21/5 lamps;
- fog lights - lamps.
Other lamps are listed on the last page of the photo report.
VW Polo lamp type table
| Low/high beam | 55/60 | H4 |
| parking lights | 5 | W5W |
| Front direction indicators | 21 | PY21W |
| Rear direction indicators | 21 | PY21W |
| Side direction indicator | 5 | W5W |
| Anti-fog headlight | 51 | HB4 |
| Stop signal | 21 | P21W |
| License plate lamps | 5 | W5W |
| Fog light | 21 | P21W |
| Additional stop signal | 21 | LED |
| Reversing light | 21 | P21W |
| Interior lighting | 10 | K10W |
| Trunk light | 5 | W5W |
This is interesting: Replacing a Volkswagen Polo sedan light bulb - let's look at the essence
How to adjust headlights in an Opel Corsa car
After replacing the lamps, it is best to adjust the headlights in the car. To do this, you should find a flat area on which the Opel Corsa D will stand. The light should fall on the wall. It is necessary to mark the surface. A person of your size should get behind the wheel of the car in order to bring the situation as close as possible to real conditions. The car is driven away at a distance of seven meters from the wall. You need to adjust the light in accordance with the marks on the wall. Next, the light flow of different lighting levels is adjusted so that a particular light flow reaches a certain fixed point.
So, changing low beam lamps in an Opel Corsa D is very simple. There are regular lamps, as well as modernized ones. Choose the ones that suit you best. They need to be replaced regularly as soon as the light deteriorates and begins to dim. After the procedure itself, it is necessary to make adjustments and adjust the lighting according to the parameters in order to avoid dangers during the trip.
Replacing the right low beam lamp H7 Corsa D - Opel Corsa de España logbook of the year on DiabloArea
The replacement process on the right and left headlights is identical, since all elements are located symmetrically.
Replacing low beam lamp Opel Corsa D
To do this, you should find a flat area on which the Opel Corsa D will stand. So, you need to unscrew a couple of mounting screws with a Phillips screwdriver and remove the headlight from the clamps. In order for the low beam of the Opel Corsa to be uniform, the lighting fixtures in the Opel Corsa D need to be replaced in pairs.
Low beam bulb for Opel Corsa sample H7. Now the most important thing is to insert the rear headlight cover....
You need to adjust the light in accordance with the marks on the wall. So, you need to unscrew a couple of mounting screws with a Phillips screwdriver and remove the headlight from the clamps.
When removing the lamp from the headlight unit, you need to act carefully so as not to damage the bulb or mounting system. As the headlights fail, the lamps need to be replaced.
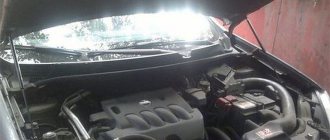
The lower air duct is removed from the filter housing, simply pulled together, it fits quite tightly, 2. Having previously loosened the clamp with a key of 7, the upper air duct is removed from the filter housing; it sits tightly, 3.
By rocking, lift the filter housing up and then towards the engine. The body sits in 4 rubber bushings. Access to the headlight is open, even if you climb into it.
How to find out the engine temperature of Opel Corsa D. Diagnostics.
We take out the fuse cover, it snaps off in 2 places and opens. Not very comfortable, but tolerable. The color temperature and intensity of the glow changes over time.
If you change only one lamp, the difference will be significantly noticeable, since the new and old lamp will shine differently.
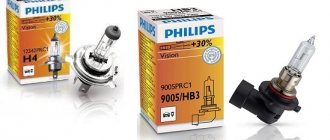
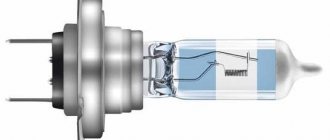
What are the best H4 low beam bulbs? When replacing them, it is strictly forbidden to handle them with bare hands.
At a minimum, they should be handled with a cloth or gloves. Marks and grease can damage the lights. If by chance the lamp gets dirty, it should be wiped with alcohol and allowed to dry.
Which models to choose
The Polo low beam lamp is classified by the H4 base. Similar optics are used for headlights on most production passenger cars. Distinctive feature: 2 filaments, working synchronously for low and high beams. For Polo sedan, factory-equipped headlights are equipped with models, less often Philips.
Choosing a lamp for VW Polo
General recommendations when choosing H4 for Volkswagen Polo headlights:
- Installing models with a long service life will save money.
- The H4 lamp must have a maximum color temperature of 4500 K with a power of no more than 55 V. Otherwise, the plastic elements of the headlight unit may melt.
- It is not recommended to install halogen models with a xenon effect with a brightness of more than 5,000 K. In wet weather and during rain, oncoming drivers may be blinded.
Replacing bulbs in a Corsa headlight
To change the bulbs in the right front headlight of the Opel Corsa, you will need to remove the air duct pipe. This will give you access to the headlight and turn signal lamps. Next you will need to rotate and remove the protective cover on the back of the headlight. Then, disconnect the wiring, fold back the bracket and remove the low beam lamp from the headlight. Install in reverse order.
Replacing the headlight bulb and turn signal is even easier. They need to be removed from the seat, disconnect the power connector and connect a new lamp. Then install it back.
Replacing the turn signal lamp is also easy. You need to pry up the repeater lamp and remove it from its seat. Then disconnect the lampshade and change the lamp. Put everything back together.
Replacing headlight bulbs on an Opel Corsa B with your own hands, video
Replacing the low beam foot of Opel Corsa
So, changing low beam lamps in an Opel Corsa D is very difficult. The lower air duct is removed from the filter housing and simply pulled together, it fits quite tightly2. It is best to carry out this operation with gloves so as not to stain the flask.
Opel Corsa headlight unit. When you decide to change the lighting equipment in your Opel Corsa D,...
When removing the lamp from the headlight unit, you need to act carefully so as not to damage the bulb or mounting system. High-quality products are the key to long-term work. Work process Replacing the low beam light bulb on an Opel Corsa is impossible without carrying out certain preparatory measures that improve access to the structure, and this is where we will begin our consideration of the process.
The body sits in 4 rubber bushings. They need to be removed from the seat, disconnect the power connector and connect a new lamp.
We take out the fuse cover, it snaps off in 2 places and opens. Not very comfortable, but tolerable. Remove the brackets from the headlight cover.
Lift the lid and pull it out towards you. Next, you need to disconnect the glass flask from the base.
Replacing bulbs in a Corsa taillight
After this, you need to insert the new lamp into the reflector until it stops. When the lamp is installed and fixed, you need to close the headlight cover and install the structure itself in place. Having replaced all the lighting equipment, you can adjust the headlights and test different levels of illumination of the car. When removing the lamp from the headlight unit, you need to act carefully so as not to damage the bulb or mounting system.
What are the types of lamps?
There are several types of low beam bulbs:
Luminous flux comparison
- Halogen is the most common type. They are a modification of incandescent lamps, have compact sizes and a long service life;
- The “daytime alternative” lamp is an economical LED lighting device as an option for daytime running lights. Such lamps are relevant in accordance with the requirement to turn on low beams during the daytime;
- Xenon (gas discharge) - they are popular due to their economy and efficiency, and have a long service life. The headlights will be white with a blue tint and very pleasing to the eye;
- LEDs are an expensive but high-quality lighting option. They consume minimal energy and are used for a long time.
Recommended literature on repair and maintenance of Opel Corsa:
OPEL CORSA petrol from 2010 onwards, repair manual More details OPEL CORSA C/COMBO petrol/diesel 2000-2006 onwards, repair manual More details OPEL CORSA petrol / diesel from 2006 onwards, repair manual More details OPEL CORSA petrol/diesel, repair, operation, maintenance More details
Removing and installing Opel Corsa headlights
- Repair manuals
- Repair manual for Opel Corsa 1993-2000.
- Removing and installing the headlight
Removing and installing the headlight
| EXECUTION ORDER |
↓ Comments ↓1. Cars Opel Corsa B, Tigra and Combo – abstract 1.0 Opel Corsa B, Tigra and Combo cars - abstract 1.2 Vehicle identification numbers 1.3 Purchasing spare parts 1.4 Maintenance technology, tools and workplace equipment 1.5 Jacking and towing 1.6 Starting the engine from an auxiliary power source 1.7 Checking the vehicle’s readiness for operation 1.8 Automotive chemicals, oils and lubricants 1.9 Troubleshooting 2. Controls and operating techniques 2.0 Controls and operating techniques 2.1 Instrument panel 2.2 Information display 2.3 Additional electronic devices 2.4 Access, security 2.5 Interior lighting 2.6 Elements of vehicle safety systems 2.7 Interior equipment 2.8 Comfort 2.9 Operating techniques 3. Settings and routine maintenance of the car 3.0 Settings and routine maintenance of the vehicle 3.1 Schedule of routine maintenance 3.2 General information 3.3 General information about settings and adjustments 3.4 Checking fluid levels 3.5 Checking the condition of tires and their inflation pressure, rotating the wheels 3.6 Replacing the engine oil and oil filter 3.7 Checking the condition and replacing the auxiliary drive belt units 3.8 Removing sediment from a diesel engine fuel filter 3.9 Checking the condition and replacing hoses located in the engine compartment 3.10 Checking the condition of components 3.11 Checking, maintenance and charging 3.12 Checking the condition and replacing brushes 3.13 Checking the exhaust system 3.14 Checking the brake system 3.15 Checking electrical equipment 3.16 Control condition of the anti-corrosion coating of the body and bottom of the car 3.17 Checking and adjusting idle speed and maximum speed 3.18 Replacing the filter element 3.19 Checking and maintenance 3.20 Replacing the fuel filter 3.21 Checking the composition of exhaust gases 3.22 Lubricating locks, hinges and stops 3.23 Inspecting suspension components 3.24 Checking and adjusting valves clearances on a diesel engine 3.25 Replacing spark plugs 3.26 Checking the clutch pedal adjustment 3.27 Replacing brake fluid 3.28 Replacing ATF 4. Engines 4.0 Engines 4.1 General information 4.2 Checking the compression pressure in the cylinders and engine oil parameters 4.3 Diagnostics of the engine condition using a vacuum gauge 4.4. Procedures for repairing SOHC gasoline engines without removing them from the car 4.5. Procedures for repairing DOHC gasoline engines without removing them from the car 4.6. Procedures for repairing diesel engines without removing them from the vehicle 4.7. General and major engine repairs 5. Engine cooling, interior heating and air conditioning systems 5.0 Engine cooling, interior heating and air conditioning systems 5.1 General information and precautions 5.2 Antifreeze - general information 5.3. Engine cooling system 5.4. Ventilation, interior heating and air conditioning systems 6. Power supply, exhaust and emissions reduction systems 6.0 Power supply, exhaust and emissions reduction systems 6.1. Power supply system 6.2. Fuel injection system for gasoline engines 6.3. Diesel engine fuel injection system 6.4. Exhaust and emissions systems 7. Engine electrical systems 7.0 Engine electrical systems 7.1 General information and precautions 7.2. Electronic ignition (and injection) control system for gasoline engines 7.3. Diesel engine fuel preheating and heating systems 7.4. Charging and starting systems 8. Manual 5-speed gearbox 8.0 Manual 5-speed gearbox 8.1 General information 8.2 Adjusting the gearshift drive 8.3 Removing and installing a manual transmission 8.4 Repairing a manual transmission - general information 9. Automatic 4-speed transmission 9.0 Automatic 4-speed transmission 9.1 General information 9.2 Adjusting the gear selection mechanism 9.3 Removing and installing the gear selection cable 9.4 Removing and installing the AT selector lever assembly 9.5 Removing and installing the AT 9.6 Overhauling the AT - general information 10. Clutch and drive shafts 10.0 Clutch and drive shafts 10.1 General information 10.2. Clutch 10.3. Drive shafts 11. Brake system 11.0 Brake system 11.1 General information 11.2 Anti-lock brake system (ABS) - general information and fault codes 11.3 Bleeding the brake system 11.4 Checking the condition and replacing brake lines and hoses 11.5 Replacing front wheel disc brake pads 11.6 Removing and installing brake shoes 11.7 Replacing brake linings drum brakes 11.8 Checking the condition, removing and installing the brake disc 11.9 Removing, checking the condition and installing the brake drum 11.10 Removing, repairing and installing the calipers of the disc brake mechanisms of the front wheels 11.11 Removing, servicing and installing the wheel cylinders of the drum brake mechanisms of the rear wheels 11.12 Checking the proper functioning and tightness of the vacuum brake booster 11.13 Replacing and checking the vacuum pump of the brake booster servo drive (diesel models) 11.14 Adjusting the parking brake drive 11.15 Removing and installing parking brake drive cables 11.16 Replacing the brake light switch sensor 11.17 Pressure regulator valve in the hydraulic circuits of the rear brakes wheels 12. Suspension and steering 12.0 Suspension and steering 12.1 General information 12.2. Front suspension 12.3. Rear suspension 12.4. Steering 13. Body 13.0 Body 13.1 General Information and Precautions 13.2 Caring for Body and Underbody Components 13.3 Caring for Vinyl Trim 13.4 Caring for Upholstery and Carpeting 13.5 Repairing Minor Damage to Body Panels 13.6 Repairing Severely Damaged Body Panels 13.7 Servicing Vehicle Hinges and Locks 13.8 Replacement windshield and other fixed windows 13.9 Removing and installing the bumper trim and support beam 13.10 and installing a decorative radiator grille (models from 03.1997) 13.11 Removing and installing the wheel arch locker 13.12 Removing and installing the windshield fairing panel 13.13 Removing and installing the hood 13.14 Replacing hood hinges 13.15 Removing and installing the front fender 13.16 Replacing the rear wheel arch trim (Corsa and Combo models) 13.17 Removing and installing door trim 13.18 Removing and installing front door glass 13.19 Removing and installing rear door glass (Corsa model) 13.20 Removing and installing window regulator 13.21 Removing and installing the outside door handle 13.22 Removing and installing the front door lock cylinder 13.23 Removing and installing the door lock 13.24 Frost protection of locks and seals 13.25 Removing and installing the outside mirror and its drive motor 13.26 Removing and installing the outside mirror housing 13.27 Removing, installation and adjustment of the door 13.28 Removing and installing the tailgate (Corsa and Tigra models) 13.29 Removing and installing the tailgate lock (Corsa and Tigra models) 13.30 Removing, installing, disassembling and assembling the outer handle and cylinder of the tailgate lock (Corsa model) 13.31 Tensioner seat belt 13.32 Safety precautions when handling the emergency seat belt pretensioner and side airbag 13.33 Removing and installing the front seat 13.34 Removing and installing the rear seat 13.35 Removing and installing the center console 13.36 Removing and installing the side trim of the front passenger's foot well 13.37 Removing and installing the glove box 13.38 Removing and installing the interior mirror and installing its mounting plate 13.39 Removing and installing the instrument panel 13.40 Sliding roof panel 14. On-board electrical equipment 14.0 On-board electrical equipment 14.1 General information and precautions 14.2 Finding the causes of electrical equipment failures 14.3 Fuses - general information 14.4 Relays - general information and checking proper functioning 14.5 Removing and installing the single lock electric motor 14.6 Adjusting the range of light 14.7 Removing and installing the switch and electric motor headlamp adjustment (Corsa and Combo models) 14.8 Removing and installing the seat heating switch 14.9 Removing and installing the horn 14.10 Anti-theft device and alarm 14.11 Replacing incandescent lamps in headlights 14.12 Replacing incandescent lamps in external lighting devices 14.13 Replacing incandescent lamps in headlights, parking lights and headlights turn indicators of the Tigra model 14.14 Replacing incandescent lamps for lighting the interior, luggage compartment and glove box 14.15 Removing and installing the headlight 14.16 Adjusting the headlights 14.17 Removing and installing the rear combination lamp 14.18 Removing and installing the fog lamp 14.19 Removing and installing the instrument cluster 14.20 Removing and installing measuring instruments and indicators 14.21 Removing and installing control lamps and the printed circuit board of the instrument cluster 14.22 Replacing the backlight lamp of the heating control unit panel 14.23 Removing and installing the steering column switch 14.24 Removing and installing the rear fog lamp (fog lamp) and seat heating switches 14.25 Removing and installing the external and internal lighting switch 14.26 Removing and installing the hazard warning switch 14.27 Removing and installing the ignition lock cylinder and its contact element 14.28 Installing the radio 14.29 Removing and installing the speakers 14.30 Installing the antenna 14.31 Removing and installing the windshield wiper 14.32 Removing and installing the front wiper electric motor 14.33 Removing and installing the electric motor / rear windshield wiper motor 14.34 Removing and installing the reservoir and windshield washer pump 14.35 Checking the brake fluid low level 14.36 Checking the proper functioning and repair of the rear window heater 14.37. Electrical connection diagrams - general information |
How to choose quality light bulbs
The quality of lighting largely depends on the light sources, so when purchasing, we recommend using the following recommendations:
| Manufacturer | Give preference to well-known brands that have proven themselves among customers. You can consult with specialists, or you can read reviews on specialized resources, which is very convenient. Remember that a low price most often indicates appropriate reliability; such elements last less and perform worse |
| Product type | According to the technical documentation, the headlights use H7 type halogen lamps with a power of 55 Watt; you should not purchase more powerful options, as this overloads the car’s electrical wiring and can lead to big problems later |
| Characteristics of light | Nowadays, options with +30% light levels are very popular; they have a brighter luminous flux, which improves visibility. But it is worth remembering that the service life of such products is shorter, so decide for yourself what is more important to you - durability or improved lighting |
The working process
Replacing a low beam light bulb on an Opel Corsa is impossible without carrying out certain preparatory measures that improve access to the structure; this is where we will begin our consideration of the process.
Preparation
The list of necessary works is as follows:
- Park the car in a well-lit place, it can be either a garage or a yard, the main thing is that there is good weather outside.
- Next, the hood is opened and fixed and the terminal from the battery is removed, this will eliminate any unforeseen situations.
- To get to the right headlight, first remove the lower air duct from the filter; you just need to pull it out, but it fits quite tightly. To remove the upper air duct, first unscrew the clamp that secures this element; it also sits firmly. Lastly, the housing itself is removed; it is attached to four bushings; to dismantle it, you need to pull it up and towards the engine.
As for the left side, everything is somewhat more complicated here - first you need to remove the cover from the fuse box to free up at least some space, after which you need to unclip the rear cover latch on the headlight housing and move it away.
We don't recommend removing the cover entirely, as due to its complex configuration and limited space on the left, getting it in place can be a challenge and you will still have to remove the bumper and headlight.
Main stage
Instructions for doing the work yourself are as follows:
Replacing the low beam lamp on an Opel Corsa D begins with opening the plug, this is done very simply: on top you will see a latch that snaps upward, after which the element can be removed. If we are talking about the left headlight, then above we gave a recommendation to simply open the system, so as not to waste time installing the cover later. Inside the housing, the low beam lamp on the Opel Corsa D is held on by two clamps, which are located on the sides. To release the knot, you need to press on one of the petals and pull it towards you; if you can’t press it, pull the base towards you with force and pull it out of the seat
Please note that you need to pull not by the wires, but by the housing, otherwise you may damage the contacts, which will result in additional work.
- Lastly, the connecting chip is removed from the base, and the old lamp is removed. At this point, the dismantling is completed and you can begin replacing.
- Assembly begins with the installation of a new light bulb, while remembering the most important rule - under no circumstances touch the glass part of the product, as this will negatively affect its operation later. If you do touch the glass, wipe it with an alcohol solution. A block with wires is connected; they are long enough to do this outside the case. (See also the article Headlights on Pajero: features.)
Next, the assembled element is inserted into place, make sure that the latches snap into place and the lamp is securely positioned
There are cutouts on the base, so there shouldn’t be any problems finding the correct position; the main thing is to insert the element all the way so that it doesn’t fall out due to vibration. Lastly, the plugs are closed and all previously removed components are installed, everything is simple and quick, so we will not focus on these works.. https://www.youtube.com/embed/FG8hbZdAQoY
The story about how I changed the lamp in the left dipped
Good afternoon, Corsaviors!
As one pioneer leader I knew used to say: “Uncle Rudoznatetz has become a man”! The time has come for me to learn all the delights of replacing headlight bulbs. Of course, everything happened unexpectedly. At a wrong time. And not in the conditions that one dreams of.
The night before I parked the car in perfect condition. And the next morning Opel greeted me blind in one eye. And, yes, of course, we had it with us. Is it possible to drive without spare lamps? It’s just -26 outside, the earlier morning and strong wind did not attract active movements with optics.
Having pushed the boring perfectionist further into... the depths of my soul, I took the child to school. Then there were other things to do. Then - noon. Then... well, winter and frost, as it turned out, came for a long time. Forecasters said that it will be warm in May. I believed them. But there is no warm garage. And I don’t see underground parking either. We had to do everything in the parking lot, in the wind, while waiting for the child to return from school.
In order not to forget the sequence of actions - even if you want it, you won’t forget it - I have compiled a small guide to action. If it turns out to be useful to someone, I will be glad. But, I’ll make a reservation, my actions are relevant for a restyled headlight, because the car is 2012.
I practiced on this headlight
On other designs the actions may be different.
And now, in fact, the order of the ordeal with comments and additions.
Since I firmly believe in the steadfastness of technical literature, I read the operating instructions carefully and without fail. And the instructions advise that to replace the low beam lamp in the right headlight, “remove the cover of the fuse box and unscrew the filler neck of the washer fluid reservoir.” And since I’m also an ordinary person, I don’t shy away from the opinions of more experienced fellow motorists. Experienced Corsa breeders don’t believe in this bible—the instruction manual—and advise anyone to do anything: bend back the bumper; remove the bumper; bend the fender liner; buy surgical and gynecological clamps, etc. The matter was complicated by the fact that my paws, I mean, palms; that is, the hands cannot be called narrow or small. Typical hands! With which I had to fit into the small gap between the headlight and the end of the fuse box.
First of all, I carefully decided on the place of the dance: opposite the neck of the tank is the high beam section of the headlight. I don't need to go there. There is no point in removing the neck. But the fuse box cover needs to be removed. There is no such thing as too much space.
After removing the block cover, it's time to remove the cover from the headlight, from the low beam section.
If you do everything as written, you will get a picture like this
Next, you can stick your hand in and feel the lamp chip. You can stick your phone in and take a photo of the lamp chip. I did both of these things.
This is what the low beam section of the headlight looks like when viewed from the engine compartment. However, you won’t be able to stick your head through. So you have to trust the camera
I grabbed the chip and tried to pull it out, shaking it slightly. And she is BEMS! And she pulled herself out!
This is how the lamp is removed from the headlight socket
Here I would like to look carefully and remember everything. But, “why can’t I change the lamp?!” - my hypertrophied sense of my own greatness screamed. So I simply took a photo of the lamp, completely missing the obvious clue for later mounting it back.
But now Dancing with a Tambourine and the Opel Kama Sutra were waiting for me. Moreover, laughing sarcastically and disgustingly... so as not to accidentally snatch the lamp bulb, I had to work in protective gloves. Well, there are some. And they had Kevlar palm protection. Good ones. Durable. In the wind and frost, your hands become like stakes and do not protect your hands from frost.
I pulled out the burnt out lamp from the chip. I installed a new one. All that remains is to install everything in place. There is not enough space. I tried it with my right paw, well, my hand, that is. Inconvenient. The wrist does not bend in the direction where the lamp asks. I try with one left hand. It's already more convenient. The lamp can be placed inside the headlight. But she doesn’t stop, you bastard. I swore. Did not help. The lamp is not fixed. I remembered the entire engineering school in Germany with a kind word. Then - unkind. Didn't help, won't fix. I try to put the lamp on, then put on the chip. I understand that the lamp can be dropped inside the headlight. I’m giving up this idea... warming up my hands. I take out my phone and climb to look at the lamp socket.
I can clearly see elastic locking plates at 15 and 21 o'clock that secure the lamp skirt in the installation. I clearly see two slots at 18 and 24 hours. Why the hell doesn’t the lamp tongue fit into the groove?! I'm holding it straight down! Having made a skeptical face, I turn the lamp 180 degrees, with the tongue up. FUCK! And the lamp snaps into place! “Ahtyzheshtvayumasha!” — I breathed out a sigh of relief and snapped all the lids back.
Be sure to check the operation with a test switch.
Everything is shining, the left headlight is in good condition
I climb into the warmth, look at the photo, the burnt out lamp and draw conclusions.
The lamp is simply burnt out. Although it is Polish. Although Narva
And the conclusions were as follows: if you were careful and put the lamp immediately with the tongue up, then the entire procedure for replacing the lamp would take about 15 minutes. If you don’t rush. And take pictures of every step. Well, well... but it’s an invaluable experience!
With the locking tab facing up - this is the only way to install the low beam lamp in the headlight socket
A check inspection showed that the new lamp shines brighter than the old one. Apparently, it was not for nothing that I was dissatisfied with the brightness of the low beam: it seems that the fan is not bad, but you have to peer at the road. It turns out that the lamps were tired and needed replacing.
On the left is an old lamp that came with the car from the previous owner. On the right is the new one.
Light spots also indicate low brightness of the right lamp.
For the guardians of strict rules: “there are also ticks on the wall, the headlight adjustment is not knocked down. But the purpose of the photo was to capture precisely the difference in the brightness of the light spots.
In a word, this is how the problem of a burnt out left lamp is solved. Perhaps I agree with the adherents of “replacing everything in pairs”: replacing headlight bulbs in pairs at once is the place to be. Reason: different glow intensity. The question about service life remains open. On the “motor ship” the difference in the service life of the lamps was more than 12,000 km and continues to increase. Let's see what the German driving school will answer to its Korean colleagues?
Well, at the end of the day - some beautiful numbers.
TOP 15 mothless
Salmo Drop
One of the most popular winter mothless baits for perch has many fans and good reviews. They are made of tungsten, weighing from 0.19 to 2.78 g. This jig comes in two types: with a hole in the body and an attached protective cambric to tie it to the fishing line and with a steel loop. Its design is such that the hook is attached to the bait so that the bait is extremely grippy. The body of the jig is painted with polymer paint with a large palette of colors from the darkest to the most brilliant shades, which makes it possible to choose the most suitable one for any type of water tank.
Tula Ant
The bait is made of tungsten alloy; the hook is soldered into the bait itself using a special machine, which makes it impossible to tear it off. It has a special polished flat, thanks to which the product “plays” very attractively under the surface of the water. The fishing line is attached through a hole in the bait, and to prevent it from fraying, there is a polymer cambric inside. The smallest model has a size of 2.6 mm and a weight of 0.38 g, the medium: 3.1 mm and 0.66 g, respectively, and the largest - a size of 3.6 mm and a weight of 1.18 g. This model of jig is very popular among anglers -athletes.
Balda Zhuk
The reelless Balda Zhuk is also considered an excellent winter bait. Unlike the usual one, it is very similar to a real beetle. A pair of rings are soldered into the base of the “Beetle”, holding a pair of hooks. When the bait moves in the water, the rings with hooks look like the moving limbs of an insect.
This mothless fish is quite massive and weighs from 7 to 10 g, which allows it to cope well with fairly strong currents in rivers. In this version of the “Beetle”, a defect in the main model, such as a line overlap, has been corrected.
When the fisherman sharply pulls the fishing rod, the fishing line with bait creates a “dead loop”, which is a feature of this model. This gesture is very attractive to the fish and it goes into an attack on the “bug”. The mothless fish is painted with a polymer composition, which is well preserved even after spending several seasons in water.
Nautilus ribbed devil
A classic baitless bait made of tungsten alloy, which has a ribbed body and looks like real larvae or pupae. The bait is electroplated in a wide range of colors from gold to black nickel.
For additional protection, the jig is also coated with waterproof varnish. Sharp, high-quality triple hooks from Gamakatsu, coated with anti-corrosion protection, are soldered into the body of the bait. Being small in size, this model is quite heavy. There is a special hole in the body for attaching the fishing line. This jig has many good reviews and has earned popularity in winter fishing.
Lucky John Garlic (Goat)
Also quite popular, a reelless winter bait made of tungsten, shaped like a garlic clove, with a double hook soldered into the base. Having an original design and shape, the “goat” can play quite attractively, oscillating horizontally.
The weight of the bait is from 0.6 to 1.86 g with a diameter of 2 to 6 mm. A bright bead is attached to the shank of the hook, which imitates a bloodworm for perch. A fishing line is attached through a hole in the bait. The plastic cambric prevents the line from chafing. The bait is covered with a protective layer of silver, copper or gold paint.
Salmo Nymph with loop and phosphor
The bait is made of tungsten alloy and has a glow effect, which allows you to use it in bad weather or at night when it is difficult to see. There are two types of bait: the first is 8.6 mm in size and weighs 0.43 g, the other is 7.3 mm in size and weighs 0.78 g. One hook is soldered into the base of the body.
The bait is coated with a special Japanese-made varnish, under which the design is visible. This model can produce light underwater for about two hours, but the effect depends on the duration of the illumination. There is a flat on top of the bait, which allows you to create special tremors when playing.
Ball Black
The bait is made of lead in the shape of a black ball, on which there are bright cambrics and beads. The fishing line is attached through a hole in the bait, and a silicone tube is inserted to protect against chafing. A sharp hook from Gamakatsu made of narrow wire is soldered into the ball. Due to good quality lead, this rewinder is no worse than similar products made from tungsten. The ball size is 4 mm and weight is 0.36 g. Such jigs are good for use in river backwaters.
Fraction
The bait is made of lead or tungsten alloy and looks very much like a small jig head, where a silicone or foam rubber bait is attached. Lead varieties are larger for the same weight than tungsten models. The most popular of them weigh 11-16 g. A sharp hook and a ring for attaching a fishing line are soldered into the bait, which are at an angle of 90 degrees opposite each other. Sometimes, instead of a ring, a hole is made in the bait in which the cambric is located so that the line does not fray. The body of the bait is galvanically painted.
Lucky John Banana Riga
The bait is made of tungsten and has a very wide palette of shades, thanks to which it can be used when hunting for the most cautious fish in small bodies of water. It is made in a curved shape, with a pattern applied with polymer paint. The banana has a size of 4 mm and a weight of 0.96 g. A large bait of this type has a size of 6 mm and a weight of 3.2 g.
Tula Washer
This is a universal mothless machine that has proven itself to work in any season of the year. It is made from tungsten billet. A sharp hook from the Japanese manufacturer Hayabusa, made of narrow wire, is soldered into the base.
The shape of the bait is similar to a small washer; a hole is drilled in the center of it for tying a fishing line; it is equipped with a polymer cambric to protect against chafing. For the winter period, it is best to choose large-sized baits. The bait is galvanically coated, which ensures its attractiveness and long service life.
Jig "Lucky John 20-S"
The appearance of the jig resembles a devil and has the shape of a triangle, into the base of which a hook and loop are soldered, weight 0.26 g. The bait is quite popular, has many good reviews and is inexpensive.
Jig "Lucky John LJ13050-139"
The weight of the bait is about 1.2 grams, and the size is about 6 mm. The bait is made of tungsten, coated with polymer paint on top. The bait has excellent characteristics and reviews, is quite strong and will last a long time.
Jig "Lumicon Female ant d.3.0"
In appearance and shape it resembles an ant that has fallen into water. The bait is quite large. Usually sold in bulk, ten samples at a time. It has earned the trust of fishermen, has good characteristics and recommendations.
Jig "Sava Uralka"
The body of the bait is made of tungsten billet and looks like a popular form of lures of this classification. There is a hole in the body through which the fishing line is attached, where a cambric is installed in order to protect the fishing line from chafing. Offered for sale mainly in bulk in dozens of pieces. It has positive characteristics, strength and durability.
Mormyshka “Ant 3.0/2 86601 – 0.2”
A domestically produced bait, the body of which is made of lead. It is an excellent model of jigs of this type. Its weight is 0.29 g, and a hook made of thin wire in Japan is soldered into the base. A hole is made in the bait to secure the fishing line, a silicone tube is inserted into it to prevent chafing, and a yellow bead is attached to the hook.
Category tree
Please note that you need to pull not by the wires, but by the housing, otherwise you may damage the contacts, which will result in additional work. The photo shows a latch that holds the lamp and which must be pressed when removing it. Lastly, the connecting chip is removed from the base, and the old lamp is removed, at this point the dismantling is completed and you can begin replacing
Assembly begins with the installation of a new light bulb, while remembering the most important rule - under no circumstances touch the glass part of the product, as this will negatively affect its operation later.
If you do touch the glass, wipe it with an alcohol solution.
A block with wires is connected; they are long enough to do this outside the case. It is most convenient to attach a light bulb to a chip from the outside; doing it inside is much more difficult. Next, the assembled element is inserted into its place, make sure that the latches snap into place and the lamp is securely in place.
There are cutouts on the base, so there should be no problems finding the correct position; the main thing is to insert the element all the way so that it does not fall out due to vibration.
The design of the headlight allows you to separate the low beam and avoid dazzling oncoming drivers. When driving in a suburban area, as well as during the daytime, you must turn on low beam headlights or daytime running lights. How to replace a low beam lamp in an Opel Corsa car If your headlight bulbs are burned out, you can go to a car service center, and professional workers will install new ones of any type for you.
But in order to save money, you can change the low beam lamps yourself. Replacing lamps is not difficult. The replacement process on the right and left headlights is identical, since all elements are located symmetrically.
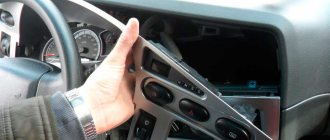
Replacing low beam lamps in an Opel Corsa D is as follows: First you need to open the hood cover and fix it. Then you should remove the spring holder of the headlight cover and remove it.
Then you should press the latch and remove the old lamp from the reflector. Next, you need to disconnect the glass flask from the base.
After this, you need to insert the new lamp into the reflector until it stops. When the lamp is installed and fixed, you need to close the headlight cover and install the structure itself in place. Having replaced all the lighting equipment, you can adjust the headlights and test different levels of illumination of the car. When removing the lamp from the headlight unit, you need to act carefully so as not to damage the bulb or mounting system.
Replacing Low Beam Lamp Opel Corsa D
Replacing Opel Corsa headlights
The Opel Corsa D is an upgraded version of the Opel Corsa, a class B car favorite. To keep your car long and beautiful, you will need to carry out inspections and light repairs from time to time, as well as make additional changes to your consumables. More and more attention should be paid to lighting technologies. Opel Corsa D cars have been developed with various current features of this brand.
The exterior of the car features a sporty bumper and eagle lights, fog lights and the Opel logo.
Replacing lamps requires changing lamps. To do this, they remove the entire headlight and change the lighting elements. One of the important parts of lighting is the low beam of cars.
Content
Name the types of lamps
There are several types of low beam lamps:
Corresponding luminous flux
- Halogen. more common type. They are a modification of incandescent lamps, have small dimensions and a long service life;
- Daylight lamp. This is an economical LED, daylight lighting if necessary. Such lamps are relevant if you need to turn on short daylight;
- Xenon (gas discharge). they like it popular for savings and efficiency, have a long service life. The headlights will be white and blue and very pleasing to the eye;
- LIGHT-EMITTING DIODE. This is an expensive, unfortunately high-quality version of the lamps. They consume little energy and are used for a long time.
READ Replacement Fuel Filter Toyota Prado 150 Diesel
Recommended recommendations for repair and maintenance of Opel Corsa:
Headlights for Opel Corsa D
Opel Corsa D headlights combine remote control and submersible. There are also turn signals and lights. All types of luminaires have their own version of the control system and switches. When you gradually see that the light has dimmed, it is time to change the lamps. Completely, when the tube becomes cloudy, the brightness decreases. This is bad for driving safety. This widespread rumor process is quite slow, but it indicates that you really need to make timely changes to your lighting equipment.
Headlight lock Opel Corsa
When you decide to change the lighting in your own Opel Corsa D, you need to choose a lamp according to several characteristics: for what type of lighting, size and power. Moreover, each lighting level has its own requirements for the power of lamps.
High beam headlights are used to illuminate a small area of the road in front of the car and the curb. close separation
light and avoid blind drivers moving in the direction.
Change the low beam of the lamp on the Opel Corsa D. Part 1
Here is a video in which I show you how to replace the Opel
Corsa D 2012. Without removing the bumper and lights.
Opel Corsa D 1.4 Automatic transmission replacement 2008 in low light
DECIDED! The glare doesn't burn
!
A common problem on Corso. lights stop shining. Dim light
.
When driving in suburban areas, daytime running lights must also be turned on.
How to change the brightness of a lamp in an Opel Corsa car
If your headlights are burnt out, you can go to a car dealership and have a professional install new ones for you. However, to save money, you need to replace your incandescent bulbs without assistance. Changing lamps is easy. The process of changing the right and left headlights from the pain is similar, since our client remains to keep the elements symmetrically arranged.
READ Replacing the Kia Optima fuel filter
Replacing the low beam in the Opel Corsa D is as follows:
- First you need to open the hood and lock it.
- The spring headlight holder must be removed and removed later.
- Then press the lock and remove the old lamp from the reflector.
- Next, disconnect the glass tube from the cap.
- As a result, you need to insert the last lamp completely into the reflector.
- When the lamp is installed and secured, it is necessary to close the headlight cover and install the structure itself in accordance with its intended purpose.
- After replacing all the lighting equipment, you can adjust the lighting and test different lighting levels for the car.
When removing the bulb from the headlight, care must be taken not to break the tube or mounting system. It is possible to loosen the lamp slightly as it is mounted on clips and must be skillfully removed from the seat outlet. When changing a new lamp, you must first plug it into the terminal and then into the seat. It is best to carry out this operation with gloves to prevent contamination of the phone. The lamp itself and the headlight elements cannot be pressed, otherwise the light adjustment can be turned off.
What you need to know about replacing lamps
Changing lighting parts requires a number of principles that depend on the characteristics of the vehicle and the type of lamp. To keep the light even, Opel Corsa D cars needed to change the lighting in pairs. There, color temperature and light intensity change over time. In this case, replace only one lamp, the difference will be noticeable as the new and old lamps will glow differently.
READ Installing the Armrest Opel Astra H
Once they change, it is strictly forbidden to take them with your bare hands. At a minimum, they should be worn with a cloth or gloves. Marks and grease. options for lamp destruction. In this case it's a lamp
dirty, it should be rubbed with alcohol and allowed to dry.
When choosing low beams, you need to change those recommended by the car manufacturer. It is better to purchase products from trusted brands: Philips, Narva, Osram. In addition, experts advise taking stocks of European brands, because they are ideal for the Opel Corsa D car. It is better not to save cars on such devices, since the lamps are part of the harmless driving accounting system.
It is recommended to install luminaires with a performance similar to the old one. If the power level is too high, serious problems may arise due to the overload of the electrical lighting metering software immediately before equipment failure. It's much better to adjust the headlights.
How to adjust headlights for an Opel Corsa
If the lamp is replaced, then it is ideal for adjusting the headlights in the car. To do this, you need to find a flat area; the Opel Corsa D will be occupied. The light should fall on the wall. You need to mark the surface. The person in your person should be driving the car in order to bring the situation as close as possible to the real world. The car drives far from the house, 7 meters from the wall. Need to adjust the shine
according to the markings on the wall. In addition, the luminous flux with different illuminance levels is adjusted so that a certain luminous flux reaches a certain fixed point.
Source