It is indispensable if you live outside the city, it justifies itself as a car for the whole family and is very stable. With the arrival of the autumn-winter period, good and high-quality operation of the heater will be relevant. If the stove does not heat well, the Chevrolet Niva will become a very uncomfortable car, and you will have to forget about its advantages. Moreover, if the car was parked in the garage overnight, it is problematic to be in it and feel the cold comparable to that of a basement. Let's consider the main components of this technological unit of the car:
- radiator;
- fan;
- dampers;
- pipes;
- air duct;
- unit for regulating fluid movement.
The stove will work properly if each of its parts works properly and in a coordinated manner.
Main malfunctions and methods for eliminating them in the Chevrolet Niva car stove:
- The ventilating elements of the heater burned out. This will be immediately visible in winter by the formation of characteristic condensation on the windows. They simply need to be replaced with new ones;
- the unit that regulates the temperature breaks, since it can be made of plastic rather than rubber or rubber, which has greater wear resistance. Naturally, the possibility of the cable falling off should also be considered. Depending on the situation, you either carefully return the part to its place and it continues to perform its traction function, or you need to purchase a new one and replace it;
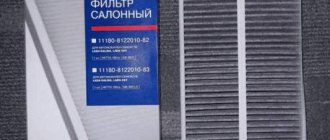
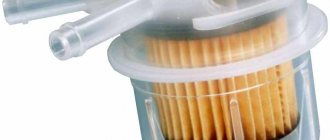
- poor filter performance due to clogging. Accordingly, they need to be cleaned or purged, otherwise air pockets will form in the stove, disrupting its productive operation;
- problems with the cooling system - you should rinse and fill in a new coolant - antifreeze or antifreeze, which is changed annually for prevention;
- The damper that regulates the supply of cold and hot air has broken. It will have to be replaced;
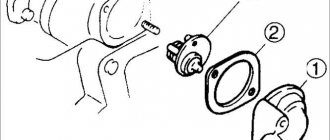
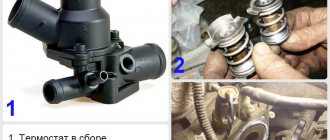
- The thermostat is not working well. It might simply get jammed. Please note that the heater will malfunction when driving fast. It must be replaced immediately, because poor quality work will lead to an increase in temperature throughout the Chevrolet Niva;
- The resistor on the radiator has burned out or the radiator is clogged. There can be many reasons: antifreeze, insects, leaves and other debris. Also, water should not be allowed to get into this part of the stove. The radiator must be cleaned periodically, and in case of a malfunction, a new resistor must be purchased and installed. Cleaning is carried out with compressed air or a vacuum cleaner, an industrial hair dryer;
- The heater control unit, the so-called controller responsible for regulating the interior temperature, may fail. This is already a problem with electronics; to fix it, you need the services of a specialist.
Recommendations for normal and long-term operation of the heating-cooling system in a Chevrolet Niva:
- periodically lubricate the bearings of the stove ventilation device;
- Check the filters and radiator regularly, and if necessary, clean them or purchase new ones. The filter cleans the air from dust and infections coming from the street;
- remove air pockets when the engine is idling and muffled;
- clean the pipes with citric acid or a special product, since poor quality coolant forms sediment and build-up in the pipes.
At a temperature of minus 20 degrees, the Chevrolet heating system should heat the top of the cabin to an average of 10 degrees, and the temperature in the legs is 5-7 degrees higher. Passengers in the rear seats will receive air with a temperature of about 14 degrees. This way, everyone will be in comfortable conditions, and the trip in winter will be quite pleasant.
To avoid problems with the heating and ventilation system, preventive maintenance should be carried out systematically. After all, a car is a complex device that will drive well and function properly only with proper care.
Of course, problems with the stove are not the most critical troubles or breakdowns, but your health, mood and, naturally, performance depend on your comfort and the comfort of your passengers. We value not the quantity, but the quality of the years lived, so let your Chevrolet Niva be a high-quality, elegant and capable car.
How to fix the problem in which the stove on a Chevrolet Niva does not blow at your feet
It is not difficult to fall in love with a vehicle like the Chevrolet Niva with all your heart. The car is truly beautiful and comes with a fair amount of benefits. Unfortunately, in modern reality it is almost impossible to find a device or mechanism that does not have flaws.
The Chevrolet Niva was also no exception, so it is not at all surprising that after some period of direct operation of this vehicle, complaints from car owners begin to arrive. This flow of some discontent especially intensifies in the winter.
Complaints are related to the fact that on the Chevrolet Niva the stove does not blow into the feet at all, which freeze very quickly, depriving both the driver and passengers of comfort. Why the stove refuses to blow in this direction is not a mystery. It’s just that most drivers are convinced that this is a technical defect due to insufficient attention from the designers who developed such a model.
To ensure proper comfort for the driver and passengers, it will be necessary to modify the heater damper drive.
This way you can come to an agreement with the Niva Chevrolet stove and make it evenly warm up the interior.
The stove is good (if it works). The stove is hot, the cabin is warm, I can’t find where to blow into my feet...
The filter cleans the air from dust and infections coming from the street; remove air pockets when the engine is idling and muffled; clean the pipes with citric acid or a special product, since poor quality coolant forms sediment and build-up in the pipes. As a result, it cannot effectively blow in several directions at once, but when the flow is directed towards the legs, the air is distributed anywhere, but not in the desired direction. This is done as follows:
If you move the lever in the opposite left direction until it stops, air will flow between the side and top deflectors. Actually, this is a design feature of this model.
Unfortunately, in modern reality it is almost impossible to find a device or mechanism that does not have flaws. The Chevrolet Niva was also no exception, so it is not at all surprising that after some period of direct operation of this vehicle, complaints from car owners begin to arrive. This flow of some discontent especially intensifies in the winter.
Complaints are related to the fact that on the Chevrolet Niva the heater does not blow into the feet at all, which freeze very quickly, depriving both the driver and passengers of comfort.
Why the stove refuses to blow in this direction is not a mystery. It’s just that most drivers are convinced that this is a technical defect due to insufficient attention from the designers who developed such a model.
The radiator must be cleaned periodically, and in case of a malfunction, a new resistor must be purchased and installed. Cleaning is carried out with compressed air or a vacuum cleaner, an industrial hair dryer; The heater control unit, the so-called controller responsible for regulating the interior temperature, may fail.
We recommend: Why do you need to break in new winter tires and how to do it?
This is already a problem with electronics; to fix it, you need the services of a specialist. Recommendations for normal and long-term operation of the heating-cooling system in a Chevrolet Niva: The filter cleans the air of dust and infections coming from the street; remove air pockets when the engine is idling and muffled; clean the pipes with citric acid or a special product, since poor quality coolant forms sediment and build-up in the pipes.
At a temperature of minus 20 degrees, the Chevrolet heating system should heat the top of the cabin to an average of 10 degrees, and the temperature in the legs is degrees higher.
You can also relatively smoothly regulate the amount of air supplied in different directions. After such a modification, you may encounter a decrease in air flow. This is due to air redistribution.
Chevrolet Niva 2004, 80 l. With. — self-repair
The result is that in the middle position the cabin is still quite cool. To eliminate this drawback, you will need an unnecessary plastic canister.
We cut off the neck from it and attach it to the deflector. The result is a fairly powerful and targeted flow.
The cause of cold in the cabin may also be a simple heater failure. Therefore, we will consider the most common causes of breakdowns. All of them lie on the surface, and in principle are characteristic of many modern cars. The most common cause is a blown fuse. Check the appropriate fuse and replace it if necessary.
The main reasons when the stove does not blow warm air into your feet
The heater radiator is leaking
Before gutting the air ducts and air dampers, you need to make sure that the antifreeze warms up to its operating temperature.
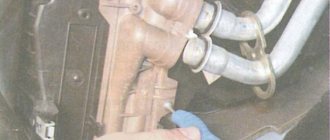
And this may depend on a lot of factors - the quality of the pump , the tightness of the system and the heater radiator , including the correct operation of the thermostat, and the quality of the coolant. If the temperature with a fully warmed-up engine is within 80-90 degrees, we look for the reasons for the lack of air in the legs in the design of the heater.
Turn on maximum heat.
A feature of the stove on a Chevrolet Niva is the absence of a heater radiator tap, that is, antifreeze circulates in a full circle in winter and summer and passes through the heater radiator. Taking this fact into account, the factory somewhat complicated the design of the air ducts and air dampers - there are two of them in the Chevrolet Niva.
Upper deflector flap.
One works for frontal airflow, the second is responsible for supplying air to the feet of the front and rear passengers and the driver. It is with this damper that problems arise that we will try to solve.
Correctly turn on the foot airflow
It turns out that even after several years of owning a Niva Chevrolet, not everyone knows how to properly turn on the warm air to blow their feet. By using fan speed controls and damper position controls, and using sound logic, we can end up with a situation where the entire flow of hot air is directed onto the windshield and into the face of the driver and front passenger. Of course, the car is warm, even hot, but your feet are cold.
Practice has shown that Shniva has a special algorithm for supplying hot air to the legs . On most instances this is done like this:
- We warm up the engine until the flow of warm air is clearly felt by the hand.
- The fan speed switch is set to the fourth position, 4th speed.
- Turn the airflow direction knob to exactly 12 o'clock.
- Immediately return it to the 10-11 o'clock position.
Correct position of the stove blower control.
- The air damper will make a characteristic click and the air flow will flow to your feet. Now you can set the blowing intensity at your discretion.
- If this method did not work the first time, the second or third time it works in 90% of cases.
Having remembered this sequence, you will have to turn on the airflow several times, after which the damper will rub in and find the desired position itself in accordance with the pictogram on the adjustment handle.
It's all about the inaccuracy of assembling the heater assembly - backlashes and gaps interfere with air distribution and setting the damper in the desired position from the first turn on.
Replacement radiator Niva Chevrolet price
The cost of such car repairs in different regions can vary significantly. For example, in Moscow, replacing a radiator will cost at least 5,000-8,000 rubles. At the same time, in the Rostov region, the procedure can be performed for 3-4 thousand rubles. At the same time, the cost of repairs may also vary among different specialists located in the same city.
Also, the cost of replacing a Niva Chevrolet radiator greatly depends on the vehicle’s equipment and additional factors such as the abundance of rust or dirt under the hood. For example, the difference between the simplest and most sophisticated versions can reach 1,500 rubles.
Only the master performing the operation can give the exact price tag.
Replacing the radiator on a Chevrolet Niva can be done by the driver himself. An ordinary repair procedure does not require deep knowledge of mechanics or automotive engineering and can be done by every car enthusiast. Also pleasing is the lack of need for specialized pullers or keys, which not every garage has.
Chevrolet Club - Information
First of all, check the flow in the expansion tank at idle. There should be a vigorous flow. If there is no stream, then throw the pump in the trash. The pump must be original, no cheap one will do, it has a smaller impeller. With a non-original or faulty pump, a stream appears in the tank only when you re-gas it.
Pump and test. Lech wrote:. Good day everyone! I would also like to make my small contribution to the forum if, of course, anyone else is interested. Not long ago I had problems with the heater which I solved by replacing the pump. If I posted the topic incorrectly, please correct me.
The essence of my problem was that with the engine well warmed up, the temperature in the cabin left much to be desired. The strong air flow from the heater was lukewarm. Thanks to the respected forum participants, the decision was made to change the pump. Indeed, in my case, the stream in the reservoir at idle was completely absent, appearing only closer to the engine speed. Having removed the pump, it turned out that there was a “hepa” with a small impeller:. The hepa impeller has a diameter of 64mm. The TZA impeller has a diameter of 72mm.
Measuring the air temperature from the heater in the glass mode with a well-warmed engine before replacing the pump showed the following result: After replacing the pump with the original one, a steady stream appeared in the expansion tank at idle speed and the heater air temperature in the same mode on the glass increased significantly: Now I I felt warm, I even unscrew the heat-cold knob to 12 hours, otherwise it’s too hot..
The presence of a wheel on the windshield is especially incomprehensible. What can we now understand from this diagram? Theoretically, nothing blows from there until you put the front in position.
In practice, it constantly blows from the front if the dampers are not treated using the technology below. In short, you need to turn the wheel in the front position. Feel what is blowing from there and never touch it again. Additional airflow to the windshield never hurts. The diagram has errors, but not major ones, the main thing is to grasp the meaning. Treatment using technology improves the overall warming of the feet.
Indications for treatment are:. This bonus significantly increases the comfort in the car interior when the damper is in frosty weather.. Bigfoot wrote a:. Everything works perfectly, now it blows where I want, in the legs of Tashkent it even blows in the legs of the rear passengers. This has never happened before.. It is better to increase the efficiency of heating the legs by eliminating air leaks from the large technological holes podiums for fastening the damper cables, which are installed at the factory no one is fooling around.
The holes are through, air is blown out of them from the stove... Here they are visible in the light. Don’t put the foam rubber too far into them, otherwise the damper will jam the heat and cold. In the photo the largest one is in the center. The flap with its small squiggle on the right can pinch and drag pieces of foam rubber inside. Where else can cold air siphon from?
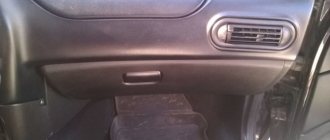
From the joints of part number 4. Owners of Shniv with a condo can relax or tense up. Because simply removing the glove compartment will not solve anything. But you can check it by removing the glove compartment and rushing through in the cold with a breeze, the passenger can feel everything.. No problems were found with the other joints. Maybe this will reassure owners of Eltse trim levels.
Causes of the problem and solutions
Any experienced motorist will confidently confirm that for the excellent performance of any vehicle, it is very important that the owner learns to “feel” the car and intervene in time if it begins to experience problems. Unfortunately, some beginners complain that it gets incredibly hot inside the Niva, but for some reason their feet freeze. This is the case for those who either haven’t read the technical manual or ignore the manufacturer’s recommendations.
Of course, the cause of poor heating is not always the wrong actions of the driver himself. Sometimes poor performance of the stove is caused by breakdowns, which can be easily repaired by service station specialists. However, we recommend that you abandon such a tempting and at the same time financially burdensome venture. It’s better to use our tips and return your car’s heater to excellent performance yourself.
Algorithm of actions
Initially, we suggest you figure out how to properly turn on the stove and regulate the direction of the flow of warm air. In most cases, due to simple ignorance, the driver adjusts the position of the damper in such a way that the entire flow of warm air is directed to the windshield, and also mercilessly blows directly into the face of the driver and passenger. At the same moment, the feet of those in the cabin simply freeze, since no warm air gets there at all.
The problem is that the Chevrolet Niva has its own algorithm for supplying warm air, which you want to direct to the lower part of the cabin.
After starting the car, warm up the engine thoroughly. The guideline for subsequent actions should be a flow of warm air, which will clearly be felt by your hand. Only after this we recommend that you set the fan speed switch to the fourth position. Now turn the air flow direction control knob to 12 o'clock, and then immediately return it to the 11 o'clock position. If you did everything correctly, you should hear a characteristic click. It will act as a kind of signal that the air damper has taken a position in which the flow of heat will be directed to the legs. All you have to do is adjust the heating intensity and enjoy comfortable conditions in the cabin. Do not despair if such “magic” did not work for you the first time. We recommend that you try again and you will be convinced of the effectiveness of such actions.
However, it is important to note that such “magic” will only work in cases where the components have not been subjected to mechanical damage. If at least some component fails, you will have to carry out repair measures.
On a Chevrolet Niva, repairs to the heater damper are often carried out because no action can be taken to change the position of the damper. Most often, such “immobilization” of the damper is caused by a broken cable. In this case, you will have to work hard, it certainly won’t be easy for you, but you can still carry out such repairs yourself, so don’t rush to the auto repairmen.
Initially, prepare tools and some items that will make the task easier. Since you will have to bend down and manipulate under the bottom of the dashboard, we recommend that you purchase a headlamp or install the flashlight so that its light output is directed to the place you need. It would also be quite appropriate to move the front seat back slightly to expand the space for yourself.
After completing such preparatory work, proceed to direct action. First, remove the handles from the damper control panel, then unscrew the screws. Now unscrew and remove the panel located on the left side, where the driver’s feet are always located. You will find latches that act as fastenings for the cables; they need to be unfastened. All that remains is to remove the recirculation damper mechanism and pull out the damaged cable. Instead, install any other suitable cable, having previously measured its length so that it matches the production analogue. Twist each end of the cable into rings and securely secure. Reassemble all the components you previously removed and check the operation of the dampers. The result of the work will definitely please you, since the dampers will be on you, and accordingly, the interior of your car will warm up quickly, creating a comfortable temperature regime.
So, you were able to make sure that there are no difficulties in performing such work. You just have to be prepared for the fact that some manipulations will simply be inconvenient to carry out. If you set your mind and want to return the stove dampers to excellent performance on your own, and read the recommendations, we are sure that you will succeed.
Source
Main stove malfunctions
Stove malfunctions can be very different. The most common reason for its failure is:
- heater valve malfunction;
- damage to radiator pipes;
- failure of the additional resistor;
- radiator damage;
- control unit problems.
We recommend: How to repair a xenon ignition unit with your own hands
As a result of any of the above situations, the stove stops working normally.
Warm air does not enter the lower part of the cabin
Before repairing the stove, you should check the temperature of the coolant (coolant). Perhaps the problem is not in the interior heater, but in the cooling system. If the engine warms up to operating temperature (90˚C), then the cause of the malfunction should be sought in the stove.
With the help of damper position regulators, warm air is directed to different parts of the cabin
The dampers should be adjusted first. To supply hot air to your feet, follow these steps:
- The engine warms up until the warm air can be felt with your hand.
- The heater fan speed switch is set to position 4.
- The airflow direction knob turns to the 12 o'clock position and immediately returns to 10 o'clock. Air should begin to flow into the lower part of the cabin.
- If the result is not achieved, the procedure is repeated.
This sequence of actions is due to assembly errors. Due to gaps and backlashes, interference is created with air distribution and installation of the damper in the desired position the first time. If after these steps the heat still does not reach your feet, the heating system needs to be modified.
Antifreeze leak from the stove
In used cars, coolant often begins to leak from the stove. The reason for this is usually wear and tear on the pipes or a malfunction of the heater tap. Since antifreeze circulates under pressure, all connections must be tight. However, during prolonged use, hoses and gaskets lose their elasticity and burst. After inspecting the heating system and identifying the leak, the worn part is replaced with a new one. When making repairs, you should not use clamps made in China due to their poor quality.
Due to loss of elasticity, the stove pipes crack over time and leak antifreeze.
Coolant can also leak from the heater radiator itself. In this case, it will have to be replaced with a new one.
The stove doesn't heat well
To diagnose the malfunction, turn on the ignition, start the stove and try to change the intensity of the air supply. If at the first three speeds the air is not supplied or is supplied cold, the cause of this is a faulty resistor that needs to be replaced.
The reason for the inability to switch speeds is the failure of the resistor
If the resistor is OK, the diagnosis continues. Check the coolant level. If it is low, add antifreeze to normal and check it after a few days. If the level has noticeably decreased, you should pay attention to the hoses and pipes, wear of which is usually the cause of coolant leakage.
One of the reasons for poor heating of the interior by the heater may be a low level of coolant in the system
If the control unit malfunctions, it will have to be removed. Repairing the unit at home is only possible if you have the appropriate tools - it’s easier to contact a car service center. Another reason for the stove stopping may be a dust-clogged cabin filter. In this case, the load on the electric motor increases, which, in turn, leads to failure of the heater fuse.
Video: replacing the heater fuse on a Chevrolet Niva
Warm air may also flow poorly or not at all into the cabin due to contamination of the heating system. In this case, it should be washed. This is true when purchasing and operating used cars.
The device of the stove of the Niva Chevrolet car
The Chevrolet Niva is equipped with a liquid-type heater. It supplies warm air to the cabin and cools the engine, overheating of which can lead to disastrous consequences and costly repairs.
Without air conditioning
The Chevrolet Niva heating system consists of the following elements:
- ventilation duct;
- windshield heating duct;
- intermediate body;
- air intake filter;
- fan;
- interior heating duct;
- foot heating duct;
- heater radiator.
The intensity of the hot air supply is regulated using dampers. The air duct system distributes the heat flow to various areas of the cabin: windshield, side windows, legs, doors, etc. In addition, there is a four-speed air supply switch.
Heating system for the interior of a Chevrolet Niva car, where 1 is the side deflector air duct; 2 — windshield air duct; 3 - intermediate body; 4 - intermediate air duct; 5 — outside air filter housing; 6 — fan housing of the heating and ventilation system; 7 — central deflector; 8 — air duct for blowing the front passenger’s feet; 9 — facing of control units; 10 — front air duct for blowing the legs of rear seat passengers; 11 — rear air duct for blowing the legs of rear seat passengers; 12 — heater assembly; 13 — air duct for blowing the driver’s feet; 14 - side deflector
Causes of poor stove performance
The recirculation lever is removed and the panel trim is removed. Behind the cladding, use a screwdriver to unscrew the screws and remove the backlight bulbs for the instrument panel of the heating system.
The terminal block is disconnected and the bolts securing the rods are unscrewed. The heater damper rods and the heater fan switch are disconnected.
The heater is repaired, if required, and reinstalled in the reverse order. Before you begin removing the radiator, you must purchase a new radiator. Drain the antifreeze from the radiator and remove the air supply filter.
To remove the filter, you need to unscrew the housing screws. Disconnect the power wires for the electric fan and heater. We unscrew the screws securing the fan and the heater itself.
We remove the heating duct, which is designed to warm the feet of passengers sitting in front. Unscrew the 2 self-tapping screws securing the heater and slightly pull the radiator out of the socket.
Use pliers or side cutters to break the upper corner of the plastic radiator flange. When installing a new radiator, first cut off the corner. After installation, seal the hole in place of the cut corner. Turn the fan on to maximum and check for cold air leaks at the entrance of the air duct from the fan to the stove. There is no factory seal and if there are air leaks, cold air will blow into the passenger's feet.
I sealed it with sealant and it became warmer in the car. The old and thin radiator was removed.
New in the process of installation. When removing the old radiator, I was very upset by the amount of coolant with which he filled the heater. I also felt for the damper with my hand through the hole for the radiator and realized that the lever opened it by one percent. I set the damper to the vertical position with my hand, the lever did not react at all.
How to change radiator pipes on a Chevrolet Niva
This is at the second end of the pipe
From availability in stores only in bulk, without homeland and flag, and Rosteco for 200 rubles.
Well, the replacement procedure itself. I drained 3-4 liters of coolant from the radiator. I removed a section of the air pipe from the throttle to get to the clamp.
I unscrewed the three screws securing the radiator trim to the upper radiator frame, otherwise I couldn’t get to the clamp.
Using a 7mm socket with an extension, unscrew the clamp and pull the pipe off the radiator.
We disconnect the second end of the pipe from the engine and pull it out. If necessary, we clean the pipe seats and put on a new one. We stretch the clamps, fill in the coolant, put the throttle pipe in place, start and check the tightness of the system, and also, if necessary, remove the air.
good evening everyone! so the stove has been replaced...the stove pipe has been sealed...a leak is unlikely...but the stench of antifreeze has not gone away...LOOKING...FINDING...smudges from under the receiver...we crane our necks like a giraffe and notice that the pipe is really in antifreeze in a circle...we're driving to the store...take REINFORCED
pipe... and having read on the Internet that you can’t change it WITHOUT removing the receiver... we go to the service... having already arrived at a familiar mechanic, he laughs... it’s like he broke it again... I explain... we are looking for solutions and we find it!
Solutions to the problem
However, realizing that poor bottom heating is a technical mistake of car developers, drivers still do not want to put up with such a problem and strive to modernize something on their own, eliminating the discomfort that has arisen. In principle, such owners do the right thing. You cannot give in to problems; it is important to look for ways to solve them. If it is difficult to find the right course of action on your own, then by visiting specialized forums, it becomes much easier to come to the right decision with the collective wisdom.
Technical problems
Initially, we suggest that you figure out why such a problem arises on Niva. In this vehicle, the heating and ventilation systems are interconnected. Air penetrating from outside enters the radiator, then it can be heated, and after that the warm flows will be redirected into the car interior. At the same time, the developers provided the vehicle with three main ways for warm air to enter the cabin. It all depends on what position the driver sets the switch:
- When the lever is moved all the way to the right, air will penetrate through the upper deflectors.
- If you move the lever in the opposite (left) direction all the way, air will flow between the side and top deflectors.
- If the lever is installed centrally, the air should be directed directly to the legs, but, unfortunately, in practice this cannot be achieved.
It should be noted that by choosing the first option for installing the lever, the driver will be able to provide a good flow of warm air onto the windshield, helping to quickly remove ice if it occurs. Experienced drivers do not recommend choosing the second option for installing the lever, since in this case the warm air flows will be mainly directed under the dashboard, leaving only “crumbs” to heat the interior.
Solutions
Now that the reasons for poor heating, especially in the lower part of the car’s interior, have become clear, it doesn’t hurt to delve into the recommendations we have proposed, which will guide you towards actions that can completely eliminate the problem.
So, most of all the problem lies in the incorrect operation of the dampers, which do not rotate enough in the right direction, and sometimes close completely. An old bank card will help you solve a technical problem. No, you will not pay off, spend your financial savings. Please note that we suggested that you use the old, no longer needed card. We'll just really need to cut some things out of plastic.
Now remove the decorative panel of the heater, then remove the damper control. While holding this regulator in your hands, remove its lower part. We recommend that you do not make hasty movements, since all parts of this regulator are made of not very durable plastic. It is not difficult to break such fragile plastic structures. Unfortunately, this will complicate your work later, since you will have to use a soldering iron to restore the integrity of the structure.
We recommend: DIY installation of xenon and bi-xenon lenses in headlights
Now set the upper flap to the upper position. To forcefully “tightly” secure this position of the dampers, prepare a suitable-sized bracket (you can even cut it yourself), and then secure it with self-tapping screws. Be sure to make sure that the bracket you install creates a real obstacle to choosing a different direction for the lower flap. From the prepared plastic card, cut out a new path for the air flow, singe the edges of the cut out part and introduce them into the structure you have modernized. Of course, after performing these not very complicated steps, you need to return the device to its place, doing all the same steps in the opposite direction.
Unfortunately, while anticipating the joy of high productivity of your own work, you suddenly discover that the air is directed exactly where you wanted it, but at the same time you notice that the strength of the air flow has become less. For this reason, the problem of poor foot heating has not been completely solved. However, we propose to continue some technical changes. Take an old plastic canister, cut out the neck, install it to the deflector, and secure it securely with self-tapping screws. This very simple technical trick will ensure increased flow.
Additional reasons
There are also additional reasons why heating the Niva’s interior becomes impossible. This can happen when a fuse blows due to a short circuit in the vehicle's electrical circuit. Of course, you will have to identify the blown fuse and replace it. In the same way, a resistor can fail; you will also need to remove it and install a new one in return.
If the heater is working, but you are not very happy with the heating power, we recommend checking the coolant level. Oddly enough, a small amount of antifreeze or antifreeze prevents the vehicle from heating well. Sometimes, by pouring in coolant, without following the recommendations, and performing all these actions hastily, the driver himself “airs” the system, which is why the heating power also drops. In this case, it will be necessary to bleed the system to eliminate any air pockets that have arisen in the system.
The following can also negatively affect interior heating:
- excessive contamination of the fan;
- failure of the stove motor;
- thermostat malfunction;
- destruction of bearings.
So, if you are attentive to your vehicle, immediately delve into the essence of the problems, eliminate them in a timely manner, following the algorithm we propose, your Niva will last a long time and will delight you with excellent work.
If this happens regularly, then it makes sense to check the wiring. The problem may also be in the fan itself. To test, turn on the ignition and check the voltage at the engine terminals.
If it is missing, you will have to replace the motor.
Naturally, each specific car has its own gaps in the heating system, so there cannot be a single treatment recipe. However, with little effort, without removing the front panel and the entire heater, you can modify the guides for the dampers so that the main flow of warm air is supplied to the feet.
To do this, you need to remove the casing from the console on the driver's side and, if desired, the steering column casing. In front of us, on the stove side, is a die that is responsible for the direction of movement of both dampers, and therefore the direction of air supply.
All that remains is to unscrew the die with the slots, change the shape in the uppermost slot from curved to straight, maintaining the starting and ending points. Having changed the geometry of the movement of the upper damper, it remains to firmly fix the lower one, which is responsible for blowing the legs. It is enough to fix the lever of the lower damper with a self-tapping screw in the position of blowing the legs.
Now there will be constantly warm air in the legs, and its quantity and proportions between the windshield and the legs are smoothly selected by a conventional air direction regulator.
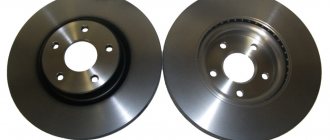
Types of radiators for the Niva stove
It doesn’t immediately become colder in the Niva’s cabin – the stove stops working normally for several reasons:
- the heating tap does not switch (stays sour in the closed or half-closed position);
- The motor rotates at low speed;
- the heater radiator is clogged;
- an air lock is created in the cooling system;
- parts turn out to be defective;
- the valve in the thermostat opens prematurely;
- poor circulation is created in the cooling system due to the water pump.
It may still be cold inside the car due to a blown cylinder head gasket in the engine. To make the interior warmer, car owners often install on Niva 21213 cars:
- three-row copper radiators of the stove, they have better heat transfer;
- The heater motor is 2108, they are more efficient than the standard ones on the Niva.
RP for the VAZ 21213 is produced by various companies, and the quality of stove radiators may vary. On the auto parts market you mainly find parts from manufacturers:
- "Orenburg radiator";
- luzar;
- DAAZ;
- SHAAZ;
- "Likhoslavl Radiator Plant";
- Iran;
Based on the material used, RPs can be made of copper or aluminum, each of them has its own advantages and disadvantages. Aluminum radiator:
- heats up quickly;
- cheaper than copper;
- has high rigidity and low weight.
But aluminum RP is not repairable, it is practically impossible to solder it. Other disadvantages of aluminum include:
- rapid cooling, this metal does not retain heat well;
- susceptibility to corrosion, which is why aluminum RPs fail more often than copper ones.
The main disadvantage of copper RP is that it takes a long time to heat up the interior, but even after stopping the engine it retains heat for quite a long time
Copper heater radiators are approximately 30-50% more expensive than aluminum ones, but this is not so important - in general, the parts are still relatively inexpensive. The problem with copper RPs is different - the quality of the products is low, and it is not so easy to buy parts of acceptable quality.
Chevy Niva car owners often have problems with heating the interior; the car can be cold even in frosty temperatures of -15ºC - the aluminum radiator of the stove does not heat very well. Another problem on VAZ 2123 cars is that stove radiators often leak.
Aluminum heater radiators on a Niva car are inexpensive:
- VAZ-2123 (Chevrolet Niva) - on average from 700 to 1000 rubles;
- VAZ-21213 (21214/2105) - from 650 to 1100 rubles.
Copper RPs are sold more expensive, their prices range from 1,500 to 2,500 rubles, the cost depends on the brand of the product, the region of sales and the sellers themselves.
Upgrading the Niva Chevrolet stove: making it blow into your feet
One of the ways to solve the problem of poor foot airflow.
In some cases, the correct switching method does not work and then you have to modify the heater to achieve full functionality.
The main problem with dampers and ducts is leakage.
We will improve the cracks and eliminate leaks in the stove.
Warm air simply spreads throughout the cabin, escaping through leaks in the dampers and air ducts. Naturally, each specific car has its own gaps in the heating system, so there cannot be a single treatment recipe.
However, with little effort, without removing the front panel and the entire heater, you can modify the guides for the dampers so that the main flow of warm air is supplied to the feet. To do this, you need to remove the casing from the console on the driver's side and, if desired, the steering column casing .
Blowing die
In front of us on the stove side is a die , which is responsible for the direction of movement of both dampers, and therefore the direction of air supply. All that remains is to unscrew the die with the slots, change the shape in the uppermost slot from curved to straight, maintaining the starting and ending points.
A radical solution to the problem of poor foot airflow is to close one damper AT ALL with foam rubber.
Having changed the geometry of the movement of the upper damper, it remains to firmly fix the lower one, which is responsible for blowing the legs. It is enough to fix the lever of the lower damper with a self-tapping screw in the position of blowing the legs. Now there will be constantly warm air in the legs, and its quantity and proportions between the windshield and the legs are smoothly selected by a conventional air direction regulator. This way you can come to an agreement with the Niva Chevrolet stove and make it evenly warm up the interior.
Repair of heating system components
Despite the rather complex design of the heating system of the Chevrolet Niva, most of the problems can be solved independently. With proper diagnosis, this will not be difficult.
Replacing damper control cables
The damper control cables fail quite often. Usually the cable braid is damaged, which leads to the need to replace the entire part. You can purchase suitable cables at almost any auto parts store.
When choosing a new heater cable, you should pay attention to its length
To replace the cables, you only need flat-blade and Phillips-blade screwdrivers. The replacement process is carried out as follows:
- Remove the side panel of the lower part of the center console. It is located under the steering wheel to the right of the pedal assembly and is secured with self-tapping screws.
- In the resulting niche you will find two cables. Unscrew all accessible screws securing them.
In the niche under the console there are lower fastenings for the damper cables. - Remove the heater control unit switch handles. Then, unscrew the four screws and remove the block itself.
- Disconnect the remaining cable fasteners.
- Install new cables. Connect them to the control unit and dampers.
When replacing control cables, it is important to set the damper to the position corresponding to the mode set by the switch.
Replacing interior heater pipes
To replace the heater hoses you will need the following tools:
- Phillips screwdriver with long blade;
- a long flat screwdriver or pry bar with a flattened end;
- ratchet with extension and set of hex sockets.
Before dismantling, it is necessary to drain the coolant by unscrewing the drain cap at the bottom of the radiator of the cooling system. To do this, you will need a container with a volume of at least 10 liters, since the Chevrolet Niva cooling system in normal mode contains about 9 liters of antifreeze.
Be sure to reinstall the rubber drain spacer after draining the coolant.
After draining the coolant, you can begin replacing the pipes in the following order:
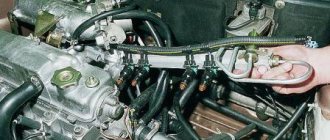
- Open the hood and loosen the clamps of the heater pipes located in the area of the engine compartment partition.
The pipes in the engine compartment are connected to the cooling system hoses using clamps - Using a flathead screwdriver or pry bar, remove the hoses from the cooling system circuit.
- Remove the lower part of the front panel opposite the passenger seat. This will give you access to the connection between the hoses and the radiator.
The heater hoses are pulled through a connector in the partition of the engine compartment - Loosen the fastening clamps and disconnect the internal pipes.
- Remove the hoses and replace them with new ones.
Stove pipes are usually sold without clamps - Connect new hoses to the cooling system on the engine compartment side and to the heater radiator in the passenger compartment.
- Fill with coolant through the expansion tank.
- Turn on the ignition and heater. Check connections for leaks.
Replacing the electric motor of the stove
The Chevrolet Niva heater motor can be removed without completely disassembling the front panel. It is enough to remove the lower panel trim in the glove compartment area using a Phillips and flathead screwdriver. The first is needed to unscrew the fastening screws, and the second is needed to pry and remove the assembly itself.
To avoid a short circuit, be sure to disconnect the terminals from the battery.
The electric motor of the interior heater is removed as follows:
- Disconnect the terminals from the battery.
- Remove the glove compartment and the lower trim of the front panel in the front passenger footwell area.
To remove the lower left part of the front panel, you need to remove the glove compartment. - Remove the passenger footwell air duct secured with screws and plastic clips.
- Disconnect the motor power cables so that they are accessible.
- Unscrew the three screws securing the electric motor to the impeller.
The electric motor is attached to the impeller with three screws - Use a flat-head screwdriver to separate the motor from the impeller and remove it.
You can disconnect the motor from the impeller using a flat-head screwdriver.
Replacing the stove control unit
Replacing the stove control unit requires special care and precision, as plastic parts are easily damaged.
The external stove control unit includes three rotary controllers and one slider
Dismantling is carried out in the following order:
- To avoid short circuits and electric shock, disconnect the terminals from the battery.
- Very carefully pull towards you and remove each of the stove mode switch knobs.
- Remove the air recirculation control lever by carefully prying it off with a flat-head screwdriver.
- Using the same screwdriver, remove the decorative panel of the controller.
Under the decorative panel of the stove control unit there are backlight bulbs - After unscrewing the two mounting screws, remove the control unit.
The heater control unit should be removed very carefully so as not to damage the cables and wiring. - Disconnect all wires from the controller. If you have an air conditioner, also disconnect the vacuum switch hoses.
- Install and connect the new control unit in reverse order.
Replacing the stove radiator
The heater radiator on the Chevrolet Niva is located inside the central unit of the interior heating system. To dismantle it, you must remove the entire front panel and the frame on which it is installed.
This is interesting: How to remove headlights from a Porsche Cayenne. We select lamps and protect lighting devices from theft
To replace the radiator you need to disassemble almost the entire front part of the cabin
After disassembling the front panel and removing its frame, access to the heater unit, inside of which the radiator is located, will be provided. Before dismantling it, it is necessary to drain the coolant and then disconnect the pipes. After this, removing the heater radiator will be quite simple. Installation of the new radiator and previously removed components is carried out in the reverse order. Before assembling the front panel, add antifreeze. This will allow you to check the quality of the hose connection.
Video: replacing the Chevrolet Niva heater radiator
Replacing the stove tap
The Chevrolet Niva heater valve is different from most domestic cars. Its design is a damper controlled by a cable.
By unscrewing the side panel of the center console, you will have access to the heater valve and its drive cable
You can reach the cable through the driver's footwell. The tap pipes themselves are mounted in the partition of the engine compartment.
The heater valve pipes are installed on the partition between the engine compartment and the passenger compartment.
To dismantle the screen of the stove tap pipes, it is necessary to disconnect the hoses from the inside and outside, after draining the coolant. After this, the two fastening screws are unscrewed and the screen is removed.
Replacing the entire heater unit
The central block of the heater includes dampers and their drive cables, a heater radiator and internal pipes. If several components malfunction at once, it is advisable to replace the entire unit. This will require removing the front panel, center console and the brackets that hold them in place. The step-by-step process is as follows:
- Disconnect the car from power by removing the terminals from the battery.
- Drain the antifreeze.
- Remove the heater control unit by disconnecting all wires and cables from it. If there is a radio, remove that too.
- Remove the glove compartment.
- Disconnect the transmission tunnel lining. You don’t have to remove it completely, but only lift it by unscrewing two screws on the driver’s and passenger’s sides.
- Remove the steering wheel, steering column trim and unscrew the screws securing the front panel. When removing the dashboard, mark all the wires to make it easier to reattach them in their places in the future.
Without removing the entire front panel, when dismantling the heater unit, some elements of the air conditioner and the stove itself can be damaged. - Remove the front panel frame attached to the body with screws.
The heater housing cannot be removed without dismantling the front panel frame - Behind the frame you will find the heater unit casing, connected to the intermediate housing of the heater or to the evaporator section on a car with air conditioning. Unscrew the casing.
- Remove the heater unit.
Installation of a new unit is carried out in reverse order.
Dismantling the stove
The stove is dismantled as follows.
- The negative terminal is removed from the battery.
- Remove the dashboard, performing the same steps as when replacing the control unit.
- The screws securing the heater to the cross member of the instrument panel are unscrewed.
- The stove is pulled out from its installation location.
Removing the stove from a Niva Chevrolet car is quite simple
Location of the heater fan on the Chevrolet Niva
The heater fan is located in a special niche under the cabin filter, just below the windshield of the car. Under its impeller there is an electric heater motor connected to the on-board electrical network and to the vehicle's safety unit.
The Chevrolet Niva heater fan impeller is located under the cabin filter and is marked with the number 15
If the owner of a Chevrolet Niva decides to replace the heater fan, then it can be removed in two ways: through the interior of the car, partially disassembling the dashboard, or through the hole in the cabin filter (but before that you will have to remove the filter itself, of course). The second method will be discussed below, since it is considered the least labor-intensive and even a novice driver can use it.
If only fourth speed works
In cases where the motor refuses to work at the first, second and third speeds, but turns perfectly at the fourth, the same resistor with three isolated windings is to blame. If you can’t buy it, you can try to restore it yourself. True, only in the case when the thermal fuse has blown, naturally, no one will rewind the windings, the game is not worth the candle.
Fan resistor
You can remove and check the resistor without dismantling the engine. This is done like this:
- Use a Phillips screwdriver with a short blade to unscrew the rightmost screws securing the glove compartment.
Unscrew the rightmost screws securing the glove compartment.
- We gain partial access to the motor, but this is enough to get to the resistor.
Move the glove compartment aside to get to the resistor.
- Remove the terminal block and move the wiring harness to the side.
We remove the contact block.
- Using a Phillips screwdriver, unscrew the screw securing the additional resistor.
Unscrew the screw securing the resistor.
- We remove the resistor from the housing.
Resistor contacts.
We take out the resistor.
- We check the integrity of the thermal fuse with a multimeter. If it is faulty, you can try to replace it.
- Installation of a new or restored resistor is carried out in the reverse order.
Replacing the heater fan on a Chevrolet Niva
Before you start work, you need to stock up on everything you need. Here's what we need:
Replacement sequence
After removing the cover from the Chevrolet Niva cabin filter, access to the fan impeller opens
The mounting bracket on the Chevrolet Niva impeller moves to the side
The Chevrolet Niva fan motor can be accessed by removing the glove compartment
The Chevrolet Niva fan motor is held on by three screws
Chevrolet Niva fan motor removed through the glove compartment
The Chevrolet Niva heating fan impeller is removed through the cabin filter niche
Repair and service of cars, engines and automatic transmissions
_____________________________________________________________________________
Replacing parts of the Chevrolet Niva cooling system
The Chevrolet Niva cooling system is a closed liquid type with forced circulation. The cooling system includes an engine cooling jacket, a radiator with two electric fans, an expansion tank, a thermostat, a water pump and a heater core.
Fig. 17. Chevrolet Niva cooling system (without air conditioning)
1 - expansion tank; 2 — cylinder head pipe; 3 — heater radiator supply hose; 4 — heater radiator outlet hose; 5 — heater radiator; 6 - coolant temperature indicator sensor of the instrument cluster (screwed into the threaded hole of the cylinder head - not visible in the figure); 7 — supply hose of the throttle assembly heating unit; 8 — outlet hose of the throttle assembly heating unit; 9 — left electric fan; 10 — outlet pipe of the jacket of the Chevy Niva cooling system; 11 — control system coolant temperature sensor; 12 — radiator; 13 — right electric fan; 14 — upper guide radiator casing; 15 — radiator supply hose; 16 — lower guide radiator casing; 17 — radiator outlet hose; 18 — steam-air hose; 19 — thermostat; 20 — bypass hose; 21 — coolant pump; 22 - inlet hose The Chevy Niva cooling system is filled with liquid through the neck of the expansion tank. The tightness of the system is ensured by the inlet and outlet valves in the expansion tank plug. The exhaust valve maintains increased (compared to atmospheric) pressure in the system when the engine is hot. Due to this, the boiling point of the liquid increases and steam losses are reduced. The intake valve opens when the pressure in the cooling system decreases relative to atmospheric pressure (on a cooling engine). The thermal operating conditions of the engine are maintained by a thermostat and electric radiator fans.
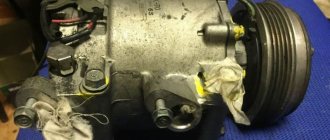
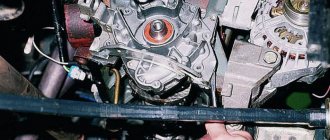
Water pump (pump) Chevrolet Niva
The Chevrolet Niva water pump is a vane, centrifugal type, driven by a poly V-belt from the auxiliary drive pulley. The water pump housing is aluminum. The roller rotates in a double-row bearing with a lifetime supply of lubricant. A pulley hub is pressed onto the front end of the roller, and a plastic impeller is pressed onto the rear end. For the correct position of the pump pulley grooves, the distance from the mating plane of the cover to the outer end of the hub should be 84.4 ± 0.1 mm. Axial and radial play in the bearing of the Chevrolet Niva water pump is not allowed. If the bearing or self-pressing seal of the pump fails, the cover assembly with the roller and impeller should be replaced.
Removing the Chevrolet Niva water pump
— Drain the coolant from the engine. Remove the accessory drive belt. — Loosen the three bolts securing the Chevy Niva water pump pulley. — We hold the pulley from turning with a slotted screwdriver, alternately inserting it between the head of each fastening bolt and the shoulder of the pulley hub. — After unscrewing the fastening bolts, remove the pulley. We unscrew the four nuts securing the Chevrolet Niva water pump cover. — Remove the pump cover complete with impeller and bearing. The joint between the cover and the body is sealed with a gasket. — We install the water pump cover in the reverse order. — To remove the Chevrolet Niva water pump assembly, use a screwdriver to loosen the clamp securing the supply hose to the body and remove the hose from the body pipe. — We unscrew the two bolts of the lower fastening of the water pump housing to the cylinder block and one bolt of the upper fastening. — Remove the pump assembly. — The joint between the Chevy Niva water pump housing and the cylinder block is sealed with a gasket. — We install the pump in the reverse order.
Design features of the Chevrolet Niva cabin stove
When purchasing a new car, most owners begin to study the technical documentation that accompanies any device. Indeed, this is the right action. This is how the owner will be able to find out for himself the design features of the devices with which the new Chevrolet Niva is equipped. Having such technical information, it is much easier to “diagnose” problems, as well as faster and easier to find ways to solve them. Since many Chevy Niva owners have had to deal with unpleasant situations associated with poor heater performance, it will not be superfluous to understand what the interior heater on your Chevrolet Niva consists of. On the Internet it is easy to find heater diagrams, as well as a listing of all the components of this device. To save your time, we invite you to take a short technical tour with us. We will not only accompany you, but also focus on important details. Such training will not be superfluous, since you will absolutely understand the connection diagram of the stove, and it will also become clear how to improve or, if necessary, restore the operation of the heating system.
Heater diagram
First of all, we want to inform you that the Niva already has a liquid-type heater installed, which allows you not only to supply warm air into the car’s interior, but also to cool the running engine, preventing it from overheating. It's no secret that overheating the engine entails extremely undesirable consequences. The engine may jam, and restoring its performance will be possible, but difficult, and you will have to incur significant financial expenses.
Design Features
The main design feature of the stove installed on the Chevy Niva is the absence of a tap. In this case, the supply and regulation of the flow of warm air is carried out thanks to the presence of dampers.
And also in the new Niva, heating and cooling are carried out by the same device. The vehicle was equipped by the manufacturer with a sufficient number of nozzles, thanks to which air flows can be targeted specifically at the side windows and doors, at the windshield, etc. In addition, the stove is equipped with a special switch for the high-speed mode of supplying warm air. There are a total of four heater operating speeds; the vehicle driver, at his own discretion, chooses the mode that is acceptable to him.
In order to expand the functionality of the heating and ventilation system, the manufacturer equipped the car with additional regulators, by controlling which it is possible to regulate not only the temperature of the supplied air, but also distribute its flow, as well as ensure the supply of outside air. Of course, everyone can easily understand that outside air will easily flow into the Niva’s interior with the side windows open. However, this is not the only way. Outside air also enters the vehicle through air intakes that are part of the heating and cooling system. It is important to note that the air passing through the air intakes then passes through the heater, and after that it enters the cabin either cold or already heated. Another advantage of passing outside air through the air intakes is its purification from dust, soot, and pollen. This becomes possible because the stove contains filters.
The intensity and direction of the air flow directed into the car interior is also regulated by dampers. They can not only be adjusted in a certain direction, but also completely closed, making it impossible for air flow to flow through. All these actions are carried out using a switch located in the second position. Below the switches there is a lever that can be moved to the left and right. This lever activates the air recirculation function. In this case, the access of outside air to the cabin is completely stopped. Recirculation is used more often in winter, when it is important to warm up the car interior in a minimum period of time. Some drivers actively use the recirculation start function also in cases where they have to stand idle in traffic jams or move in a tunnel. In these cases, the concentration of harmful substances in the air increases due to the simultaneous presence of a large number of vehicles.
However, it is also undesirable to use this mode often, since this results in an increase in the level of humidity inside the cabin. Of course, high humidity causes the windows to fog up, limiting the driver’s visibility.
If you suddenly notice that your windows have started to fog up, you can direct a stream of cold air onto them by using the air flow distribution control and the outside air supply control. If you have to operate a car in winter, you know that in severe frosts the windows freeze excessively and ice appears on them. It is possible to eliminate such ice by using the first switch, selecting the maximum indicator, indicated in red. You can also turn on the fan in the mode of supplying warm air directed directly at the frosty glass.
If you have a long trip in winter, it would be useful to use the electric heating function. Of course, it is very important in winter to take care of sufficient heating of the vehicle interior by adjusting the supply of heated air flow through certain nozzles.
So, the design of the heater on a Chevrolet Niva cannot be called simple, since it consists of many separate, but very important devices. However, by showing patience, you can initially fully understand the operating principle of the heating and ventilation system, and subsequently even memorize each mechanism and its purpose, which will allow you to make the most efficient use of the technical resource of the Chevrolet Niva, providing comfortable conditions inside the cabin.