Today I started unloading the CG as I wanted, I did it for about 5 hours, nothing complicated, if you have the hands and the desire, do it, there will be fewer problems with the car. I express my gratitude to maxxx090.
On Nexias, the ignition switch contact group burns out quite often. Let's try to find out what is the cause of the burnout and how to repair the contact group. What are the symptoms of a burnt Nexia contact group? Most often, when you turn the key in the ignition, the starter does not turn. A new contact group for the ignition switch costs about 600 rubles. (code in exist.ru - 530395, analogue - 93741069), the cost of repair is about 100-200 rubles. (replacing the contact group) But replacing the contact group will not help for long - after a while the new contact group will start to heat up in the same way and will require similar repairs
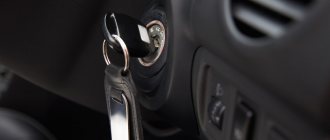
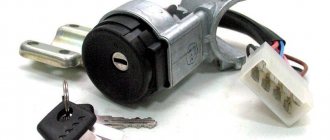
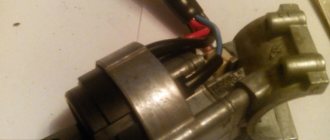
First, remove the contact group of the ignition switch
There are 5 contacts on the contact group of the Nexia ignition switch:
“30” – power supply from the battery “15” – ignition “15a” – heater fan “50” – starter “Kb” (“Ka”) – radio
On sale there is a contact group for Nexia with 6 contacts (in addition to those described above - contact “R”).
Connection of the contact group contacts at different positions of the ignition key: Initial position of the key “I”: “30”+”R” Initial position of the key “I” + the key is recessed into the ignition switch: “30”+”R”+”Ka” Position “II”: “30”+”Ka” Position “III” “30”+”Ka”+”15a”+”15″ Starter position: “30”+”50″+”15″+”Ka”
Why does the contact group burn out on Nexia?
The answer is simple: from contact “30” to contact “15” when the ignition is on, there is a strong load, and when the starter is turned on, from contact “30” to contact “50” an additional powerful load appears. Thus, a high power current flows through contact “30,” which leads to overheating and melting of this contact. Contact “15a” has little effect on the burnout of the contact group, since power goes through it to the first three speeds of the stove, while the 4th speed goes through a separate relay.
How to avoid contact group burnout on Nexia?
The problem of burnout of the contact group on the Nexia can be solved by installing additional unloading relays. This material provides an algorithm for installing the unloading relay in the group “30”-“15”, but if desired, you can install the relay in the group “30”-“50” by analogy. As practice shows, often unloading “30” - “15” is enough to forget forever about repairing the contact group
We purchase in advance: A starter relay from a VAZ-2108 (30 A) or even better from a VAZ-2110 (50 A), cost about 50 rubles. Relay block – 20 rub. Female terminals for relays (4 pcs) – 4 rubles. Red wire 0.5 m long – 10 rubles. Black wire 0.5 m long – 10 rubles. Screw terminal (1 piece) – 1 rub. Electrical tape – 25 rubles.
1. From the connector of the contact group, we take out the wires of contacts 30 and 15 along with the terminals, and reconnect them to contacts 30 and 87 (respectively)
2. Solder a 25 cm long wire to wire 30 at the terminal inserted into the relay, crimp the terminal onto the other end of this wire and insert it into socket 30 of the contact group connector
3. Another wire 25 cm long with terminals crimped on both sides, insert one end into contact 85 of the relay, the other into socket 15 of the contact group connector
4. We crimp a wire, preferably black, on one side with a terminal, which we attach to contact 86 of the relay; we crimp the other end of this wire with a screw terminal and attach it securely to the ground (body) of the car.
5. Wrap the resulting wiring harness with electrical tape. We remove the relay under the panel so that it is accessible and can be reached from below from under the panel. We attach the connector of the ignition switch contact group to the contact group itself. If all connections to the relay are made using the relay connector (block), then there will be fewer problems during installation and replacement. Now all the current to consumers will be directed not through the contact group of the ignition switch, but through the relay. Accordingly, the contact group will no longer overheat and melt! Information taken from this site www.nexia-faq.ru/remont/kontakt-group.html. Thank you for your attention, and happy new year friends.
The bottom line is that we now have the following problems: the contact group of the ignition switch has burned out (the contact has melted); the block of the unloading relay of the contact group is burnt; the unloading relay of the contact group burned out; The turn signals do not work (once they work, three do not work, the emergency lights work); The doors do not close with the central lock from the key fob (once it closes, it does not close the second time); something is draining the battery; with a weak battery, the car will not start (even if it is 12.0V); The third speed of the cabin fan does not work (sometimes it works, sometimes it doesn’t, the first two and the fourth work); The radio does not work (with the current contact group, it works with the new one).
I tried to figure out the central locking wires, but there are a lot of them, some of them are hanging in the air, not connected anywhere. I broke my head there, I'll leave that for another time. It’s also not clear with the turn signals, sometimes they work, sometimes they don’t. More often than not. But what is certain, before the contact group of the ignition switch melted there were no problems with the turn signals.
The contact group unloading relay is burnt out and does not turn off the ignition. I disassembled the relay and only the housing was burnt, visually the relay inside showed no damage. I put it back in the block and it works. But not like before. The relay has become self-feeding (or whatever the electricians call it) and does not open the coil. I bought a new contact group, but even with it the ignition turns off only if the relay is pulled out. Or it can start without an unloading relay, that also turned out to be possible. Without a relay, the ignition is turned off by the key.
The main symptoms of a malfunction of the ignition switch contact group
The main signs by which you can understand that the contact group is burnt out and does not work or will soon break. You can touch it, the contact group gets very hot, turning on the low beam, heater, windshield wipers, radio - at this moment there is a colossal load on the contact group, the contacts get very hot and the plastic begins to melt. The contact group will work for some time, but due to the fact that the plastic has melted, the contact has become even worse - a breakdown is not far off.
So the first sign is strong heating of the contact group. The second and main sign is the smell of burnt wires or plastic. If you remove the steering column casing, you will smell a burning smell and see a picture - blackened, burnt wires and a corrected contact group. Consider this article your salvation, you just need to read it to the end.
There is also a situation when you turn the key, but the car does not react. Nexia has a standard problem. This means 99 percent that your contact group has received a hitch. But don’t despair, if you don’t have a contact group at hand, you can drive normally by starting the engine with wires (see How to start a Nexia engine with wires without keys). If when you turn the key, the car does not start, then the contact group is to blame. It also happens that the starter simply does not turn when you turn the key - this is the same trouble.
Eliminating the cause of burnout
It should be noted that replacing the contact group with a working one helps for a while. For high-quality repairs, it is necessary to eliminate the cause of burnout: reduce the current load on the contacts. You can strengthen the weak point of the Daewoo Nexia by installing additional relays according to the diagram:
When using two relays, the load on a group of contacts is halved
This method will help extend the service life of the contact group by more than 2 times. Anyone can improve the electrical ignition circuit of a Korean car.
Video: Replacing the contact group on the Daewoo Nexia
To fully understand the process of replacing a group of contacts in the Daewoo Nexia, watch the video:
Repairing the contact group on a Daewoo Nexia car yourself will not be particularly difficult. Additional difficulties will arise if the wiring needs to be replaced. The wires going to contacts “30” and “50” often melt. If possible, relieve the contact group. This will protect the car from fire and extend the life of the part.
Why does the ignition switch contact group get hot?
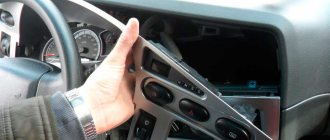
First you need to remove the contact group. You can see the numbers on the contact group (see photo):
As you can see, there are only 5 contacts per kg of the ignition switch:
“15a” – stove fan
“Kb” (“Ka”) – radio tape recorder
R - rare on rare 6-pin kg
By turning the key we close the following contacts:
Initial key position “I”: closed “30”+”R”
Initial position of the key “I” + the key is recessed into the ignition switch: “30”+”R”+”Ka” closes
Position “II”: “30”+”Ka” are closed
Position “III” is closed “30”+”Ka”+”15a”+”15″
Starter position: closed “30”+”50″+”15″+”Ka
Why is the contact group burning out so quickly? I hope no more questions arise. All consumers of the car pass through this thing (see photo below), this is the whole problem, to solve it you need to unload the currents using a relay.
The main sources of consumption arise when contacts 30 and 15 are closed, so they need to be unloaded from this current. Installing an unloading relay would be the right option, so you can forget about the problem of burnout of the contact group on the Nexia.
How to check and make repairs
Any car enthusiast can check the serviceability of the group of contacts in the ignition switch. Performance is determined by the appearance of the plastic case and the presence of carbon deposits on the contacts inside the group. To get to the part, it is enough to arm yourself with a Phillips and straight screwdriver.
- We remove the plastic under the steering wheel, it is secured with screws.
First you need to remove the protective plastic under the steering wheel.
The connector can be easily removed from the group of contacts with a simple screwdriver
Using a thin flat screwdriver, unscrew the screw that secures the group in the ignition switch housing
If the case is not damaged, be sure to inspect the internal contacts. To do this, carefully disassemble the case. If carbon deposits are found, remove it with a sharp knife or screwdriver. This temporary procedure will help along the way. As soon as possible, contact an electrician at a service station or replace the contact group yourself.
Unload the contact group of the ignition switch on the Nexia
To unload using a relay, you need to purchase the necessary materials in advance, namely, we will need:
A starter relay from a VAZ-2108 (30 A) or even better from a VAZ-2110 (50 A), cost about 100 rubles.
Relay block – 50 rub.
Female terminals for relays (4 pcs) – 5 rub.
Red wire 0.5 m long – 15 rubles.
Black wire 0.5 m long – 15 rubles.
Screw terminal (1 piece) – 2 RUR.
The terminals on the contact group that need to be unloaded are shown in red:
The following is a schematic diagram of the relay:
BEFORE unloading, diagram of connection and operation of the contact group on Nexia:
Connect the relay to the contact group as indicated in the diagram. Scheme for unloading the contact group through a relay:
Using the same scheme, you can install another relay in parallel. After this unloading, you will extend the service life of the contact group and avoid melting of the wiring and burnt plastic in the car interior. Suddenly, if one wire going to “30” heats up, then leave the old wire per kg, and run a new wire from the battery to contact “30”.
Your headaches regarding the contact group will go away, since now the entire load passes not through the pitiful contacts, but through the unloading relay.
By the way, I almost forgot, if you detect melting of the contact group, be sure to replace it with a new one, so I recommend that you read our article about kg. (See Article number of the ignition switch contact group on the Nexia).
ps Share the publication with a friend Nexiavod, so as not to forget how to relieve the contact group on the Daewoo Nexia.
Theme Options
Display
- Linear view
- Combined view
- Tree view
I'm wondering why 15 heats up and 30 stops. and before that I drove normally for 4 years without unloading and so on
Good afternoon The other day my contact group burned out. At first I thought that the contact group itself was closed. I installed a new original one. Then I realized that the problem is not in the contact group, but in the wiring. Then I didn’t know that you could relieve the wiring burden by installing a relay. Yesterday I went to the service center and they installed two 70A unloading relays. The wiring stopped heating up. But now these two relays, after about ten minutes, crack so much that you can’t even lift your finger. I went to the service center because... I paid 1100, but the reason for not heating was not eliminated. The service center told me that it is normal for the relays to get hot. I argued and argued with the service for a long time. As a result, I agreed to go to another master tomorrow. The relay starts to heat up when you turn on the headlights. Can anyone tell me why before everything was fine with the wiring, but now everything has started to heat up!?
It depends on what the relay is from. There are starter ones, they warm up and something else. I got 2*30 from the market, that’s fine. That's what my PTF relatives thought, but they're worth it.
Fuse and relay block Daewoo Nexia N100
The mounting block is located on the instrument panel, to the left of the steering column, under the protective cover. The inside of the cover shows the location and purpose of fuses and relays in the current block.
Fuse layout in the Daewoo Nexia N100 interior
Inner side of the mounting block
Description
Fuse No. 1 (10A, red) protects the electronic control unit circuit.
Fuse No. 7 (30A, green) - fuel pump fuse.
| Number | Denomination | Purpose of fuses |
| F1 | 10 | ECU (battery circuit) |
| F2 | 10 | Side lights, license plate lights |
| F3 | 10 | FlaflyBHafl airbag |
| F4 | 20 | High beam headlights |
| F5 | 10 | Left headlight (low beam) Electric drive for adjusting the direction of the light beam of the left headlight |
| F6 | 10 | Right headlight (low beam) Electric drive for adjusting the direction of the light beam of the right headlight |
| F7 | 30 | Electric fuel pump fuel injectors |
| F8 | 20 | Turn Signals, Hazard Lights Brake Light Switch and Lamps |
| F9 | 30 | Windshield wiper |
| F10 | 10 | Fuel filler flap drive, ABS, immobilizer |
| F11 | 10 | Air conditioning compressor electromagnetic clutch activation relay |
| F12 | 30 | Cooling Fan Motor (Low Speed) |
| F13 | 20 | Reversing lamps, alternator circuit, instrument cluster, cigarette lighter fuse , melodic sound signal |
| Fi4 | 30 | Horn, Cooling Fan Motor Relay (High Speed) |
| F15 | 20 | Clock with display, interior light , trunk light, antenna drive motor |
| F16 | 30 | Window lift motors |
| F17 | 10 | Car radio (circuit from ignition switch) |
| F18 | 30 | Trunk lid lock control, rear window heated timer Central door locking system, car radio (battery circuit) |
| F19 | 30 | Heater fan relay |
Relay and designation
Relay number | Relay purpose |
| 1 | Cooling Fan Motor (High Speed) |
| 2 | Direction indicators |
| 3 | Fuel pump |
| 4 | Fog lights |
| 5 | Windshield wiper speed control |
| 6 | Heated rear window timer |
| 7 | Lighting devices |
| 8 | Headlights |
| 9 | Cooling Fan Motor (Low Speed) |
| 10 | Turning on the air conditioning compressor |
| 11 | Sound signal |
| 12 | Melodious signal |
| 13 | Heater fan motor |
General information about the Nexia ignition switch
The Daewoo Corporation, which is the manufacturer of the vehicle we are interested in, which is very popular among domestic drivers, designates the ignition switch (often called a switch) as a mechanical locking device equipped with an electrical contact group.
If the lock on your “swallow” has stopped responding to commands, it is not at all necessary to look for a car service where it will be put in order. Any malfunction can be eliminated independently by replacing the lock cylinder, its contact group or the entire switch assembly. In cases where a new lock assembly is being installed, the steering column must be removed.
The bolts that secure the element we are interested in need to be knocked out (put a chisel on the fastener and hit the tool tangentially with a hammer); pull out the released unit and install a new ignition switch in its place. The bolts, as you yourself understand, will have to be purchased new.
Fixing the problem of burning ignition switch contacts on Daewoo Nexia (N) — DRIVE2
As practice shows, this component breaks down quite often and requires repair; this information is confirmed by motorists in numerous reviews on the Internet.
Daewoo Nexia - Unloading the Contact Group - Duration: We repair it ourselves. Unloading Daewoo headlights...
But remember that after this operation the lock will be opened with one key, and the trunk with another.
How to install a new contact group on the ignition switch?
Contact 15A does not receive a large load, so it controls the operation of only the first three speeds of the stove, and the fourth goes bypassing it, through a separate relay.
Loading .
It remains to resolve the question of what to do in order to avoid burnout of the ignition switch contact group? Most likely, the problem will be solved by connecting additional relays for general unloading.
Installing such additional relays in groups will help each owner never remember that there is a problem in the ignition switch contact group. To carry out all preventive work, you must purchase in advance: Such a part costs about 50 rubles.
Causes of burnout and symptoms of breakdown
A strong current passes through the ignition switch. As a result, the wiring becomes very hot and the contacts melt. A large load occurs when the engine starts, the pin marked “30” suffers the most. First of all, it doesn’t hold up; the plastic case near the contact melts.
Due to the high current that passes through the group of contacts in the ignition switch, the contacts become very hot and the plastic housing melts
In most cases, burnout of the contact group manifests itself as follows: after turning the key in the lock, the starter does not turn. When driving, it manifests itself as follows: the engine suddenly stalls, the instrument panel goes dark and the smell of burnt plastic appears in the cabin. The second sign of a breakdown is a non-working standard radio.
It cannot be said that the starter does not spin and the car radio does not work only because of the contact group, but in 90% of cases for the Daewoo Nexia the symptoms are exactly the same.
How to install a new contact group on the ignition switch?
If you need to replace only the contact group, then in this case you can perform all the necessary work without dismantling the ignition switch. You only need two screwdrivers - a flat head and a Phillips head. Having prepared the tools, you can begin the repair process.
- Open the hood and disconnect the negative terminal from the battery.
- Next, as in the previous case, you need to unscrew the bolts securing the plastic lining in the area of the steering wheel.
- Using a flat head screwdriver, you need to disconnect the plug and then remove the upper steering column housing.
- After these steps, you need to remove the sealing ring located on the lower casing; to do this, unscrew the four screws.
- Disconnect the wiring harness mounted on the block, then insert the key into the lock and turn it to position 2.
- Next, unscrew the bolt that secures the device, and you will need to remove the element itself from the lock itself. Instead of this group, a new one is installed; all further actions specified in the instructions must be performed in the reverse order.
How to install a new contact group on the ignition switch?
Replacing the daewoo nexia clutch instructions with photos
If it is necessary to dismantle the contact group in order to install a new unit, you can do without removing the entire lock. Fold out the “-” battery, arm yourself with a regular flat-head and Phillips screwdriver, and then perform the following steps: as when replacing the cylinder, unscrew the screws on the plastic case; remove the plug (flat screwdriver); remove the casing (upper) of the column.
Next, remove the rubber ring-seal from the lower casing (you will need to unscrew four fasteners); disconnect the wiring harnesses that are located on the block; The key is inserted into the lock (select position 2). After this, the screw that holds the structure is unscrewed, and the contact group we need is removed from the lock. We place a new node in its place, and then perform all the described operations in reverse order.
Home →
Practical advice → Malfunctions →