Classic “loaf”
UAZ 3741 or 452, called by the people “loaf”, is the most famous creation of the Ulyanovsk Automobile and is remembered as a reliable ambulance, emergency gas service, police, water utility vehicle. She has many positive qualities. It is unpretentious in maintenance, has excellent maneuverability and endurance.
But for all its advantages, like any machine, sooner or later it needs partial or major repairs. For this purpose, it is not necessary to contact service centers. The structure of a domestic car is not very complicated, and you can figure out how to repair some of its parts yourself.
Brake system maintenance and repair
The UAZ-452 brake system includes hydraulic and mechanical elements.
The first sign of a malfunction is the “failure” of the clutch pedal - the pressure in the system is below normal. The cause of the problem may be different:
- air has entered the circuit;
- the integrity and tightness of the pipeline is compromised;
- liquid was not added on time;
- failure of the circuit mechanisms.
How to bleed the brakes
After the brakes have failed, regardless of the work performed, bleeding the UAZ brakes is a necessary action.
Pre-clean the valves on all four wheels from dirt. At the same time, you can check the condition of tubes, hoses and connections for mechanical damage and leaks. To do this, perform the following actions:
- Add brake fluid to the reservoir to about or a little more. The level must be monitored throughout the entire operation, otherwise air will enter the system again.
- For the valves, you need to select a plastic or rubber tube of suitable diameter, the length of which should allow the second end to be lowered into a container with brake fluid. The structure serves as a one-way barrier between the circuit and the atmosphere.
- You can't bleed the brakes alone, you need an assistant. One person sits in the cabin and, upon command, sharply pressing the pedal several times, holds it pressed all the way; the second one under the car at this moment releases the valve using a key at 11 so that the air comes out. When the bubbles stop or the pedal hits the floor, the valve closes. The procedure is repeated on all wheels, starting with the rear right one, until all the air is released from the system and the movement of the lever under the foot becomes natural for a properly operating machine.
How to separate the pads
It is possible that the brakes are pumped, but when you press the lever sharply, the car does not skid, as if there is not enough effort.
If you put the car on jacks and spin the wheel, it should rotate freely. In a situation where it spins tightly and a grinding noise is heard, most likely the pads need to be moved apart. This is done like this:
- On the back of the brake drum you need to find a nut with a screw lock and unscrew it 0.5-1 turn.
- Turn the wheel and tighten the nut until it stops. After this, gradually loosen until the rotation becomes silent and easy.
- Fix the position and repeat the operation on the remaining wheels.
Replacing pads
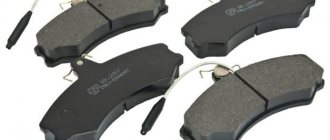
The friction linings wear out - they become thin, chips and grooves appear on them, so the UAZ brake pads need to be replaced periodically.
After the car wheel is removed, the procedure for replacing the brake pads on the UAZ looks like this:
- unscrew the brake drum;
- Having removed the protective cap, spread the pads and take out the tension spring;
- by pressing and turning 90º, remove the upper cup and remove the pressure spring and its rod;
- take out the support pin, bushing and remove the block.
On some models, the front pads are longer than the rear ones.
How to tighten the handbrake
The UAZ hand brake is adjusted in the following order:
- We hang out the rear wheel of the car.
- Set the gear shift lever to the neutral position.
- We lower the handbrake completely.
- We tighten the adjustment screw so that the drum stops turning freely by hand.
- Let go until the drum begins to rotate slightly, turning the screw ½ turn. We try the lever - there should be 5-7 clicks.
- We go to the drive, unscrew it, and remove the cotter pin.
- We twist the fork, tighten the cable, align it and insert the cotter pin.
Pull the handbrake and try - the car should stand on a slope of 20-30º.
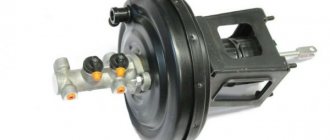
Replacement and repair of the main brake cylinder
Before repairing the GTZ, you need to pump out the liquid from both tanks that are located on it. This can be done with a 20 cc syringe. Using a screwdriver, unscrew the containers and remove them.
Use a 17 wrench to unscrew the pipes, and be sure to hold the nuts on the pipes with a second wrench (12). Do not apply any force, as copper cracks easily.
After this, remove and clean the signaling device. We disconnect the cylinder from the vacuum, remove the lock washer on one side and unscrew the end nut on the other. We take out the insides of the GTZ. Inspect the inner surface for scratches. We change the repair kit and assemble it in the reverse order.
If the performance check shows that the device is easier to replace, then we remove the old one without disassembling it and install the purchased one. Fill in the liquid and bleed the system. Before installation, you can pre-fill the tanks and manually “drive” the piston.
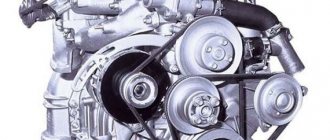
Power unit
Since 2021, UAZ will be equipped with UMZ 421 engines in injection or carburetor versions. The most common engine breakdowns:
- Thermal clearances of the timing valves go away;
- the connecting rod bearings are rotated;
- the ignition system fails;
- The thermostat breaks;
- the pump does not pump;
- The engine is heating up.
Coolant replacement
After 2 years of operation or 60,000 km, the coolant in the car needs to be replaced. Replacement is carried out on a cold engine and on a level surface.
If there is crankcase protection, you will have to remove it. Open the heater tap, place the container and unscrew the cap on the radiator. We unscrew the cap of the expansion tank and the plug in the cylinder block.
You can use water to flush the system several times. Fill the antifreeze through the expansion tank, start and warm up the engine. If necessary, add fluid to the maximum mark.
Where is the charging relay located?
The charging relay protects the generator from overload and is located with it under the hood on the right side of the engine.
How to remove a radiator
The radiator on the car is initially mounted poorly - the top is on the body, and the bottom is on the frame. Mechanical stresses are created, which lead to microcracks and product leakage.
The order in which to remove the cooling system radiator is intuitive. Through the cabin and from the bottom of the machine, we unscrew the pipes and fasteners, and remove the assembly.
Copper radiators are well soldered. In aluminum devices, you can try to seal the tubes with sealants, for example, “dry welding”.
Changing the engine oil
Engine oils are used recommended by the manufacturer. Change every 10 thousand km.
If the crankcase guard is installed, it may need to be removed. Depending on the engine brand, the location of the drain plug differs.
Replacement is carried out with the car warmed up.
To avoid strong pressure from below, it is recommended to first place the container and unscrew the magnetic plug and only then open the oil filler hole.
The system should be flushed periodically before adding new oil. A cleaning agent is used for this purpose.
When the waste or flushing has drained, tighten the plug and fill in fresh oil to the upper mark of the dipstick. The car is started and the pressure is checked.
To reduce oil consumption on ZMZ engines, the valve cover of the cylinder block, the crankcase ventilation system, and the labyrinth connection of the oil deflector are modified.
How to remove the engine
The engine from the car can be lowered into the pit or removed through the passenger compartment. There is no need to remove the boxes from the car.
Before starting the procedure, it is necessary to remove the attachments, generator, fuel pump, wires, hoses and pipes, and unscrew the fastenings of the product to the body.
For safe work, it is better to use devices with a crane beam. The engine is lifted into the cabin and removed through the doors or lowered into the pit on a stand.
How to remove the starter
In order not to remove anything unnecessary, the UAZ starter is replaced from two positions - from under the car and from the cab.
Use a spanner wrench to unscrew the fasteners using short movements. We move aside the electric starter connection wires. We turn the device with the retractor relay down and remove it. The starter retractor relay is located on the side of the device body, the control relay is in the engine compartment on the left in the direction of travel. There is also a locking relay installed in the cabin.
How to connect a generator
Connection diagrams for a car generator differ depending on its modifications and engine type. Timing belts can also be different.
To replace the product, you will need an electrical circuit that matches your brand of car, or a service center specialist.
Before working with electrical wiring, turn off the onboard power. In all cars, you need to connect the battery (plus) to the generator, connect the ignition switch and a light bulb with a voltmeter on the instrument panel.
To optimize the on-board network, car owners install an additional battery through an isolation device.
Replacing the alternator belt
For the ZMZ engine, tension is performed by the power steering pump, and the procedure for replacing the belt is as follows:
- Loosen the pump fastenings to the bracket, tighten the adjustment bolt and move the assembly to the right.
- Remove the belt from all rollers.
Some models have a tension roller. The belt is removed by adjusting its position.
How to install the ignition
The ignition is adjusted by aligning the marks using the starting handle on the crankshaft and cylinder block (with an advance angle of 5º). It is necessary that the marks coincide at the end of the compression stroke of the first cylinder. This is determined by the distributor slider - it should be directed to the contact of the desired cylinder.
To set the ignition, there is a red mark on the sensor rotor, and an arrow on the stator. We relax the octane corrector and move it to the zero position. After this, by turning the distributor body, we align the marks and tighten to fix the setting.
Check the correct installation of the ignition on the UAZ by sharply pressing the accelerator while driving at a speed of 50 km/h. Detonation knocks should be no more than 3 seconds. Their absence or long duration is a sign that additional adjustment is required.
How to bleed the brakes on a loaf in 5 minutes
To bleed the brake hydraulic system in order to remove air, each brake cylinder has a special fitting, which can be left alone when repairing leaking brakes in the field.
Important How to choose a stove for an Ermak bath: top 7 models with descriptions of technical characteristics and customer reviews
When replacing brake pads, an experienced mechanic-driver puts new pistons in the brake cylinders - so, as they say, for the rest of their lives. After the pistons with new cuffs are inserted, we pump the brakes through these pistons, and not through the soured fitting, which we no longer need. Only after bleeding the cylinder do we move on to installing the brake pads and all subsequent assembly.
So, new pistons are inserted into the cylinder. Now we take a chisel or a beard and a hammer in our hands, and the assistant (or assistant) in the cabin, at our command, presses the brake pedal. The pistons extend from the depths of the cylinders, but do not fall out of them, since the brake pedal sinks all the way, and an assistant holds it in this position. At the same time, we see a small amount of brake fluid protruding from under the outer cuff. This means that there is no longer any air in the cylinder. Well, or almost not.
The assistant holds the pedal in the pressed “to the floor” position, and at this time we use a hammer and chisel to drive the pistons back into the cylinder. To be sure that there is no air in the system, we repeat this operation several times. For example, my god loves four.
It is convenient to do a similar operation with installed pads. Only the boot on one side should be temporarily moved from its seat towards the block. It is on this side that we use a mounting tool and press the block so that when you press the pedal, the piston can extend to the limit on this side. All clear?
With this method of bleeding the brakes, virtually no fluid is lost from the system. But the point is not about savings, but about the simplicity and reliability of the proposed method. I repeat: this method is applicable in the field for urgent repairs of leaking brakes.
It’s better to spend an hour or two on urgent brake repairs while standing on the side of the road than to drive into someone’s car in an hour or two.
Take care of yourself and your loved ones!
I made a warm and cozy house on wheels from my “buhtobus” (3909 farmer loaf). Tomorrow I’ll change the clutch and, it seems, that’s it: I won’t lie under it again until the end of my life.
ABOUT! Ours, nomadic). I compare the Japanese quality of the Japanese UAZ with our “goats”. The score is not in our favor. Moreover, for such components as diffs, we lose by an order of magnitude in the quality of processing of parts. Walking, of course, suffers greatly.
The Proza.ru portal provides authors with the opportunity to freely publish their literary works on the Internet on the basis of a user agreement. All copyrights to works belong to the authors and are protected by law. Reproduction of works is possible only with the consent of its author, which you can contact on his author’s page. Authors bear responsibility for the texts of works independently on the basis of the rules of publication and the legislation of the Russian Federation. You can also view more detailed information about the portal and contact the administration.
The daily audience of the Proza.ru portal is about 100 thousand visitors, who in total view more than half a million pages according to the traffic counter, which is located to the right of this text. Each column contains two numbers: the number of views and the number of visitors.
This is interesting: Design features and technical characteristics of the UAZ flatbed truck: consider in detail
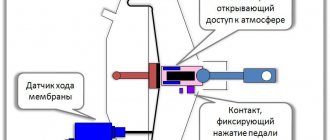
Design of the main brake cylinder of the UAZ “Bukhanka”
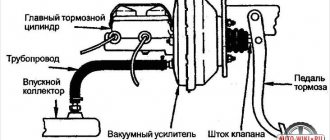
The safety of any vehicle largely depends on the efficiency and uniformity of braking. The UAZ “Bukhanka” was no exception, the all-wheel drive of which only increases the importance of high-quality formation, strengthening, distribution and transmission of braking forces.
The center of the car's braking system is the main brake cylinder , which is entrusted with the final function of converting the mechanical movement of the pedal into fluid pressure moving along hydraulic lines.
All models of the UAZ-452 series are equipped with two-section master brake cylinders . The part is located on the cover of the vacuum booster; the top is covered by reservoirs with brake fluid, connected to the working sections through bypass and compensation holes.
The liquid located in the tanks is used by the system to replenish small process losses, for example, minor leaks or evaporation. Most often, tanks are made of translucent plastic and equipped with a scale or simple liquid level sensors.
In the longitudinal body of the main brake cylinder there are two pistons communicating with each other. The first piston is connected to the rod of the vacuum booster, the second does not have a rigid connection with mechanical parts.
The tightness of the system and the tight fit of the pistons to the cylinder mirror are ensured by rubber cuffs.
Return springs are installed between the pistons, as well as between the second piston and the rear wall of the crankcase, which are necessary to hold the elements in their original position until the pedal is pressed and return to it after the control action has ceased.
The incoming mechanical force is perceived by the master cylinder rod, equipped with a boot, a retaining ring and an outer collar.
Outgoing hydraulic forces are transmitted through the channels of the first and second circuits to the corresponding lines and are perceived by the working bodies of the wheel cylinders.
About the brakes
Since the loaf has drum brakes, it makes sense to talk about the drums themselves. In general, the design of UAZ brake drums is the same for all cars:
- cast iron rim;
- disk stamped from sheet steel;
- amplifier welded to the disk.
All these elements are combined into one structure when the rim is cast. At the same time, convenient access to the drums is provided, since they are removable. Thanks to this, cleaning and checking them will not cause serious complications, since there is no need to remove the hubs, and accordingly, the adjustment of the wheel bearings will not be disrupted.
Finally, we note that the drums are attached to the hubs by three screws. Interestingly, these screws are located unevenly, which allows you to install the drum in exactly the position in which it was when assembling this car system.
As you can see, the design of the loaf’s braking system is quite simple, but there is one important caveat:
Important: How is the training carried out and how long does it take to study to become a tower or truck crane operator after 9th grade?
Rear brakes
We will install rear disc brakes on the UAZ from VAZ. The calipers must be from a model with a 16-valve engine, as they fit 14-inch wheels. After reading the above material, you can already imagine the installation process and the necessary components for the rear axle. Among the features:
- on a UAZ with military axles, the caliper from the right front wheel of the VAZ is suitable for the left axle. A caliper installed correctly when the bleeding hole is at the top (will ensure full bleeding of the brakes);
- To install the UAZ caliper discs you need to file a little.
Replacing drum brakes with disc brakes from UAZ 3160 is also possible using calipers from GAZelle. The bracket for attaching the brake hose to the bridge can be taken from Volga. You may also need spacers to adjust the gap between the caliper and the disc. When planning a brake upgrade, think about the wheels. After installing disc brakes, wheels with a standard offset and radius will no longer fit. Be sure to compare the parameters of your discs with the dimensions of the installed brakes.
It is extremely difficult to describe all the intricacies of the conversion process in one article. Therefore, here is a video on installing disc brakes. Do-it-yourself installation is shown using the example of both the UAZ 469 and the more modern UAZ Hunter.
Good night everyone, I’m writing late because I don’t have any more time)) so I bought a set of disc brakes for the front axle, which cost 10,800 rubles
Well, I’ll show you what they packed for me)) it’s funny, but we’re in Russia; I received the box at the market and didn’t unpack it because I know the guys if they change anything))
brake hoses and adapters for them
Then he smiled, although he asked me to post this thing that I don’t need, but it’s here, let’s see the number is two, but why are they so different?
then the faceplates for attaching the caliper are also two and also different))
so let's get some wheels that aren't bad and we'll see how long they last
but the same pads that were on the rear axle did not last 1000 km, maybe about 1000)))
Next comes the installation and I’ll try to take more photos, I’ll also disassemble the front side panels and see the condition of the hubs and mushrooms. Thanks for your attention
Communities › UAZ drivers › Blog › Question? or advice!
Friends, the question is this: I crawled under the UAZ today and noticed an interesting thing! Below is a diagram of the UAZ Hunter brake system. Separate contours front and back! Everything seems to be the same for everyone! But I discovered an interesting thing! My circuits are closed to each other! (Highlighted with a red line!) - There is a tee in front in front of the hose going to the bridge and a copper tube comes from it! - This pipe comes back to the sorcerer! that is, it turns out that the contours are closed to each other! But why is this? And for what? I'm wondering why the front contour is included in the sorcerer? Tell me, does anyone know if this could be causing the brakes to be sluggish?!
Repair of military bridges UAZ 469
Due to the greater number of parts, military bridges are more difficult to repair than their civilian counterparts. It is better to entrust the repair of the unit to professionals. There are a number of malfunctions that most often occur when using military bridges:
- Increased noise in the bridge area. Crunch, whistle, knock, etc. indicate increased friction of rotating parts. Most often, noise occurs when there is a lack of lubrication or deterioration in its characteristics. To avoid severe wear of components, the oil should be changed promptly.
- Radial displacement of the propeller shaft mounting flange. The sign indicates the destruction of the bearings. It will be necessary to replace failed parts with new ones.
- Presence of oil smudges on the gearbox housing. Observed during a visual inspection of the bridge or when spots appear under the car. Indicates depressurization of the gearbox housing. In some cases, the presence of smudges may indicate a malfunction of the breathing valve. To eliminate the problem, you will need to clean the breather from contaminants.
- Water in the gearbox housing. Often appears during regular off-road driving and fording. Water enters the crankcase through the breather valve. It is necessary to bring the breather to the highest possible point. To do this, use a flexible hose, one end of which is attached to the breathing valve, and the second is led into the engine compartment.
- Broken axle shaft. Occurs when there is a high load on the part. A damaged axle shaft cannot be repaired. A complete replacement of the part will be required.
- High heat. An increase in lubricant temperature is considered normal. Strong heating indicates deterioration of lubrication of rotating parts. The lubricant needs to be replaced.
- Node jamming. Sometimes the military axle gearbox jams due to bearing failure. Parts need to be replaced.
- Broken final drive gears. Malfunctions rarely occur when the vehicle is used in extreme conditions. If a malfunction occurs, the gearbox gears must be replaced.
Most breakdowns of UAZ 469 military axles are minor faults that can be eliminated without removing the mechanism from the vehicle. If serious damage occurs, you will need to remove the bridge from its seat.
Military UAZ 469 bridges have an advantage over civilian ones when overcoming off-road conditions. When using a car to drive on a good quality surface, installing military bridges is impractical. Installation of components intended for the military UAZ 469 is possible on the civilian version of the car. Replacement can be carried out without the involvement of specialists.
Important Operating principle and operating features of the Pioneer jib crane
Characteristics of the UAZ ABS system
The modern “loaf” is equipped with ABS
Another important component of the braking system is ABS. Modern “loaves” also have it. The system is designed to protect the car during emergency braking from wheel blocking and skidding.
Anti-lock braking system includes:
- sensors that collect data on wheel speed;
- the main control unit, which processes information received from sensors and controls the braking process.
In order for the ABS to work fully, you need to regularly check the operation of all its parts. The sensors require the most attention. The operation of the microcontroller depends on them, which sends a signal to the valves so that they change the amount of liquid supplied to the cylinder.
Sensor failure can lead to problematic signal transmission to the main control unit. If the ABS signal is interrupted, the wheels lock when braking. If such a problem occurs, you should not fix it yourself, but rather contact a technical center.
In order for the driver to pay attention in time to the failure of the ABS sensor, the car is equipped with a self-diagnosis system. If the sensor is broken, there is no need to delay replacing it. Repairing a vacuum brake booster requires the same attitude.
Installing disc brakes on a military axle
- First, remove the wheels. We unscrew the drum, pads, tubes, support pins. Slowly, carefully, so as not to damage the parts.
- Next comes dismantling the coupling, which is somewhat more complicated and responsible.
- After the coupling, the hub and brake shield along with the axle are unscrewed.
- Everything that was unnecessary was removed - now we proceed to installing the caliper holder on the steering knuckle with the bosses facing out. This is not an easy matter. The main problem is that usually the caliper holder hole is smaller than necessary, so you will have to file it down. Fitting the part will require some physical effort. To make the job easier, equip yourself with a hammer.
- Now we remove the old studs and install new ones. Then the spacer is installed. Do not forget that the part is placed with the groove of the largest diameter towards the caliper, and not vice versa.
- Next, we return all the parts to their places in the order in which they were removed, but do not secure the coupling yet.
- There will be a protrusion on the caliper that we don't need. It must be cut with a grinder. We should also polish the fist to make it more suitable for our idea.
- We dismantle the hose. Sometimes it gets stuck and it is simply impossible to unscrew it manually. But it's not scary. Use a torch and heat the joint. If this doesn't help, just cut off the tube and flare it.
- Select a new hose of suitable length and install it.
- The pads are installed and the caliper is attached to the caliper holder. As a rule, the part has to be adjusted to size. Make sure that the caliper rotates normally and that nothing interferes with it. It's better to work hard now than to suffer later.
- We put on the wheel. Now we perform all the above actions with other wheels. Once you're done, bleed the brakes.
The work is finished. We wish you good luck and a great mood!
Replacing a UAZ brake cylinder
For the first time in the entire life of the car, the main brake cylinder failed. The front brakes worked fine, but the rear brakes were gone. No leaks were visible either on the main or working cylinders, as well as on the system pipes. After some fuss, the UAZ master brake cylinder was replaced. But in order.
Diagnostics
There were still brakes, but they were very weak, and it felt like the brake pedal was sinking to the floor. To identify the cause, it was first decided to change the front and rear brake pipes on the master cylinder. During a test drive, it turned out that the rear ones appeared, the front ones disappeared. It was concluded that the main one was faulty.
Repair kit for master brake cylinder
It was decided not to change it, but to purchase a repair kit for the main brake cylinder and repair it ourselves. After two days of operation, the cylinder literally jammed. After disassembling it turned out that the rubber bands were swollen. The same thing happened with the second repair kit. The third one lasted a week, but still refused, since the rubber bands had simply worn out.
The main brake was inspected for damage and scratches. We were unable to find anything suspicious. Repair kits were purchased in different price categories, in different stores, and everyone praised the product. Conclusion, they are selling Mr. It's a pity for the money spent, almost a third of the price of a new one.
Tools
To replace the master cylinder you will need:
- Key for 12;
- Key for 14;
- The key is 17.
Replacing a UAZ brake cylinder
I have an old-style UAZ master brake cylinder installed, that is, it has not one fluid reservoir, but two separate ones. There is nothing complicated when replacing it, it is changed in the same way as on the UAZ 469, UAZ 3151, “loaf”. The tubes of the front and rear brake systems are unscrewed. The cylinder is unscrewed, and a new one is installed in its place, then the tubes are connected.
- fill the fluid into the reservoir (fill in high-quality DOT type fluid);
- press out the cylinder with the lever, the corresponding outlet hole should be open;
- close the hole, release the lever. The sequence is important; when the hole is closed, when the lever is released, a vacuum is created and liquid from the tank enters the cylinder;
- repeat the operation several times until liquid appears.
After the liquid appears, screw the tubes and pump the entire system. How to quickly and independently bleed the brakes in another article.
Unfortunately, there is no similar video about replacing the main brake cylinder in a UAZ, but here it’s almost the same:
Assembly and adjustment of brakes with a hydraulic drive of a GAZ-51 car
To assemble the brake mechanism of a GAZ-51 car, you must perform the following operations:
- insert two adjusting eccentrics into the protective brake disc, put the springs on them from the outside and tighten the nuts;
- assemble the wheel brake cylinder, installing a spring, two cuffs, two pistons, put on sealing covers and install the brake pad stop pins;
- screw the wheel brake cylinder assembly to the protective disc;
- install the pads, secure them with brackets and insert support pins with eccentric bushings and a tension plate; Screw locknuts with spring washers onto the fingers from the reverse side;
- put on tension spring 6 pads;
- attach the protective brake disc 7 to the steering axle flange (front wheel) or to the axle housing flange (rear wheel) and install the brake drum;
- Screw the air release valve with plug into the wheel cylinder from the side of the protective disk and attach the hydraulic drive hose fitting.
To assemble the brake master cylinder you need:
- install into the cylinder sequentially the exhaust 13 and check valves 14 assembled with the exhaust valve spring 15, the check valve spring 16 with the support washer, the front rubber cuff 18 and the piston 21 with the star-shaped plate 19 and, the rubber o-ring 22 at the piston support washer 23 and the locking spring ring 24;
- insert a wire with a diameter of 5-6 mm into the compensation hole 12 and make sure that it is free and not blocked by the front cuff;
- install gasket 4 and screw on reservoir cover 10;
- secure the protective rubber casing 1 on the cylinder washer with a clamping ring, insert rod 2 and secure the second end of the protective casing to it;
- attach the cylinder to the frame, connect the cylinder rod to the brake pedal and screw in the hydraulic drive fittings;
- fill the system with brake fluid; To do this, pour liquid into the cylinder reservoir and sequentially pump all the wheel brakes, as indicated above, in order to remove air from the system.
Blog about UAZ
The braking system of utility vehicles of the UAZ-452 family consists of front and rear service brakes on all wheels, hydraulically driven by a pedal, and a parking hand brake, actuated by a lever using a rod and a flexible cable.
The design of service brakes for vehicles of the UAZ-452 family.
The distribution of vehicle weight along the axles and its redistribution during braking requires higher efficiency of the front brakes compared to the rear ones. Therefore, the brakes of the front and rear wheels are different in design. In front brakes, each brake pad is actuated by a separate wheel cylinder. When braking the car while moving forward, both front brake pads will be captured by the drum.
For rear service brakes, both pads are actuated by one wheel cylinder. When braking, only one shoe will be captured by the drum, resulting in lower efficiency of the rear service brakes.
The main characteristics of the front and rear service brakes of cars of the UAZ-452 family.
— Brake drum diameter in mm: 280+0.15 — Friction lining width in mm: 50+-1 — Diameter in mm: master cylinder: 32+0.027 master cylinder pistons: 32–0.025 wheel cylinders: 32+0.027 wheel cylinder pistons : 32-0.025 — Length of the return spring of the main cylinder in mm: in a free state: 100 under a load of 7.2+-0.4 kgf: 60 — Length of the spring of the wheel cylinders in mm: in a free state: 20+-2 under a load 4 .7+-0.5 kgf: 3.5
The design of the front service brakes of cars of the UAZ-452 family.
The brake shield of the front brakes is attached to the steering knuckle axle with six bolts. Two wheel cylinders are mounted on the brake shield, on the support pins of the pads. On the support pins, between the washers under their heads and the support lugs of the wheel cylinders, bronze eccentrics are fixedly mounted on which the brake pads are pivotally mounted.
By turning the support pins with the eccentrics mounted on them, you can move the support ends of the pads relative to the brake shield. Brakes are adjusted using support pins when they are assembled at the factory or during repairs with the replacement of pads or linings to achieve uniform fit of the latter to the brake drum.
The support fingers on the outer ends have marks (cores). The position of the support pins with eccentrics after adjustment is fixed with nuts. The rim and pad rib are stamped and relief welded. The friction linings are attached to the rim with aluminum rivets recessed into the body of the lining. The moving ends of the brake pads rest against the piston tips of the wheel cylinders.
The pads, with the inner surface of their rims, rest on adjusting eccentrics, movably mounted on the brake shield. In a given position, the eccentrics are held by springs in a compressed state. The pads are pressed against the eccentrics by tension springs. With the help of eccentrics, the hexagonal heads of the axes of which are brought outwards, the required gap between the pads and the drum is established.
The pads are kept from lateral displacement by pad supports riveted to the shield and release springs. Inside each wheel cylinder there is a piston with a rubber sealing collar and a spring that presses the piston to the thrust end of the pad rib. The wheel cylinder has two holes: one is used to supply brake fluid from the drive system, and the other is to remove air from the system during bleeding.
A bypass valve is screwed into the second hole, which with a conical chamfer tightly closes the hole into the cylinder cavity, ensuring its tightness. To protect the axial hole of the valve from clogging, a protective rubber cap is placed on it. The cylinders are connected to each other by a tube. The internal cavities of the wheel cylinders are protected from contamination by rubber caps.
Rear service brakes for UAZ-452 family vehicles.
The brake cylinder of the rear service brakes is secured to the brake shield with two bolts. The pistons, cuffs and other cylinder parts are the same as the front brakes. At the bottom of the brake shield there are support pins, which are fitted with adjusting eccentrics similar to those of the front brakes, against which the pads move. To increase the rigidity of the pad supports, the ends of the fingers are connected to one another using a plate.
The rear brake pad lining is shorter than the front brake pad lining, ensuring equal wear on the rear and front pads.
Brake drums for front and rear service brakes.
The brake drums are the same for all wheels and vehicles of the UAZ-452 family. The drum has a cast iron rim and a disk stamped from sheet steel with an amplifier welded to it, connected into an integral structure when the rim is cast.
For easy access to the brakes, the drums are made removable, which allows you to clean and check the brakes without removing the hubs or disturbing the adjustment of the wheel hub bearings. The brake drums are attached to the hub with three screws, which are unevenly spaced around the circumference.
This ensures that the drum is installed on the hub in one specific position, in which the drum was processed with the hub assembly. It is not recommended to move brake drums from one hub to another, as this may lead to increased runout of the working surfaces of the drum relative to the brake linings.
Source: auto.kombat.com.ua
Body repair
When repairing the body of a UAZ, it should be taken into account that the most vulnerable metal is located at the bottom of the car. Corrugated floors, wings, beams and partitions are susceptible to corrosion. The weakening of rigid structural elements causes a body lift.
When dismantling the seats and interior trim, it is easy to gain access to any parts. In case of major repairs, the body can be strengthened by replacing standard load-bearing units and installing additional stiffening elements. It is better to coat unwelded seams with sealant - this will eliminate unnecessary noise.
Cars of the UAZ family lend themselves well to tuning and modifications. All-terrain tires, electric winches are installed on them, spring spacers are made, and the transmission is strengthened to compensate for the wide tires.