Signs of a malfunction of the vacuum brake booster of the VAZ 2114
Brake booster malfunctions have several fatal negative consequences:
- Significant reduction in vehicle control during braking cycles. In the absence of the amplifier, the load on the gas pedal increases proportionally - the pedal goes hard, and the braking effect is significantly reduced. For an unprepared driver, such behavior of the car can come as a shock and lead to a traffic accident due to the increased braking distance; If the brakes malfunction, a car loses significant braking potential and becomes practically uncontrollable;
- The gas pedal is slow. When moving, the pedal is very difficult to press. This is a clear sign of a malfunction of the amplifier housing diaphragm chamber. In this case, the car must be operated with great care, since it has lost a certain effectiveness of the braking system;
- A sign indicating a faulty brake system lights up on the dashboard at short intervals. This symptom may also relate to other malfunctions in the brakes, but in combination with a tight brake pedal it clearly indicates a faulty booster. The electronic unit of the car constantly monitors all systems for operability (and although on the VAZ 2114 model this unit has not been considered modern for a long time with its functions, it copes with its functions at a good functional level and with high efficiency despite the small number of sensors);
Deterioration in the braking performance of the system, along with other signs, indicates a direct involvement of a faulty brake booster in the risk of an accident. This symptom is the main one among all the others; however, operating a car with a very weak brake system is very dangerous - the circuits in this case do not receive additional force and cannot effectively brake.
Troubleshooting most often involves replacing the faulty element with a new unit - this will save repair time, since resuscitation of an old product will require no less time and a slightly lower cost of parts. That is why car enthusiasts most often resort to complete replacement of a failed part.
Order of Operations
Removing the VAZ 2110 vacuum booster and installing a new device is similar to the work on 2111 and 2112. Special conditions are not required to perform repairs. The machine is installed on a flat surface, and the following operations are performed sequentially:
- The soundproofing fasteners are unscrewed. Then you need to unfasten the expansion barrel belt, lift it, move it to the side, put it aside and fix it. The left part of the sound insulation must be removed and also put aside.
After the sound insulation is removed, the block with wires is disconnected from the sensor indicating the fluid level in the brake system.
Now you can remove the hose from the vacuum check valve and unscrew the two fasteners of the cylinder to the amplifier.
- The main cylinder turns to the side; here you need to keep an eye on the hoses; if they break, you will have to change them too.
- Now you need to go into the car interior. From here you can unscrew the four fasteners that hold the vacuum seal bracket to the body. They are located under the dashboard.
- Also in the cabin you need to disconnect the wire connectors from the brake light device.
The pin lock plate is now removed. You need to pry it off with a screwdriver. Then the finger is pushed out, it is made of metal, it is easy to pull it out by pressing from below or from above. Then the booster pusher is disconnected from the pedal.Now you need to remove the amplifier from the bracket, having first unscrewed the two fasteners from the bracket.
This completes the procedure for removing a failed vacuum booster. The new unit is installed in the reverse order. The order must be strictly followed. Mistakes are not acceptable. Installation operations are carried out before the stage of reinstallation of the soundproofing material. Here you need to stop and test the amplifier in operation. If the test results are positive, you can complete the work completely. Do not forget about the smooth pedal stroke; it should vary between 3 and 5 centimeters.
How to check the vacuum brake booster of a VAZ 2114
The process of checking the vacuum brake booster on a VAZ 2114 is as follows:
- Press the brake to the floor 4-5 times with the engine not running. This will create uniform pressure in the two parts of the amplifier. When you press the brake, the valve will immediately show itself: if it squeaks, then you need to seriously think about it.
- After the pressure has become uniform, start the fourteenth. But at the same time you need to keep the brake to the floor. If everything is in order with the brake booster system, the pedal will rise after the engine starts. If this does not happen, then repair is definitely required.
- In the event that you realize that there is a problem with the amplifier, you need to look to be sure how the hose is secured and what condition the flange is in. If the fastenings at any point do not correspond to the norm, this may affect the fact that the pedal does not lift, and in fact the fault will be on a separate incorrect fastening, and not on the entire system as a whole.
Master brake cylinder
Now let's talk about the master brake cylinder on a VAZ 2110 car. If you do not want to allow the brakes to fail while driving, they should be checked periodically, and if problems arise, take appropriate action immediately.
A common reason for replacing the master brake cylinder of a VAZ 2110 is precisely the fact that the brakes are lost.
Symptoms of a problem
Of course, brakes can completely lose their effectiveness for various reasons, but now we are talking specifically about the master cylinder. If the reason lies therein, then it can be determined by the following signs:
- The master cylinder shows signs of brake fluid leakage;
- The pedal has an idle motion, that is, when it is pressed, no force is created;
- The brake pedal simply won't press.
Replacement
The most difficult process is disassembly. Therefore, let's talk about it in more detail.
- Carefully disconnect the master cylinder from the pipeline.
- Disconnect the block, which is equipped with wiring, from the emergency brake fluid indicator. The connection to the “ten” is made by terminals.
- Cover the pipe and assembly openings with something to prevent brake fluid from leaking. It will pollute the interior space, which is undesirable.
- Now remove the cylinder along with the reservoir. To do this, simply unscrew the fastening nuts that connect the element to the vacuum booster.
- After removing the brake fluid level sensor, drain the brake fluid present from the cylinder and the cylinder itself.
- If there is no serious need, you should not remove the tank. But for complete assembly, the tank is removed and then installed in place in strict order.
- Before reassembly, each element is washed with purified brake fluid. A good alternative is isopropyl alcohol.
- Do not forget to dry the parts with a compressor and wipe with a clean, dry cloth.
- Carefully avoid contact of the main cylinder with fuel or kerosene.
- Pay special attention to the O-rings. If you wash them with special alcohol, do not keep the rings in this liquid for more than 20 seconds. After processing, immediately dry and wipe the seals.
- Treat the surface of the piston and mirror to remove all rust.
- When replacing the master cylinder, new O-rings must be installed, regardless of their current condition.
- Check the elasticity of the piston springs under load. Refer to the VAZ 2110 repair manual, which indicates the appropriate loads and forces for testing.
- When free, the length of the spring should be 59.8 millimeters. If the indicator deviates from the norm, be sure to replace the springs.
Leveling up
If you think that after replacing the brake master cylinder you can safely go out on the roads, then you are mistaken. In fact, a complete repair of brake cylinders on a VAZ 2110 includes bleeding.
The procedure is not complicated, but requires following the instructions.
- Find someone who will help you in this matter. One will be near the car, and the second will be directly in the cabin.
- Inflate the brake pedal by pressing it several times.
- The assistant presses the pedal, and meanwhile you slightly unscrew the fitting on one of the brake system pipes.
- This should release air, as well as a small amount of brake fluid. Don't be alarmed by leaks, this is completely normal.
- Retighten the fitting using the same wrench as when unscrewing - 10.
- Command your assistant to lower the part.
- The procedure is repeated until air bubbles begin to come out when unscrewing the fitting.
- Each of the four circuits is pumped using similar actions.
- First make sure that the brake fluid in the expansion tank is filled to the required level.
Actually, at this point the repair work related to the master brake cylinder can be considered complete. Experience in operating a car like the VAZ 2110 suggests that you should always store a container of brake fluid in the trunk. All sorts of situations happen on the road, and you need to be prepared for them.
Vacuum brake booster VAZ 2114 - which is better, selection criteria
In order to choose the best vacuum brake booster for the VAZ 2114, I recommend that you pay attention to the following points:
- Price. Price is one of the most important criteria for choosing a vacuum amplifier. You should not buy cheap Chinese options in order to save money, since they will not last long. It is advisable to give preference to products in the mid-price category - not the most expensive, but not the cheapest.
- Package. This packaging, used by a genuine manufacturer, is made by Point of Sale. You should not buy goods from market traders. There are plenty of good, trusted auto parts stores in any city. Ask to see certificates and documentation for the parts.
- Label. The label should be clearly legible - the date of production of the part, the production batch number and the name of the manufacturer. I am made of corrugated cardboard.
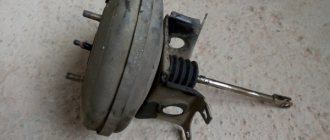
Removal of VUT
- To access the VUT fasteners, you need to dismantle the engine filter housing. To dismantle, unscrew the two bolts securing the housing at the front, also loosen the clamp securing the pipe and remove the connector from the mass air flow sensor. Turn the front bolts by hand and loosen the clamp with a Phillips screwdriver.
Release the clamp securing the adsorber and move it to the side without disconnecting the hoses. It is convenient to loosen the clamp with an open-end wrench by ten.
Unscrew the 2 nuts securing the brake cylinder and, together with the expansion tank, move it to the side. It is convenient to unscrew the nuts with a thirteen wrench.
- Remove the pipe from the check valve fitting.
- Unscrew the four nuts securing the amplifier from the body.
It is convenient to unscrew the nuts using a wrench with an extension and a cardan. Thirteen head nuts. Remove the spring pin retainer that secures the brake booster rod to the pedal. - Remove the pin and disconnect the rod from the brake pedal.
- Remove the VUT by pulling it towards you from its seat.
Unscrew the two nuts of the bracket that secures the amplifier to the body.
Replacing the vacuum brake booster of a VAZ 2114 - step-by-step instructions
To replace the vacuum brake booster of a VAZ 2114 you will need a certain set of tools and materials. It includes:
- Screwdriver Set;
- Pliers;
- Socket wrench for 13 and 17 millimeters;
- Special wrench for brake pipes;
- New plugs;
- New fittings.
And so let’s begin the replacement process itself:
- Removing the vacuum booster can be difficult due to the brake cylinder. Therefore, we advise you to remove it first. Another option is to disconnect the pipes from the brake cylinder and move them to the side for a while. Here you decide for yourself what is more convenient for you.
- The cylinder is not the main problem. It is difficult to cope with the mounting of the vacuum booster. It's just not very convenient to do this. This is the design of the VAZ 2114.
- Start with the valve - remove the hose fasteners from it, remove the support bush, after which you can pull out the brake pin.
- Next, using a 13 mm wrench, all four fasteners of the vacuum booster are dismantled.
- After all the inconveniences of the work done, you can remove the element and get ready to install a new amplifier in its place.
- To do this, you will have to install a special mounting frame. The frame is tightened with a 17 mm wrench, after which the new component is installed inside the car.
- If you want to make your work as easy as possible, do not forget to first connect the brake pedal to the booster with your finger when reassembling it. After this, it is much easier to cope with putting the vacuum seal back into place.
When replacing the vacuum booster, be sure to change the old vacuum hose at the same time. This element is far from eternal, therefore, as it wears out, it will negatively affect the quality and efficiency of the new vacuum cleaner.
Let's get started
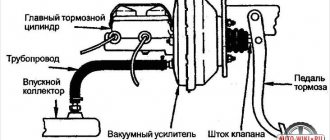
Work should be carried out during daylight hours or in a garage with good lighting. So, put the car in gear and raise the hood. The amplifier is located on the left, driver's side and is screwed to the engine bulkhead. At the first stage, we need to disconnect the clamp of the rubber tube that is connected to the body. This can be done with a flat or Phillips screwdriver. At the next stage, remove the brake fluid level sensor chip. then move the driver's seat as far back as possible. This is necessary in order to conveniently perform work under the steering column. So, lowered into the pedal assembly. It can be dark here, so a portable lamp will not be superfluous. Next, using pliers, remove the stopper from the bushing that connects the pedal to the vacuum rod. The rod connector itself is easy to identify. It is a U-shaped plate with several holes.
Next, remove the rod and lower it to the floor. We return under the hood to the amplifier. To remove it, you will first need to remove the brake master cylinder. It is dismantled along with the iron tubes. Do not unscrew them separately under any circumstances. Otherwise, air will get into the system, some of the fluid will spill out and you will have to fill it in, followed by pumping all four brake mechanisms.
Then we clean the threaded connection on the master cylinder bushings with a metal brush. If necessary, you can use a liquid key lubricant. Please note: the nuts must be unscrewed carefully without damaging the threads. If the nut does not “go”, tighten it one turn, and then unscrew it back. This should help. Also, together with the nuts, remove the washers that are in a compressed state. If they are stuck and difficult to remove, use a flat-head screwdriver. By walking slightly along the cylinder body, you can get these washers out.
Why does the vacuum brake booster of the VAZ 2114 hiss?
The car's braking system is subjected to constant loads, and with the so-called sporty style of city driving, it is also subject to overloads. This happens regularly even with a measured and leisurely rhythm - there is no escape from this problem.
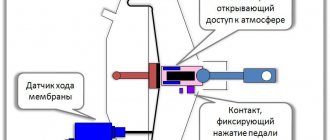
Therefore, this unit must be regularly tested to ensure maximum driving safety for the driver and passengers. So it is in the story with vacuum brake boosters. As a rule, problems in its operation occur due to the failure of a special diaphragm located inside the device . It bursts, cracks, and ceases to perform its duties—to create a vacuum. Sometimes the exhaust valve also malfunctions - it is for these reasons that the vacuum brake booster begins to hiss.
What's next?
At the next stage, you can proceed to dismantling the master brake cylinder. It is important not to damage its tubes. The element is removed forward, without distortions to the side. Now you can unscrew the vacuum booster. As we have already said, it is located on the partition and mounted on brackets. The latter is secured on two studs. They often rust. Therefore, it is recommended to first apply lubricant or soda solution here. After this, unscrew the nuts and remove the amplifier along with the bracket. Next, unscrew the two “blind” bolts from the vacuum seal. We screw the new amplifier to the bracket and install it in the reverse order.
Is it necessary to carry out additional work on the brake system? If the tubes were not damaged and the fluid level did not drop, there is no need to bleed or do anything else.
VUT installation
- Install the bracket onto the new VUT and secure with two nuts.
Before installation, turn the rod straight so that it immediately fits onto the pedal.
Place the vacuum cleaner into the seat and insert the locking pin from inside.
The process of replacing the vacuum amplifier VAZ 2113, 2114, 2115 is clearly shown in this video:
Unit cost
It is better to find out how much a vacuum brake booster for a VAZ 2114 costs directly from the stores. Since the regions are different, the price categories are different and it’s easier to navigate the area locally. The approximate cost is from 2,000 to 3,000 rubles. Installing it in the service will cost a third, or even half, of the cost. Despite the inaccessibility of the unit and some inconvenience, it is much easier to change the amplifier yourself. The frequency of breakdowns or replacements directly depends on the quality of the track, driving style and the general wear and tear of car parts, in particular the chassis. Therefore, it is difficult to say that there is any specific regulatory period. The only thing you need to remember is about timely diagnosis: sometimes it’s worth getting confused and going over your fourteenth with the eye of a caring owner. And, of course, you shouldn’t delay repairing or replacing the unit.