The gearbox of almost any modern car has oil seals for the input shaft, right and left CV joints. Their number may vary depending on whether the car is equipped with rear- or front-wheel drive. This part is needed to prevent oil leakage directly from the gearbox housing. The oil seal is a consumable item, so the gearbox oil seal often needs to be replaced. Another function that puts additional stress on this element is protection against dust and dirt getting inside.
It is impossible to give a definite answer to the question of exactly how much the presented work costs; the price is determined by many factors, including depending on what type of oil seal needs to be replaced (input shaft, right or left CV joint). High-quality repair of a manual transmission usually does not take more than a day (if you change the input shaft oil seal) or may even take 4-5 hours.
- Where is the gearbox seal located?
- Transmission seal replacement process
- Important nuances when replacing the gearbox seal
Where is the gearbox seal located?
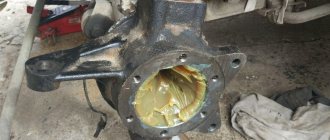
The gearbox oil seal is located in the clutch housing on the inside of the box, and therefore its replacement is possible only after disconnecting the housing. To carry out the work of replacing the oil seal, you will need an inspection pit or overpass. Before starting work, reliable stops are placed under the wheels of a car standing on a pit or overpass to prevent its accidental movement.
Materials for replacing the gearbox seal
- keys for “10”, “13”.
- a curved slotted screwdriver or something similar to a crochet hook.
- awl.
- plastic pipe from under water.
For such repairs you will need an inspection hole or overpass. Important! When you go into a hole, be sure to immobilize the vehicle using the parking brake and chocks.
Transmission seal replacement process
If the oil seal has become unusable, it cannot be restored or repaired; it must be immediately replaced with a new part. The most common reasons that the oil seal stops performing its functions correctly are:
— wear and tear from long service life;
— mechanical damage from impact;
- deformation.
In these situations, the only correct solution is to replace the gearbox seal. The quality of the work performed will largely determine how long the gearbox itself will work from defects. These works are often carried out in conjunction with replacing the CV joint. The initial stage of work is diagnosing the condition of the gearbox; usually (in this case it all depends on the make of the car) its repair becomes necessary after 70 thousand kilometers. The cost of work and the speed of troubleshooting will largely depend on timely contact with specialists.
Before repairing the gearbox, the drive shafts are removed and the internal elements of the CV joint are dismantled. This is a necessary procedure in order to gain direct access to the seal. Before installing a new element, it must be treated with grease. The oil seal is mounted in its place under the influence of a special tool - a mandrel.
We recommend: The influence of vehicle technical characteristics on the choice of oil
1. Place the car on a lift.
2. Disconnect the wire from the terminal.
3. Remove the flywheel.
4. Remove the rear shield of the clutch housing, which is directed towards the bushings.
5. Unscrew the bolts (8 pieces).
6. Remove the holder from the part.
7. Now you need to knock it out of the gearbox; to do this, use a screw and a hammer.
8. Now we take the new element and press it into the holder. Outer diameter -99(±0.5) mm.
9. The working edge should be on the inside, if so, turn it over.
10. A gasket that is torn must be removed. It will stay in place thanks to the grease on the holder.
11. Lubricate the edge with engine oil.
12. Also lubricate the crankshaft flange with engine oil.
13. Place the working edge onto the flange.
14. Tighten the bolts.
15. Reinsert the crankcase and bushings.
16. Replace the flywheel and clutch.
Done, the gearbox seal has been successfully replaced. Let your car drive for a long time and not leak. A good owner's car is always in excellent condition. So it all depends on you! Monitor and check, take it for diagnostics on time if necessary. And try not to waste a lot of money on service centers, but also don’t try to do everything yourself if you don’t understand this area.
Important nuances when replacing the gearbox seal
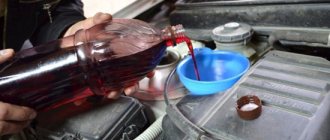
1. To replace the seals of the internal joints of the front wheel drive, drain the oil from the gearbox.
2. The front wheel drive inner joint seals can be replaced without removing the gearbox from the vehicle.
3. Do not disconnect both front wheel drives at the same time, as the side gears will move inside the differential box and reinstallation of the drives will become impossible.
Subscribe to our feeds on social networks such as Facebook, Vkontakte, Instagram, Pinterest, Yandex Zen, Twitter and Telegram: all the most interesting automotive events collected in one place.
Diagnosis of the problem
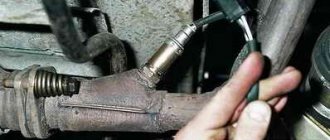
- Signs indicating the need to replace the gearbox seal are, first of all, oil traces left on the asphalt after the car has been parked.
- Before changing the oil seal, you should first make sure that this is the problem.
- Because oil leakage is often caused by a poorly screwed oil filter.
- Failure to identify an oil leak problem in a timely manner can have serious consequences.
- If you do not detect an oil leak from the gearbox in a timely manner, it will leak out completely, and then instead of the oil seal, the price of which is 50-100 rubles, you will have to repair the gearbox (see Repairing the VAZ 2109 gearbox - we do it right), and the price will increase significantly.
- To prevent this, it is necessary to periodically check the oil level in the engine and gearbox.
- Insufficient oil level in the gearbox can be manifested by a characteristic crunching sound that occurs when changing gears.
Causes of manual transmission oil seal malfunction
If there are obvious signs of oil leakage on the gearbox, then the oil seal has stopped performing its functions. Frequent causes of malfunction:
- Natural wear and tear over a long service life. Nowadays, manufacturers care about the durability of parts, but sooner or later even the most durable materials become unusable. If we talk about seals, then under the influence of high temperatures and oil, rubber cracks and dries out;
- Mechanical damage is often associated with road traffic accidents or poor quality repairs;
- Deformation;
- Use of non-original oil seals made from low quality materials.
We recommend: How Brake Force Distribution (EBD) works
To replace the old seal with a new one, you need to understand the causes of the failure. If the reasons are not found and corrected, there is a high probability that the new part will also quickly break.
Replacing CV joint seals
- To replace the seals of the internal CV joints (constant velocity joints), be sure to drain the oil from the gearbox.
Note: Replacement of CV joint oil seals is carried out without removing the gearbox from the car for VAZ 2109.
Warning: When unscrewing the hub nuts, the machine must be on the ground! We loosen and tighten the bolts that secure the wheels only on the car standing on the ground. The tightening torque for bolts is 65-95 Nm (which corresponds to 6.5-9.5 kgf-m).
- We brake the VAZ 2109 car with the parking brake, install thrust bars (shoes) under both rear wheels of the car and lift the front part, installing reliable supports.
- Remove the front wheel from the car.
- Then unscrew it completely and remove the hub nut.
- Using a screwdriver, remove the thrust washer.
- We take out the cotter pin that secures the nut securing the ball joint of the rod to the lever.
Two ways to replace the gearbox seal on a VAZ-2110
It is easier to change the oil seal with the gearbox removed.
Replacing an element that has become unusable can be done in two ways.
- The first of them is very labor-intensive , since it will be necessary to remove the gearbox. But replacing the oil seal will be much easier.
- The second method seems less time-consuming and labor-intensive , but in practice it is very difficult to carry out this procedure. Only experienced motorists who have repeatedly had to repair their cars can replace the oil seal directly on the car without removing the gearbox.
We recommend: Front wheel hub bearing - what is it?
Troubleshooting
Experienced car owners know the visual reasons why they can determine the failure of the rocker seal. Naturally, for such reasons it is impossible to accurately determine the cause of the leak, but this gives a signal to carry out diagnostics, in which the cause of the oil leak can be accurately identified.
The most important sign is oil stains under the car, especially in the gearbox area.
An oily rubber boot indicates a malfunction of the rocker seal.
But these spots do not always indicate oil seal failure. It happens that this is due to the oil filter, which sometimes does not tighten properly. In any case, the driver is obliged to monitor for any oil leaks in the checkpoint area . To do this, you need to monitor the oil level. This is the only way to save the box from damage, which will certainly happen if it operates with a minimum amount of oil.
Another way that indicates the oil seal is worn out is a characteristic crunch that is heard when changing gears . But only an experienced VAZ-2110 owner can diagnose this crunch. In any case, if you hear unusual sounds when shifting into gear, it is better to diagnose the gearbox.
Set of tools required for replacement
A minimum set of tools for replacing the oil seal without removing the gearbox.
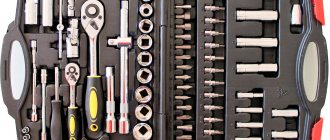
In order for the replacement of a part to take place without problems, you need to prepare the place and the necessary set of tools in advance. You will need:
- A set of keys and sockets, and for 13 you need two keys and there must be a key for 10. There must also be a socket head for 22.
- A chisel or screwdriver will be needed to knock out the oil seal.
- The hammer is small so you can get under it.
- Silicone sealant.
- Awl and hook.
Additional accessories
A regular self-tapping screw will allow you to do without a special puller.
For those who decide to replace the gearbox seal without removing it from the car, you will need additional equipment:
- Several long screws.
- A piece of pipe for pressing in a new oil seal.
It should be noted that the replacement process without removing the gearbox is much more complicated. In addition, there is a possibility of damaging the part being replaced during pressing.
Replacing the gearbox shaft seal
This article will again be devoted to our favorite topic: “Hit the head with a sledgehammer, not the oil seal!” In general, as you already understand, we will talk about the oil seal, now the gearbox shift shaft.
This oil seal leaks very often, there are many reasons for this. Firstly, of course, we work with the gearbox shaft very often, especially on the pit, where the gears are meek and we have to constantly poke up and down. Well, this is, in principle, a normal occurrence on any enduro and cross motorcycle. Also, of course, the quality of the oil seal leaves much to be desired, and if you change it, it is advisable not to buy a Chinese one. Lubrication of the chain also does its inevitable job: one way or another, parts of it end up on the shafts, crankcase, etc., as a result, dust, dirt, sand settles, which leads to accelerated wear of the working edge of the oil seal. Well, and the most important operating condition: here, whatever one may say, if the pit drives as it should, then the ingress of all types of dirt and liquids cannot be avoided, and this again leads to rapid wear. An atypical, but also cause, is thoughtless pressure washing of pita pita. The one who, without a head or the presence of reason in it, with daily confidence, uses a Karcher to scatter the seals, otherwise “they are dusty.”
In short, there are many reasons, but the result is the same - the oil seal will leak.
Let's go!
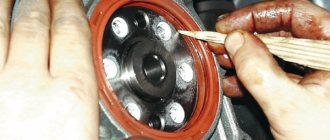
Let's take the oil seal! We smear it both outside and inside, for sure! You can use any liquid oil, be it fork oil or motor oil, it’s not that important.
Well, of course, we coat the gearbox shaft itself well so that the oil seal does not get caught on anything, but moves smoothly, without snagging, so that the working edge does not tear in any case.
Note!!! The shaft has splines and a variable cross-section!!! Therefore, there is no need to fool around with the oil seal: carefully twist it clockwise and counterclockwise and put it on the shaft through the splines. You can put it on foolishly, but you risk, firstly, damaging the working edge on the splines, and secondly, the ferrule ring may come off at the moment of a sharp transition from a small shaft diameter to a large one in the place where the groove for the gear shift foot is.
And, of course, WE WARM!!! We heat the oil seal seat with a construction hair dryer or a gas torch. We do this so that the metal expands, and the oil seal by hand - by pressing your fingers - goes into place on its own! DO YOU HEAR?!! MYSELF! WITHOUT THE HAMMER, SLEDGEHAMMER AND MANDARDS WITH WHICH YOU WILL HIT THEM IN MIRACLE SERVICES!
If you beat it, you can damage the metal base of the oil seal, it will become crooked, leak within a day, fly out, and so on. Is this what you need? Better save your time and money on a new oil seal.
Bottom line: of course, it’s up to you how you will bet, with what and whether you will listen to advice. We do not impose anything, but only write to you about methods that do not cause any subsequent problems and guarantee the operation of this or that part.
Replacing the gear shift rod hinge boot and rod seal
We carry out the work on an inspection ditch or overpass.
We move the joint assembly with the control rod from the gear selector rod.
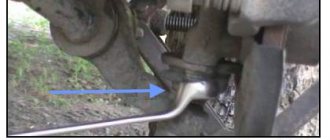
Using a 10mm spanner, unscrew the hinge locking screw.
. and remove the screw.
We move the joint assembly with the control rod from the gear selector rod.
Remove the protective cover of the hinge from the switch rod
Using a powerful slotted screwdriver, evenly (from different sides) pry the seal ring by the collar.
. and press the race with the oil seal out of the clutch housing socket.
A mandrel of the appropriate size.
. press the oil seal out of the cage. We clean the race and the seat under it in the clutch housing from the old sealant. Select a mandrel (for example, a tool head) with a diameter close to the outer diameter of the oil seal.
. press the oil seal into the cage until it stops (the working edge of the oil seal should face the clutch housing). We apply transmission oil to the working edge of the oil seal, and sealant to the outer surface of the race. We put the cage on the switch rod and press it into the clutch housing socket, resting it with a mandrel of a suitable size on the collar of the oil seal cage. We carry out further assembly in reverse order. We replace the damaged hinge cover. Before assembly, clean and degrease the threads of the hinge locking screw and apply locking (thread) sealant to the threads. Before tightening the screw, we ensure that the holes in the hinge and the gear selector rod match
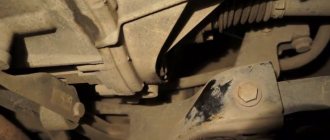
Hello. In this article I will tell you how to replace the gear selector rod oil seal on VAZ 2114 and later models such as the VAZ 2109. When you find fresh drops of oil under the car, this is a reason to drive it into a pit or overpass for inspection. If a worn gear selector rod seal is to blame, you will see a fresh oil stain around the rod. If there are leaks, check the oil level.
Along with the oil seal, it is best to change the cardan housing, since oil from the box most likely got on it. Rubber quickly begins to crack after oil gets on it. Another argument in favor of replacing the yoke cardan boot together with the box rod seal is the possible damage to the boot during removal. Well, let's begin! First of all, bend the cardan boot and put a mark between the gearshift lever and the cardan. This is done so as not to adjust the position of the gear shift lever during assembly.
Now you can start turning the nuts! We take the key 13 and unscrew the bolt of the gearshift lever clamp and remove the lever from the cardan.