Fuel system
Fuel tank, Water level sensor, Fuel level sensor, Tank vent valve, Fuel tank button, Fuel tank cap, Fuel neck, Fuel pump, Fuel pump, Fuel pump strainer, Fuel pump gasket, Fuel pump relay, Fuel injector, Injector ring, Throttle valve, Sensor throttle valve, Throttle pipe, Idle air regulator, Air receiver, Throttle valve heating tube, Turbine (turbocharger), Turbine gasket, Solenoid valve, Injection pump, Injection pump valve, Compressor, Compressor gasket, Carburetor, Fuel rail (rail), Fuel pressure regulator , Fuel line, Fuel valve, Fuel hose, Fuel pipe, Air flow meter, Engine control unit, Air pipe, Intake manifold, Intake manifold gasket, Additional air pump, Fuel pump, Gas pedal, Potentiometer, Throttle cable
Transmission repair
VAZ 2107 axle shafts: removal and installation, oil seal replacement
If one of the faults is detected, the box should be repaired to prevent its complete failure.
Before repairs, you need to prepare a place, tools, washing liquid, preferably kerosene, rags, boxes for small parts.
It is better to remove the gearbox on an overpass or pit.
Preparing tools
When removing and repairing the gearbox, you will need the following tools:
- hammer;
- powerful screwdriver;
- two simple flat screwdrivers and one Phillips screwdriver;
- 13 mm and 17 mm heads with extension;
- 10 mm and 19 mm socket wrenches;
- tweezers;
- set of wrenches;
- wipe or rags;
- container for used oil.
Removing the box from the car
Before dismantling the gearbox, it is necessary to place the car on an overpass and support the wheels so that it does not move. Disconnect the negative terminal on the battery or turn off the ground, if any. Drain the transmission oil.
Next in order, in the cabin:
remove the radio panel;
remove the gearbox lever;
Use two screwdrivers to open the petals and remove the damper from the lever;
remove the cover covering the hole in the floor;
under the car:
- disconnect the electrical wires from the box and from the starter;
- remove the starter;
- disconnect the driveshaft by disassembling the elastic coupling;
- disconnect the speedometer drive;
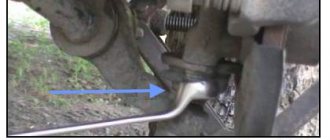
- disconnect and remove the exhaust gas pipe;
unscrew the cover covering the clutch basket;
place a support under the box;
- Using a 19 mm socket wrench, unscrew the bolts securing the gearbox housing to the engine cylinder block;
- insert a screwdriver between the crankcase and the block, press the crankcase away from the block;
- remove the box.
It is better to remove this unit with two people, as its weight is 23 kg. The removal option can be seen in the video:
Disassembling the box
Before disassembling the box, it must be thoroughly washed with kerosene or white spirit.
It is better to do disassembly on a workbench with a sufficient countertop area, with boxes nearby for storing small parts.
When working, you need to be careful and remember what is where, because you still have to assemble it.
The process of disassembling the box is shown in the video. The master shows and tells how to do this from start to finish:
Bearing change
One of the frequent and serious malfunctions of the box is wear of the bearings. These parts are designed in such a way that they cannot be repaired. Therefore, they are replaced with new ones of the same brand.
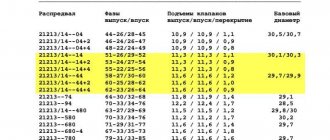
There are four types of bearings installed in the Zhiguli gearbox. Each shaft has its own, different in design and size.
The process of removing bearings is shown in detail in the video in the chapter “disassembling the box”. The input shaft bearings can be changed without disassembling the gearbox.
How to change the input shaft bearing is shown in this video, using the example of a Niva box:
The meaning of the primary and secondary shaft oil seals
The direct and main purpose of these small parts is to reliably seal the metal parts and connections of the gearbox housing and other parts of the vehicle system to prevent transmission oil from leaking. Oil seals are made of durable polyurethane alloy using special compounds, since they are constantly in an aggressive environment. Oil is constantly present inside the parts, which negatively affects the condition of the part over a long period of time. Externally, these parts can be damaged as a result of mechanical stress due to breakdown or under the influence of an aggressive natural environment. The average resource or lifespan of units largely depends on operating conditions.
The manufacturer does not provide a specific guarantee for these parts; accordingly, it does not limit their service life; planned replacement is not required at certain mileages. However, in most cases, under normal operating conditions, the service life of the parts is sufficient for runs of up to 200 thousand kilometers. When used in harsh natural conditions, reliability decreases accordingly, and with it the service life of up to 100 thousand kilometers.
These parts are located at the junction of the transmission with the clutch in the case of the primary shaft, and the secondary one is located directly inside at the junction of the flange and the gearbox housing. Sealing of pipes and hoses, as well as metal parts, is achieved by tightly connecting two parts directly to the seals, which is a circle with several layers of polyurethane material. It is precisely because of the unsatisfactory condition of these small parts that transmission fluid often leaks outside the box. Therefore, responsible owners, when the first signs of malfunction appear, replace the part with a new one. Due to their simple design and the absence of any moving parts, these units cannot be repaired; they are simply replaced with new ones. However, their failure can cause major consequences in the form of failure of the entire gearbox as a result of oil “starvation”. Therefore, preventing the condition of oil seals is one of the important procedures in the daily maintenance of the VAZ 2107.
READ Replacing the main oil seal Ford Focus 2
Replacing oil seals
Do-it-yourself replacement of the rear axle gearbox seal of a VAZ 2107
Most often, gaskets and seals are subject to wear. And if the gasket can be changed even by an inexperienced driver, then the replacement of oil seals should be treated with the utmost care.
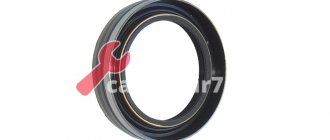
By its design, the oil seal is a rubber gasket that acts as a sealant. That is, if the oil seal breaks or wears out, the box ceases to be sealed, which, in turn, leads to oil leaks and breakdowns.
The design of the oil seal allows it to seal all joints between parts on the shaft
In order to restore the tightness of the gearbox, you will need to change this gasket. To work you will need:
- new oil seal from the same manufacturer;
- spanners;
- hammer;
- screwdriver with a flat thin blade;
- knife;
- sealant.
Input shaft oil seal
The VAZ 2107 gearbox input shaft oil seal has the following performance characteristics:
- weight - 0.020 kg;
- dimensions - 28x47x8 mm;
- operating temperature range - from -45 to +130 degrees;
- location - on the input shaft in the clutch housing.
Accordingly, in order to replace the gearbox input shaft oil seal, you will need to remove the gearbox from the car and disassemble the casing:
- Remove the bell (casing) from the box; it is secured with four bolts.
- Remove the fork and release bearing from the box (the fork is secured with screws, the bearing will have to either be knocked out with a hammer or pressed out with a vice).
- Access to the input shaft and its oil seal is provided.
- Using the blade of a knife or screwdriver, pry up the old ring and remove it from the shaft.
- It is good to clean the seal area from dust and dirt.
- Install a new oil seal.
- Reassemble the gearbox in reverse order.
The work of replacing the input shaft oil seal is not particularly hassle.
Secondary shaft oil seal
The secondary shaft oil seal differs slightly in its characteristics from the input shaft gasket:
- weight - 0.028 kg;
- dimensions - 55x55x10 mm;
- operating temperature range - from -45 to +130 degrees;
- location - on the secondary shaft at the flange junction.
The oil seal is replaced with the gearbox removed:
- The first step is to firmly fix the flange of the box; you can insert a bolt or a thick screwdriver into it.
- Turn the flange fastening nut with a wrench.
- Using a screwdriver, pry up the centering metal ring and pull it out from the secondary shaft.
- Remove the bolt from the hole.
- Place the puller against the end of the secondary shaft.
- Remove the flange along with the washer.
- Using screwdrivers or pliers, remove the old oil seal from the box.
- Clean the joint and install a new oil seal.
Thus, replacing the secondary shaft oil seal is somewhat more difficult than doing the same job on the input shaft. The difference is due to the location of the seals and their dimensions.
How to make a replacement?
To start work, you should send the VAZ-2107 to the pit (otherwise you won’t be able to get to the parts). After this, you need to set the first gear to fix the crankshaft. Attention! The machine must be well secured with the parking brake. To replace the front crankshaft oil seal you will need:
- Disconnect the protective shield. A key set to “8” is suitable for this. If an injection model is being serviced, it is possible to install an additional shield; it will also have to be dismantled.
- Remove the alternator belt. To do this, unscrew the generator nut and move it all the way to the side.
- Using a “38” open-end wrench, unscrew the nut securing the pulley to the crankshaft and remove it.
- Remove the oil seal from its seat. To do this you will need a wide screwdriver. After this, the box needs to be thoroughly wiped with gasoline and the new cuff lubricated.
Then everything is assembled in reverse order. The outer diameter of the oil seal is 4 mm, the outer diameter is 56 mm.
Gearbox oil for VAZ 2107
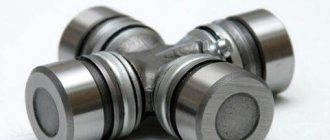
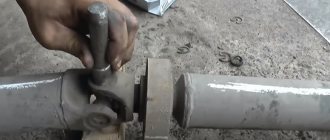
Do-it-yourself replacement of the driveshaft and steering shaft crosspieces
A special transmission oil is poured into the VAZ gearbox. It is necessary to lubricate gears, as it extends their service life.
The choice of gear oil depends on many parameters: the driver’s finances, manufacturer’s recommendations and the preferences of the owner of a particular brand. You can undoubtedly fill the gearbox of the “seven” with gear oil from the following companies:
- UFALYUB UNITRANS 85W-90;
- LUKOIL TM-5 85W-90;
- SAMOIL 4404 80W-90 or 85W-90;
- FAIR SUPER E-80W-90 or T-85W-90;
- TNK TRANS GIPOID 85W-90 or 80W-90;
- AGIP ROTRA MP 80W-90 or 80W-95;
- NORSI TRANS 80W-90 or 85W-90;
- NOVOIL SUPER T 80W-90;
- SPECTROL FORWARD 80W-90;
- MP GEAR LUBE-LS 80W-90 or 85W-140 (GL-5).
The brand is always popular not only among VAZ drivers, but also among foreign car owners
How to check the oil level in the gearbox
If you suspect an oil leak, you need to check the level in the box. To do this, you will have to put the VAZ 2107 on the inspection hole and start working:
- Clean the drain plug and filler hole on the box body from dirt.
- Take a 17mm wrench and use it to unscrew the filler plug.
- Use any suitable object (you can even use a screwdriver) to check the oil level inside. The liquid should reach the bottom edge of the hole.
- If the level is lower, you can add the required amount of oil through a syringe.
You can check the level with a screwdriver, a narrow ruler, a bolt or a special probe purchased in a store.
How to change the oil in a VAZ 2107 gearbox
To change the oil in your car, you will need to prepare in advance:
- container for draining used liquid (at least 2 liters);
- key to 17;
- hexagon;
- screwdriver;
- rags.
VAZ 2107 needs to change transmission oil approximately every 3–4 years of operation
Operating procedure
To prevent the work from causing trouble, it is best to immediately cover the space around the box with rags. Next, follow the following diagram:
- Unscrew the oil fill plug on the box body.
- Place the drain container under the plug and open it with a hex key.
- Wait until the oil completely drains out of the box.
- Clean the drain plug from old oil and install it in place.
- Carefully pour 1.5 liters of fresh oil through the filler hole.
- After 10 minutes, check the level, if necessary, add more lubricant and close the plug.
How to change the oil seal on a VAZ 2107
It is recommended to change the oil seals in the crankshaft of the VAZ-2107 every 2–3 years. This part is one of the most important in the engine, as it ensures the operation of the pistons and cylinders. If the cuff has become unusable, the load on the engine increases, as the working oil flows out through the damaged oil seal. Metal parts begin to rub against each other, creating high temperatures, leading to destruction of the assembly. Therefore, timely replacement of the seal is a strategic task if you want to extend the life of the car. The work itself takes a lot of time and requires care and caution. Therefore, before changing the crankshaft oil seal, calculate your own strength and time.
Causes and symptoms of bearing failure in manual transmissions
The design of the “Seven” gearbox is designed for many years of service. Usually the driver carries out the first and even the second major overhaul of the engine, and only after that does the need to repair the gearbox arise.
In addition, the “seven” itself has acquired a reputation as a “workhorse” throughout its long history. The machine really serves faithfully for many years, but this does not mean that each of its mechanisms will not wear out over time.
If we talk about malfunctions of the VAZ 2107 gearbox, then most often drivers complain about three defects: the inability to engage the desired gear while driving, the gear being knocked out and a strong crunch in the box.
In the early years, the VAZ 2107 was equipped with a four-speed gearbox, and since the early 1990s, a five-speed gearbox
It is very difficult to drive a vehicle if the driver cannot change gear. On the one hand, the shift lever moves to the desired position, but, on the other hand, switching as such does not occur. Or the lever cannot be set at all to the desired speed switching position.
In any case, the problem lies precisely in the box:
- Some of the moving (hinge) elements of the shafts are very worn out - it is recommended to carry out a major overhaul of the gearbox;
- wear of the blocking rings on the synchronizer - replace the rings with new ones;
- the synchronizer spring is stretched or broken - replace the spring;
- severe wear of the gear splines - only complete replacement of the gear will help.
The problem is that the lever works, but the gearbox doesn't.
The malfunction may be associated with different elements of the box:
- jamming of the hinge on the gear shift lever - it is necessary to remove the lever skirt, clean all connections and lubricate them;
- breakage of the lever - it is impractical to carry out repairs; it is easier to immediately replace the lever with a new one;
- the clutch does not work correctly - in this case, the entire blame cannot be placed on the box; it is quite possible that after adjusting the main elements of the clutch, the gear will not be knocked out;
- The forks in the box are bent - it is recommended to replace the entire set of forks.
The driver sets the lever in the desired position, but it comes back
The driver may not experience problems with shifting gears, but while driving, hear a loud knocking, crunching and grinding sound in the gearbox cavity:
- the bearings on the shafts are broken - replacement is recommended;
- The gear splines are badly worn - the entire gear needs to be replaced;
- minimum oil level in the cavity of the box - you need to add lubricant and make sure that there is no leak;
- malfunction of the shafts (they began to move along another axis) - replacement of bearings on both shafts.
Unusual sounds in the gearbox are the first sign that the gearbox needs checking and repair.
Bearing units in a manual transmission perform the function of rolling bearings, therefore, if the rolling bearing is faulty, there will be difficult rotation of the elements, an imbalance will appear, as well as radial and axial runout, backlash, noise, and knocking.
Signs of bearing failure in a manual transmission are as follows:
- The bearing hums, the noise increases when the clutch is disengaged;
- Difficulty switching gears;
- Spontaneous transmission shutdown;
- A knocking noise is heard when pressing the clutch pedal.
Reasons for failure:
- Expiration of product service life;
- Poor quality ball bearing;
- Wear or runout;
- Aggressive driving style and gear shifting;
- Insufficient amount of lubricant on the bearing or its absence;
- Dirt or abrasive particles getting inside the ball bearing;
- Malfunction of adjacent components (releaser, clutch, secondary or intermediate axle).
After removing the axle from the axle, you need to make sure that the part is faulty. To do this, check the ease of rotation of the part, and also do a visual inspection, namely, the presence of damage to the rings, cage, as well as defects in the raceway. If the product is in good condition, it is advisable to take measurements of the axial clearance and radial clearance, as shown in the video.
VAZ 2109 gearbox seal: how to replace
VAZ 2109 is a common domestic car that has front-wheel drive. The VAZ 2109 is equipped with power units of different volumes (1.1, 1.3, 1.5 liters). The VAZ 2114 is a worthy competitor to the “nine”.
To ensure that the car does not lose its operating functions, it must be subjected to scheduled maintenance and undergo timely maintenance. At the station, mechanics must check the full functioning of the vehicle system. If necessary, replace worn components, for example those related to the transmission system. This procedure will help extend the working condition of the VAZ.
When is it necessary to replace gearbox seals?
VAZ 2109 cars support the installation of a manual transmission. This type of transmission is a complex mechanism designed for a long service life. One of the consumables related to the gearbox is the oil seal. It is a type of sealing device installed in the area of movable joints. Gearbox seals are located on the input shaft, drive, and rod.
Appearance of oil seals
We list the main reasons why the gearbox seal should be replaced:
- natural wear and tear of consumables;
- the component part does not fit well into the standard place;
- a defective part was installed.
Replacing the gearbox seal is relevant if the following symptoms occur:
- reduction of fluid in the gearbox;
- the appearance of extraneous noise from the box;
- the appearance of oil traces under the car.
If the transmission fluid decreases, a crunching sound appears when changing speed modes. Also, irregular maintenance may be the reason why the oil seal on the box leaked as a result of wear. Only timely replacement of consumables can avoid such situations.
Replacing gearbox seals
How to replace the oil seal on a gearbox? In order to carry out this procedure, you should arm yourself with special tools. Their set differs depending on which part of the car the oil seal will have to be replaced. For greater convenience, the car must be placed on a viewing hole.
Replacing the rod seal. If this procedure is necessary, access to the boot must be provided. Next, you should disconnect the existing cardan from the rod or lever. You should use a key specifically for this. The cardan and rubber boot must be removed. The awl must be removed from the VAZ gearbox seal. After this, you should clean the seat from dirt, then you can install a new rod seal.
You can replace the oil seal on a VAZ 2109 gearbox either with or without dismantling the gearbox. It is necessary to remove the gearbox if there is a need to replace the gearbox input shaft seals. In this case, you need to inspect the integrity of the place where the cuffs are installed. The release bearing must be dismantled. Below it is the input shaft oil seal. When installing a new oil seal, it is worth using a sealant and first degreasing the consumable itself.
If the crankshaft oil seal is leaking, it is necessary to determine which consumable has failed (front or rear). The owner of a Lada may encounter this problem after 100,000 km.
How to replace the drive seal? Replacing the gearbox drive seal can be done with your own hands. Among the tools, the car owner needs a wrench and socket wrench, a pry bar, a hammer, and a screwdriver. When performing this procedure, it is necessary to drain the fuel from the VAZ gearbox. Taking this into account, you need to drive the car onto the overpass and prepare a container into which the liquid will drain. A pry bar and a screwdriver are needed to pull out the drive and oil seal. Finally, the seal must be pressed in. Pressing is carried out using a hammer and a suitable sized piece of metal pipe.
prokpp.ru
Oil seals VAZ 2107
The oil seal on the VAZ 2107 is a rubber reinforced cuff that provides sealing and sealing of engine parts and prevents the leakage of oil and other liquids. The oil seal also protects the car's mechanisms from dirt, unwanted impurities and dust.
Replacing the oil seal on a VAZ 2107 is most often carried out every 3 years. The need for a new reinforced cuff may arise earlier. It is very important to carry out maintenance of the mechanisms on time, while maintaining the required temperature conditions. In addition, the high quality of the oil seal and its timely replacement help to avoid serious damage, protecting the car owner from expensive repair work.
"MP Credo" offers its customers oil seals for the VAZ 2107 at a price that does not harm quality. Specially trained employees, a modern production line and proven raw materials allow our company to process orders of any complexity and volume on time.
Motor or gearbox?
If oil is leaking between the engine and the gearbox, you need to determine from which unit it is leaking. If it is thick fluid, then it is transmission fluid, and the problem is in the gearbox. If the car is more than 10 years old, you should check the rear crankshaft oil seal. Due to wear and constant vibrations, it is squeezed out and leaks oil. You can also check the crankcase ventilation. To do this, you can bring a piece of paper to the previously removed pipe. If the engine does not bend at engine speeds above 1 thousand, the system is clogged. In this case, increased pressure occurs in the engine lubrication system and fluid begins to flow, as they say, from all cracks. The weak point is the junction with the gearbox. The transmission also has its own ventilation.
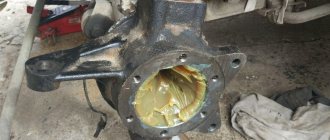
Replacing the secondary shaft oil seal of a VAZ 2107 gearbox
The need to replace the secondary shaft oil seal in the gearbox of a VAZ 2107 car arises when oil leakage is detected from the gearbox. Drops of oil on the gearbox housing are not allowed, but oil sweating is acceptable, which is not a sign of damage to the oil seal. To perform the work of replacing the oil seal in the gearbox, you will need a three-jaw puller and fixing glue.
Removing the gearbox seal of a VAZ 2107
1. We install the VAZ 2107 car on an inspection hole or overpass (see “Preparation of the VAZ 2107 car for maintenance and repair”).2. On VAZ 2107 cars with an injection system, remove the heat shield (see “Drivetrain - removal and installation”).3. We disconnect the driveshaft from the rear axle gearbox and unscrew the two bolts securing the intermediate support of the driveshaft to the cross member (see “Driveshaft - removal and installation”).4. We disconnect the elastic coupling of the cardan drive from the flange on the secondary shaft of the gearbox (see “Drivetrain - disassembly and assembly”) and move the cardan drive back.5. Using pliers, remove the thrust ring.
6. Secure the elastic coupling flange from turning by inserting bolt A into its hole. Using a 30 mm wrench, unscrew the flange fastening nut and move the centering ring B of the elastic coupling along the shaft.
7. After tightening the nut a few turns, use two slotted screwdrivers to pry up the centering ring and remove it from the secondary shaft of the gearbox.
8. Unscrew the nut.
9. Remove the bolt from the flange hole. 10. Place the screw of the three-jaw puller against the end of the secondary shaft and press the flange off the shaft.
11. Remove the flange along with the washer.
12. Using sliding pliers, remove the damaged oil seal from the gearbox.
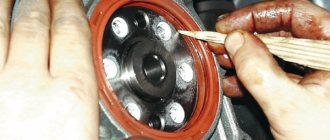
Installing the VAZ 2107 gearbox oil seal Attention: Before installing the oil seal, check the condition of the inner cylindrical surface of the flange in contact with the oil seal. There may be signs of corrosion and wear that should be removed by polishing. Before installation, lubricate the surfaces of the new oil seal with a thin layer of grease
1. Press in the oil seal with a mandrel of suitable diameter.
For clarity, we show the following operation on a gearbox removed from a VAZ 2107 car.2. Using a hammer, press the flange onto the shaft. Having installed the washer, apply fixing glue to the threaded surface of the shaft (according to the instructions for use) and tighten the nut.
Instructions
- Place the car on a lift.
- Disconnect the wire from the terminal.
- Remove the flywheel.
- Remove the rear shield of the clutch housing, which is directed towards the bushings.
- Unscrew the bolts (8 pieces).
- Remove the holder from the part.
- Now you need to knock it out of the gearbox; to do this, use a screw and a hammer.
- Now we take the new element and press it into the holder. Outer diameter - (99±0.5) mm.
- The working edge should be on the inside, if anything, turn it over.
- A gasket that is torn must be removed. It will stay in place thanks to the lubricant on the holder.
- Lubricate the edge with engine oil.
- Also lubricate the crankshaft flange with engine oil.
- Place the working edge onto the flange.
- Tighten the bolts.
- Reinsert the crankcase and bushings.
- Replace the flywheel and clutch.
The process of disassembling the gearbox
is ready, the replacement of the VAZ 2110 gearbox seal has been successfully completed.
Let your machine run for a long time and not leak. A good owner's car is always in excellent condition. So it all depends on you! Monitor and check, take it for diagnostics on time if necessary. And try not to spend a lot of money on service centers, but also don’t try to do everything yourself if you don’t understand this area!
How to repair a gearbox on a VAZ 2107
A four-speed gearbox was installed on the “old” model VAZ, and a five-speed gearbox on the “new” model VAZ. However, working with both mechanisms is not much different from each other. The essence of the repair work is to perform the following steps:
- Removing the box from the car.
- Disassembling the gearbox into its component parts.
- Replacement of failed elements with new ones.
- Assembling the box.
- Installation of a gearbox on a car.
With such a defect, the shaft will not be able to work correctly, which will immediately affect the convenience of gear shifting.
Preparing tools
To carry out all of the above work, you will need to prepare in advance:
- heads for 13 and 17;
- extension to the heads;
- Phillips screwdriver;
- flat screwdriver with a thin blade;
- flat screwdriver with a powerful flat blade;
- impact screwdriver;
- tweezers;
- wrenches 13 (2 pcs), 10, 17, 19 and 27;
- circlip puller (or pliers);
- hammer.
How to remove the gearbox
The box can only be repaired after it has been removed from the car, so you will need to be patient and time-consuming. Repairing a gearbox is clearly a difficult and slow task.
To remove the box from a VAZ 2107, you will need to drive the car into a pit or viewing platform. The jacking option will not work, since it will be impossible to complete all stages of the work:
- Remove the wire from the negative terminal of the battery.
- The first stage of work is carried out directly from the salon. For convenience, it is necessary to remove the panel in which the radio is located.
- Press the gear shift lever and insert a flat-head screwdriver into the hole in the gearbox locking sleeve.
- Using a screwdriver, pull the bushing towards you.
- Disconnect the rod from the gear shift lever.
- Use tweezers to hook the edge of the damper insert and remove it.
- Using two flat screwdrivers, press apart the petals of the damper insert and move them apart.
- Then remove the damper and bushings from the gear lever.
- In the cabin, move the foot mat near the gearbox.
- Using a Phillips screwdriver, unscrew the four screws on the box lid.
- Remove the cover from the gear shift lever.
- The second stage of work is carried out directly under the car. The first step is to remove the exhaust manifold pipe from the box.
- Disconnect the clutch mechanism.
- Immediately remove all connections from the gearbox (at the same time, you can check the integrity of the wires).
- Disconnect the cardan drive.
- Remove the flexible shaft mounting mechanism from the speedometer.
- Unscrew the two bolt connections on the side cover of the gearbox.
- Remove the box from the car.
- Place something strong and stable under the body of the box, as it may fall out.
Video: dismantling instructions
The box body weighs more than 20 kg, so it’s better to ask your friends for help to safely remove it from the car
How to properly disassemble the box
Repair work on the gearbox is possible only after identifying the real cause of the breakdown. Therefore, it will be necessary to disassemble the device correctly and safely for each component of the box and perform troubleshooting.
To ensure the disassembly process goes quickly and without interference, it is recommended to immediately prepare the following tools:
- impact screwdriver;
- wrench 10;
- socket wrench 13;
- three-jaw puller;
- vice;
- tweezers;
- torque wrench.
Of course, as necessary, gaskets, oil seals, and those parts that were discarded during the work will be needed.
There are many large and small parts in the box design
Operating procedure
Disassembling the box yourself in a garage is a completely doable task. However, the work will require maximum concentration and attention:
- After removing the gearbox from the car, it is recommended to wash the housing from dirt. You can even use kerosene or white spirit to ensure the surface of the box is clean.
- Remove the bell (casing).
- Turn the box over and unscrew the cover bolts.
- Remove the gear block plug from the rear cover.
- Pull out the retaining ring with tweezers.
- Press out the gear block bearing.
- Press out the reverse gear bearing.
- Remove the secondary shaft oil seal.
- Pull out the thrust washer from the rear bearing of the secondary shaft.
- Press out this bearing.
- Remove the speedometer drive gear and pull out the roller ball (clamp) behind it.
- Remove the gear fork mounting bolt.
- Block the shafts by inserting a thick bolt or a powerful screwdriver between them.
- While turning the input shaft, pull it towards you along with the gears and bearings.
- Then pull out the secondary shaft.
- The intermediate shaft comes out easily.
Disassembling the box
Increased noise of the gearbox can be caused by wear or failure of its shaft bearings, as well as significant wear of gears and synchronizers. To determine what is causing the increased noise, you will need to disassemble it.
This work is quite complex technologically, and if the car owner is not confident in his abilities, then it is better to contact a specialized service station, otherwise in the future, incorrect assembly can lead to more significant consequences, or to the fact that the gearbox will not work.
But, if you decided to repair the VAZ-2107 gearbox yourself, then this will require a set of keys and sockets, a powerful screwdriver, and pullers for removing bearings.
First of all, unscrew the nuts that secure the shift lever housing and remove the lever from the box.
Then the exhaust pipe mounting bracket is removed. After this, the bolts securing the rear and bottom covers of the box are unscrewed. This will be enough to visually determine the condition of the gears and synchronizers.
If significant wear is noticed, then most likely the reason for the increased noise in them. But it is also worth checking the box shafts for axial displacement. If there is one, then the bearings are also very worn and require replacement.
To carry out work to replace worn parts, a complete disassembly of the gearbox will be required. To do this, first remove the back cover by unscrewing the nut securing it, access to which is possible after removing the bottom cover.
https://www.youtube.com/watch?v=hqcrKAMxH0k
To make it easier to remove, you will need to move the 1st-2nd gear slider down. Then, lightly tapping the lid, remove it from the studs.
POPULAR WITH READERS: Replacing the timing chain of a VAZ 2107
Using a puller, the bearing and the secondary shaft oil seal are carefully removed from the cover housing. If they show signs of noticeable wear, they are replaced with new ones.
Disassembly and reassembly of the gearbox if any malfunction is detected should be performed in the following sequence:
- de-energize the system by removing the negative contact from the battery;
- dismantle the radio panel;
- slightly move the locking sleeve down and remove it from the rod cavity;
- with a sharp movement we pull the rod out of the gear shift lever;
- remove the upper and lower bushings from the lever;
- dismantle the gearbox cover, which is fixed with four screws;
- remove the cover that protects the handbrake from dirt, and then unscrew all the fasteners located on the floor of the car;
- dismantle the hoses through which warm air is supplied to the air filter;
- move the starter forward a little, then unscrew the gearbox housing plug and drain the transmission oil;
- dismantle the muffler and disconnect the universal joint, the reverse switch and the speedometer cable, which connects the part to the gearbox;
- disassemble the clutch housing cover and the cardan drive;
- disconnect the last fastenings of the gearbox, move it back a little and remove it out.
If the user has never encountered the repair of such a complex unit, the procedure should be carefully prepared.
- Disassembly of the mechanism is carried out only after it has been completely cleaned of dirt.
- All the tools required for disassembly are pre-prepared - keys, squeezes, pliers, lock ring pullers. It is also advisable to have a separate container for storing small bolts, nuts, and washers.
- It is necessary to dismantle the mechanism parts by first treating the bolts with an anti-boiling agent.
- When disassembling, the units are folded in the dismantling sequence.
- Human memory is extremely unreliable - a photograph of a disassembled mechanism before its reassembly is the best reminder.
- All gaskets without exception must be replaced. Recycling of seals is strictly prohibited.
- No one has canceled the abundance of the cleaner. When washing the structure, you should not skimp on the cleaning material; the better you wash it, the more fun it will be.
- Assembly of the unit is carried out exclusively in the reverse order.
- If after installation there are excess parts left (which is not uncommon), the entire gearbox is completely rebuilt.
It is also necessary to maintain maximum cleanliness during work. Dust, metal shavings, or foreign objects can cause serious damage to the gears.
The meaning of the primary and secondary shaft oil seals
The direct and main purpose of these small parts is to reliably seal the metal parts and connections of the gearbox housing and other parts of the vehicle system to prevent transmission oil from leaking. Oil seals are made of durable polyurethane alloy using special compounds, since they are constantly in an aggressive environment. Oil is constantly present inside the parts, which negatively affects the condition of the part over a long period of time. Externally, these parts can be damaged as a result of mechanical stress due to breakdown or under the influence of an aggressive natural environment. The average resource or lifespan of units largely depends on operating conditions.
The manufacturer does not provide a specific guarantee for these parts; accordingly, it does not limit their service life; planned replacement is not required at certain mileages. However, in most cases, under normal operating conditions, the service life of the parts is sufficient for runs of up to 200 thousand kilometers. When used in harsh natural conditions, reliability decreases accordingly, and with it the service life of up to 100 thousand kilometers.
These parts are located at the junction of the transmission with the clutch in the case of the primary shaft, and the secondary one is located directly inside at the junction of the flange and the gearbox housing. Sealing of pipes and hoses, as well as metal parts, is achieved by tightly connecting two parts directly to the seals, which is a circle with several layers of polyurethane material. It is precisely because of the unsatisfactory condition of these small parts that transmission fluid often leaks outside the box. Therefore, responsible owners, when the first signs of malfunction appear, replace the part with a new one. Due to their simple design and the absence of any moving parts, these units cannot be repaired; they are simply replaced with new ones. However, their failure can cause major consequences in the form of failure of the entire gearbox as a result of oil “starvation”. Therefore, preventing the condition of oil seals is one of the important procedures in the daily maintenance of VAZ 2107.
READ How to change the rocker on a VAZ 2110
Replacing the input shaft oil seal in a VAZ 2107 gearbox
Replacing the front oil seal of a VAZ 2107 gearbox occurs in several stages:
- First you need to disconnect the parts of the clutch with which this part interacts by dismantling the clutch fork, housing and release bearing, which are secured with several bolts.
- Then it is necessary to dismantle the casing itself, thereby freeing up space for removing the oil seal itself.
- After this, you should remove the used part by removing it from the seat using a knife. The vacated seat must be carefully processed to remove any remaining waste oil from the part, as well as other contamination.
- A new unit is installed in its original location, lubricated with transmission oil, and the entire system is reassembled in the reverse order.
Replacing the secondary shaft oil seal in a VAZ 2107 gearbox
- Fix and dismantle the gearbox flange, since it is this part that is fixed to the secondary oil seal.
- After dismantling, it is necessary to press it out using a special puller and gain access to the oil seal itself.
- Next, use a screwdriver or other tool to remove the used part, and also treat the landing site.
- Install the new element and reassemble in reverse order.
Replacing the input shaft oil seal in a VAZ 2107 gearbox
Replacing the front oil seal of a VAZ 2107 gearbox occurs in several stages:
- First you need to disconnect the parts of the clutch with which this part interacts by dismantling the clutch fork, housing and release bearing, which are secured with several bolts.
- Then it is necessary to dismantle the casing itself, thereby freeing up space for removing the oil seal itself.
- After this, you should remove the used part by removing it from the seat using a knife. The vacated seat must be carefully processed to remove any remaining waste oil from the part, as well as other contamination.
- A new unit is installed in its original location, lubricated with transmission oil, and the entire system is reassembled in the reverse order.
Which gear oil is best for the VAZ 2107, oil change, how often should it be changed
Oil changes are required not only in the car engine. Although much less common, oil changes should be done in the gearbox. According to the regulations, transmission oil is changed approximately once every 40 - 60 thousand kilometers, and is different for each specific car manufacturer. If you do not change the oil in the gearbox, it, like in the engine, will begin to lose its qualities and properties useful for the units, which will lead to breakdown of the mechanism.
https://youtube.com/watch?v=jpzO7iyGtpk
In this article we will take a closer look at the process of replacing transmission fluid in the gearbox of VAZ family cars, namely the so-called “Classics” or “Zhiguli”. These cars include 2107 (seven), 2105 (five), 2106 (six), 2101 (kopek), and 2103 (three). All these cars manufactured by VAZ have rear-wheel drive. They are valued and respected for their simplicity and low cost of both consumables and spare parts, and the cars themselves. And also, of course, we will consider what kind of oil to fill and how much, or rather, what volume of it needs to be poured into the box.
WHAT IS NEEDED TO CHANGE THE OIL IN THE VAZ 2107 AND 2106 Gearbox
Of course, you need to approach changing the gearbox oil with all responsibility and care, and you also need to have the following tools and consumables with you:
- Hexagon at “12”;
- Key to "17";
- Capacity of five liters - for example, it could be a plastic bottle;
- Special syringe for filling oil;
- Rag.
OIL CHANGE FREQUENCY IN VAZ 2107, 2106 manual transmission
Speaking about how often you need to change the oil in a Zhiguli transmission, first of all, of course, you should refer to the technical documentation accompanying the car. The regulation clearly states the manufacturer's recommended replacement frequency, namely three years of vehicle operation or 60,000 kilometers, whichever occurs first.
Of course, there are many other factors that influence these numbers. For example, this is the quality of the liquid poured into the box. By pouring low-quality lubricant, you not only significantly reduce the interval between maintenance, but also destroy the gearbox from the inside. It is also worth remembering that transmission oil should be poured into the gearbox, not engine oil, and of course, do not forget about the markings, this also needs to be taken into account.
A few tips for proper oil changes:
Firstly, the replacement process must be carried out on a hot engine brought to operating temperature. This will ensure quick and complete removal of the gearbox from old fluid and wear products; Carry out all work with rubberized gloves - this will protect you from burns
Also take care of your face and eyes; Replacement is best done either on an overpass or in a viewing hole; When changing the oil, pay attention to the presence of metal shavings - they indicate that the car needs to repair the gearbox as soon as possible; The five-speed “Classics” gearboxes have a certain peculiarity - they need to be filled with a little more oil (approximately 250 milliliters), this is due to the fact that, due to the design features, if this factor is not taken into account and the required amount of oil is not poured, this will lead to its failure building and will require its repair; Changing the oil is quite easy, the most important thing is to decide what kind of oil to fill. First, you just need to check how much oil is currently in the gearbox and what quality it is.
THE PROCESS OF CHANGING THE OIL IN THE TRANSMISSION OF A VAZ 2107
Having prepared the tools, warmed up the car and driven it to the required site, you can begin the process of replacing the fluid:
- We move under the car and carefully clean the gearbox pan from dirt with a rag;
- Using a key set to “17”, unscrew the filler plug;
- Then, take a 12" hexagon and use it to unscrew the drain plug;
- We place a pre-prepared container under the drain hole (you need to cut off the top of the bottle and that’s it);
- Using a rag, we clean the plugs themselves and the entire space next to them;
- Screw the drain plug back on;
- Now you need to use a special syringe filled with new oil and inserted into the filler hole to pour fluid into the gearbox;
- You need to add oil until it starts pouring back out;
- Screw the filler plug back in;
- With this, the replacement process has come to an end.
In conclusion, it is worth noting that the volume of oil in the gearbox should be at the same level. The replacement must be done efficiently, because changing the oil is a very important process.
If you find an error, please select a piece of text and press Ctrl+Enter.