Design and purpose of the heater valve of the Niva Chevrolet car
In a Chevrolet Niva car, coolant can circulate in two cooling circles: summer and winter.
The heater tap allows the driver to select one of the circles. If the tap is fully open during the warm season, the interior will be too hot. You will have to open the hood and close the tap, and open it again when cold weather sets in. Antifreeze in the heating system circulates in two circles
Reasons for replacing a heating tap
In a Chevrolet Niva car, the heater tap is not a serviceable unit. Its repair is impractical for both financial and technical reasons. The only option when a faucet fails is to replace it, the need for which arises in the following cases.
- Internal oxidation of parts. Since the heater valve is in the closed position for a long time during the warm season, its elements can become heavily oxidized and stick to each other. In this case, it is almost impossible to open the tap without breaking it.
- Violation of tightness. The rubbing elements of the faucet wear out over time and can no longer fit tightly to each other. As a result, coolant leaks appear, which can be seen with the naked eye.
Heating tap location
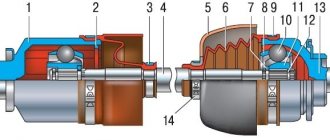
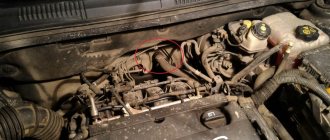
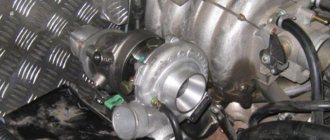
On a Chevrolet Niva car, the heater tap is mounted in the wall of the engine compartment. If you open the hood of the car, you can see the pipe going from the radiator to the tap adapters.
The heating valve is mounted in a special niche in the engine compartment
To provide access to the crane, it is necessary to disassemble the dashboard on the passenger side of the cabin.
The main signs that a Niva Chevrolet heater radiator needs to be replaced
If you drive a Chevrolet Niva for a long time and do not do or check anything in it, then an unpleasant situation can happen when the car becomes cold in winter because the heater will not work properly. To prevent this from happening suddenly, you need to take into account the following signs associated with the cabin radiator (also called a heat exchanger):
- if antifreeze appears under the driver's mat, this is a serious sign;
- the smell of antifreeze appeared in the cabin;
- a greasy coating began to appear on the glass;
- the air heats up slightly during the cold season;
- Antifreeze in the cooling system must be constantly topped up.
If there are no antifreeze leaks at the joints, it means that all of them need to replace the heater radiator. And then, you can see this just by looking at the radiator; if it is covered in drips, then it is clear that it must either be repaired or replaced. Then you need to choose a new stove radiator; they are usually made from aluminum or copper; both are good, depending on which one you already like.
Procedure for installing a new part
Due to the fact that the heater radiator is located above the engine, part of the coolant does not flow out of it when it is emptied. And even more so it is full when the old tap is stuck closed. So before disassembling the unit, you need to stock up on a plastic bag without holes: it is convenient to place it in places with limited access.
Disassembly and removal of the tap are carried out in the following order:
The rod mount and pipe must be installed on the new element using fresh gaskets coated with sealant. Then the crane is mounted in place and the unit is reassembled.
Replacing the VAZ 2107 stove valve with a ball valve (part 2) with your own hands
Taking this opportunity, it wouldn’t hurt to check the tightness of the connection of the second pipe to the radiator and, if necessary, change the gaskets there. It is also recommended to install new clamps on the hoses.
How to replace the stove tap on Niva 21214
To avoid air locks when filling the system with liquid, you need to fill it slowly until antifreeze flows from the carburetor heating pipe. In this case, the heater valve must be open.
The heater valve is removed to replace it when it fails or leaks, as evidenced by traces of antifreeze under the front passenger seat.
Below is shown a method for replacing the heater valve without removing the heater core.
(Access to it has some difficulties. In addition, if the car is equipped with a heater radiator with an aluminum core and plastic tanks, when removing the tap, the captive nuts securing the tap usually fall out of their sockets on the tank. Support them when removing the tap and install them in place if they still fell out, it is possible, although somewhat difficult. Therefore, replacing the heater tap can also be carried out on a removed radiator. see here)
We drain the liquid from the cooling system with the heater tap open (see here).
For clarity, operations carried out in the engine compartment are shown with the engine removed.
In the engine compartment on the front panel, using pliers, loosen the clamp securing the hose to the lower radiator pipe...
...and remove the hose from the pipe (the hose from the upper pipe of the heater radiator was removed when dismantling the engine).
Using the “7” head, unscrew the two self-tapping screws securing the seal to the front panel.
Replacing the heater valve VAZ 2107
. and remove the seal.
In the cabin we remove the storage shelf (see here).
Using a “7” wrench, loosen the bolt securing the crane drive rod clamping bracket...
...and remove the rod from the crane lever.
The heater valve is attached to the radiator mod. 2105 (aluminium) with two bolts, to the radiator mod. 2101 (brass) - two nuts.
Using a 10" socket (1/4 inch square) with a cardan joint, unscrew the two bolts securing the faucet to the radiator.
Remove the tap and pipe.
Using a 10mm wrench, unscrew the two bolts securing the pipe to the tap.
We remove the pipe.
We replace the heater valve on a VAZ 2114
...and gaskets.
We install the tap in the reverse order.
The lower nut securing the faucet to the aluminum radiator...
...during disassembly, it may fall out of the radiator tank socket.
When installing the nut in place, secure it in the socket with plasticine.
Video
New Niva heater tap
Modernization of the stove faucet VAZ classic, NIVA
Today the topic of myrrh-streaming is trending. Poklonskaya’s bust of the bloody Nicholas II was streaming with myrrh, a friend on LiveJournal made a post about the myrrh-streaming of Chinese faucets and collected several hundred comments, and I decided to pick up the baton, because... Just this week, the phenomenon of myrrh-streaming of the heater faucet on the Niva forced me to spend three hours replacing it. A short introduction. Everyone knows about the problem with heater taps on Zhiguli cars and in the fuss they try not to mention this topic. No matter how you try it, these faucets don’t last long. So on April 18, 2021, five days before the two-year anniversary of the car, this ill-fated faucet began to flow like a stream at the most inopportune moment. The interior of the car filled with steam and I had to urgently solve this problem. The problem was solved by closing it (it only began to drip), purchasing a new faucet from Chance-Auto, searching for and purchasing original factory antifreeze (which is not easy), and then replacing the unit a few days later.
Stove faucet on Niva
Niva. replacing the coolant and eliminating the air lock.
Installing a motor from a VAZ 2108 stove on a field
Original parts vs analogues: practical advice
As mentioned earlier, such a choice does not affect the quality of the heating system. At the same time, car mechanics make several reservations. For those who plan to use VAZ stoves, it would be useful to check the power system. It is different for some modifications. That is why all actions are consistent with the drawings.
It is permissible to use the VAZ 2108 heater, provided that two recommendations are followed. Firstly, the mounting socket is 1-2 cm larger than the size of the device. The additional area will reduce the vibration impact. Secondly, the switch is installed taking into account the specifics of the VAZ heating system. You will have to tinker less when minor modifications to the system are needed.
The ventilation system is updated in 1-2 hours, depending on the degree of wear of the engine.
It’s worse if the factory equipment of a Chevrolet model has manufacturing defects. A complete replacement of the device is recommended. This will save time.
The operation of the heating system determines the comfort and safety of driving. The driver constantly monitors the system's performance. If extraneous noise appears, it is necessary to urgently carry out a technical inspection.
I have long wanted to modernize the heater in Niva, but never got around to it. Either there is no time, then there is no desire. And now spring is coming, and I decided to tinker with the car. =)
I would like to note that the standard stove heats well in my case: the heat in the car and the windows go away quite quickly. But the noise is annoying. Therefore, there is a desire to install a heater motor from a figure eight or similar.
Also in winter, especially in cold weather, the driver’s legs feel a lack of heat, while the passenger’s legs “burn.” In the standard version, when the hatch is opened from below, the main air flow goes towards the passenger and the gearbox and transfer case levers. I decided to close the hatch and install grantylogan stove deflectors or a cheap option - plastic sewer corners.
The motor (without the snail) from the eight was given for nothing. It's been idle for about a year now. I was about to integrate it into the “boot”. I was thinking about how to install it, and decided to disassemble the motor itself and check it. It turned out that the brushes were almost worn out, one fell off completely. The contacts are also worn out. I haven’t found any suitable brushes in the store yet and decided to put the matter aside. Got busy with another problem.
The toad strangled me to buy deflectors from Grantylogan, I bought a pair of plastic corners 45 degrees, 50 mm in diameter for 18 rubles. =) And also a universal, heat-resistant sealant.
Read more: Opel Zafira cabin filter where it is located
Removing and installing heater parts in a Niva is quite a task. It seems nothing complicated, but it’s so inconvenient, especially from the driver’s side. During the work I had to do this several times and everything began to turn out easier and faster. But the first time I swore a lot. =)
So. I decided on where to install the corners so that they wouldn’t touch anything and there would be no need to file or cut anything. I moved the standard resistor (resistance) closer to the center, drilling one additional hole.
I drilled holes for the corners and then leveled them. It didn't turn out perfect (there was no suitable half-round file), but the sealant corrected the situation. =)
Having set out to increase the efficiency of my car's heater, I re-read the available methods on the forums, and realized that these methods have some drawbacks that did not suit me. For example, installing a fan from a VAZ 2108 allows you to increase the air flow through the heater and blower nozzles, but this air is taken from the street, it is icy, and therefore the interior begins to warm up only after the engine has completely warmed up. In addition, this method requires significant modifications to the design of the heater, as well as the cost of purchasing a fan. Next, I’ll tell you how to modify the stove on the Niva with your own hands without investment and in a short time.
How to remove and install the stove tap
To replace a part, you must initially prepare the appropriate consumables, as well as tools:
- open-end and socket wrenches;
- pliers;
- flat screwdriver;
- a five-liter tank into which you will need to drain the liquid from the radiator;
- new faucet.
After preparing the necessary tools, you can begin replacing the tap, and the sequence of actions should be as follows:
- We install any container with a volume of about five liters under the radiator and unscrew the cap on it. Wait approximately 10 minutes until all the coolant has drained.
- Next, open the hood of the car and loosen the pipe clamp on the tap pipe.
- We take pliers, carefully bend them and pull out the short cotter pin.
- Remove the hose from the pipe.
- We unscrew the 2 screws, using a socket wrench set to “7”. In this way the sealing plate is removed.
- Remove the sealing plate.
- Using the key “8” we unscrew the fastenings of the glove compartment located in the cabin, after which the heater tap will be accessible.
- The rod is secured to the glove compartment lever with clamping brackets. To loosen the nut located on the bracket, take a “7” open-end wrench. Remove the traction cable from the stove tap lever.
- The “10” socket is designed to unscrew the 2 bolts that secure the valve to the wall of the engine compartment.
- The final stage is to remove the heating tap from the niche and replace it with a new one.
A pipe is installed on the part, as well as rod fastenings; in this case, new gaskets must be used, which are pre-coated with sealant.
Sealing plates are coated with sealant to reduce the risk of coolant leakage
The tap is put in place as follows:
- We tighten the two nuts on the pipe with the rod using a “10” wrench.
- We put the part in place and tighten the fastening bolts located on the tap.
- We install the rod and tighten the clamping bolt using the key to “7”.
- We tighten the self-tapping screws that hold the sealing gasket with an “8” wrench.
- We insert the pipes into the fittings and tighten the clamps.
When filling the system with liquid, fill it slowly to avoid air pockets. Antifreeze is poured in until it begins to flow out of the pipe. Moreover, the heating tap must be open.
Antifreeze must be poured into the heating system carefully, avoiding the formation of air pockets.
Video: how to install a heater tap on a Chevrolet Niva
Replacing the heater tap on Niva
Replacing a broken tap with a new one on a Chevrolet Niva is easy. To do this, you need to acquire the usual set of tools that are found in every car, and buy a new faucet. After which even an inexperienced driver will be able to install it on the car.
Home →
Maintenance and Repair → Repair →
Replacing the heater tap on a Chevrolet Niva
Many Chevrolet Niv car owners complain about the operation of the stove, blaming the engineers for their “crankiness”. If you are also one of those who are dissatisfied with the functioning of the heating system in your Niva, then we recommend that you surf the Internet.
There, on specialized forums, you will find a lot of interesting proposals, based on which you can easily perform some actions yourself, while successfully modifying the stove.
However, we understand perfectly well that not everyone likes to surf websites, some do not know how to carry out such searches, so we are ready to participate in solving your problem and share specific recommendations.
Most often, it is enough to perform three modifications, after which you will notice a clear improvement in the operation of the stove. The interior of your favorite car will warm up in a matter of minutes and delight you with a comfortable temperature regime. One of these improvements is the replacement of a heater tap that does not suit you in some respects.
Faucet replacement process
Those car owners who have an amazingly developed engineering sense, whom nature has endowed with design abilities, immediately notice that the weak link in the Chevrolet Niva heating system is the fan. They are also particularly unhappy with the design of the air ducts. It is for this reason that it is initially recommended to modernize these two components.
Those who have already walked this path argue that it is completely unreasonable to stop at the achieved result, since, in addition, even the stove faucet is unable to do its job as efficiently as possible. The reason for this is its small internal cross-section. In such a narrow space, the coolant cannot move quickly, and accordingly, it is impossible to count on quickly heating the interior. It’s even worse when the heating becomes ineffective due to the failure of this tap.
In this case, it becomes necessary to carry out certain repair work, during which many people have a question about how to replace the heater tap on Niva 21214. We will help you understand this issue.
Replacement algorithm
So, if you have a critical situation in which the stove faucet needs to be replaced, you will, of course, first need to decide which faucet is most suitable for you in this case. Experienced craftsmen recommend giving preference to cranes from foreign cars. They benefit from a longer service life as well as high operating efficiency.
By the way, if you want to minimize your financial expenses, and also not subject yourself to labor-intensive actions in the future, it is best to pay attention to cranes from budget Volkswagen or Opel models. So, after you have not only decided, but have already purchased the desired replacement option, you can begin to take immediate action.
Initially, you should disconnect the hose from the pipe. This action is quite difficult, since the hose sits tightly on the pipe. If you move incorrectly, your hand may slip and you may be injured. For this reason, we recommend that you wear gloves to avoid such unfortunate consequences.
Now, using a screwdriver, unscrew the screws that secure the seal, pressing it against the partition. After removing the screws, lightly pick up the seal and remove it completely. It will be more convenient for you to carry out the following steps from inside the car; they consist in the fact that you need to loosen the clamping screw of the faucet using an open-end wrench.
Next, remove the cable from the faucet lever. All that remains is to unscrew the fixing elements holding the radiator. They can be either screws or nuts. Now you can remove the tap; all that remains is to remove the pipe, freeing it from the fixing nuts.
Now the work ahead is to install a new crane. All actions are performed in exactly the same way, only in reverse order. We recommend that you use a little trick when attaching the radiator. Simply tightened nuts fall out almost instantly. To avoid this, take plasticine, place nuts on it and tighten them. When assembling, be careful with the cable. You cannot reduce its length, otherwise it will be difficult to perform some actions with the stove, in particular, adjusting the temperature or speed of the warm air flow.
So, don't be afraid to do some things yourself to improve the performance of certain parts of your vehicle. If you strictly follow our recommendations, you will be able to enjoy the results achieved.
Source: https://remam.ru/vozdsys/kak-zamenit-kran-pechki-niva-shevrole.html
Procedure for installing a new part
Due to the fact that the heater radiator is located above the engine, part of the coolant does not flow out of it when it is emptied. And even more so it is full when the old tap is stuck closed. So before disassembling the unit, you need to stock up on a plastic bag without holes: it is convenient to place it in places with limited access.
Disassembly and removal of the tap are carried out in the following order:
- From the engine compartment, you need to loosen the clamps of the pipes leading into the cabin, and then remove them from the fittings.
- Unscrew the screws holding the sealing gasket (key 8) and remove it.
- From the interior of the Niva, you need to get to the tap and disconnect the rod by unscrewing the clamping bolt (key 7). Place a plastic bag to catch the remaining antifreeze.
- Loosen the bolts securing the faucet to the stove (key 10), unscrew them and pull out the part along with the metal pipe. If the heater radiator is copper, of the old type, then instead of bolts there will be nuts.
- Separate the metal pipe from the old faucet by unscrewing 2 nuts (10 wrench). Remove the traction mount from it.
The rod mount and pipe must be installed on the new element using fresh gaskets coated with sealant. Then the crane is mounted in place and the unit is reassembled.
Taking this opportunity, it wouldn’t hurt to check the tightness of the connection of the second pipe to the radiator and, if necessary, change the gaskets there. It is also recommended to install new clamps on the hoses.
To avoid air locks when filling the system with liquid, you need to fill it slowly until antifreeze flows from the carburetor heating pipe. In this case, the heater valve must be open.
When disassembling the heater, a large number of tree leaves and insect remains were found in the air intake casing and in the honeycombs of the heater radiator grille, which also reduced the efficiency of the heater. Therefore, after cleaning and flushing the heater core, I took measures to prevent the radiator from clogging.
To do this, I bent a wire frame to the size of the air intake inlet, covered it with a nylon mesh with a 1x1 mm cell, and installed it at the bottom of the rubber seal of the air intake inlet. It was perfectly fixed there in the fold, like an accordion, without additional fastening.
All work to modify the heater took me about 4 hours of time and did not cost a penny of additional costs. Unfortunately, during work I didn’t think to take a photo, but from the attached drawing and picture everything should be clear. I'm happy with the result, now the stove heats better.
Preparatory stage
Before proceeding with dismantling the structure and installing a new faucet, it is necessary to accurately determine the cause of the problem. Often, antifreeze leaks into the interior appear due to wear of the rubber gaskets located between the heater tap and the radiator. In this case, the problem can be resolved by replacing worn-out products with new ones.
How to change the tap of the NIVA stove
As an alternative solution, some owners of Niva 21214 SUVs use not a special product, but a regular 1/2″ water tap (diameter 15 mm) to replace a worn part. Practice shows that such a non-standard approach to eliminating problems with the stove is fully justified (with the exception of some inconveniences with further valve control), since plumbing products are optimally suited for replacing an unsuitable factory locking element on a car stove, have good performance characteristics and increased reliability.
What to put in place
Before rushing to the store for a new part, you should first disassemble the assembly and make sure that the faucet is to blame for all the troubles.
It often happens that the seal between it and the heater radiator, where the rubber gaskets are located, leaks. They become limp and begin to leak coolant. The cause of jamming may be the rod attached to the element. Faucets made of metal or ceramic are available for sale. In terms of price, they are approximately the same; in terms of reliability, motorists praise ceramic ones more. In addition, you need to purchase 2 new gaskets and high-temperature sealant (usually red).
For reliability, some VAZ-21213 owners prefer to install a regular plumbing faucet with a diameter of 15 mm (DN 15), connecting it to the stove with flexible pipes. The option is reliable, since plumbing fittings are more durable than car parts. But then it’s better to forget about convenient controls, because every time you have to dive under the glove box on the front passenger side to open or close the valve. It is also installed on the engine side, under the hood, resulting in the same “conveniences”.
Factory (standard), ball or ceramic valve, which is better?
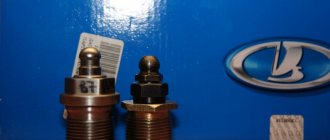
Among car owners on various forums, discussions constantly arise about which heater tap is better. Most often, battles unfold between two options: ball or ceramic. Almost no one doubts that a standard valve based on a rubber membrane is not reliable, more often than others it leaks, “sticks” and is especially susceptible to acidification. As proof of this, see the images above, where the reason for the replacement is a jammed faucet and a fluid leak.
Ball or ceramic?
We recommend purchasing a ceramic faucet. The body of such a faucet is ordinary, but the locking element consists of two ceramic plates with slots that rotate relative to each other.
Ceramic heater tap
A ball valve, in principle, is also not bad; the undoubted advantage of such a valve is its greater throughput compared to a ceramic one (when open, the passage hole is equal to the internal diameter of the pipe). At low temperatures this is especially noticeable, but the likelihood of souring is higher for a ball valve than for a ceramic one.
Installing a motor from a VAZ 2108 stove on a field
What is a stove tap, its functional features and location
The stove tap is a metal part that resembles a regular water tap. Antifreeze (coolant or coolant) constantly flows through it.
In the Chevrolet Niva, the coolant can flow through 2 cooling circles: winter and summer. The heating tap gives the driver the opportunity to switch to one of them. For example, with the onset of summer, when the tap is fully open, it is almost unbearable to be inside the car due to the heat, so it is closed for this period of time, and with the onset of cold weather, the tap is opened again. Due to active use, the part eventually becomes unusable and leaks coolant.
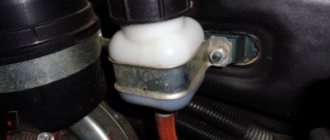
It is very easy to determine whether a part is faulty - lift the cover in the Chevrolet Niva interior. If there are obvious signs of leakage, the unit must be replaced.
In the diagram you can see where the heater tap is located and the circulation of antifreeze in two circles
It is best to replace the metal faucet of the stove with a ceramic one, which will increase its service life several times.
Why do you need to change the faucet?
In Niva cars, as in classic Zhiguli models, the heating intensity of the interior is controlled using a special tap. It is installed on the coolant supply pipe leading to the heater radiator. The stove tap is made in such a way as to open and shut off the flow in just half a turn of the rod. Thanks to this, the faucet can be controlled using a rod attached to a lever on the center console.
In reality, no one uses the heater valve as a regulator; more often it is used to cut off the heater from the Niva engine in the summer. This is where the following problems arise:
- the faucet jams in one position, it is impossible to close it;
- after a warm period, the tap turns sour and does not want to open;
- the part begins to leak at any time of the year.
If you do not shut off the fluid flow in the summer, then the interior of the VAZ-21213 will become very hot. In the Chevrolet Niva, the faucet is missing as a weak link, and the stove is constantly heating up. The design of a regular Niva is not designed for this and the problem needs to be solved somehow.
The situation is the same in the other two cases, and due to a leak, harmful antifreeze vapors will accumulate inside the car. Since the design of the heater valve does not provide for its repair, the part only needs to be replaced.
My account
After removing the glove compartment, access to the heater valve opens. A rod is attached to the crane lever using a clamping bracket. Use an open-end wrench size 7 to loosen the nut located on the bracket.
The traction cable is removed from the crane lever. Using an open-end wrench, the fastening of the rod is loosened. Using a 10mm socket, unscrew the two bolts securing the faucet to the wall of the engine compartment. The mounting bolts of the heating tap are unscrewed with a 10 mm socket wrench. The heater tap is removed from its niche and replaced with a new one.
The heating tap is removed from its seat. The tap is assembled and installed in the reverse order. Initially, you should disconnect the hose from the pipe. This action is quite difficult, since the hose sits tightly on the pipe. If you move incorrectly, your hand may slip and you may be injured.
For this reason, we recommend that you wear gloves to avoid such unfortunate consequences. Now, using a screwdriver, unscrew the screws that secure the seal, pressing it against the partition.
To dismantle the stove faucet, it is necessary to drain the antifreeze. Open the faucet as far as possible. We substitute the hose and insert one end into the basin. To drain the antifreeze, you need to unscrew the plug on the cylinder block. Lightly hold the hose with your hand and gradually open the cap located on the expansion tank.
We do this work carefully, as the stream of antifreeze will gradually increase
In order to remove the stove valve, it is necessary to completely drain the antifreeze. Loosen the clamp on the carburetor heating pipe and remove this part from the fitting. After all the coolant has flowed out, screw the plug into the block and tighten it well. Antifreeze leakage from the stove In used cars, coolant often begins to leak from the stove. The reason for this is usually wear and tear on the pipes or a malfunction of the heater tap.
Since antifreeze circulates under pressure, all connections must be tight. However, during prolonged use, hoses and gaskets lose their elasticity and burst. After inspecting the heating system and identifying the leak, the worn part is replaced with a new one. When making repairs, you should not use clamps made in China due to their poor quality.
Due to loss of elasticity, the stove pipes crack over time and leak antifreeze. The coolant can also leak from the heater radiator itself. In this case, it will have to be replaced with a new one.
Replacing a Chevrolet Niva Chevrolet heater core
https://youtube.com/watch?v=PgDz4rJ2GJ0
The stove does not heat well. To diagnose the malfunction, turn on the ignition, start the stove and try to change the intensity of the air supply. If at the first three speeds the air is not supplied or is supplied cold, the cause of this is a faulty resistor that needs to be replaced.
The reason for the inability to switch speeds is the failure of the resistor. If the resistor is OK, the diagnosis continues. If it is low, add antifreeze to normal and check it after a few days.
If the level has noticeably decreased, you should pay attention to the hoses and pipes, wear of which is usually the cause of coolant leakage. One of the reasons for poor heating of the interior by the heater may be a low level of coolant in the system. If the control unit malfunctions, it will have to be removed
Faucet replacement process
Repairing the unit at home is only possible if you have the appropriate tools - it’s easier to contact a car service center.
Another reason for the stove stopping may be a dust-clogged cabin filter.
In this case, the load on the electric motor increases, which, in turn, leads to failure of the heater fuse. In this case, it should be washed. This is true when purchasing and operating used cars. However, it can sometimes fail. Replacing the heater cable Sometimes it is not possible to change the position of the heater damper.
The reason for this is a broken cable. To replace it, you will need a standard set of tools and a headlamp. Replacing the cable is carried out as follows. The driver's seat moves back. The handles are removed from the damper control panel and the screws are unscrewed.
The panel is dismantled on the left side at the location of the driver's feet. To access the cable, you will need to remove the heater control mechanism. The latches securing the cables are removed. The recirculation damper mechanism is dismantled and the cable is removed.
Each end must be twisted into a ring and securely fixed. Using a cable, the position of the air supply flap is changed. Assembly is carried out in the reverse order.
Chevrolet Niva heater tap: where it is, how to replace it + video » AutoNovator - Auto site
Lack of voltage on the electric motor due to poor contact. Visible damage to the motor wires due to chafing. Failure of the fan fuse at 25 Replacing the heater tap of the Niva Chevrolet video, located in the fuse block under number F. Failure of one of the resistors, manifested in the absence of one of the speed modes.
Deterioration of the armature and brushes of an electric motor as a result of long-term continuous operation. If the electric motor malfunctions, it will need to be removed. In any of the above situations, the electric motor will need to be removed.
How to change the heater tap on a Chevrolet Niva
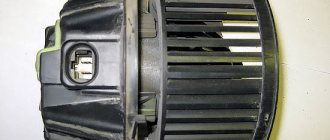
Heating system fan repair To diagnose a malfunction, the electric motor is connected directly to the battery. Heater valve on Replacing heater valve Niva Chevrolet video If it works, the problem should be looked for elsewhere. Otherwise, the electric motor is removed for repair or replacement. My account It is located under the glove compartment panel in the cabin. After dismantling, the electric motor is disassembled and inspected.
The heater electric motor may not work due to internal contamination. The design of the electric motor is quite simple. The reason for its stopping may be contamination, wear-out of the armature, bushings or brushes.
The reason for the failure of the electric motor may be the replacement of the heater valve, brushes or armature. The electric motor is cleaned and installed in place or replaced with a new one.
Repair of the stove radiator The main signs of a malfunction of the stove radiator are as follows: Coolant leakage from the stove radiator must be repaired immediately. If any of the signs are detected, the stove is diagnosed, based on the results of which a decision is made to repair or replace the radiator.
More often, car owners install a new radiator. In this case, the system is completely freed from coolant. When a heater radiator fails, it is usually replaced. Replacing a radiator on a car with air conditioning is a rather complex process that requires special equipment and appropriate skills. The fact is that in the summer the tap is closed, and its elements stick to each other. This is true when purchasing and operating used cars. However, replacing the heater valve Niva Chevrolet video can sometimes fail.
Replacing the heater cable Sometimes it is not possible to change the position of the heater damper. The reason for this is a broken cable. To replace it, you will need a standard set of tools and a headlamp.
Replacing the cable is carried out as follows. The driver's seat moves back. The handles are removed from the damper control panel and the screws are unscrewed.
The panel is dismantled on the left side at the location of the driver's feet. To access the cable, you will need to remove the heater control mechanism. The latches securing the cables are removed.
The recirculation damper mechanism is dismantled and the cable is removed. A new cable is installed.
Each end must be twisted into a ring and securely fixed. Using a cable, the position of the air supply flap is changed. Assembly is carried out in the reverse order. The functionality of the mechanism is checked. Replacing the interior heating control unit A faulty control unit can also cause incorrect operation of the interior heating system.
Its dismantling, necessary for repair or replacement, requires the following procedure. The negative terminal is disconnected from the battery. All handles are removed from the heater control mechanism.
To do this, they need to be carefully pulled to replace the heater valve Niva Chevrolet video. All handles are removed from the heater control mechanism. Use a flat screwdriver to remove the air circulation lever. Use a flat screwdriver to remove the air circulation lever. Use a screwdriver to pry up and then remove the block lining.
Use a screwdriver to pry up and then remove the block lining. Under the lining, use a Phillips screwdriver to unscrew the self-tapping screw. Under the cladding, two self-tapping screws are unscrewed. The control unit is removed. Remove the connector with the wires going to the speed switch. The block of wires that provide illumination of the unit is disconnected. The connector with wires is removed from the control unit. If there is an air conditioner, all hoses coming from the vacuum switch are disconnected.
Use a screwdriver to remove the bracket holding the damper cable braid and other similar elements. All rods are disconnected from the control unit. A new or repaired device is installed in the reverse order. After dismantling, the control unit is repaired or replaced with a new one. Replacing the stove pipes If a coolant leak is detected, the pipes along with the clamps should be replaced.
Where is the heater valve on a Chevrolet Niva?
The work is performed in the following sequence: The coolant is drained from the system. The screws securing the glove compartment are unscrewed and it is removed. Use a Phillips screwdriver to unscrew the clamp of the lower pipe. The hose is removed carefully - the antifreeze should not get on exposed skin. If difficulties arise, the pipe should be rotated around its axis. The second pipe is removed in the same way.
New hoses are installed and tightened with clamps. If antifreeze leaks, the heater pipes are replaced with new ones: Before removing the heater electric motor, you need to make sure that it is faulty. The most common reasons for its failure are: Lack of voltage on the electric motor due to poor contact.
Visible damage to the motor wires due to chafing. Failure of the 25 A fan fuse, located in the fuse block under number F. Failure of one of the resistors, manifested in the absence of one of the speed modes. No ignition. Deterioration of the armature and brushes of an electric motor as a result of long-term continuous operation.
If the electric motor malfunctions, it will need to be dismantled. In the above situations, the electric motor will need to be removed.
Heating system fan repair To diagnose a malfunction, the electric motor is connected directly to the battery. If it works, the problem should be looked for elsewhere. Otherwise, the electric motor is removed for repair or replacement. It is located under the glove compartment panel in the cabin.
After dismantling, the electric motor is disassembled and inspected. The heater electric motor may not work due to internal contamination. The design of the electric motor is quite simple. The reason for its stopping may be contamination, wear-out of the armature, bushings or brushes.
The cause of failure of the electric motor may be wear out of the brushes or armature. The electric motor is cleaned and reinstalled or replaced with a new one. Repair of the heater radiator The main signs of a malfunction of the heater radiator are as follows: Opel Astra h does not open the door with the key Coolant leakage from the heater radiator must be repaired immediately If any of the signs are detected, the heater is diagnosed, based on the results of which a decision is made to repair or replace the radiator.
More often, car owners install a new radiator. In this case, the system is completely freed from coolant. When a heater radiator fails, it is usually replaced. Replacing a radiator on a car with air conditioning is a rather complex process that requires special equipment and appropriate skills. The fact is that in the summer the tap is closed, and its elements stick to each other. When you try to turn it off, the tap breaks. Usually it is replaced with a new one. If the heater tap fails, replace the heater tap of the Niva Chevrolet Video with a new one. Replacing the tap is done as follows: On a cooled engine, with the heater tap fully open, the coolant is drained.
The traction cable and glove compartment are removed. To remove the traction cable, use an open-end wrench to loosen the nuts. Loosen and remove the clamps securing the pipes. The tap is removed. When replacing, it is recommended to install a ceramic faucet with an extended service life. The cost of such a product is RUB. Removing the stove The negative terminal is removed from the battery.
Replacing the heater tap of a Niva Chevrolet video dashboard, performing the same steps as when replacing the control unit. The screws securing the heater to the cross member of the instrument panel are unscrewed. The stove is pulled out from its installation location. This is due to errors in the assembly of the system. The main problem is the lack of tightness in the air ducts and dampers. This leads to incorrect distribution of warm air throughout the cabin.
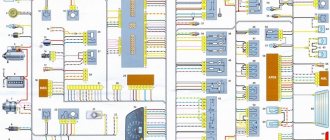
Heater diagram
The most common reason for its failure is: Warm air does not enter the lower part of the cabin Before starting repairs of the stove, you should check the temperature of the coolant. Perhaps the problem is not in the interior heater, but in the cooling system.
With the help of damper position regulators, warm air is directed to different parts of the cabin. First, the dampers should be adjusted. To supply hot air to your feet, follow these steps: The engine warms up until the warm air can be felt with your hand. Consequently, it is almost impossible to open the tap without breaking it.
stove Niva Chevrolet
https://youtube.com/watch?v=UNMCm8ypDbI
To get to it, you need to dismantle the dashboard in the cabin on the passenger side. The stove tap is mounted in a special niche in the engine compartment. If the tap has been replaced, then it is better to install new pipes along with it, because during operation they have probably lost their elasticity.
Collective farm tuning of the Niva Chevrolet stove: In some cases, the correct switching method does not work and then you have to modify the heater in order to achieve its full functionality. The main problem with dampers and ducts is leakage.
We will improve the cracks and eliminate leaks in the stove. Remove the heater control unit by disconnecting all wires and cables from it. If there is a radio, remove that too. Disconnect the transmission tunnel lining.
You don’t have to remove it completely, but only lift it by unscrewing two screws on the driver’s and passenger’s sides. Remove the steering wheel, steering column trim and unscrew the screws securing the front panel. When removing the dashboard, mark all the wires to make it easier to reattach them in their places in the future.
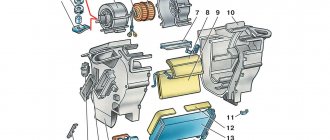
Without removing the entire front panel, when dismantling the heater unit, some elements of the air conditioner and the stove itself can be damaged. Remove the front panel frame attached to the body with screws. The heater housing cannot be removed without dismantling the front panel frame. Behind the frame you will find the heater unit casing, connected to the intermediate housing of the heater or to the evaporator section on a car with air conditioning.
Chevrolet Niva 2012, 80 l. With. — self-repair
Installation of a new unit is carried out in reverse order. The most common purpose of such tuning is to improve the air supply to the driver's and front passenger's footwells. To do this, install additional air ducts and adjust the shape of the damper drive strip
For such modification you will need: You must work with the plastic of the heater housing very carefully, as it is quite fragile
The steps are performed in the following order: Select tubes suitable for the role of additional air ducts. You can use plumbing pipes as additional air ducts. Remove the side trims on the center console on both sides.
Air flows in the cabin are distributed by air ducts, which are located under the instrument panel and under the floor tunnel lining, and under the floor upholstery to supply air to the feet of the rear passengers.
To control the distribution of air flows, use the distribution regulator handle on the center console of the instrument panel, as well as the regulators and guides of the central and side deflectors on the instrument panel.
To heat the interior, move the temperature control knob to the hot red zone. In this case, the outside air is directed using a damper through the heater radiator, which is integrated with the engine cooling system.
Remove the screws of the tie rod brackets. Disconnect the rods from the heater damper levers. Unscrew the screw of the bracket securing the recirculation flap drive rod and remove the lever bracket and disconnect the wiring harness block from the heater electric fan switch.
Heater diagram First of all, we want to orient you that the Niva already has a liquid-type heater installed, which allows you not only to supply warm air into the car interior, but also to cool the running engine, preventing it from overheating. It's no secret that overheating the engine entails extremely undesirable consequences.
An electromagnetic clutch is built into the compressor pulley, which engages and disengages the compressor shaft from the pulley according to signals from the engine control system controller. Refrigerant vapor from the compressor under high pressure enters the condenser located in front of the radiator of the engine cooling system. Passing through the honeycombs of the condenser, the refrigerant is cooled by the counter flow of air and with the help of fans of the cooling system.
Lada 4×4 urban Niva air conditioner and heater with cabin filter.
You will need: flathead and Phillips screwdrivers.
1. Remove the window handle: remove the latch by prying it with a screwdriver between the latch and the washer.
2. Remove the door handle: take out the plug, prying it off with a screwdriver, and then unscrew the three fastening screws.
3. Remove the inner handle trim: pry it off with a screwdriver.
4. Remove the door trim (depending on the configuration and year of manufacture):
- Unclip the 8 plastic clips around the perimeter (two on each side and four on the bottom).
- Unscrew the door trim fastening screws around the perimeter (phillips screwdriver).
There are slight differences in the process of dismantling the door trim of the new model (different door handle and location of fastening screws).
Procedure:
- Remove the door handle: take out the plug, prying it off with a screwdriver, and then unscrew the two fastening screws.
- Remove the inner handle trim: pry it off with a screwdriver.
- (For rear door trim) Remove the window handle: remove the latch by prying it with a screwdriver between the latch and the washer.
- Unscrew the door lock.
- Unscrew the screws securing the casing (4 on top under the plugs and 3 on the bottom).
- Remove the door trim by unclipping the rivets around the perimeter.
Read news about the new field
- Air conditioning Niva Chevrolet - design and repair
- What tire size is available for installation on Niva, available versions and recommendations
- Mud tires for Niva 4x4: radius 15 and 16 - which one is better to install "
- All about the Valet button and how to disable it yourself on alarm systems of different brands
- Niva Lynx buy in Samara - prices for the new Lada “Bronto” (Niva Pickup) | cost and equipment
- Air conditioning Niva Chevrolet - design and repair "
- Niva Chevrolet installation of air conditioning - Auto magazine MyDucato
- Instrument panel Niva Chevrolet designations. Improving the Chevrolet Niva dashboard
Types of radiators
Radiators are made from two types of materials: copper and aluminum. Each has its own pros and cons. An aluminum radiator heats up quickly, is inexpensive and has good rigidity with low weight. However, such a device cannot be repaired, since it is very problematic to solder it. Aluminum also does not retain heat well, so it cools quickly.
Copper radiators are more expensive, but have their own positive characteristics:
- Unlike aluminum ones, they last longer because copper does not corrode.
- They maintain the set temperature for a long time, despite the fact that they heat up slowly. In the Niva SUV, the stove requires heating more space than in conventional sedans. This is why you should choose a high-quality radiator.
The downside of a copper radiator is one thing: acquiring parts of acceptable quality is not very easy. A copper device is more expensive than an aluminum one. Its price is in the range of 2000–2500 rubles.