The starter relay can fail on any vehicle. Niva Chevrolet owners should know where this part is located and how to replace it if necessary. The device needs electrical energy and receives it from the battery installed in the car. Consists of various gears with small and frequent teeth. The main task of the part is to start the engine. This option works in conjunction with the flywheel crown and crankshaft. If the part is damaged or faulty, then the work will be done “idle”.
At the moment the motor is turned on, if there are no violations in the unit, power is immediately supplied to all windings located in the starter. This unit contains windings of two different types: retractor and retainer. If problems with operation are detected, it is worth knowing how to replace the starter relay. This will be discussed below.
Location and appearance of the part
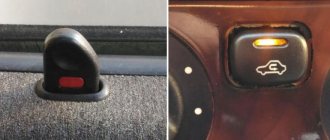
Not all drivers know where the Niva Chevrolet starter relay is located. For this brand it is located on the left side for ease of maintenance . You need to look for it near the steering column. You need to look below the dashboard. The relay dimensions are small. Feature: the element is created in such a way that it cannot be removed. Visually, the starter relay resembles a small box (its color is black).
There are various reasons for breakdowns:
- contacts are burnt out;
- worn out from time or duration of use;
- parts inside the mechanism were destroyed.
If the starter relay is broken, I report the following malfunctions::
- characteristic buzzing under the hood. It begins when the engine starts;
- the starter works, but the engine does not start;
- The starter makes clearly audible clicks, but does not start.
Main types of Chevrolet Niva relay faults
- damage to contacts (burnout)
- winding damage
- spring or armature wear
- destruction of the body or parts.
It is important to remember that the device is made in the form of a solid body, so its repair is not always possible or advisable. Therefore, it is better to replace the relay completely.
To understand when replacement is required, you need to pay attention to some characteristic signs when starting the car.
- When the engine starts, the relay does not return the bendix back, which causes the starter to rotate. At the same time, a strong buzzing sound appears under the hood.
- The starter works, but the engine does not start
- When you turn the key, you can hear the starter click, but it does not rotate.
This is interesting: Did you drink? Your car won't start
Car models up to 2009
The element in question is located under the steering column . Look at the bottom left, under the instrument panel. Fuses indicate breakdowns - it is important to know what each symbol means.
Explanation of fuse values and description
There are several notations that you need to be able to decipher in order to understand what problem has arisen (notation F) :
- The problem area is associated with the lighting lamps, which allows you to distinguish car numbers in the dark or on the dashboard. In this case, the number 1 is displayed.
- 2 is displayed - you also need to look at the lamp under the hood of the car or the one responsible for the presence of side lights (for the left side): it is recommended to check not only the lamps themselves, but also the connectors and wiring, as they can sometimes burn out or melt;
- 3 – the high beam in the left headlight, as well as the high beam indicator lamp, requires attention;
- 4 - a problem in operation may be related to the operation of the backup (8) fuse;
- 5 - the problem is related to the way the front door power windows, as well as their relays, function.
- 6—the problem affects the control unit for blocking all existing door locks.
Such values are typical for models 2004, 2005, 2009 .
Designations A may be used (5,10, 30 and 15, respectively).
Russia, Penza 2015
Chevrolet Niva is a five-door compact SUV (SUV class) with permanent all-wheel drive.
Produced from 2002 to the present. In 1998, AvtoVAZ presented at the Moscow Motor Show a concept car that was supposed to replace the familiar Niva. The concept received the VAZ-2123 index. In 2006, the rights to the Niva brand were transferred to General Motors. Chevrolet Niva has permanent all-wheel drive - unlike its main “rival” - Renault Duster. The main disadvantages of the Chevrolet Niva are its weak 80-horsepower engine, which provides very modest dynamics, the absence of ABS and a high noise level in the cabin.
- Page navigation
- Mounting block - restyl
- Mounting block - dorestayl
- Fuses and relays KSUD
Fuse box - located to the left of the steering column under the instrument panel. To access the block, you need to unscrew two screws and press down the decorative cover (held in rubber bushings). This car is equipped with two types of mounting block, respectively the doreystyle and restyle versions (see information below).
Chevrolet Niva mounting block (Restyle - model from 2009)
Location of fuses and relays
| F1(5A) | License plate lights, dimensions - left side, engine compartment lamp, side light indicator lamp. Add. brake signal. |
| F2(7.5A) | Low beam (left headlight). |
| F3(10A) | High beam (left headlight), indicator lamp for turning on the high beam headlights. |
| F4(10A) | Left fog lamp. |
| F5(30A) | Power window relay, front door power windows. |
| F6(15A) | Cigarette lighter fuse. |
| F7(20A) | Horn relay, horn, trunk light. |
| F8(25A) | Heated tailgate glass element, heated tailgate glass relay, heated outside rear view mirrors. |
| F9(20A) | Heated tailgate switch, windshield wiper relay, windshield wiper motor, windshield washer pump, right steering column switch, glove box light, reverse light bulbs. |
| F10(20A) | Remote control unit for electrical accessories (door locking) |
| F11(5A) | Side light lamps in the right headlight and right rear lamp, instrument illumination brightness control. |
| F12(7.5A) | Low beam (right headlight), gear motors for the headlight beam controller (electric headlight correctors). |
| F13(10A) | High beam (right headlight). |
| F14(10A) | Right fog lamp. |
| F15(20A) | External mirror control unit, electric drives of external rear-view mirrors, heated seat control unit. |
| F16(10A) | Relay-breaker for direction indicators and hazard warning lights (in hazard warning mode). |
| F17(7.5A) | Interior lamps, anti-theft system status indicator lamp, brake signals, additional brake signal. |
| F18(25A) | Heater fan, heater fuse. |
| F19(10A) | Relay-breaker for direction indicators and hazard warning lights (in turn signal mode), instrument cluster (except for the engine management system malfunction warning lamp), starter relay, air conditioning switch. |
| F20(7.5A) | Rear fog lights, immobilizer, buzzer. |
| K1 | not used |
| K2 | Windshield wiper motor relay |
| K3 | Relay-breaker for direction indicators and hazard warning lights |
| K4 | Low beam relay |
| K5 | High beam relay |
| K6 | Auxiliary relay (Tailgate defroster relay coil, heater fan, windshield wiper and washer, tailgate wiper and washer) |
| K7 | Tailgate glass heated relay |
| K8 | Reserve |
Remote relays (under the mounting block)
| K1 | Fog light relay |
| K2 | Power window relay |
| K3 | Seat heating relay |
| K4 | Horn relay |
| K5 | Starter relay |
Chevrolet Niva mounting block (Dorestayl - produced before 2009. Block from VAZ 2110)
| F1(5A) | License plate lighting. Instrument lighting. Exterior lighting indicator lamp in the instrument cluster. Engine compartment lamp. Additional brake signal lamp. Front dimensions. |
| F2(7.5A) | Low beam (left headlight). Electric headlight corrector (left side). |
| F3(10A) | High beam (left headlight). |
| F4(10A) | Left fog light. |
| F5(30A) | Power window relay and front door power windows. |
| F6(15A) | Door lock control unit. |
| F7(20A) | Horn relay. Sound signal. Cigarette lighter. |
| F8(20A) | Tailgate heated glass relay (power circuit). |
| F9(20A) | Tailgate heated glass switch. Windshield wiper relay. Windshield wiper motor. Windshield and tailgate wiper and washer switch. |
| F10(20A) | Reserve. |
| F11(5A) | Rear dimensions. Instrument lighting regulator. |
| F12(7.5A) | Low beam (right headlight). Electrical headlight adjustment (right side). |
| F13(10A) | High beam (right headlight). |
| F14(10A) | Right fog light. |
| F15(20A) | External mirror control unit. Mirror motors. Heated seats. |
| F16(10A) | Relay breaker for direction indicators and hazard warning lights (in emergency mode). |
| F17(7.5A) | Stop signals. Add. brake lights. Check Engine Light. Interior lighting and individual lighting. |
| F18(25A) | Reversing lamps. Tailgate glass heating relay (winding). Windshield and tailgate washer. Tailgate glass cleaner. Heater electric motor. |
| F19(10A) | Relay breaker for direction indicators and hazard warning lights (in turn mode). Direction indicators in the instrument panel. Direction indicators. Instrument cluster. Indicator lamp on center differential locks. |
| F20(7.5A) | Reserve. |
Also interesting: Niva Chevrolet where is the starter relay located?
| K1 | Power window relay |
| K2 | Fog light relay |
| K3 | Heated Seat Horn Relay |
| K4 | Exterior mirror drive relay |
Fuse and relay block of the engine control system (ECS) Chevrolet Niva.
The strip with relays and fuses is located on the ECU bracket. This entire structure is located behind the glove box. To access the fuses, you must remove the glove box.
For cars manufactured after 2009
To determine the problem, you also need to look at the values indicated by the fuses. On new units that were released after 2009, the purpose of the installed fuses has changed.
Fuse identification and description
The changes are that in the additional relay block the manufacturers added a part to enable the heating system for the front and rear seats.
The fuse box has 5 fuses . A 15 amp protective insert for the fuel pump has appeared. The mechanism is controlled by a separate relay.
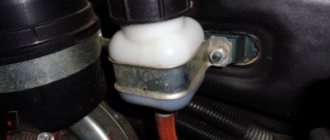
Photo where the Niva Chevrolet starter relay is located
12.5.2 Replacing ball joints
12.5.1. Replacing ball joints
Before proceeding to replacing the ball joint, it must be carefully checked (see subsection 12.5.4).
When carrying out work to replace the hinge, unscrew the drive shaft nut. Since the weight of the car should not rest on a loose wheel bearing, the nut must be unscrewed after installing the car on supports.
The review talks about the Chevrolet Niva starter relay where the photo is located, compiled from the opinion and experience of car owners.
To replace the hinge, perform the following operations:
— loosen the wheel nuts and raise the car slightly;
— loosen the 12-sided nut of the drive shaft and separate the shaft from the wheel hub (see section 8);
— disconnect the bolts securing the drive shaft flange from the gearbox and remove the shaft;
— mark the initial position of the heads of the three indicated in Fig. 262 bolts and remove the bolts;
When installing a new ball joint, do the following:
— insert the ball joint into the steering knuckle;
- screw on the new nut and tighten it
Along with this, you need to pay attention to the following
You can find exciting news about the Chevrolet Niva starter relay where the photo is located on our website very soon.
Due to the fact that it is impossible to install a socket with a torque wrench between the ball joint and the steering knuckle, the nut will need to be tightened with a ring wrench to a torque of 35 Nm. The tightening torque will have to be determined approximately. In addition, the ball head bolt can turn at one time.
— remove the wood block and press to set the shock absorber strut to the correct position. At the same time, engage the axle shaft with the wheel hub and at once connect it to the gearbox flange;
- screw in the three shown in Fig. 262 bolts and tighten them by hand. Later move the wishbone until the marked bolt heads are in their previous positions again. Tighten the bolts in this position to a torque of 35 Nm;
— move the drive shaft on the inside to the required position and tighten its bolts to a torque of 45 Nm;
— tighten according to the instructions in section. 8 nut and lower the car to the ground. Tighten the wheel nuts to a torque of 110 Nm.
An exciting and interesting video from YouTube about the Niva Chevrolet starter relay where the photo is located, viewers’ comments and the best moments only with us.
https://youtube.com/watch?v=xgnCwgBWF6E
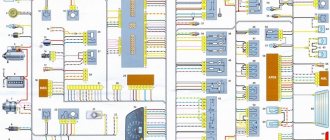
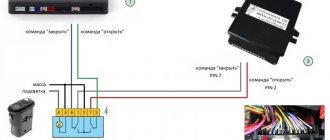
Scheme for Niva Chevrolet
You need to know exactly where the starter relay is located. For this purpose, it is recommended to study the layout of all fuses . A new element that is installed during repairs must have the same current marking.
For cars up to 2009
Values to be specified:
- K1 – element for monitoring the operation of all installed lamps;
- K2 – is responsible for cleaning the windshield automatically;
- K3 – turn signals and emergency lights;
- K4 – low beam from headlights;
- K5 – high beam requires attention;
- K6 – ignition switch contacts;
- K7 - heated glass located in the luggage compartment.
K8 is a reserve (additional).
For those released after 2009
The values are relevant for models whose year of manufacture is 2010, 2011,2012 . This period also includes 2013 (the symbol also remains K): 1 – windshield, 2 – element of turn signal breakers, hazard warning lights, 3 – low beam, 4 – high beam headlights. Fuse number 5 - this signal notifies you about the heated glass of the tailgate door and the status of the fan. The next signal is 6 – contacts of the ignition switch, 7 – heated glass located in the luggage compartment.
Fuse number 8 is also a backup.
Main block with fuses and relays
- damage to contacts (burnout)
- winding damage
- spring or armature wear
- destruction of the body or parts.
It is important to remember that the device is made in the form of a solid body, so its repair is not always possible or advisable. Therefore, it is better to replace the relay completely.
To understand when replacement is required, you need to pay attention to some characteristic signs when starting the car.
- When the engine starts, the relay does not return the bendix back, which causes the starter to rotate. At the same time, a strong buzzing sound appears under the hood.
- The starter works, but the engine does not start
- When you turn the key, you can hear the starter click, but it does not rotate.
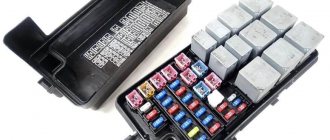
This block is located to the left of the steering column and is closed from below with a lid. To get to it, you need to tighten 2 screws, then press the top edge of the cover and gradually free it from all fasteners.
The block that appears will be held on a special bracket. The fuse diagram itself and the number of elements on it may vary depending on the configuration and year of manufacture.
photo of the fuse box in a Chevrolet Niva
The fuse and relay box is located in the vehicle interior, to the left of the steering column.
Cars considered were 2002, 2003, 2004, 2005, 2006, 2007, 2008, 2009, 2010, 2011, 2012, 2013, 2014
Where is the fuse and relay mounting block located?
Most fuses and relays are located in the mounting block under the instrument panel on the left side.
To get there you need to unscrew two screws with a screwdriver.
By pressing the top edge of the cover, we remove it from engagement with the instrument panel
Next, moving the cover up, remove the cover pins from the rubber bushings and remove the cover
behind the cover is the fuse box
Decoding for cars from 2009
Mounting block fuses in the Chevy interior
Fuse designation (rated current, A)
License plate lights, side light lamps in the left headlight and left rear light, engine compartment lamp, side light indicator lamp
Low beam lamp (left headlight)
High beam lamp (left headlight), high beam indicator lamp
Left fog lamp
Power window relay, front power windows
Horn Relay, Horn, Trunk Lamp
Also interesting: How to check the generator on your own: checking the generator without removing it from the car, relay regulator, diode bridge
Heated tailgate glass element, heated tailgate glass relay, heated outside rear view mirror elements
Heated tailgate switch, windshield wiper relay, windshield wiper motor, windshield washer pump, right steering column switch, glove compartment lamp, reverse lamps
Remote control unit for electrical accessories (door locking)
Side light lamps in the right headlight and right rear lamp, instrument lighting brightness control
Low beam lamp (right headlight), gear motors for headlight beam control
High beam lamp (right headlight)
Right fog lamp
Outside mirror control unit, electric outside rear view mirrors, heated seat control unit
Relay-breaker for direction indicators and hazard warning lights (in hazard warning mode)
Interior lamps, anti-theft system status warning lamp, brake lights, additional brake light
Heater fan, heater fuse
Relay-interrupter for direction indicators and hazard warning lights (in turn signal mode), instrument cluster (except for engine management system malfunction warning lamp), starter relay
Fog lamps in the rear lights, anti-theft control unit, buzzer
Relay of the mounting block in the car interior
K1 (not used)
Windshield wiper relay
Windshield wiper motor
Relay-breaker for direction indicators and hazard warning lights
Turn signal lamps
Low beam relay
Low beam headlight bulbs
High beam relay
High beam lamps for headlights
Tailgate heated relay coil, heater fan, windshield wiper and washer, tailgate wiper and washer
Heated tailgate glass relay
Tailgate glass heating element
Remote relays are attached to the bottom of the mounting block
1 — fog lamp relay; 2 — power window relay; 3 — seat heating relay; 4 — sound signal relay; 5 - starter relay
Fuse and relay block for Chevrolet Niva up to 2009
Remote relays
Chevrolet Niva engine management system fuse and relay block.
https://www.youtube.com/watch?v=xgnCwgBWF6E
Where is it located?
Attached to the controller bracket.
To get to the fuses and relays, you need to remove the glove box.
Click on the image to enlarge
Location of relays and fuses in the Chevrolet Niva block
1 - additional relay (turns on the right electric fan through an additional resistor at low rotation speed); 2 - fuse (50A), protecting the power circuits of the additional relay and the right electric fan relay; 3 - fuel pump (fuel pump) fuse (15A), protecting the power circuits of the electric fuel pump relay;
4 - fuse (15A) protecting the constant power supply circuit of the controller; 5 — right electric fan relay; 6 — left electric fan relay; 7 — electric fuel pump relay; 8 - main relay; 9 - fuse (50A), protecting the circuits of the left electric fan; 10 - fuse (15A), protecting the power circuits switched on by the main relay; 11 - controller
To replace the fuse and relay, remove it from the block, you can pry it off with a screwdriver.
To replace the relay and fuse for the air conditioner, remove the left screen of the instrument console
We remove the relay by hand. Install new fuses and relays in reverse order
Chevrolet Niva fuse diagram
How to remove the relay and fuse mounting block
Remove the block cover, then use a Phillips screwdriver to unscrew the self-tapping screw securing the mounting block
We remove the block holders from the bracket and disconnect the five wires of the instrument panel harnesses from the block
Pressing the latches of the remote relay pads
and sliding it off the block guides, remove the pads assembled from the relay, similarly remove the remaining pads
Removing the mounting block
Installing the unit in reverse order
Checking the mechanism: step-by-step instructions
To understand what the fuse means and whether the relay is functioning, it is recommended to pay attention to the following signals :
- a whirring sound coming from under the hood with the engine running but not turning over;
- starter operation without a running engine;
- Starter clicking sounds (won't start).
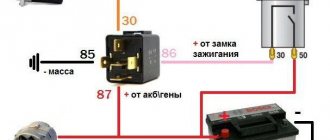
If such signs are present, the relay should be changed . Before this, a check is carried out. The device is removed. The contacts on the back wall are closed. To close the circuit, you need to attach a piece of metal or wire. If after this the starter starts working without failures, then the main problem lies in the relay of this element. When the starter starts to operate and the relay starts, then it is the starter that will need to be repaired or replaced.
What is the purpose and how does the Solenoid Relay function?
First, it’s worth considering why a car starter is needed. It is a conventional electric motor that is powered by direct current from a battery. The design of the device has a toothed gear, which, when it starts, engages with the flywheel ring. Thus, the crankshaft of the Chevrolet Niva internal combustion engine rotates. But what role is given to the device itself? So, it has already been mentioned above that the product causes the connection of two gear elements, which include:
- flywheel;
- Bendix gears, i.e. overrunning clutch.
Thus, the retractor is designed to push the gear out, and if this does not happen, the starter will run dry. In order to understand the principle of operation, it is necessary to consider the process of starting the engine of a Niva Chevrolet car. When you turn the key in the ignition switch, power is supplied to each winding of the starter retractor mechanism. Its windings are of two types: retracting and holding.
This is interesting: When to change spark plugs in a car
The retractor winding is connected to the starter control contact, and the holding winding is connected to the control circuit, which is output to the housing.
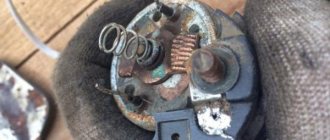
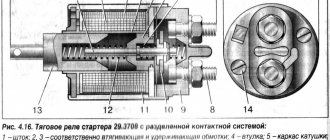
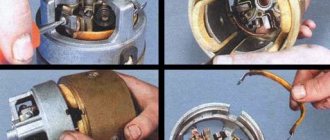
The retractor relay on a Chevrolet Niva consists of a housing, a magnet, a return spring, an armature and, in fact, the two windings mentioned above. After power is supplied to the terminals, magnetic induction is induced, creating a magnetic field. This field acts on the armature, which compresses the return spring. In this case, the bendix, which connects the battery and the trigger mechanism, rotates.
After the contacts are closed, the retractor winding provides power from the “+” terminal, while the current is already induced on the coil. After the engine is started, the power is turned off, and at this moment the spring pushes the armature back to its original position. The contacts open. The starter relay in good condition does not exceed the power supply of 8 V, and the temperature should not be higher than 25 degrees. If the power exceeds this limit, then it is worth dealing with the drive and the device itself.
Breakdowns and relay location on Chevy Niva?
The starter solenoid relay is located directly on the starter mechanism itself. It looks like the one shown in the photo below. As you can see, the product is one-piece, which is due to the lack of possibility of its repair.
As for the solenoid relay, the reasons for its failure are:
- Burnout of contacts;
- Winding failure;
- Wear;
- Destruction of internal parts.
What are the signs that indicate that a device is faulty? There are the following signs for this:
- The engine starts, but the starting motor continues to rotate. This is determined by a buzzing noise under the hood.
- The starter is working, but there is no effect of starting the car engine;
- You can hear the starter turning on when you turn the key, but it does not start.
If such signs are detected, it is necessary to carry out repair work, or rather, replacement, but first you need to make sure of the specific part that has failed. We will check the device for functionality.
Functionality check
To check the serviceability of the retractor relay on a Chevrolet Niva, you do not need to remove it from the car. It is enough to close its contacts, which are located on the back of the product. The connection is made using a piece of wire or metal.
In this case, the circuit will close, through which current will flow to the starter. If the starter starts working, then we can conclude: the fault lies in the product itself.
If the opposite happens: the starter relay clicks, but the starting device remains silent, then the reason should be sought directly in the starter mechanism itself.
How to replace a product on a Chevrolet Niva
Some relay models are a collapsible design that you can try to repair. But, on the Chevrolet Niva, this element is a non-separable structure, which does not allow internal repairs of the device. If it turns out that the problem is in the relay itself, then first you should not rush to replace it. Initially, the contact groups powering the device are checked. The nuts holding the power wires are unscrewed and the contacts are cleaned. Under no circumstances should contacts be cleaned with sandpaper. It is necessary to use gasoline, and then apply Solidol to the cleaned contacts.
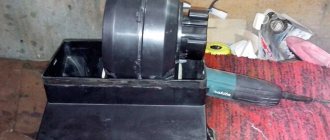
We proceed directly to replacing the solenoid relay on the Niva Chevrolet SUV. First, the starter itself is removed (the removal procedure can be found in the relevant sections), after which we proceed to removing the failed part. Before starting work, you need to make sure you have the appropriate tool, which includes a screwdriver and the relay itself. The procedure for removing the product is as follows:
- Three bolts are unscrewed from the front of the product.
- The product is removed and the joint is cleaned.
- A new device is being installed. It is fixed with the same bolts, but if they are damaged, it is better to replace them with new ones so that you don’t have to suffer next time.
- The starter assembly with the new device is installed in its original place. The functionality of the device is checked, if everything is done correctly, then the Chevrolet Niva should start the first time!
Replacement: step-by-step instructions
Proper replacement of the starter requires a number of measures. There are no difficulties in the work, but you need to follow a certain sequence of actions .
For vehicles on sale before 2009
Replacing the Niva Chevrolet starter relay is performed as follows::
- the terminals from the car battery are disconnected (if this action is neglected, a short circuit may occur, which will also lead to the replacement of the electrical wiring);
- the fuse box located on the left side below the instrument panel opens;
- The starter is being replaced.
To work, you will need a set of tools and hand protection.
For those released after 2009
The main stages of producing a relay replacement will be similar . Pay attention to the fuses, since the circuit is different.
Replacing a faulty starter relay on a Niva
Before replacing the relay, you must make sure that the contacts of the device are not oxidized and are in good working order. To do this, you can wipe them with gasoline or kerosene. Do not use sandpaper or files. If the contacts are in good condition and the threads on the stud are not broken, then the device should be completely replaced.
Also interesting: Chevrolet Niva pinouts. Wire diagrams || Niva Chevrolet power window button diagram
Replacement is carried out in several stages:
- Unscrew 3 mounting bolts
- the faulty relay is removed
- a new device is being installed
- The functionality of the starter is checked.
If the work is done correctly, the car should start the first time.