Many people have probably found themselves in a situation where their car for some unknown reason did not want to start. If everything is normal with the electronics, the battery is working properly and charged, then the problem is probably in the starter. If subsequent attempts to start the engine fail, then it’s time to get ready for repairs.
The bottom line is that the starter is not complicated in structure, and with instructions, any motorist can disassemble and reassemble it.
However, even with such a simple design, removing and then installing the solenoid relay turns out to be very problematic for many. The first step is to diagnose the part and identify the location of the breakdown. The first thing a mechanic notices is the ignition switch and the power relay, located under the hood of the car.
If the starter is silent when starting the engine, then most likely the breakdown lies in these parts. If at the moment of starting the starter rattles, clicks, or makes noise, then the source of the breakdown is located in another place.
Just in case, check the battery again and replace it if necessary. If after replacement the problem does not disappear, then you will have to proceed with more serious repairs.
Repair
What to do if the starter and solenoid relay do not turn on.
First of all, we check the charging of the battery and recharge it if necessary. Next, you need to check the condition of the battery terminals, check their tightness and, if necessary, clean them from oxidation.
There is a break in the wire from the additional relay to the solenoid relay, check and, if necessary, fix the problem.
The contact board of the ignition switch has failed, as a result of which the lock does not supply voltage to the power supply circuit of the starter and traction relay.
The holding coil of the solenoid relay has lost contact with ground or it has become unreliable.
The solenoid relay is turned on, but the starter armature does not rotate.
Again, you must first check the charging of the battery, also check the condition of the battery terminals, if necessary, clean them and tighten them.
The malfunction may also be hidden in the traction relay itself, namely, the starter contacts could have burned out.
Remove the starter from the car and check the condition of the brushes and brush holders, replace the brushes if necessary.
As a result of the “spacing” of the winding, the starter armature is jammed and therefore, when the solenoid relay is turned on, it does not turn.
The solenoid relay turns on and off - knocking.
Again, first of all, when determining a malfunction, we look for a possible cause in the battery, check its charging and the quality of the connection of the terminals and their condition. We eliminate all defects and if the retractor does not work as it should, then we continue to look for the fault further.
The holding coil of the solenoid relay has lost reliable contact with ground.
The reversing lights do not light up on the link.
How to remove
Next, we need a minimum of tools, namely:
Screwdriver with a flat blade 13 socket with a wrench or ratchet (open-end or socket wrench)
First of all, unscrew the nut securing the terminal leading from the starter to the relay:
Then we bend the terminal to the side so that it does not interfere with us:
Now take a screwdriver and unscrew the two bolts securing the solenoid relay.
After which you can remove this part, slightly lifting it up to free it from the clutch with the starter.
What is the price
Depending on the manufacturer and store. From 400 to 900 rubles.
Where is
— As far as I remember, under the hood on the right, near the air filter. There are three relays, two nearby - low beam, high beam and the third starter relay
— Power to the starter solenoid relay comes from the ignition switch (cl. 50 thick red wire)
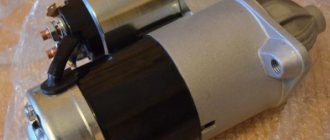
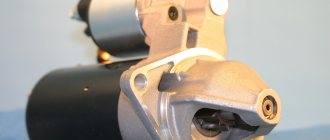
Currently, VAZ 2106 cars are mainly equipped with a 35.3708 starter with an end manifold. Starters made in Germany or Belarus can be installed on some VAZ 2106 cars produced. These starters are interchangeable with starter 35.3708 in terms of their characteristics and installation dimensions.
Repairing the starter relay seems to be a very troublesome and often hopeless task, so an easier option would be to simply buy a new one and replace it. This is due to the fact that, worrying about the reliability of their product, most manufacturers produce non-separable starter relays for both VAZ 2106 cars and other brands of cars. However, there are still models that are not difficult to disassemble and repair.
There are several main breakdowns that you may encounter while working with the starter relay of a VAZ 2106 car. The first is wear of the mechanical wire, the second is the burning of nickels, and the third is a short circuit. Each of these failures can be determined by disassembling the starter relay.
You can also use a special tester to check the serviceability of the starter relay, which does a good job of determining a short circuit in the circuit.
If, after disassembling this part, you find scratches or burrs on it, they need to be removed using sandpaper. Parts that have significant wear can be corrected using gaskets, but this does not always bring the desired result. Sometimes it will be more effective to replace them with new ones. Damaged insulation should also be replaced with a new one. Collectors with worn or loose plates cannot be repaired and must be replaced.
If there are noticeable breaks or damage to the thread, then it is worth cutting a new one or using so-called screws.
If there are faults in the excitation windings, you should disassemble the housing, remove the screws securing the tips and terminals. The coils must be thoroughly dried and impregnated with insulating varnish. Contacts that have oxidized must be cleaned, and those that have been welded must be replaced with new ones.
Doesn't turn
I myself had to deal with a problem on a VAZ 2106, when the starter refused to work when the ignition key was turned. And this happened more than once, and what’s most interesting is that there were always completely different problems. There may be many reasons why the starter does not turn and it is worth considering them in more detail, as well as ways to eliminate them.
The battery is dead. Of course, experienced drivers will immediately understand when the battery is low, but some beginners may not understand that the reason is precisely the battery being low. Simply turn on the low beam and see how bright the lamps are. Usually, if the battery is low enough, the lamps may glow dimly or not light up at all. In this case, it is necessary to charge the battery.
Poor contact of battery terminals. It also happens that all the instruments and lights on the instrument panel seem to be lit, electrical appliances are working, but the starter does not turn. If the contact on one of the terminals is poor, there may not be enough current to crank the starter. To avoid this, it is necessary to lubricate the terminals with a thick lubricant, such as lithol, after each removal and installation of the battery, and such a problem will not arise!
The starter does not click and does not turn on the VAZ-2106: reasons, repairs
Starter retractor relay VAZ 2106
Many people have probably found themselves in a situation where their car for some unknown reason did not want to start. If everything is normal with the electronics, the battery is working properly and charged, then the problem is probably in the starter. If subsequent attempts to start the engine fail, then it’s time to get ready for repairs.
The bottom line is that the starter is not complicated in structure, and with instructions, any motorist can disassemble and reassemble it. However, even with such a simple design, removing and then installing the solenoid relay turns out to be very problematic for many. The first step is to diagnose the part and identify the location of the breakdown. The first thing a mechanic notices is the ignition switch and the power relay, located under the hood of the car.
If the starter is silent when starting the engine, then most likely the breakdown lies in these parts. If at the moment of starting the starter rattles, clicks, or makes noise, then the source of the breakdown is located in another place.
Just in case, check the battery again and replace it if necessary. If after replacement the problem does not disappear, then you will have to proceed with more serious repairs.
Repair
What to do if the starter and solenoid relay do not turn on.
First of all, we check the charging of the battery and recharge it if necessary. Next, you need to check the condition of the battery terminals, check their tightness and, if necessary, clean them from oxidation.
There is a break in the wire from the additional relay to the solenoid relay, check and, if necessary, fix the problem.
The contact board of the ignition switch has failed, as a result of which the lock does not supply voltage to the power supply circuit of the starter and traction relay.
The holding coil of the solenoid relay has lost contact with ground or it has become unreliable.
The solenoid relay is turned on, but the starter armature does not rotate.
Again, you must first check the charging of the battery, also check the condition of the battery terminals, if necessary, clean them and tighten them.
The malfunction may also be hidden in the traction relay itself, namely, the starter contacts could have burned out.
Remove the starter from the car and check the condition of the brushes and brush holders, replace the brushes if necessary.
As a result of the “spacing” of the winding, the starter armature is jammed and therefore, when the solenoid relay is turned on, it does not turn.
The solenoid relay turns on and off - knocking.
Again, first of all, when determining a malfunction, we look for a possible cause in the battery, check its charging and the quality of the connection of the terminals and their condition. We eliminate all defects and if the retractor does not work as it should, then we continue to look for the fault further.
The holding coil of the solenoid relay has lost reliable contact with ground.
The reversing lights do not light up on the link.
How to remove
Next, we need a minimum of tools, namely:
Screwdriver with a flat blade 13 socket with a wrench or ratchet (open-end or socket wrench)
First of all, unscrew the nut securing the terminal leading from the starter to the relay:
Then we bend the terminal to the side so that it does not interfere with us:
Now take a screwdriver and unscrew the two bolts securing the solenoid relay.
After which you can remove this part, slightly lifting it up to free it from the clutch with the starter.
What is the price
Depending on the manufacturer and store. From 400 to 900 rubles.
Where is
— As far as I remember, under the hood on the right, near the air filter. There are three relays, two nearby - low beam, high beam and the third starter relay
— Power to the starter solenoid relay comes from the ignition switch (cl. 50 thick red wire)
VESKO-TRANS.RU
AutoNews / Reviews / Tests
Where is the Starter Relay on the VAZ 2106
Checking and repairing the starter electromagnetic relay
Many people have apparently had to find themselves in a situation where their car, for unknown reasons, did not want to start. If the electronics are fine and the battery is working and charging, then it looks like the problem is with the starter. If the next attempt to start the engine fails, then it’s time to prepare for repairs.
The bottom line is that the starter is not complex in design, and if there is an abstract, then at least some motorist will be able to disassemble and reassemble it. But even with this conventional design, removing and reinstalling the electromagnetic relay turns out to be very problematic for many.
First you need to diagnose the part and determine the location of the failure. The mechanic's eyes were the first to catch the ignition switch and relay under the hood of the car.
If the starter is silent when you start the engine, there is probably a breakdown in these places. If at the moment of starting the starter roars, clicks, noises, then the center of the breakdown is located in a different place.
So, just in case, check the battery and replace it if necessary. If the problem persists after replacement, a more complex repair will be required.
RELAY VAZ 2106. DESIGN
View all Vasel relay 2106
, where it
is
and appropriate. necessary information for vase owners. Let's.
replacing the starter relay on a vase
replacement starter relay for vaz
.
check electromagnetic relay
electromagnetic relay operates on the principle of an electromagnet. When pulled, voltage is applied to the relay and attracts a part, which, in turn, extends the bendix to engage the flywheel. At the same time, the contacts that supply voltage to the windings are closed. If any link in this chain fails or malfunctions, the pusher can only be started
You can check the relay either with the starter removed or directly on the car by blocking it with a screwdriver or other metal object. When the circuit is closed, voltage is applied directly to the windings, bypassing the relay. If the starter then the relay is indeed faulty.
If, when you turn the key, the relay is retracted, but the starter does not rotate, then the source of the malfunction must be found directly upon startup.
Here are the reasons why a breakdown may occur:
- Old age and destruction of materials
- Combustion winding
- Burning heel inside the relay
Traction repair of starter relay
If, after all the testing, you come to the conclusion that the problem is actually centered on the starter solenoid relay, it will need to be repaired (although in many cases it is easier to buy a new one).
The fact is that many manufacturers, trying to make the relay as reliable as possible, make it inseparable, in which case, of course, you need to buy a new one. If the relay can be disassembled, then its operation can be restored with your own hands. Here are some breakdowns you may encounter:
- Mechanical wear of wire
- Dimes are burning
- Short circuit
Starter relay in VAZ 2106 cars and its repair
Sooner or later, every car owner, regardless of its make and model, has to face the problem that his vehicle refuses to start. The first thing, naturally, is to check the fuel level, battery charge, and electronics. If all this does not cause any complaints and doubts about serviceability, then most likely the problem is in the starter. After all, successful engine starting depends on it.
Currently, as a rule, relays 35.3708 with an end-mounted collector are installed on cars of this model.
However, on some copies of the VAZ 2106, starters made in Germany or Belarus may be installed, since they can be interchanged with starter 35.3708.
At an earlier time, approximately in the 70-80s, the ST-221 starter was also installed.
Starter relay repair
Repairing the starter relay seems to be a very troublesome and often hopeless task, so an easier option would be to simply buy a new one and replace it. This is due to the fact that, worrying about the reliability of their product, most manufacturers produce non-separable starter relays for both VAZ 2106 cars and other brands of cars. However, there are still models that are not difficult to disassemble and repair.
There are several main breakdowns that you may encounter while working with the starter relay of a VAZ 2106 car. The first is wear of the mechanical wire, the second is the burning of nickels, and the third is a short circuit. Each of these failures can be determined by disassembling the starter relay.
You can also use a special tester to check the serviceability of the starter relay, which does a good job of determining a short circuit in the circuit.
If, after disassembling this part, you find scratches or burrs on it, they need to be removed using sandpaper. Parts that have significant wear can be corrected using gaskets, but this does not always bring the desired result. Sometimes it will be more effective to replace them with new ones. Damaged insulation should also be replaced with a new one. Collectors with worn or loose plates cannot be repaired and must be replaced.
If there are noticeable breaks or damage to the thread, then it is worth cutting a new one or using so-called screws.
If there are faults in the excitation windings, you should disassemble the housing, remove the screws securing the tips and terminals. The coils must be thoroughly dried and impregnated with insulating varnish. Contacts that have oxidized must be cleaned, and those that have been welded must be replaced with new ones.
The bushings on the starter of a VAZ 2106 car are changed if they have significant wear or scuff marks are found on them. To determine the wear of these same bushings, you need to measure the roller clearance. If it is more than 0.2 mm, then the bushings are worn out and must be replaced.
Assembling the starter parts of a VAZ 2106 car is carried out in the reverse order to the one in which you disassembled it.
When carrying out all the above work, one should not forget about safety precautions and under no circumstances violate them.
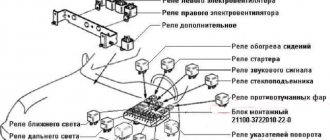
Fuses and relays VAZ 2106
The electrical equipment of the VAZ 2106 (21061) car is protected by several fuses and relays.
They are located in two mounting blocks (main and additional) under the instrument panel, to the left of the driver. The fuses are installed in the mounting block in numerical order - from left to right. Fuses rated 16A have a green insulator, 8A have a black insulator.
Fuses and relays for electrical equipment of the VAZ 2106 (21061) car
Main mounting block fuses
F1 (16A) - Sound signal. Plug socket for portable lamp. Cigarette lighter. Brake light bulbs. Watch. Interior lighting lamps.
F2 (8A) - Windshield wiper relay. Heater electric motor. Windshield wiper and washer motors.
F3 (8A) - High beam headlights (left headlights). Indicator lamps for high beam headlights.
F4 (8A) - High beam (right headlights).
F5 (8A) - Low beam (left headlight).
F6 (8A) - Low beam (right headlight). Rear fog lamp.
F7 (8A) - Side light (right sidelight, left rear light). Sidelight lamp. Right license plate light. Instrument lighting lamps. Cigarette lighter lamp.
F8 (8A) - Side light (left sidelight, right rear light). Left license plate light. Engine compartment lamp. Indicator lamp for turning on the dimensions.
F9 (8A) - Oil pressure gauge with warning lamp. Coolant temperature gauge. Fuel level indicator in the tank with a reserve lamp. Lamp for parking brake and brake fluid level. Battery discharge indicator lamp. Direction indicators and their indicator lamp. Carburetor solenoid valve. Tachometer. Reversing lamp. Glove box lighting lamp. Indicator for opening the carburetor air damper. Rear window heating relay coil.
F9 (8A) - Voltage regulator. Generator excitation winding.
Additional mounting block fuses
F11 (8A) - Reserve.
F12 (8A) - Reserve.
F13 (8A) - Reserve.
F14 (16A) - Rear window heating element.
F115 (16A) - Electric motor of the engine cooling system fan.
F14 (8A) - Direction indicators in hazard warning mode.
Relay VAZ 2106
Relay for low and high beam headlights
Two relays type 90.3747 (or 113.3747). Installed on the right engine mudguard in the engine compartment.
Relay-breaker for direction indicators and hazard warning lights
Relay 231.3747 is installed behind the instrument panel. To access it you need to remove the instrument cluster.
Battery indicator lamp relay
Relay PC702 is installed on the left mudguard in the engine compartment.
Windshield wiper activation relay
The PC514 relay is installed under the instrument panel on the driver's side.
Notes and additions
— For convenience of working with the electrical wiring of the VAZ 2106 (21061) car, the wires connected to the fuses of the main unit have different colors. For example, for the first fuse the wires are red, for the second - yellow with black stripes, for the third - green with black stripes, the fourth - green, the fifth - gray with a black stripe, the sixth - gray, the seventh - yellow, the eighth - brown, the ninth - orange, the tenth is also orange.
Starter diagram VAZ 2108, 2109, 21099
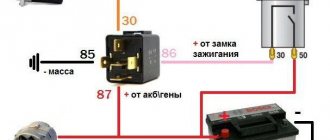
Electric current enters the starter circuit from terminal “30” of the generator. Next, through block Ш8 (Х8) of the mounting block (pins 5,6), block Ш1 (Х1) - pink wire, to the ignition switch. The driver turns the key in the ignition to turn on the starter (position 2) and closes the contacts (50, 30). After which the ignition switch, through the red wire, current flows to block Ш1 (X1) of the mounting block (pin 8), then block Ш5 (Х5) (pin 4), starter switch relay (pin 85). The relay is activated. From terminal “30” of the start relay, current flows to terminal “50” of the starter traction relay, energizing its winding. The traction relay is activated, activating the starter.
The starter electrical circuit uses a switching relay 111.3747-10.
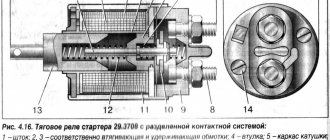
- Screw securing the protective cap.
- Protective cap.
- Retaining half ring.
- Rear cover fastening nut.
- Back cover.
- Brush springs.
- Brush guides (outer part).
- Brushes.
- Stator.
- Anchor.
- Drive lever.
- Drive unit.
- Restriction ring.
- Retaining ring.
- Drive lever axis.
- Screws for securing the traction relay.
- Front cover.
- Plastic sealing ring for the lid.
- Tie rods.
- Rubber plug.
- Traction relay core.
- Return spring.
- O-ring for traction relay.
- Traction relay.
- Sealing washer.
- Adjusting washers.
Solenoid relay
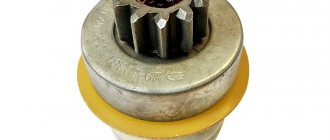
The starter, by its design, is a small electric motor, a special coupling (Bendix) of which engages with the flywheel of the power unit for a few seconds, causing the crankshaft to rotate. Despite the small size of the starter, when the engine starts, currents that reach hundreds of amperes pass through it. If power is supplied to this device directly through the ZZ, then no contacts will withstand such loads and will burn out. Therefore, to connect the starter to the power source, a special retractor relay is used, which is designed with contacts designed for high currents. This mechanism is structurally located on the starter housing.
The switching device in question is assigned a number of functions:
- connecting the starter to the power source;
- engagement and retention of the bendix with the engine flywheel;
- turning off the starter power after the engine starts running.
Operating principle
The retractor mechanism operates in the following order:
- When you turn the key in the ZZ, an additional relay is activated.
- Power from the battery is supplied to the traction relay coil.
- Under the influence of a magnetic field, the armature moves inside the winding.
- The starter fork is driven and extends the bendix.
- The starter sprocket engages with the flywheel of the power unit.
- A plate attached to the end of the solenoid relay rod connects the contacts to each other.
With the described actions, the engine starts within a few seconds. After activating the starter, the retractor winding stops working, and the current passes through the holding coil, due to which the armature remains in its extreme position. The presence of two windings reduces battery energy consumption during engine starting.
After the motor starts working, the starter's electrical circuit opens, the current through the holding coil stops flowing, and the armature, due to the spring, returns to its original position. At the same time, the clutch and coin are removed from the relay contacts, the bendix moves away from the flywheel and the starter is disconnected from the battery.
Malfunctions
Since the retractor operates every time the power unit is started and is subjected to high loads, it gradually wears out and fails. Relay malfunctions can be judged by characteristic signs:
- when the engine starts, the starter continues to operate, making a buzzing sound;
- when the engine starts, the relay makes a click, but the starter does not function;
- When you turn the key, the starter spins, but does not engage the flywheel.
Problems can occur for several reasons:
- violation of the integrity of the relay housing;
- problems with the retractor or retention coil;
- burning of contacts;
- weakening of the spring.
All of the listed problems occur as a result of natural wear, burnout of the windings, or destruction of parts of the assembly.
Examination
You can check the relay in two ways - without dismantling the starter and with the device removed. Let's consider both options.
By car
We carry out diagnostics with a multimeter or “control”:
- Visually assess the integrity of the relay wiring.
- We check the operation of the relay, for which we turn the key in the ignition switch and listen to the starter: if the click is not heard, the relay is considered faulty.
- If there is a characteristic sound, but the starter does not turn, the contact coins in the relay itself may be burnt. To check, remove the chip that comes from the ZZ and close the two threaded contacts together. With this connection, the starter will be powered bypassing the relay. Rotation of the starter will indicate a problem with the switching element.
- We connect the multimeter to the “+” relay, i.e. to the contact where power comes from the battery, and connect the minus to ground. We turn on the ignition and if the voltage is below 12 V, then most likely the battery charge is not enough to start the engine, but enough to trigger the relay.
Starter Repair Tools
What you will need to remove and repair the starter:
- Keys for 8, 10 and 13
- Screwdriver (2 pieces)
- Calipers
Vernier calipers - can be regular or electronic
- Multimeter
You will need such a measuring device
- Pliers
- Hammer
- Bearing mandrels
- Lubrication
- Sandpaper
VAZ 2101 starter connection diagram
- starter;
- holding winding of traction relay;
- ignition switch;
- generator VAZ 2101;
- fuse box;
- pull-in winding of the traction relay;
- accumulator battery.
Under normal loads, the current generated by the starter is 150 A. When heavy loads occur, for example in winter, the resulting current can reach 500 A. This is a serious test for this electrical unit, so it is not recommended to keep the key on the start for more than 10 seconds, and repeated starting attempts must be made with a break of at least a minute.
VAZ 2106 starter repair
Home • VAZ • 2106 • Electrics
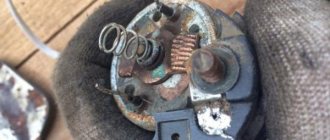
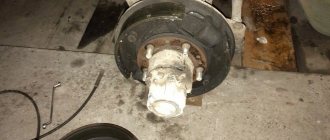
After removing the starter on the VAZ 2106, we begin to disassemble it and identify the causes of the malfunction.
Disassembling and identifying the causes of the VAZ 2106 starter malfunction
Using a 13mm wrench, loosen the nut securing the wire to the traction relay
disconnect the wire tip.
Apply 12V voltage to the relay output
“Minus” - to the body, and connect the ohmmeter to the contact bolts. In this case, for a working relay, the armature should move the overrunning clutch into the window of the front cover, and the contact bolts should close. Replace the faulty traction relay with a new one
Replacing the solenoid relay on a VAZ 2106
Using a Phillips screwdriver, unscrew the three screws.
We remove the traction relay (VAZ 2106 retractor)
We remove the rod with the spring from the relay body. We install the new traction relay in the reverse order.
To further disassemble the VAZ 2106 starter, use a Phillips screwdriver to unscrew two screws.
Removing the starter cover of VAZ 2106
To check the condition of the brushes, use a slotted screwdriver to unscrew the screw securing the contact wire
Using a screwdriver, press out the spring and remove the VAZ 2106 starter brush. Use the same method to remove the three remaining brushes. Replace brushes worn to a height of 12 mm or less.
By connecting an ohmmeter one by one to the terminals of the stator windings, we check them for short circuits to the housing and for interturn short circuits. At the same time, we make sure that the free terminals of the windings are isolated from the housing
Using a screwdriver, remove the retaining ring
Remove the washer from the axle
Use a 10mm wrench to unscrew the two coupling bolts.
We disconnect the starter housing and remove the insulating tubes of the coupling bolts from it. By external inspection we check the condition of the collector and windings. Charring of windings is not allowed. If the collector is slightly burned, we clean its plates with fine abrasive sandpaper. In case of severe burning and wear, it is better to replace the anchor. We remove scuffing and enveloping of bronze from the bearings onto the journals of the armature shaft with the finest sandpaper, followed by polishing.
Using an ohmmeter, we check the armature windings for a short circuit. We replace the faulty anchor
VAZ retractor relay device
The traction relay has a simple design, it includes the following parts:
- Pull-in winding;
- Holding winding;
- An armature (core) with a starter relay rod and a starter fork drive rod;
- Contact disk;
- Starter relay contacts;
- Return springs;
- Frame.
The relay is based on a cylindrical retractor coil (it forms a solenoid, an electromagnet), inside of which there is a movable core (armature). The turns of the holding coil are wound on top of the retractor coil. On one side of the armature there is a rod that pushes the starter fork; this rod extends beyond the dimensions of the housing; at its end there is either a hole or a crossbar (depending on the model). On the other side of the armature there is a rod ending in a contact disk for the starter relay.
The starter relay itself is a cup made of insulating material, into which two large-area contacts with a cut thread are pressed (terminals are installed on it using nuts). Usually on the outside of the cover between the contacts there is a rim that prevents a short circuit. This cover is screwed to the end of the retractor relay using screws so that the contacts are located opposite the contact disk on the armature rod.
This entire structure is placed in a cylindrical metal case. On the housing of the VAZ solenoid relay, on the side of the fork drive rod, there may be a flange with holes for mounting to the starter, or threaded holes drilled directly into the end of the housing. This depends on the starter model and the method of installing the solenoid relay on it.
The solenoid relays of all VAZ cars have such a device; the differences lie in the details - dimensions, characteristics, method of fastening, etc.
Relay - replacement
1. Prepare the car for work (see “Preparing the car for maintenance and repair”).
2. Disconnect the wire from the negative terminal of the battery (see “Battery - removal and installation”).
Replacement of windshield wiper relay (PC514)
The windshield wiper relay is located in the passenger compartment on the left side of the body under the instrument panel and is designed to provide intermittent operation.
To complete the job, you will need two plastic upholstery holders.
1. Having removed the seal from the flange of the front pillar of the driver's door, use a screwdriver to pry up the sidewall upholstery and remove it, removing the two holders from the holes in the sidewall (the holders are usually destroyed in this case). We bend the sound insulation.
2. Disconnect the relay wire block from the harness. The connector is located at the bottom of the instrument panel.
3. Using a Phillips screwdriver, unscrew the two screws and remove the relay.
4. Installation of all removed parts is carried out in reverse order. We secure the side panel upholstery with new holders.
Replacing the turn signal and hazard warning relay (231.3747 or 23.3747)
The breaker relay is installed on the partition of the engine compartment behind the instrument panel. The relay is designed to receive an intermittent light signal from the direction indicators both in the emergency mode and in the direction indication mode and to monitor the serviceability of the direction indicator lamps. When the lamp burns out, the relay doubles the blinking frequency.
10 mm socket wrench
Unscrew the relay mounting nut. Under the nut are the tips of two “ground” wires.
3. Disconnect the wire block from the relay.
4. Installation of all removed parts is carried out in reverse order.
Replacing the headlight switch relay (90.3747-10 or 113.3747-10)
Two relays for turning on the low and high beams are installed in the engine compartment on the upper part of the right mudguard.
1. Use a Phillips screwdriver to unscrew the fastening screw and remove the relay. Under the bracket for fastening the high beam relay there is a tip of the mass “wire”.
A
— relay for turning on the high beam,
B
— relay for turning on the low beam.
2. Having marked or remembered the location of the wires, disconnect them from the relay terminals. For convenience, you can disconnect the wires sequentially and immediately connect them to a working relay.
3. Installation of all removed parts is carried out in reverse order.
Replacing the Battery Warning Lamp Relay (PC702)
The relay is installed in the engine compartment on the top of the right mudguard. The relay is used to turn on the warning lamp on the instrument panel if a malfunction occurs in the battery charging circuit. When the ignition is turned on, the warning lamp lights up, and after starting the engine (if the charging circuit is working), the lamp should go out.
1. Using a Phillips screwdriver, unscrew the two fastening screws and remove the relay. A “mass” wire is secured under one of the screws.
2. Having marked or remembered the location of the wires, disconnect them from the relay terminals. For convenience, you can disconnect the wires sequentially and immediately connect them to a working relay.
3. Installation of the relay is performed in reverse order.
Replacing the cooling system radiator fan relay (90.3747-10 or 113.3747-10)
The relay for turning on the radiator fan of the cooling system is installed in the engine compartment on the upper part of the left mudguard.
1. Use a Phillips screwdriver to unscrew the fastening screw and remove the relay.
2. Having marked or remembered the location of the wires, disconnect them from the relay terminals. For convenience, you can disconnect the wires sequentially and immediately connect them to a working relay.
3. Installation of the relay is performed in reverse order.
Basic starter malfunctions and their causes
The fact that the described VAZ 2106 mechanism requires repair is usually indicated by the following malfunctions:
- When the device starts, the relay is triggered, but the armature does not operate, or its abnormally slow rotation is observed. The cause of such a malfunction may be burning of the commutator, a break in the windings, loosening of the fasteners that support the relay, a low charge of the car battery, a short circuit between the commutator elements, wear or sticking of the brushes.
- The relay and armature do not operate when the starter is turned on. Most likely, you will need to remove the device, since this failure occurs due to the armature being stuck, a short circuit in its windings, loose terminals, a short to ground, or a wire break. In any of these cases, you will need to remove the relay, disassemble it and make the required repairs.
Also, removal and disassembly of the starter is necessary in cases where the crankshaft does not rotate when the armature is rotating (replacement of the buffer spring, lever axis of the clutch launcher or its other element is required), the driver hears a strong noise when the mechanism operates (replacing gear teeth or bushings), after When starting the engine, the starter does not turn off. The latter situation is caused by a skewed starter, a broken return spring, or a jammed drive handle or relay.
Starter malfunctions
What is the approximate service life of a starter?
The average value is 5 years or 120 thousand km. How long the starter lasts directly depends on the operating conditions. For example, if you drive short distances in urban areas and constantly start the engine, the starter will quickly fail. I’ll tell you about the signs that accurately indicate a device malfunction. These are symptoms such as:
- A specific crackling sound is heard.
- There is a delay in starting the engine after the driver turns the ignition key.
- The starter motor can be heard starting, but there is no sound of the engine running.
- There is no action after turning the ignition key.
- The starter operates after the engine starts.
What possible malfunctions can occur with the starter?
- Poor contact. This is a common breakdown, and the driver can notice it when starting the engine. In this case, you should check the device's mounting and contacts.
- Magnets may fall off. This applies to modern devices. Here it is better to entrust repairs to experienced auto repairmen.
- Wear of support bushings. In this case, the armature will seem to “dangle” and there will be no full contact of the brushes with the commutator. In this case, there will be sparks, the brushes will burn and wear out. In this case, you need to replace the brushes and support bushings, and groove the commutator.
- Wear of rollers in bendix. In this case, it is towed. The bendix needs to be completely replaced.
- Solenoid relay malfunction. Most often, nickels burn. The copper melts in them, and the nickels are soldered to the contacts. In this case, even after starting the engine, the starter will continue to work. All this drains the battery a lot. Therefore, here you should disconnect the wire from the battery as soon as possible, remove the device and replace the solenoid relay.
If the crankshaft rotates slowly, the reasons for this are:
- High viscosity motor oil.
- Low battery charge.
- The wire contacts have oxidized.
If the starter runs too long, it is due to a stuck ignition switch or problems with the contacts.
If the starter does not start when you turn the key, the reasons for this may be the following:
- The battery is discharged or broken.
- There is no contact of the ground wire with the battery or between the winding and the collector.
- The anchor is worn out.
- The brushes do not adhere to the commutator.
- Solenoid relay is faulty.
- The device control connector is disconnected.
- In automatic transmission, the selector is not in position N or P.
- The gearbox switch is faulty.
If the starter rotates very slowly, this is indicated by the following faults:
- The battery does not work or is low.
- Bushings are worn.
- The wire between the battery and the starter is faulty.
- Damage to the solenoid relay.
- The stator or armature winding is faulty. The mechanisms must be replaced.
- Poor contact of the armature or stator winding with ground.
- The brushes have poor contact with the commutator due to wear or incorrect position.
- Commutator burning.
The starter works, but the engine does not:
- Overrunning clutch worn.
- Parts in the gearbox are broken.
The starter rotates together with the flywheel:
- Solenoid relay is broken.
- Failure in the contact group of the ignition switch.
There is no click of the solenoid relay:
- Low battery charge.
- Contacts or coil of the solenoid relay are burnt out.
- The contact on the positive terminal of the battery or starter has oxidized.
- There is a malfunction in the ignition switch component.
- Short circuit to ground in the coils of the solenoid relay. Here it is better to replace all the parts.
- The relay armature mechanism is stuck.
If the crankshaft does not rotate the starter armature, then the probable causes of the breakdown are:
- Towing the freewheel.
- Jamming when moving parts along the screw thread of the shaft.
- Broken clutch release lever.
- Malfunction of the clutch spring or drive ring.
If loud noises appear when starting the engine, you should check the fastening in the starter parts.
If a gear grinding noise occurs in the starter, you should check the switch contacts, the gear travel adjustment, the drive device spring, and the flywheel ring teeth. If the ring gear is damaged (it is often made of plastic), then it is better to replace it with a metal one. There is also a possibility that the solenoid relay is stuck.
Video: Checking a car starter, all methods and breakdowns
This video is suitable for beginners; an experienced mechanic talks very interestingly.
How to check the VAZ 2106 starter in the garage - diagnostics, removal, repair and installation
Hello, dear motorists! When we write material about how to remove and check the starter on a particular car with our own hands, it’s not out of idleness. For example, you are standing in a garage, in a parking lot or in the yard of a house, and in the morning the starter simply stopped showing signs of life.
There are several possible solutions: help from a friend, calling a tow truck to transport the car to a service center, and repairing the starter yourself. There is not always a friend who is a motorist nearby, a tow truck will cost you a pretty penny. It remains - with your own hands. So, let's go.
Frequent malfunctions
How do you know if the starter needs to be repaired or replaced? The following signals may indicate this:
- The starter relay on the VAZ 2106 works properly, but the armature does not work or rotates very slowly. This may be a consequence of the commutator burning out. It is also worth checking the integrity of the winding, whether the relay fasteners are loose, whether there is a short circuit in the commutator, whether the brushes are worn out or stuck. The problem may also arise due to a discharged battery.
- The starter turns on, but the relay and armature do not work. Most likely this indicates that the armature is stuck. You also need to check whether the tips are tightened well, whether there is a short to ground and how intact the wires are.
- The armature rotates, but the crankshaft does not rotate. This may indicate that the buffer spring has failed. You also need to check the integrity of all coupling elements.
- Loud noises are heard. This usually indicates defective bushings and gears.
- When the engine is started, the starter continues to operate. This is a consequence of failure of the return spring, misalignment of the device, or jamming of the relay and drive handle.
Starter malfunctions
As you operate a vehicle with a starter, problems of various types may occur. Each breakdown manifests itself with its characteristic symptoms, which allow you to quickly and correctly identify the problem and eliminate it in a short time.
The starter works, but the engine does not start
If you hear that the starter is functioning, but the engine does not spin, then the problems may be of the following nature:
- Worn overrunning clutch gear teeth. This leads to the fact that there is no engagement with the flywheel teeth and rotation does not occur. Tooth wear is normal. However, the failure of this part can be accelerated by the use of thick motor oil, incorrect operation of the relay, or prolonged cranking of the starter after the engine has already started. When the teeth wear out, you will hear a characteristic buzzing sound from the device without any further action. Teeth can also wear out on the flywheel, which is quite rare. If the starter gear breaks, the Bendix will need to be replaced.
- The fork itself, which engages the gear with the flywheel, may fail. In such a situation, you will hear that the relay has activated, but the drive sprocket has not moved out of its place. With such a problem, the starter will turn, but without transmitting torque to the flywheel.
- It is possible that the Bendix drive gear may be misaligned, such that it will not fully engage with the flywheel. This happens when the Bendix spring supporting the gear is deformed. If in such a situation you try to continue to start the engine, the teeth on the bendix or on the flywheel itself may break off.
- It may be that the starter is unable to spin the crankshaft until the start occurs. The malfunction comes down to problems with power supply (wiring, brushes, oxidized battery terminals). In such a situation, the starter will simply not have enough voltage due to its drawdown.
If the bendix wears out, the starter will turn, but the engine will not be able to start.
The starter clicks but doesn't turn over
If the starter makes clicking noises, but nothing else happens, then the reasons should be looked for in the following:
- With one powerful click, you can judge that the retractor relay is working, but the force of this device is not enough to turn the motor. If several unsuccessful attempts have been made, the starter will need to be dismantled for further disassembly and troubleshooting of parts. The probable causes of this phenomenon may be wear of the starter brushes and bushings, short circuit or breakage of the coils, poor contact of the power wire, problems with the retractor or bendix.
- With several clicks, the fault lies in the solenoid relay, unreliable contact between the starter itself and the relay or ground. Before you begin repair work on the starter, you need to check the reliability of the connections, starting from the battery and ending with connecting the wires to the starter.
- Bendix malfunctions (breakage of teeth or fork).
Video: the starter clicks but does not rotate using the example of a VAZ 2110
https://youtube.com/watch?v=M4lhK1TG-ZM
Crackling sound when turning on the starter
There are situations when, when trying to start a car engine, the starter makes sounds in the form of a crackling or grinding sound. In this case, malfunctions may be of the following nature:
- The fastening of the starter to the power unit has become loose, resulting in vibration.
- The bendix is worn out.
- Lack or lack of lubricant on the shaft, which led to difficult movement of the bendix.
- Broken flywheel teeth.
The starter does not turn on
If the starter does not respond to turning the key in the ignition switch, then the reasons should be sought in the following:
- Problems with the solenoid relay. To determine that the problem is in this element, it is necessary to apply voltage directly from the battery to the starter power terminal. If the motor starts to crank, then the reason is obvious - the traction relay is faulty. The contact pads in it quite often burn out, which will require disassembling the device and cleaning the contact elements.
- Broken ignition switch. Sometimes the contact group fails, which can be replaced without completely replacing the lock.
- Problems with power supply. It is necessary to check the entire circuit from the voltage source to the consumer.
- There is a short circuit in the winding, which will be indicated by a characteristic burning smell and the appearance of smoke. In such a situation, the starter must be dismantled and the windings replaced or the old ones rewound.
Due to burnt contacts in the contact group of the ignition switch, problems with starting the starter may occur.