On modern MTZ tractors, the engine starter consists of an electric motor, a starter retractor relay and a drive mechanism. The design is reliable and thoughtful, so it usually lasts for many years without any problems. But if the load is exceeded while the tractor is operating, the traction relay may burn out in the area of the bolt fastenings. How does the MTZ starter solenoid relay work? What is the difference between traction relays on tractors 80, 82, 1221 and others? How to replace a burnt out starter relay? We will answer these and other questions later in the article.
Checking and repairing the starter retractor relay
A faulty starter relay is often the reason why the car refuses to start when the key is turned in the ignition.
Perhaps these are not the most pleasant moments in the life of any driver. Therefore, in such cases, it is important to know how to check the starter solenoid relay, and how to start the car if it does not work. We will tell you about the purpose of the starter solenoid relay and its structure, how you can check it and perform simple repairs yourself.
At the end of this article, watch the video that shows how to start your car if the starter solenoid relay is not working.
Also on our website you can find information about other common causes of starter malfunction with step-by-step instructions on what to do if the starter does not work.
When, when you turn the key in the ignition switch, you can clearly hear that the starter is idling, then the cause of this malfunction may be the solenoid relay. But before you start diagnosing it, you should know the purpose of this electrical unit.
The retractor clicks, but the starter does not turn. A simple solution to the problem for pennies
Greetings, dear readers.
At the end of winter, my car began to have a problem with the starter: the retractor clicks, but the starter does not turn.
At first, simply turning the ignition off and on helped. Because of this, thoughts arose that the fault lay not in the starter, but in the ignition switch.
However, gradually, with each passing week, the problem progressed more and more and now turning the ignition off and on was no longer enough. I had to open the hood and move the wires going to the starter. When the car started up after such a procedure, I realized that the problem was not at all in the ignition switch.
I also noticed that if the battery is removed and fully charged, then. Conclusion: the starter does not have enough energy.
What is the most common cause of this problem? Acidified contacts.
After simply using analogue WD-40 did not help, it was decided to remove the starter:
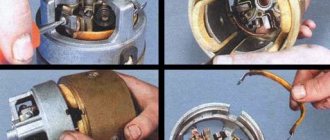
Having previously removed the negative terminal from the battery, I unscrewed the two bolts that hold the starter and now the engine starting device is in my hands.
It was quite dirty, both outside and inside. The contacts were also dirty:
What interested me was the thick, small, stranded wire that comes from the pull-in relay into the housing of the starter itself. After all, the retractor clicks, which means current is flowing to it, but it does not reach the starter through this wire.
I cleaned all the contacts with 180-grit sandpaper, treated them well with analogue WD-40, and then installed them in place.
Next is the verification stage. The situation has definitely gotten better; now you don’t need to turn the ignition on and off, much less climb under the hood.
However, not everything is perfect, quite often, after turning the key, the following situation arises: the starter turns, then stops, then there is a pause of 1-2 seconds, after which it starts turning again, after which the engine usually starts. During this entire time, the key is turned to the “start” position.
Here the problem is most likely in the spark plugs, they need to be cleaned or replaced, which is what I will do. If you have other assumptions, write them in the comments, I’ll take a look, maybe I really have something different.
In any case, the problem is no longer as identified as it was before, so the result is positive in any case. And its cost is quite small, I think everyone has sandpaper and something like WD-40 in their garage.
Friends, if you liked the article, subscribe to this channel and like it, and also share it on social networks, I tried very hard when writing it.
If you have anything to add or have any questions, write in the comments. Good luck on and off the roads.
Signs and causes of relay failure
If the relay is broken, the following signs will tell you about it:
- when you try to start the engine with the key, it does not start, or starts only after two or three attempts;
- There is a buzzing sound after the engine starts. This means that the starter rotates at higher speeds, although it should no longer be.
If at least one of these signs is observed, then this is a reason to be wary. The relay may soon break. There are several reasons why this happens:
- one of the windings, or both, were burned or broken at once;
- deformation of the return spring inside the mechanism;
- a short circuit has occurred inside the part on one of the windings;
- The surface area of the contact plates has decreased, or they have completely burned out.
Understanding the reasons why the relay fails, repairs will take less time, because It’s immediately clear where to look for the problem.
Operating principle of the solenoid relay
One of the features of any internal combustion engine is that it cannot spin up on its own without an external source of energy. Chainsaws and gas generators, as well as motor boats, use a manual starter - a bobbin with a spring and a steel cable wound on it.
Starter actuators (retractor relays) operate on the same principle, but the driver's muscle power is not used, except for operating the ignition key.
The retractor runs on electricity, so it is connected to a battery. When the driver turns the car's ignition to "start" mode, the solenoid coils receive energy from the battery. A powerful magnetic field is created inside the device, acting on the rod, moving it inward. A fork is connected to the rod, fixedly fixed in the center.
How to repair a relay with your own hands
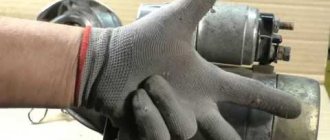
Basically, repair work involves dismantling a number of mechanisms. Here it is important to remember to take precautions - do not rush, do everything very carefully, turn off the power to the machine. It is also worth considering carefully whether there is a need to repair the starter retractor relay yourself. In the absence of the necessary skills, abilities and tools, you should entrust everything to the hands of professionals - otherwise you can not only aggravate the breakdown, but also get injured.
At the same time, if you decide to carry out repair work yourself, disconnect the power from the battery. This is the initial step to disassemble the starter, otherwise all the car's wiring may burn out.
Do not rush to dismantle the device; first, wipe all elements from dirt so that dust does not penetrate inside the system. Only after this we begin to unscrew the brush assembly nut. Next we get the contact. Then we proceed to the coupling screws, the task of which is to connect the assembly to the mass.
If everything is done correctly, we will be able to completely remove the relay from the mechanism. Now we proceed to unscrew the nut at the end, as a result of which the part is divided into two parts. This way we gain access to the core, thanks to which we can replace the faulty element, after which we install the mechanism in its place.
Examination
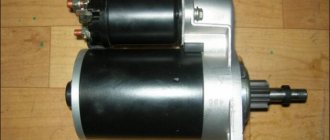
VAZ 2110 retractor starter
To check the functionality of the starter, you will need a battery and two wires:
- First the starter is removed;
- Using the first wire, the output of the solenoid relay is connected to the positive terminal of the battery;
- The second cable is connected to the negative terminal with the starter ground;
Note: if there is a click, this indicates that the Bendix mechanism is working. It is important that the click is sharp and fast. If the sound seems sluggish and drawn out, then something is wrong inside the mechanism, for example, the pin contacts have burned out.
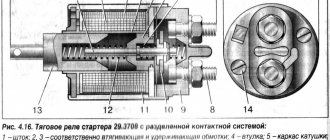
Operating principle and design of the starter retractor relay
This mechanism consists of the following elements:
- electromagnet with holding and retracting winding;
- frame;
- contacts;
- anchor;
- return spring (it is located in the core of the device).
When voltage is applied to the windings of the retractor mechanism (it occurs when the ignition key is turned), a magnetic field is created that moves the starter armature. This anchor, in turn, presses on the return spring and compresses it. The end of the fork, located at the end opposite from the device body, begins to move towards the flywheel, which leads to the engagement of the gear with its crown.
In this case, the so-called “nickels” are closed - a pair of contacts built into the design of the relay we are considering. As a result of all these movements, the holding winding turns on and transmits the required current to the motor winding, which rotates the flywheel and shaft engaged with the gear.
When the ignition key returns to its original position (the engine is started), the “nickels” open, and the mechanism stops receiving electrical energy. As a result, the armature, controlled by the return spring, returns to its initial position, and the flywheel disengages with the bendix. As you can see, the design of the starter traction relay is simple; for this reason, any driver can understand the principle of its operation.
Starter design
The unit used to start a car engine is essentially a compact and powerful electric motor, the design of which is supplemented with several specific details:
- A bendix (overrunning clutch) located on the armature shaft, necessary to transmit torque from the electric motor to the crankshaft of the internal combustion engine.
- A fork that longitudinally moves the coupling along the armature shaft. It is installed in the front cover (mask) of the starter.
- A retractor relay that drives the plug and closes the electrical circuit through which current is supplied to the windings of the electric motor. It, like the fork, is installed on the front cover.
The transmission of torque to the bendix can be done directly or through a torque-increasing planetary gearbox, which is mounted in the main body of the unit, its front or rear cover.
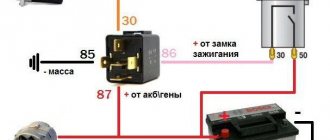
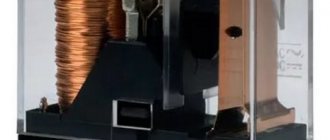
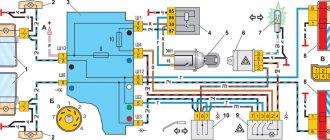
Starter solenoid relay diagram
Starter retractor relay device
The design of the unit is quite simple. Inside the metal case are:
- The core, also called the armature or rotor. The core is made of a magnetic or magnetizable alloy, or is made in the form of a steel rod with a winding.
- Drive rod fixed to the core.
- Armature return spring.
- Closing rod with a contact plate located on it.
- Contact plate compression and return springs.
- Pull-in winding.
- Holding winding.
- The back cover of the relay is made of dielectric material, most often plastic.
- Bolts passing through the cover with contact plates located at their inner ends. From one of these bolts, current is supplied to the pull-in and holding windings.
- In some cases, there are one or two additional terminals to supply voltage to the windings.
The assembly is secured with screws or bolts to the front cover (mask) of the starter.
Do-it-yourself starter retractor relay repair
Self-repair requires certain skills. It’s not worth getting down to business without having either experience or the necessary tools. Strictly speaking, installing a new part is always preferable to repairing a broken one.
If you decide to take an important step, you will first have to remove dirt from the surface of the assembly using a stiff brush and a rag soaked in kerosene, white spirit, etc. After this, an external inspection is carried out to familiarize yourself with the structure of the relay housing.
How to disassemble the starter solenoid relay?
There is no point in opening a rolled case. This is a complex procedure with unpredictable results. But, if the manufacturer has provided for the possibility of opening the solenoid relay by securing its back cover with separate screws or nuts on the power terminals, then access to the contact plates will not become a serious problem. Simply unscrew the fasteners and pry up the cover using a knife or screwdriver.
Why does the starter relay fail?
The starter relay can fail for a variety of reasons. This occurs due to burnout of the electrical winding , physical wear and destruction of individual elements, and burnt contacts . In most cases, the following breakdowns :
- Failure of a magnet with an electric winding;
- Broken or burnt winding;
- Hull deformation;
- Problem with contacts: “sticking”, burnout of contact plates;
- Spring wear;
- Faulty or damaged armature.
It is possible that the relay is working properly, and the reason lies in the bendix . Then you will have to remove the overrunning clutch . To do this, remove the starter and pull out the retaining ring. Perhaps a centrifugal weight and needs to be put back in place.
Repair of a collapsible solenoid relay
The manufacturer equips starters with a non-separable or collapsible retractor device. If a non-separable relay breaks down, it must be replaced, but a dismountable relay can be repaired. The described method allows you to check the solenoid relay of all VAZ models: 2101, 2102, 2103, 2104, 2105, 2106, 2107, 2108, 2109, 21099, 2110, 2111, 2112, 2113, 2114, Niva, Lada Priora, Kalina, Granta, Vesta and most foreign cars. Disassembly and repair of the relay is carried out in the following order:
- Unscrew the nuts securing the housing cover.
- If necessary, the ends of the windings are additionally soldered.
- After removing the cover, inspect the power contacts:
- If they burn, the damaged part is cleaned with sandpaper;
- When worn out, replace.
- The device is assembled in the reverse order and tested for functionality.
- The repaired relay is installed back on the starter.
REPLACEMENT
We figured out where the starter relay is located on the VAZ 2114, now all that remains is to find out how it can be changed. There are two options for replacing this part:
- With the removal and installation of the starting unit itself;
- Without removing the starter.
In any case, you should have the necessary tools:
- Combination key 13;
- A screwdriver (it would be better to have several of them - Phillips and slotted ones);
- Key for 10.
A set of keys is always necessary to have in stock
. Let's look at how to replace the solenoid relay on a VAZ 2114 with removing and installing the starter (by the way, this is much easier to replace):
- Remove the battery terminals;
- Unscrew the two bolts securing the air filter housing (10mm wrench);
- Disconnect the connector of the air flow sensor (MAF);
- Unscrew the air pipe clamp and dismantle the housing;
- We pull off the wire chip of the solenoid relay (held on a plastic clip);
- Using a 13mm wrench, unscrew the nut securing the positive terminal;
- We unscrew the fastenings of the starter itself (it is secured with three 13 nuts);
- We take out the mechanism;
- With the starting device removed, use a 13mm wrench to unscrew the wire on the VR cover going to the stator winding;
- Using a screwdriver, remove the three screws securing the VR and dismantle this device.
Now you need to install the new part and put everything back together in reverse order. That's it, the replacement of the retractor on the VAZ 2114 is completed. Of course, you can try to get to the relay mounting screws right in place without removing the starter, but it’s up to you to decide how easier it is to remove this device.