I decided to update the BZ, although the entry does not directly concern the 2115, BUT they drove around on my former machine to get all the components)) (so it “helped”). A record about what our people sometimes get to when their head gives no rest to their hands!)) And now the point:
A neighbor has an Oka, which I had the misfortune of driving away in a friendly manner to servicemen I knew to replace the clutch. After this operation, ironically, the clutch cable died for a long time, dragging along with it the new disc + basket + original flywheel. EVERYTHING new was purchased and after that (after installation and short operation) Oka “became capricious” - it gobbled up the new crown. Everything was filmed again, on a rather middle-aged car - 2001. - and replaced - the reason, as always, is small and nasty - the starter bushing (who doesn’t know/forgot - on the Oka with this bushing it’s the same idiocy as on chisels - the bushing is pressed into the clutch housing). They replaced it, installed it - without paying attention to the wear of the seat - a week later it was 25 again - a crunch, a roar and the crown said “let's go for now!”... And since the neighbor was an elderly man and it was not convenient in front of him - it was decided to take on an equally great one (from this is no less a “strange” idea): install a starter from 2110, immediately geared! Well, it seems like there’s nothing further to write about, but we decided to save money))))) The idea is simple - like everything ingenious (my modesty is asleep, because the post is being written at 00:35 this day) - from my grandfather on the Oka an “almost new” KZATE starter was installed, catalog number - 7102.3708-01. So, I persuade him that it’s enough to stop tormenting the bushing - and it turned out that that’s right - because. the seat was divided into an “oval”. The proposal, as some have already guessed, is the following - we take the “head/beak/dome/bell/head” of the KZATE 2110 starter, No. 5702.3708, compare it and try, after finishing it, to screw it on. As a result, in the analysis, for 400 rubles (I know, it’s expensive - nothing, we were showing off) we take the “beak” from this gear starter + (not unimportant) in addition - a gearbox (axle, 3 planetary gears and an old Bendix). As it turned out, this was also not done in vain - why? - further in the text! We look from behind - our option is that the KZATE plant has unification in this part! Looking ahead, I will say that it fits perfectly, except for one thing - the dimensions of the gearbox axles are slightly different - in the 2110th the diameter for the beak bushing is 12 mm, and in Okushny it is 10 mm... That is. The gearbox axis was not superfluous in this situation. It was possible, of course, to have a turner grind a bushing into the “beak” of the 10th starter for the percussion axle - but you need to look for the brauuuuuuun, well, you get it))) In general, we assembled a kind of Frankenstein, we were glad how well done, we checked - everything is spinning, even very well ! It's all about fine-tuning! Everyone remembers that the head of the 10th starter cannot simply be ground to fit the mounting diameter of the eyebox and installed - different heights of the heads will lead to the fact that the bendix will later come off the crown after start-up and wear out. Plus, it’s not a fact that it will come out as expected and, at the same time, supply power to the starter motor. We do what many do here, on D2 - we sharpen 2 washers of 5 mm each for the future “ears” of the starter so as not to break them off. Dimensions of rings - washers - 10*20*5. Why 5 mm - strictly because the height on the 10th starter is 5 mm (don’t ask again - “whaaat?!” - that’s how it should be, 5 mm, everything is okay). And then I got itchy - the starter NEEDS to be centered, a centering RING SHOULD be done, give me a turner and all that))) A turner was found with an acceptable cost of work, material and we began: The starter head, up to the centering stop, is machined to a diameter of 64 mm.
Typical starter malfunctions and ways to eliminate them
Why does the mechanism turn, but cannot start?
Let's consider the main malfunctions in the operation of the device, as well as ways to eliminate them:
- There were problems with the contacts, as well as connections, and the electrical control circuit of the device. It is necessary to diagnose and clean the circuits, and if necessary, clean the contacts.
- Failure of the traction relay. Engine starter for Lada 1111 Oka is on sale. Buy original auto parts, analogues from stores, car dismantling yards, and individuals. In this case, the part must be replaced.
- If the unit turns very slowly, then perhaps the reason lies in the weak tightening of the nuts that secure the wire tips to the relay terminals. This problem can be solved by tightening the nuts.
- It happens that when you try to start the power unit, the traction relay is activated, but then immediately turns off, which is accompanied by a knocking sound. If the ignition switch is working properly, then you need to check the traction relay and, if necessary, replace it. Also, the reason may be the increased resistance of the electrical power circuit of the mechanism; cleaning and fixing the wiring more reliably will solve the problem. If there are damaged sections in the chain, they must be replaced.
- Another reason may be damage to the gear teeth, both in the drive and in the flywheel. If the damage is significant, the parts must be replaced.
If a device fails, it must be repaired, which consists of replacing failed structural components or completely replacing the unit.
Main malfunctions and why the starter does not turn?
Malfunctions of the Oka starter, as well as the power electric motors of cars, are divided into two categories - mechanical and electrical. The first includes:
- Wear of armature support bushings;
- Damage to gear teeth;
- Jamming of the retractor relay armature;
- Development of splines for the armature shaft;
The most common mechanical failure is wear of the support bushings, which subsequently becomes the cause of other breakdowns. Due to significant wear of the bushings, the position of the armature and, accordingly, the bendix are disrupted. As a result, it is more difficult for the gear to engage, the wear rate of the teeth increases, and they may crumble.
Electrical faults include:
- Breakage of stator windings, armature, solenoid relay;
- Heavy wear of collector plates;
- Critical wear of brushes;
- Closing the windings;
- Burning of “nickels” of power contacts;
To this category of breakdowns you can also add problems with the power circuits of the electric motor and relay.
Malfunctions of the Oka starter manifest themselves in different ways:
- The starter does not turn on, there are no additional sounds;
- You can hear the activation of the solenoid relay, but the electric motor does not turn;
- The starter rotates, but picks up speed;
- Extraneous sounds are heard when turned on (crunching, grinding);
If such signs occur, the unit should be repaired.
Video “We repair the mechanism with our own hands”
Detailed repair instructions are given in the video below (by Sergey Neverov).
In every car, the starter device is one of the main components of the ignition system. Thanks to this mechanism, voltage is supplied, which is subsequently used to ignite the air-fuel mixture. And Oka cars are no exception. Read more about what elements the Oka starter consists of, what its operating principle is, and what malfunctions are typical for it.
How to replace VAZ-2109 starter bushings
Before you change the bushings on the starter, you will have to dismantle it, but first remove the terminal from the battery. Then you need to disconnect two wires from the solenoid relay. If to disconnect the thin one (which powers the relay winding) you just need to pull it, then removing the thick conductor requires using a “13” wrench to unscrew the fixing nut. Next, using the same wrench set to “13”, unscrew the three nuts that secure the starter to the clutch block.
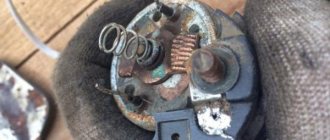
Disconnect the wires at the back of the relay
After removal, the device must be disassembled, which will allow us to determine whether the cause of the malfunction really lies in worn bushings. To do this, first disconnect the solenoid relay by unscrewing the two bolts using a screwdriver. Now you need to remove the rotor from the bendix plates. Using the key set to “10”, remove the rear cover of the starter, after which access to the rotor axis will open. The retaining ring on it must be removed using a flat-head screwdriver. At the last stage of disassembly, all that remains is to unscrew the nuts on the two studs so that all three parts that make up the starter housing are disconnected. This completes the disassembly process. You will learn further about how to replace the starter bushings without resorting to the help of a specialist.
Replacing the rear starter bushing
If, as a result of an external inspection, it was revealed that one or both bushings are worn out, they must be removed from their seats and functional analogues installed. Even in cases where only one part turns out to be unsuitable for further use, both the front and rear parts are usually replaced. First, let's look at how to correctly replace the bushing located in the rear cover of the VAZ-2109 starter.
The dismantling technology is not much different from how the rear starter bushing is replaced on all classic VAZ models. In other words, you just need to remove the back cover and knock out the old part and its remains. After this, the new bushing is pressed in, and the work is completed. True, very often the installed sample fits into the mounting socket too tightly. In this case, its outer diameter should be slightly reduced - you cannot push it in with great force, since the lid may burst. Therefore, simply sand the part with sandpaper. It is not recommended to use lubricants during installation, otherwise the bushing may rotate and break the seat.
Replacing the front starter bushing
The front starter bushing bears a larger portion of the load when starting the engine, and therefore wears out much faster. If the starter on your car has failed for the same reason and you are interested in how to replace the VAZ-2109 starter bushing located in its front part, just take into account the information below.
First, I would like to draw your attention to the fact that, unlike the classic VAZ, the front bushing of the Nine is not located in the starter housing - it is pressed into a special seat in the clutch housing. Therefore, to remove it, you do not need to disassemble the starter, but you will still have to dismantle the device to gain access to the mounting socket. You won't be able to remove the part with your bare hands - for this you will need a tap with a diameter of 14 mm with a welded handle. It is also advisable to put a heavy metal clip on the tool, which will facilitate the extraction process.
Characteristics of the starter on Oka
First, let's look at the main functional features of starter devices. Let's start with the design and principle of operation.
Location and purpose
The starter unit is a device used to convert electrical energy into mechanical energy, which is necessary to start the engine. In Oka cars, this mechanism is located under the cooling system thermostat. It is secured with a screw and nut on the clutch housing.
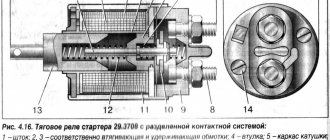
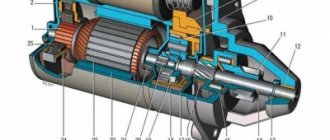
Design and principle of operation of the unit
The mechanism body contains the poles of the excitation winding, which are fixed with special screws. Three of these windings are series connected and one is a shunt winding. The entire structure is secured by two housing covers, secured with screws. On the back cover there is a special brush mechanism with four brushes.
How to install a 2110 starter on Oka
regarding departure, visit the website of our favorite magneton. there is a drawing of dimensions for each starter with dimensions, including the distance of the bendix gear in the retracted and extended distance
besides, if you have a gearbox housing with an already broken hole for the bushing - it doesn’t matter even if it falls apart - it’s not a shame to buy a new housing
Registered: 12/05/2007 Messages: 2698 From: Mytishchi
Well, I can’t consider this decision normal. I did it wrong, and the experience so far is not bitter (although if the magnetron dies, I will be puzzled if they are not making them now)
I’m somehow in favor of production culture or something. Such pictures (such as milling with a drill and breaking the crankcase) make me sick.
PS you can call me a snob!
Registered: 11/06/2010 Messages: 98 From: Kuzbass, fuselage1111+engine1113
15-20kg with force, it won’t budge. cast aside doubts, took it, and did it our way!
Registered: 11/20/2008 Messages: 273 From: Kurgan region
You can throw rotten eggs at me if I'm wrong!
The answer to your request on how to install a starter from a VAZ 2110 on the eye - go ahead, we are waiting for you. Videos and reviews on do-it-yourself car maintenance and repair. How to repair a car yourself at home. We will help you with repairs and repair the car yourself. We know how to restore a car with minimal investment. I have attached video instructions.
Category: Do-it-yourself repairs
Typical starter malfunctions and ways to eliminate them
Why does the mechanism turn, but cannot start?
Let's consider the main malfunctions in the operation of the device, as well as ways to eliminate them:
- There were problems with the contacts, as well as connections, and the electrical control circuit of the device. It is necessary to diagnose and clean the circuits, and if necessary, clean the contacts.
- Failure of the traction relay. In this case, the part must be replaced.
- If the unit turns very slowly, then perhaps the reason lies in the weak tightening of the nuts that secure the wire tips to the relay terminals. This problem can be solved by tightening the nuts.
- It happens that when you try to start the power unit, the traction relay is activated, but then immediately turns off, which is accompanied by a knocking sound. If the ignition switch is working properly, then you need to check the traction relay and, if necessary, replace it. Also, the reason may be the increased resistance of the electrical power circuit of the mechanism; cleaning and fixing the wiring more reliably will solve the problem. If there are damaged sections in the chain, they must be replaced.
- Another reason may be damage to the gear teeth, both in the drive and in the flywheel. If the damage is significant, the parts must be replaced.
If a device fails, it must be repaired, which consists of replacing failed structural components or completely replacing the unit.
Diagnostics
The first stage of repair is to determine where the breakdown occurred - in the power circuit or the unit itself. This is done simply:
- We immobilize the car with the handbrake, set the gearbox to “neutral”;
- Open the hood. From the thermostat side we find the starter;
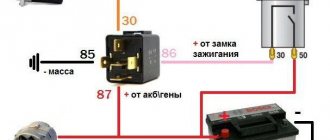
- On the solenoid relay we find power contacts (two studs with nuts to which the wiring fits);
- We take a screwdriver with an insulated handle and close the contacts with each other;
If after a short circuit the electric motor starts to turn, the fault should be sought in the solenoid relay and its power supply circuit. If, after the described procedure, the electric motor does not start or will work, but without developing speed, or when triggered, extraneous sounds will occur, the unit will have to be removed from the car.
Replacing the starter bushing on an Oka car
Despite the fact that the design of the starter on the Oka is implemented on a principle similar to the VAZ-2109 (the front bushing is also located in the clutch housing), the execution of the engine starting mechanism turned out to be extremely unsuccessful, as were most other components of this car. The main reason for this is the desire of designers to reduce the cost of the production process as much as possible. It is for this reason that bushings are manufactured using technology taken from powder metallurgy, and a combination of graphite chips and bronze is used as the starting material. Because of this, these parts have a very small margin of safety, which negatively affects their service life.
For those car enthusiasts who are interested in how to replace the starter bushing on the Oka, you need to know about one more drawback of the engine of this car. We are talking about a seat in the clutch housing itself, which breaks down unevenly during long-term operation. Therefore, if you buy a standard size product (external diameter 13.03 mm) to replace it, then most likely it will fit into place too loosely and even begin to dangle. This should not be allowed, as the part will very soon become unusable. Knowing this feature, experts recommend using a repair size bushing (external diameter 14 mm), but it often turns out that its diameter does not correspond to the size and even shape of the seat.
In the case where the development of the socket is relatively the same around the entire circumference, the problem is solved by simply adjusting the outer diameter of the sleeve using sandpaper. If, during replacement, you find that the seat is unevenly divided (for example, in the form of an ellipse), in this case it will have to be leveled. At the same time, experts do not recommend trying to unscrew the front bushing socket yourself using hand tools, since in this case it will not be possible to maintain alignment with the starter shaft, which is fraught with problems in its operation. If you find yourself in such a situation, it is better to contact specialists who, using special equipment, will turn the hole in the right direction. By the way, many car service centers manufacture repair-size starter bushings from bronze.
You can make a part of the required diameter at specialized service stations
After reading this manual, you were able to see for yourself that replacing starter bushings on a “nine”, as on any other car, is not the easiest task. Difficulties can begin already at the stage of removing the starter due to the inconvenience of work and end with pressing in the bushings. Therefore, when performing this type of repair, be patient, take your time, and follow the instructions strictly.