+4
It often happens that the cooling system leaks, and as a rule, this happens, as luck would have it, far from home and the nearest car service center. Today I will talk about ways that will help temporarily eliminate cooling system leaks so that you can get to a service center or even home.
In any case, the methods I have given are only a TEMPORARY solution . A leaky cooling system indicates wear/crack of some part. A part that has leaked most often requires replacement. Therefore, you should not consider the TEMPORARY solutions to the problem that I have given as a complete cure for the problem, although some of the methods can eliminate the leak for a long period of time. It all depends on the specific case.
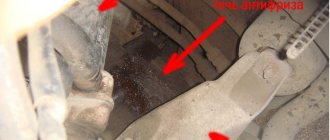
The first thing you need to do is understand where exactly the cooling system is leaking. Most often, an antifreeze leak appears due to a leaky pipe or radiator, but it is also worth inspecting the pump, thermostat, and coolant tank.
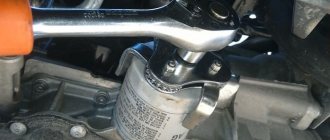
In any case, the first thing you need to do is remove the safety valve from the expansion tank plug . The excess pressure will disappear and the leak will decrease or stop altogether. The cost of a cork usually does not exceed 500 rubles, so in this case it will be the first victim.
Expansion tank plug
Directions
The pipe on the radiator broke off. What can be done?
IngredientsDirections
[adace-ad id=”5714"]
Spring is the same time of year as the rest, only with tire changes, slippery roads and icy windows in the morning, and also “Put your car away, tomorrow they will clean the yard.” In general, it’s an adventure for a motorist. But no matter what time of year it is, it is always worth monitoring the engine cooling system, because driving with leaking antifreeze is not comme il faut
One of the most unpleasant moments in car operation is a broken radiator pipe. The phenomenon is rare, but extremely hemorrhoidal. Theoretically, you need to buy a new radiator, because... This item is not repairable. But first of all, it takes a long time. Secondly, it’s expensive. Thirdly, we ourselves have a mustache.
Naturally, all of the following is a temporary option to wait for spare parts - the radiator will most likely have to be replaced in the end. However, no one forces you to update your order status in Exist for days. If you have a Lexus, then go to the car service https://6499977.ru/ - they will not only select an original spare part by its number, but also replace the radiator with a significant discount using the club card. By the way, you can also calculate the cost of body repairs using a special calculator.
Restoration or production of rubber pipes.
On many rare or old motorcycles, and cars too, rubber pipes begin to harden and crack over time. And if for vehicles that are freshly produced, you can easily purchase a new rubber part in a store, then for vehicles of ancient years of manufacture, or simply rare (antique) models, rubber parts are not so easy to find in a store, especially in the outback. You can, of course, make a new pipe from a piece of hose of a suitable diameter, but many pipes do not have a simple cross-sectional shape (for example, in the shape of a step or a bend), so a regular straight hose will not work here. I propose a fairly simple method for restoring rubber parts at home, and not only restoring old ones, but also making new parts.
To work, you will need a medical bandage, or better yet, thin fiberglass, and high-quality silicone sealant that is resistant to gasoline and oil. I highly recommend using high-quality Victor Rains sealant, which, when hardened, turns into gasoline-oil-resistant rubber.
Repairing a rubber pipe is quite simple: we clean the damaged pipe with fine sandpaper, also cleaning out holes or cracks, then degrease it with anti-silicone (it does not dissolve rubber) and coat the prepared pipe with a thin layer of sealant, and also fill holes and cracks (where there are holes, We seal them from the inside with tape, it will not allow the sealant to protrude into the inside of the pipe, and when the sealant dries, we remove the tape). We work in medical latex gloves. Next, until the sealant has dried, we wrap the pipe with a pre-cut narrow (about 2 cm wide) thin fiberglass tape, turn to turn.
We fix the fiberglass at the end of the pipe, for example, using a clothespin. The fiberglass is impregnated with sealant, but you still need to apply one or two more layers of sealant on top. All you have to do is wait for the sealant to dry and then trim off the excess piece of fiberglass (where it was pinched with a clothespin). As a result, you will get a durable pipe reinforced with fiberglass, which, despite the fact that it will become a little thicker, will look like new. If desired, the top layer of the dried sealant can be sanded with sandpaper (or you can also tint it with rubber paint, it is sold for tinting tires).
Making a new rubber pipe: 1 - flange for attaching to the cylinder, 2 - fiberglass with sealant, 3 - oilcloth.
If your pipe is very old and torn and literally crumbles in your hands, then you can make a new one. To do this, you need to remove the metal flange from the engine cylinder (it is blue in the picture) and tighten it using two washers and a long thin bolt to the carburetor pipe. Let's look at the picture and everything will become clear, only the carburetor is not shown in the picture, but instead a blue tube is drawn. For this purpose, the carburetor will need to be disassembled, removing the valve with the needle during repairs so that they do not interfere with inserting the bolt.
Also, do not forget, before coating the carburetor pipes and flange with sealant, wrap the carburetor pipe with thin oilcloth (can be cut from a plastic bag), the oilcloth layer is shown in red in the figure, and it will not allow the carburetor to stick to the new pipe, which means the carburetor can always be used remove without problems.
When you have tightened the whole thing using a bolt, nuts and washers, you can coat the parts with sealant and wrap them with fiberglass according to the method described above. Only when making a new pipe, wind not one, but two layers of fiberglass (between each layer of fabric there is a layer of sealant), and at the end, apply a thicker layer of sealant. After the sealant has dried, you can pull out the carburetor, then sand the new pipe with sandpaper and, if desired, tint it. All that remains is to put the clamps on the new pipe, insert the carburetor and tighten the clamps. And the new pipe made of durable fiberglass reinforced material is ready.
Well, if your pipe has a stepped or curved shape (with a bend), or it had one, but fell apart, then you will have to glue together a mock-up of it from paper or cardboard (you can use adhesive tape when working), and then try this mock-up on a motorcycle, and if its shape will suit the location, then all that remains is to coat the model with sealant and reinforce it with fiberglass as described above in the text. I hope you succeed. Good luck!
If this article is useful to you, please share it on social media. networks by clicking the buttons below. Thank you.
RќСЂР°РІРёС‚СЃСЏ
What does it look like?
It is important that you have at least a piece of the pipe left, and not broken off at the root. At least like this:
View from above:
There are two options here: either make an external “patch” using a hose of a smaller diameter, which will have to be pulled over a stub of a plastic radiator pipe, or an internal one - using a tube, the end of which will go inside the radiator. We decided to combine both methods
[a[adace-ad id=»5226"]r> First, we find a piece of rubber pipe that we can insert into the existing one - this will give an additional seal at the junction with the radiator, since the existing pipe is most likely already very splayed out and will not fit very well against the remains of the plastic pipe on the radiator. It looks like this:
Next we are looking for a tube that needs to be inserted inside this structure - this is necessary so that a clamp can be placed at the junction of the two pipes. Without a tube, you will not be able to tighten this place properly - the hoses will simply bend. However, if this piece sits very tightly inside the main pipe, you can do without a tube with a clamp. But it's better to find a phone:
Now you need to find a tube that will go inside the radiator. The one that is now higher into the hole in the pipe will not fit, so we are looking for another one with a smaller diameter. Why is this necessary? The tube inside the radiator will provide additional fastening and better sealing of the connection. In order not to block the free flow of antifreeze inside, you can make cutouts:
Insert this entire structure into the radiator: the tube will go inside, the new, denser rubber pipe will fit over the remains of your plastic pipe in the radiator. Be sure to coat everything with sealant, otherwise there will be little use. If possible, you should put a clamp on the stub. Result:
If the piece is too short, you need to pull it with wire to the radiator (it can get caught on the TV).
At the moment, the mileage with this “temporary” solution is already more than 1000 km - no leaks have been detected.
CONSEQUENCES
This seemingly simple situation, like a burst radiator hose, poses a serious threat to the engine. When coolant leaks, the engine temperature instantly rises, which is associated with loss of cooling of the cylinders, where the temperature reaches more than 2000 degrees Celsius.
The consequences of overheating can result in a major overhaul of the engine with the replacement of today's expensive parts. Therefore, the condition of the rubber of the cooling system must be given increased attention.
CAUSES
Car operating experience shows that 50% of drivers are indifferent to dripping or fogging of the cooling hoses, constantly adding fluid from the expansion tank. Danger can arise for several reasons. This could be fatigue wear, which is natural during many years of use, an untightened or faulty clamp, or a pinched clamp, which is actually even more dangerous.
A pinched clamp cuts the first layer of the hose, thereby compromising its integrity; when a sudden rupture occurs, only the rubber itself knows. A burst radiator pipe will make itself known by an increase in temperature on the instrument panel or by abundant steam escaping from under the hood of the car. In such a situation, it is definitely necessary to turn off the engine and do not start it until the malfunction is eliminated.
ADVICE FROM EXPERIENCED DRIVERS
In 90% of cases it bursts under the clamp; if you cut off the damaged area, it can still be put in place with a certain interference. As a last resort, you can remove the radiator mounts, thereby increasing the length of the pipe, and secure the radiator itself using any available means. For example, a useful tip is to not fully screw the bolt that fastened the radiator into place, and place a wire tie between it and the “ear” of the radiator, which will make it immobile.
If the radiator pipe has already been cut before, it will be clearly short when cut again. In this case, you can wrap a layer of rubber under the hose, put the damaged pipe back in place, and cover the rubber layer on top with a tin strip, say, from a beer or juice can.
Place a clamp on top, and even if after this there is partial digging, you will nevertheless be able to get to the house or the nearest workshop. If the pipe did not burst, but was torn out of place, then either the clamp was faulty or not tightened, or it was due to gases entering the cooling system. This is the most severe case and you will have to use the services of a tow truck, since most likely the head gasket has broken (provided that the expansion tank cap valve is in working order).
For new cars, the problem of a burst hose is not so pressing, since new hoses serve without problems for at least three years, and there is a reason to replace all pipes at once on cars with sufficient mileage. It is not always possible to find an original radiator pipe for replacement, but the range produced by the domestic auto industry is so large that you can choose a close analogue.
Replacing the fill pipe
The pipe connecting the tank to the powder receptacle often becomes unusable. More often than not, it’s not a matter of cracks, but a blockage - part of the detergent settles on the surface of the tube in a thick layer. As a result, the washing machine stops the cycle, or the hose breaks due to increased pressure. The easiest way for owners of modern washing machines from LG. Here, removing and inspecting the inlet pipe is much easier: just unscrew the top cover, find the hose and release it from the clamps. On the vast majority of machines, for such a check you will first have to get rid of the front panel. The instructions are as follows:
- disconnect the washing machine from communications;
- remove the top cover;
- remove the powder receptacle;
- Unscrew the bolts located in the recess from the tray and along the perimeter of the dashboard;
- Carefully pry off the “tidy” with a screwdriver, release the latches and, without disconnecting the wiring, place the panel on top of the machine;
- slide the technical hatch door off the latches;
- open the hatch and loosen the outer clamp on the cuff;
- tuck the cuff inside the drum;
- Unscrew the screws holding the UBL;
- loosen the screws securing the end around the perimeter;
- pull the front panel towards you - it will immediately “come off” from the grooves.
Finding the fill hose is easy - it connects the washing tank to the powder receptacle. To remove the tube, you need to loosen the clamps holding it and unhook it from both fittings. Then inspect the hose for damage and blockages. If everything is clean and intact, we return it to its place; if it’s clogged, we clean it with a brush; if it’s torn, we replace it with a new one.
Radiator repair P11-GA16DE
Dear Nissan drivers. I am an admirer of yours (I often read and study your experience of repairing and maintaining my beloved Primer glasses). I myself have some experience, which I modestly shared on the forum pages. But now I am asking for help. A BIG misfortune happened to my car today. A piece of the incoming (upper) radiator pipe burst and broke off. The antifreeze instantly squeezed out all of it, but I didn’t destroy the motor, because it was in the city, I didn’t press the hardware, and in time I saw the thermometer readings, and immediately stopped. It remained in the tube an annular piece of pipe, and also on the radiator, about 10-12 mm long. I pressed the pipe onto the “stub”, tightened the clamp and “neck-and-neck” I got to the garage. Please advise, Dear Friend. What to do now. The stub won’t hold the tube, especially if I get too much gas on the highway, the pressure will rip it off. Various “smart people” say, “Khan, you need a new radiator.” This is a BIG expense. It may be possible to repair. But how. I ask you, do not ignore my misfortune, please advise what can be done? In any case, I am VERY THANKFUL, and I remain your admirer and grateful follower.
Last edited by Gotfater; 04/24/2010 at 00:37.
Well, as an option, find a tube with a diameter of a smaller pipe, put it in there, glue it and seal it, and put a pipe on it (it will stick out, as it were, from the radiator) and secure it. Try this.
VOVANych
, No, I’m afraid the rest of the neck, in this case, will open up like a rose. Well, while I’m driving, as soon as it’s given, I’ll immediately try my own option or buy a used radiator. Thanks for the advice!
———- Message added at 02:34 ———- Previous message added at 02:27 ———-
Here, in this photo, you can see how the pipe is pulled over the neck to the very “don’t play around.” You can see the old mark from the clamp on the pipe. There is nothing under this mark. https://radikal.ru/F/s48.radikal.ru/i. 1bdfd.jpg.html
Brothers, I really needed a “Try-on”, so I grabbed a new radiator. Now I'm tinkering with the old one. Thanks to everyone who wrote and especially to VOVAN and AyBolit, I hope to win. New rad-license-KOYRAD. Has anyone already dealt with this “company”, and what can I say? Here in Odessa-mama this “unit” cost $90. I hope it will serve at least a little more than it costs.
Gotfater
, If you find a solution, be sure to write and preferably with photos!
There was also a similar problem. My upper radiator supply pipe at the very base had come off by half, and the antifreeze was leaking out. At first I thought it was leaking from under the hose. I took off the hose, coated it with sealant, tightened it, and it started leaking again. And only then did he discover the crack. All this was on the road. Long story short, I found a store, explained the problem, and the guy gave me some crap like glue. You mix the two parts one to one and cover it. I waited 15 minutes, filled in antifreeze, and everything was fine. This glue became like glass. I've been driving like this for about a year now. I remember it cost 30 rubles. If anyone is interested, I can look up the name at home, there are tubes somewhere.
Source
Troubleshooting problems associated with a broken intercooler pipe
You can do the troubleshooting work yourself, but repairing the intercooler pipe requires special tools and strict adherence to the instructions. If you install the pipe yourself, you cannot be completely sure of the tightness of the connection at the junction. Specialists will be able to choose the best option for a specific system and car model, which will have a positive effect on its service life.
To independently repair a burst pipe, you need to remove the car bumper, and then the intercooler itself. The entire pipe needs to be degreased and sanded over it. After this, the breakthrough site must be slightly opened by squeezing, and then coated with a sealing compound. After this, a bandage is applied to the pipe. This design should be left to dry for several hours, although for greater assurance it is recommended to leave the pipe for a longer time.
What is an intercooler pipe?
The intercooler pipe is a structural element, mainly made of silicone, that connects the intercooler to the turbine. The upper intercooler pipe is the most vulnerable element of the entire turbocharging system, which consists of an air filter, throttle body, turbocharger and intake manifold.
The efficiency of the intercooler largely depends on the length of the pipe: the shorter it is, the greater the increase in engine power. Its diameter must correspond to the speed of the air flow inside it, therefore, for the effective and durable operation of the intercooler, it is very important to correctly calculate its dimensions.
The inlet neck of the engine radiator pipe is broken
An accident happened. Help with advice. The inlet neck of the internal combustion engine radiator pipe broke while pumping coolant. It is located on the top bank in the left corner in the direction of travel of the car. A tip of 5-7 mm remains. It's only enough for the clamp. The clamp clearly does not have enough of this and it jumps off. Will extending this neck with a plastic tube suitable for the size of the pipe and the neck itself glued to PAXIPOL help and what is the best way to do this. ? Or does anyone have any other thoughts?
———- Message added at 23:45 ———- Previous message added at 00:15 ———-
Does anyone have any thoughts? Has anyone encountered this? (((((((
I had about the same problem: only the right neck of the pipe broke - it just rotted
Now I don’t know what to do - shouldn’t I replace the radiator because of this?! H.Z. Maybe I can find a good radiator mechanic. If you find a solution to this problem, please post, and I will also post if I find out anything!
So far I haven’t done anything except; 1. I sharpened the remains of the neck and pulled the pipe - so far it holds, I don’t know what will happen in the summer. 2. I bought an adapter pipe (40 rubles) and a clamp (about 10 rubles) at the construction market. The diameter seems to fit on all sides.
3. Trimmed. 4. Heated it up and rolled up the edge. The other side was left unchanged. 5. I put Paxipol, a clamp and antifreeze in the car. 6. I'm waiting for it to pick.
The wide side will go to the radiator neck, and the narrow side will fit the pipe. The method has not been tested, so it’s difficult to say how effective it is, and whether it’s effective at all. I'm still waiting for the moment.
How to reliably patch a pipe?
You can seal the pipe, but only temporarily. Even the best patch threatens to leak, especially if the repair is done quickly and poorly. The safest thing to do is to refuse repairs, buy a whole hose and replace the old one. If it is not yet possible to purchase new components, then you can make do with improvised means. There are several ways to repair a hose. Below are the most reliable and popular options.
- Insulating tape. The easiest way is to wrap the damaged area of the hose with a thick layer of adhesive tape. The main thing is to seal 10 cm before and after the hole, sparing no material. True, this option is not reliable; it is better to replace the pipe as soon as possible.
- Threads. The patch will be stronger if the crack is sewn up with thick shoe threads. The seam should go in a herringbone pattern, with large stitches, tightening the hole. Afterwards, all the “creativity” is generously lubricated with sealant. This patch lasts a long time and is practiced even on curved areas of the part.
Covering a torn pipe with electrical tape is not enough - water will quickly start leaking!
- Shunt tube. In a straight section of the pipe, you can seal the hole using a plastic tube that is comparable in diameter to the hose. It is necessary to trim the corrugation, exposing the insides, and insert the nozzle so that it “fits” into the sleeve at least 3 cm on both sides of the hole. Afterwards, the ends of the pipe are tightened with steel clamps over rubber.
If the option of replacing a torn hose is temporarily impossible, then it is recommended to consider a patch made of thread and sealant or tube. In the second case, the patch will be the most reliable - water will pass through an improvised shunt, bypassing the hole. But it’s better not to take risks, but rather install a new pipe.
A radiator pipe burst on the road, there is a “way out”
- CONSEQUENCES
- CAUSES
- ADVICE FROM EXPERIENCED DRIVERS
- CAR OWNER REVIEW
Hello dear readers of the blog RtiIvaz.ru. Today’s article in the “Auto tips and experience” section will be devoted to radiator pipes. Useful advice for motorists is good because it is only advice, it is like a guide in a difficult situation, and the owner himself makes the decision on what to do in this or that case, taking into account the advice and his own experience.
164 Repair of the cooling system, coolant leaking Not such a rare malfunction as leaking radiator pipes, which in most cases, if you do a little analysis, lies on the conscience of the owner himself. The rubber pipe has a multilayer structure and is also designed for fairly high temperatures.
Therefore, nothing can happen at once with a serviceable, let’s say yesterday, pipe. Something must have preceded this, to which the owner or technician servicing the car paid little attention. Advice from experienced drivers is always designed to prevent an emergency situation even in the last case; they give advice on how to get out of it with dignity, while preserving the engine.
Replacing the drain pipe
The drain hose located between the washing tub and the drainage pump often leaks. The explanation is simple: not only soapy water with detergent residues passes through this tube, but also all the debris that gets into the drum. Sometimes a crack appears due to simple wear and tear, and sometimes from a sharp foreign object.
It is not difficult to inspect and replace the drain pipe, especially if the washing machine does not have a tray. In this case, it is enough to carefully place the machine on its side. The main thing is to choose the side where the dispenser is located - otherwise the water remaining in the powder receptacle will end up on the control board. If the washing machine has a tray, you must first remove it. Do not forget that many modern machines support the Aquastop system: in this case, you will have to carefully disconnect the wiring connected to the float. Then everything is simple:
- loosen the clamps;
- remove the hose from the fittings;
- inspect for blockages and defects.
A pipe clogged with scale and debris is cleaned or soaked for 2-3 hours in a warm lemon solution. If there are cracks in the rubber, then it is better not to experiment with patches, but to immediately replace the corrugation.
Interesting:
- Washing machine connection - review
- How to change the hose in a washing machine?
- How to fix a washing machine drain hose?
- Error F04 in a Siemens washing machine
- LG washing machine is leaking from below
- How to Replace Dishwasher Fill and Drain Hose
Reader comments
- Share your opinion - leave a comment
Where to look for a coolant leak?
The first thing you should check is the expansion tank; if no problems are found, we proceed to inspect the radiator, since it is often damaged. It is necessary to carefully inspect the places where the pipes connect to the radiator. Then we check all hoses and pipes of the cooling system for leaks. It is also worth checking the clamps; they could have weakened due to vibration, resulting in fluid leaking at the joints. The most unpleasant and problematic leak is when coolant enters the engine crankcase. When you pull out the dipstick to check the oil level, you can see that it has foamed. This is a sign that antifreeze has entered the engine lubrication system.
This is interesting: Technical characteristics of D4EA 2.0 l / 112 - 140 l. With.