Chevrolet Niva cars have a dry clutch. It is driven by a hydraulic mechanism. If the clutch malfunctions, it needs to be adjusted. Here are a few signs that require immediate diagnosis:
- increased pedal play. If, when pressed, the pedal exceeds its travel according to the standard, this means that the clutch is not completely disengaged. In this case, the disc does not fully contact the flywheel. Untimely repairs can lead to severe wear and tear.
- Pedal travel is too small. Such a defect can lead to slipping of the gasket. At the same time, engine power drops greatly.
- The appearance of jerks when starting off. It is also possible that shocks may occur in the transmission.
The appearance of all these signs indicates the presence of problems with pedal adjustment. If they are ignored, this can lead to clutch replacement and costly repairs.
Bleeding the hydraulic clutch and replacing the fluid of a Niva Chevrolet
If, when the pedal is pressed all the way, the clutch does not disengage completely (“drives”), which is accompanied by a characteristic grinding of gears when engaging reverse gear, there may be air in the clutch hydraulic drive.
Remove it by bleeding the drive. In addition, pumping is performed when the hydraulic drive is filled with fluid after its replacement or after repair of system components associated with its depressurization.
You will need: an “8” wrench, a bleeder hose, a container for brake fluid, brake fluid.
Carry out the work with an assistant in the inspection ditch.
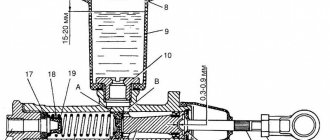
The supply of hydraulic clutch brake fluid is located in the reservoir located on the left side of the front panel.
With the cap installed, the brake fluid level in the reservoir should reach the lower edge of the filler neck.
With the reservoir cap removed, the liquid level should reach the upper edge of the reservoir clamp.
An increase in the fluid level in the clutch hydraulic reservoir indirectly indicates (with a sealed hydraulic drive) significant wear on the clutch driven disc linings.
To add brake fluid to the reservoir, turn it counterclockwise and remove the reservoir cap.
Add DOT-4 fluid into the tank to the required level.
Replace the lid, screwing it tightly.
If brake fluid gets on your car's paintwork, plastic parts, or wiring, it can cause damage.
Remove it immediately with a clean cloth.
Bleeding the clutch hydraulic drive, replacing vehicle fluid
We pump the clutch hydraulic drive to remove air from it after it is depressurized when replacing the master cylinder, slave cylinder, hoses, tubes, as well as in case of replacing the working fluid.
We remove air from the hydraulic drive when the engine is not running.
Before pumping, check the fluid level in the clutch hydraulic reservoir and add fluid if necessary.
We bleed the hydraulic drive with an assistant.
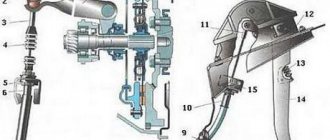
Remove the protective cap 1 from the bleeder fitting 2 of the working cylinder (Fig. 4).
Using an 8-mm spanner, loosen the tightening of the bleeder fitting.
We put a hose on the fitting, and immerse its free end in a container partially filled with working fluid.
Using the “8” wrench, unscrew the bleeder fitting 1/2–3/4 turn.
The assistant sharply presses and smoothly releases the clutch pedal several times until the air bubbles coming out of the hose disappear.
In this case, it is necessary to monitor the fluid level in the tank and top it up. With the clutch pedal pressed, tighten the bleeder fitting.
We remove the hose, wipe the bleeder fitting dry and put a protective cap on it.
If air cannot be removed, check the tightness of connections, pipelines, hoses, master and working cylinders.
We tighten leaking connections, replace faulty master and working cylinders.
We replace the working fluid in the clutch hydraulic drive in accordance with the maintenance regulations - after three years.
When replacing, pump out the old fluid from the tank with a syringe or rubber bulb.
Fill the reservoir with new fluid.
We pump the clutch hydraulic drive until new fluid (lighter than the old one) begins to come out of the slave cylinder bleeder fitting.
After pumping, bring the fluid level in the clutch hydraulic reservoir to normal.
Types of clutch faults
The clutch drive is a whole mechanism, so there are many reasons for the malfunction of this part. We will not consider all the malfunctions, since this information is already available on the global network, but we will pay attention only to the main reasons.
So, the main malfunctions when the clutch drive in a Niva Chevrolet slips, that is, it is incompletely engaged:
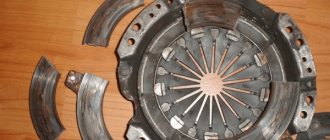
- The friction linings are too worn or have burned out. In such a situation, you can solve the problem by replacing the disk.
- The presence of oil on the surface of the friction linings of the driven disk, which indicates a malfunction of the sealing parts. In this case, you can get by by washing the discs with the obligatory removal of the cause of oil leakage.
There are also malfunctions that lead to the clutch starting to move, that is, it is not completely disengaged. The reasons for this phenomenon are as follows:
- End runout or warping of the driven disk. In such a situation, repairs can correct the problem, provided that the damage is minor. But most often, the presence of such a malfunction indicates the need to replace the disk.
- Friction lining rivets are loose. The driven disk will need to be replaced with a set.
- Air in the system. To do this, it is necessary to bleed the system.
- Distortion and warping of the pressure plate. Malfunctions of this kind can be resolved by replacing this part.
There are still malfunctions that will require replacement of some parts and components. Malfunctions can be identified by characteristic signs:
- You hear characteristic noises when you press the clutch pedal;
- Similarly, noises are heard, only when the clutch pedal is released.
All these malfunctions indicate one thing - you need to disassemble the clutch system and repair the breakdown.
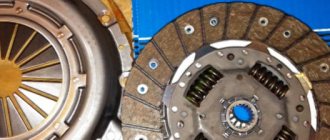
Clutch replacement
Having found out the cause of the malfunction, it is necessary to take appropriate measures to eliminate it. Let's look at how to replace the clutch on a Chevrolet Niva together with the release bearing.
So, repairing or replacing the clutch is a fairly long process, so first you need to be patient and carry out all the steps according to the instructions. Replacement includes the following sequence of actions:
- Install the Niva Chevrolet SUV on the inspection hole for ease of repair work.
- Stock up on the necessary set of tools: screwdrivers, wrenches and a mandrel in order to be able to center the driven disk.
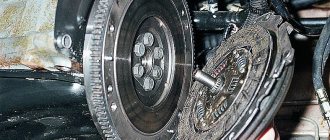
- Replacing the clutch requires removing the transmission to get to the unit itself.
- After removing the gearbox, you need to make marks for the location of the casing and flywheel. But this is only necessary if the old pressure plate will be used after replacement.
- Next, using the “8” key, you will need to unscrew all six mounting bolts. These bolts secure the clutch disc to the flywheel itself. To carry out the unscrewing procedure, it is necessary to keep the flywheel stationary.
- Now you can carry out the process of dismantling both disks: driven and pressure.
- It is important to inspect the driven disk. If there are cracks, chips, signs of wear, etc., then such a disk must be replaced.
It is necessary to measure the distance from the rivets to the surface of the lining; if it is less than 0.2 mm, then this disc cannot be used.
At this stage, the process of replacing the main clutch parts is complete. When replacing clutch discs, it is very important to pay attention to the release bearing. It is better to replace it immediately, so as not to have to disassemble the device again in a month.
Replacing the release bearing
The release bearing is also an important element of this device. With its help, the process of disengaging the clutch is carried out. If noise is heard at the moment of switching off, then this is a signal that the bearing needs replacement. The replacement process consists of the following steps:
- The bearing is disengaged from the release fork.
- The fork must be moved to the side and the bearing removed.
- Now, before installing a new one, you will need to clean the seat and thoroughly lubricate it with Litol-24. The bearing itself also needs to be lubricated before installation.
- Reassemble in the reverse order of removal.
When replacing the bearing, clutch adjustment is not required, since the process is automated. You can read more about its replacement in a separate article.
Clutch master and slave cylinders
The main cylinder is designed to transmit impulse from the pedal to the working parts of the device. If there is a fluid leak, as well as incomplete engagement or disengagement of the clutch, the master cylinder will need to be repaired or replaced. In order to make repairs, you must first remove the master cylinder. After removal, you can carry out an inspection, and then decide what is necessary - repair or replacement of the product.
If the master cylinder body is intact and shows no mechanical signs of wear, repairs can often correct the problem. The repair includes flushing all parts with brake fluid. The repair also includes replacing the cylinder components, which are included in the repair kit.
The clutch drive operates through the operation of the slave cylinder. That is, the force when pressing the pedal is transmitted to the fork and release bearing. The master and slave cylinders are connected to each other by a steel tube with a rubber hose on the lower edge. It is due to this rubber connection that periodic fluid leaks occur. As a result, the clutch drive is not completely disengaged. To replace the working cylinder on a NivaChevrolet SUV, you must first remove it. After the product has been repaired, it is necessary to bleed or adjust the clutch.
Clutch slave cylinder in place
You can bleed the clutch drive by the following measures:
- The hose is attached to the valve of the working cylinder.
- The second end of the hose must be lowered into a container with liquid.
- Now you need to depress the clutch pedal at least five times and hold it.
- The valve then opens and air is released. After this, the valve is tightened and the pedal is released. The drive can be considered adjusted only when, after opening the valve, liquid flows without air bubbles. This completes the adjustment.
Bleeding and adjusting the Chevrolet Niva clutch: step-by-step instructions
Chevrolet Niva clutch malfunctions are divided into two groups.
Some can be eliminated by adjusting the mechanism, while others require replacement of parts or the entire assembly. At the same time, breakdowns of the first category tend to quickly develop into the second.
Parts of an untimely adjusted clutch wear out quickly and require replacement. An unadjusted clutch drive causes inconvenience when driving a car - difficulties appear when changing gears or jerks when the car starts moving.
This harms the engine and gearbox. Therefore, the driver’s task is to correctly diagnose and eliminate the problem in the clutch operation.
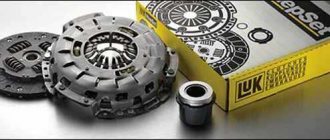
Lada 4×4 3D BadboY › Logbook › Installing a clutch kit from Chevy Niva.
Today I will tell you how I decided to replace the clutch kit with a custom kit from Chevy.
Since the entire transmission is already lying on the floor in the garage and, based on the results of the autopsy, the clutch needs to be replaced, it was necessary to decide which kit to install, standard 21213 or from Chevy. Before this, I read a lot of smart forums and all sorts of reviews, thanks to the topic on the forum www.niva-faq.msk.ru, where everything is described in detail. And I decided to act. The standard, of course, is much cheaper, but this is only at first glance. Since, judging by the same forums and reviews, a regular kit lasts 40-50 thousand km, and a Chevy kit lasts up to 100 thousand km (well, of course, it depends on how everyone drives, but I took average figures), then we see that by installing a more expensive kit from Chevy (with replacement of the flywheel) once, we can replace the standard clutch twice during this mileage, and it is also not a fact that our standard flywheel will not die during this time. In general, from an economic point of view, it seemed to me profitable and justified. Plus they say that the Chevy clutch is smoother, more reliable and softer. The flywheel will be new, the working cylinder too, by the way, it will not require adjustment, the only advantages are short!
I started by looking for spare parts, since there are rare things for sale there. I took the list of necessary parts: 1. Flywheel 21230-1005115-00 "AVTOVAZ" 2. Clutch kit VAZ 2123-1601000-91, manufacturer VALEO 826474, working surface diameter 215 mm. 3. Working clutch cylinder 21230-1602510-00 "AVTOVAZ" 4. Bracket for the working cylinder of the clutch "AVTOVAZ" 2123-1602492 (difficult to find) 5. Spring plate of the working cylinder of the clutch "AVTOVAZ" 2123-1602157 (difficult to find) 6. Crankshaft oil seal rear VAZ 2101-1005160-03 7. Bearing of the input shaft of the manual transmission VAZ 2101-1701031-03 8. Bolts for securing the clutch basket VAZ 2108 (6 pcs.)
The search began precisely with the bracket and spring plate for fastening the clutch slave cylinder, these parts are in short supply, people even look for them through disassembly sites, but I was lucky; I found them quite easily on the car market! And the rest is not a problem! All the parts on the list were found within a day, and all the parts were at the old (pre-crisis) prices. The clutch fits like original, without requiring any alterations or adjustments, the clutch fork remains the same. I didn't even have to change it; it was in good condition.
Important! place the spring plate exactly as shown in the picture, with the boot facing down; otherwise, if installed incorrectly, it will be deformed by the clutch cylinder when the bracket is tightened.
I’ll write about changes in clutch operation later once I’ve assembled the car)
Source
When should it be adjusted?
It is necessary to adjust the pedal free play and pump the hydraulic drive in the following cases:
- Pedal travel is too long. In this case, the clutch does not disengage completely (“drives”). This leads to difficult gear shifting and intense wear of the friction lining on the driven disk.
- Small clutch travel. In this case, the disc slips, especially under heavy load on the transmission (driving uphill, in high gear).
- Jerking, knocking or squeaking noises when changing gears or when the car starts moving.
Important: operating a car with an incorrectly adjusted or “aired” clutch drive leads to accelerated wear of gearbox parts.
The design of the Chevrolet Niva clutch coincides with a similar unit of the “classic” AvtoVAZ. The only difference is in the different dimensions of the working cylinder and, accordingly, in a larger and easier pedal stroke.
Useful video
Look at the information about Chevy Niva clutch malfunctions:
| Cause of malfunction |
| (face runout more than 0.5 mm) |
| on the splines of the input shaft |
| master cylinder |
Clutch Clutch faults Bleeding the clutch Replacing the clutch reservoir Replacing the clutch master cylinder Replacing the clutch slave cylinder Replacing the clutch hose Removing and repairing the clutch Replacing the clutch bearing Gearbox Gearbox faults Changing the gearbox oil Replacing the secondary shaft seal Removing and installing the gearbox Disassembling the gearbox Repairing the input shaft Repairing the secondary shaft Repairing the gear selection mechanism Repairing the gear selection drive About inspection and check of gearbox partsAssembly of gearboxTransfer case Malfunctions of transfer caseChanging oil in transfer caseReplacement transfer case oil sealsSpeed sensor driveReplacing transfer case cushionsOff. differential lock lampsRemoving the transfer caseDisassembling and assembling the transfer caseDriveline driveLubricating the driveline driveRemoving the intermediate shaftRepairing the intermediate shaftRemoving the driveline driveRepairing the driveline driveFront drives and CV jointsRemoving the wheel drivesReplacing CV joints or their bootsFront axleReplacing the gearbox oilReplacing the front gearbox oil sealReplacing the bearing and oil seal int. CV joint Removing the front gearbox Rear axle Finding oil leaks from the rear axle Replacing the rear axle oil Removing the axle shaft Replacing the wheel stud Replacing the axle shaft oil seal Replacing the rear axle gear oil seal Checking the rear gearbox on the move Removing the rear gearbox Removing the rear axle Dismantling the rear axle
The Chevrolet Niva, like the classic AvtoVAZ models, is equipped with a dry clutch with a hydraulic drive. This unit transmits torque from the engine to the gearbox.
Its purpose is to temporarily disconnect the engine from the transmission and smoothly connect them.
This ensures easy gear shifting and a smooth start of the car.
How to adjust it yourself?
To adjust the mechanism you will need keys 10, 13 and 17, pliers and a pencil. The operation is performed on a lift or inspection pit. The work order is as follows:
- Using a 10mm wrench, unscrew the locknut of the pedal travel limiter.
- By rotating the nut, set the free play within 0.4-2 mm.
- Tighten the locknut.
Then you need to go down under the car and adjust the free play of the pusher within 4-5 mm (to unscrew the nuts, you need wrenches 13 and 17). The check is performed as follows:
- Using pliers, remove the clutch fork release spring.
- Place a pencil against the boss of the lower mounting of the working cylinder.
- Make two marks: opposite the fork and 5 millimeters to the right.
- Pull the fork all the way back, selecting the free stroke of the pusher.
- The fork should stop exactly opposite the mark on the pencil.
If the gap does not correspond to the nominal one, you need to loosen the lock nut and rotate the nut to achieve the required parameters.
When adjusted correctly, the clutch begins to disengage when the pedal travel is 25-35 millimeters.
The final check is performed with the engine running. If everything is done correctly, the gears change easily, and the car starts to move if the pedal is released approximately ⅓ - ⅔ of the stroke.
Bleeding the hydraulic clutch, replacing the working fluid Chevrolet Niva
Tools:
- Split spanner 8 mm
- Split spanner 10 mm
- Brake fluid container
Parts and consumables:
- Brake fluid
- Bleeding hose
- Rags
Note:
According to the manufacturer's recommendation, the working fluid in the clutch release hydraulic drive must be replaced after 2 years.
If, when the pedal is pressed all the way, the clutch does not disengage completely (“drives”), which is accompanied by a characteristic grinding of gears when engaging reverse gear, there may be air in the clutch hydraulic drive. Remove it by bleeding the drive.
In addition, pumping is performed when the hydraulic drive is filled with fluid after its replacement or after repair of system components associated with its depressurization.
Carry out the work with an assistant in the inspection ditch.
1. Remove the protective cap from the clutch slave cylinder bleed valve.
Replacing the master cylinder
New clutch master cylinder under the hood.
- Pumping out brake fluid from the reservoir with a rubber bulb
- Unscrewing the tube, removing the hose from the fitting and unscrewing the fastening nut and removing the cylinder.
- Installing a new one follows the steps in reverse order.
Do not miss the moment of fixing the pedal pusher with a fillet (notch) on the cylinder piston, pumping the hydraulic drive.
Video about clutch problems on a Chevrolet Niva
Bleeding the clutch on a Chevrolet Niva
When everything you need for work is at hand, you should perform the following activities:
- Open the reservoir where the liquid is poured and fill it to the neck. It is located in the engine compartment.
Clutch bleeding fluid
Bleed the clutch by pressing and holding the pedal
Controlling the color of the liquid and air bubbles
Checking the clutch condition
Before a test drive, check how the gears engage with the clutch depressed.
To check the technical condition of the clutch, you will need:
- With the engine warm and idling, depress the clutch pedal and engage the gear. During the process, no grinding noise should be heard in the gearbox.
- When accelerating a car, it must gain speed in proportion to the increase in crankshaft speed. If the engine is running at high speeds, but the car does not accelerate dynamically, it means that the clutch is slipping. It will need to be repaired.
Checking clutch performance
Let's start by looking at the concept of cohesion. So, this is a mechanism whose operating principle is based on the force of sliding friction (friction clutch). It is used to transmit torque.
The Chevrolet Niva has a clutch closed with a central diaphragm spring, which is installed using a hydraulic drive. A reinforced clutch is also installed on this car, which has a large diameter and a powerful damper. In addition, this element has a large disk thickness. Over time, on a Chevrolet Niva this mechanism fails, requiring either adjustment or replacement. You can check the functionality in the following ways:
- Engage neutral gear and start the engine. Next, you need to wait a little until the engine warms up and depress the clutch pedal, engaging reverse gear. If the transmission is easily engaged, this means that the system is working properly. It’s another matter if you hear creaks - this indicates the need for repairs.
- An easier way to check is to switch gears in order and check for any extraneous sounds from below. If they are, then you need to immediately go to the service center.
- You can notice a malfunction of the mechanism when it starts to slip while accelerating. This also means that it’s time to show the car to the experts.
There is no need to worry too much about a faulty clutch, because you can bleed the hydraulic drive. If you have at least the slightest knowledge of mechanics and the desire to independently adjust the operation of the mechanism, then you do not need to go to a service station at all. Bleeding the hydraulic drive is done as follows:
- first, the hose is put on the cylinder valve, and the other side is immersed in the brake fluid;
- Next, you need to press the clutch pedal and hold it a little. This manipulation should be repeated exactly 5 times;
- then you need to open the valve and release the pressure. This operation must be performed until the liquid flows out.
How to determine the need to bleed the clutch
This can be determined because when you engage any gear, you will hear a grinding noise in the box.
This situation may indicate that air has appeared in the system. This can happen as a result of replacing both the fluid itself and system parts.
To do this work yourself, you should have a set of tools, replacement fluid, an empty container and a tube. It will be convenient to carry out the work with an assistant. Pumping should be done on an inspection hole or overpass.
Useful tips
You should not constantly keep your foot on the clutch pedal while the car is moving.
In this case, the disc will slip and wear out faster. And also the release bearing will work under load, as a result of which its life will be reduced. For the same reason, you should not keep the clutch pedal depressed for a long time. This can happen, for example, in a traffic jam.