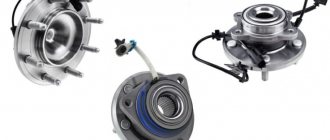
A car uses many technical elements. One of these is the wheel bearing. UAZ is also equipped with it. This is an integral part of any car. After all, it is this bearing that ensures smooth rotation of the drive and driven wheels around the axis. This node is experiencing enormous loads. Therefore, it is possible that the UAZ front wheel bearing may fall apart. What is the service life of this element, what are the signs of failure and how to replace it? All this will be discussed further in our article.
Why is this happening?
Bearing failure occurs in most cases due to lack of lubrication. It can be washed out of the clip. This happens especially often on cars that are used off-road. When crossing the next ford, water gets into not only the bridges and gearbox, but also the UAZ wheel bearing. As a result, the element runs dry. In addition, the UAZ wheel bearing fails in the presence of solid contaminants. Dust and dirt will work in the cage as an abrasive. High load is also a cause of wheel bearing failure. If the machine is frequently used on rough terrain, be prepared for an upcoming bearing replacement. Also, the element does not like large holes. Even on off-road high-profile tires, all unevenness should be handled extremely carefully. The hub bearing does not like rough driving. In addition, shocks are transmitted to other suspension elements. These are shock absorbers and silent blocks of levers (in the case of the Patriot front suspension).
Removing and installing the front wheel hub UAZ Hunter 31516
- Repair manuals
- Repair manual for UAZ 31519 (Hunter) 2003.
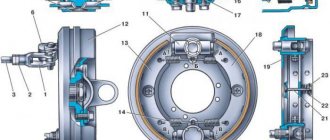
- Removing and installing the front wheel hub
You will need: a “14” wrench, a special “55” tubular wrench, a wrench, a flat-blade screwdriver, a hammer, a chisel, and a mounting blade.
| Helpful Hint: The front wheel hub can be removed with or without the brake disc. In case of replacing the hub, the second method is preferable, since the hub is supplied as spare parts without a disc. |
1. Brake the car with the parking brake and place chocks under the rear wheels of the car. Raise and place the front of the car on supports and remove the wheel.
| 2. Remove the brake disc (see “Replacing the brake disc” ). | 3. Remove the three screws securing the wheel release clutch cap... |
| 4. ...and remove it. | 5. While holding the wheel hub from turning with a mounting blade, remove the six bolts securing the wheel release clutch... |
| 6. ...and remove the coupling. | 7. Use a chisel to bend the tab of the lock washer... |
| 8. ...and unscrew the hub locknut. | 9. Using a screwdriver, remove the lock washer. |
| 10. Unscrew the hub nut. | 11. Remove the lock washer... |
12. ...and the hub assembly with bearings.
| Useful advice If the inner races of the hub bearings are very tightly seated (the hub cannot be removed), use a puller. |
13. Carefully inspect all parts of the hub, assess the condition of the bearings on the axle (see “Replacing the front wheel hub bearings” ) and the wheel mounting bolts, replace the bearings and bolts if necessary.
14. To replace the hub bolt, fix the hub in a vice and press out the bolts. Press in the new bolt by lightly hitting the head with a hammer.
15. Install the parts in the reverse order of removal.
16. Adjust the clearance in the hub bearings (see “Adjusting the clearance in the front wheel hub bearings” ).
| Note When locking the hub bearing nuts, bend the tabs of the lock washer on the edge of both nuts. |
↓ Comments ↓
1. Car structure
1.0 Car structure 1.1 General information about the car 1.2 Passport data 1.3 Car keys 1.4 Instrument panel and controls 1.5 Heating and interior ventilation 1.6 Doors 1.7. Seats 1.8 Rear view mirrors 1.9 Interior lighting
2. Recommendations for use
2.0 Recommendations for use 2.1. Safety rules and recommendations 2.2 Recommendations for traffic safety 2.3. What you need to have in your car 2.4 Operating the car during the warranty period 2.5 Running in the car 2.6. Preparing the car for departure 2.7 Refueling the car 2.8 Using a jack 2.9 Towing the car
3. Problems along the way
3.0 Malfunctions along the way 3.1. The engine does not start 3.2 Malfunctions of the fuel injection system 3.3. Interruptions in engine operation 3.4. The car moves jerkily 3.5 The car accelerates poorly 3.6 The engine stalled while driving 3.7. Oil pressure dropped to 3.8. Engine overheating 3.9. The battery does not recharge 3.11. Extraneous knocking noises appeared 3.12. Problems with brakes 3.13. Wheel puncture
4. Maintenance
4.0 Maintenance 4.1. General provisions 4.2. Daily Maintenance (EO) 4.3. First maintenance (TO-1) 4.4. Second technical maintenance (TO-2) 4.5. Features of the first technical maintenance (TO-1) of cars with a diesel engine 4.6. Features of the second technical service (TO-2) for cars with a diesel engine
5. Engine
5.0 Engine 5.1 Design features 5.2 Possible engine malfunctions, their causes and solutions 5.3 Helpful tips 5.4 Checking compression in the cylinders 5.5 Removing and installing engine mudguards 5.6. Replacing the suspension supports of the power unit 5.7 Replacing the generator and water pump drive belt 5.8 Installing the piston of the first cylinder to the TDC position of the compression stroke 5.9 Replacing chains and gears of the gas distribution mechanism 5.13. Replacing engine seal parts 5.14. Engine cylinder head 5.16. Engine repair 5.17. Engine lubrication system 5.18. Engine cooling system 5.19. Exhaust system 5.20. Power system 5.21. Fuel vapor recovery system 5.22. Diesel engine design features
6. Transmission
6.0 Transmission 6.1. Clutch 6.2. Gearbox 6.3. Transfer case 6.4. Cardan transmission 6.5. Front axle 6.6. Rear axle
7. Chassis
7.0 Chassis 7.1. Front suspension 7.2. Rear suspension
8. Steering
8.0 Steering 8.1 Design features 8.2 Possible steering malfunctions, their causes and solutions 8.3. Steering column 8.4. Steering linkage 8.5. Steering gear
9. Brake system
9.0 Brake system 9.1 Design features 9.2 Possible malfunctions of the brake system, their causes and solutions 9.3 Bleeding the brake system hydraulic drive 9.4 Checking and adjusting the free play of the brake pedal 9.5. Main brake cylinder 9.6 Replacing the vacuum brake booster 9.7. Replacement of hoses and pipelines of the hydraulic brake drive 9.8. Front wheel brakes 9.9. Brake mechanisms of the rear wheels 9.10. Brake force regulator in the hydraulic drive of the rear brakes 9.11. Parking brake
10. Electrical equipment
10.0 Electrical equipment 10.1 Design features 10.2. Battery 10.3. Mounting blocks 10.4. Generator 10.5. Starter 10.6. Ignition switch (lock) 10.7. Electronic petrol engine control system (fuel injection system) 10.8. Ignition system of injection engines 10.9. Electronic diesel engine control system (fuel injection system) 10.10. Lighting, light and sound signaling 10.11. Windshield cleaner 10.12. Windshield washer reservoir 10.13. Tailgate glass cleaner 10.14. Tailgate glass washer reservoir 10.15. Electric motor of the heating and ventilation system fan 10.16. Cigarette lighter 10.17. Instrument cluster 10.18. Speedometer 10.19. Replacing sensors and switches
11. Body
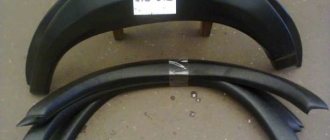
11.0 Body 11.1 Design features 11.2. Removing and installing bumpers 11.3. Removing and installing wheel arch liners and mud flaps 11.4 Removing and installing front fenders 11.5 Removing and installing radiator trim 11.6 Removing and installing radiator trim 11.7 Removing and installing engine compartment mud flaps 11.8 Removing and installing floor hatch covers 11.9 Removing and installing the battery shelf 11.10. Hood 11.11. Side doors 11.12. Tailgate 11.14. Wind window 11.15. Hatch covers for filling pipes of fuel tanks 11.16. Seats 11.17. Mirrors 11.18. Interior fittings 11.19. Instrument panel 11.20. Heater 11.21. Body care
12. Tips for a novice auto mechanic
12.0 Tips for a novice auto mechanic 12.1. Safety precautions during repair work 12.2. Tools 12.3 Before you start 12.4. Restoring threaded connections 12.5 Tips for body repair
13. Purchase of spare parts
13.0 Purchasing spare parts 13.1 Engine oil 13.2 Greases 13.3 Coolants 13.4 Brake fluid 13.5 Fuel filter 13.6 Air filter 13.7 Engine lubrication system oil filter
14. A trip to the service station
14.0 A trip to the service station
15. Winter operation of the car
15.0 Winter operation of a car 15.1 How to prepare a car for winter 15.2 Recommendations for starting the engine in severe frost 15.3 What is useful to buy for winter 15.4 Useful winter tips
16. Preparation for technical inspection
16.0 Preparation for technical inspection 16.1 Recommendations 16.2 List of malfunctions and conditions under which the operation of vehicles is prohibited 16.3 Changes to state standards regulating the maximum permissible content of harmful substances in the exhaust gases of vehicles
17. Applications
17.0 Appendices 17.1 Appendix 1. Tightening torques for threaded connections 17.2 Appendix 2. Temperature range of application of motor oils 17.3 Appendix 3. Fuels and lubricants and operating fluids 17.4 Appendix 4. Lamps used on vehicles 17.5 Appendix 5. Special tools and accessories
18. Electrical diagrams
18.0 Electrical diagrams 18.1 Diagram 1. Connections of the engine control system mod. ZMZ-5143.10 18.2 Diagram 2. Connections of the engine control system mod. ZMZ-409 (Euro-2) 18.3 Diagram 3. Connections of the engine control system mod. ZMZ-409 (Euro-0) 18.4 Scheme 4. Electrical equipment of cars mod. 31519-095, 31519-195 18.5 Scheme 5. Electrical equipment of cars mod. 315195-025, 315195-125 18.6 Scheme 6. Electrical equipment of cars mod. 315195-023, 315195-123
How to determine wear?
Since this element interacts with the hub, breakdowns will be associated with the wheel. Determining whether a bearing is faulty is quite simple. As you move, you will hear a “dry crunch” (this is how spherical mechanisms roll). This means that the inner race is broken and the needles are spinning unevenly. Over time this sound will get stronger.
If you continue to ignore the problem, the car will begin to pull to one side. You will have to constantly grasp the steering wheel to continue moving in a straight line.
Oil seal and its features
On the UAZ Patriot, the front axle axle seals are rubber sealing rings with special springs that are involved in the sealing process. The slightest deformation of these devices leads to oil leakage.
You should also be aware that a leak through the oil seal may be caused by a clogged breather or may be caused by an excess amount of lubricant.
Currently, UAZ Patriot produces seals made of rubber and polyurethane materials. Rubber seals have a low cost (about 100 rubles per piece), but they also have a short service life. Polyurethane products have a high cost and a correspondingly long service life. But finding polyurethane seals is not so easy.
Product replacement
If you find an oil leak in the area of the steering knuckle, then it is important to take measures such as replacing the seals. In this case, it is not necessary to replace the seals on both sides if the leak is observed in only one place. So, let's look at what it means to replace the front axle axle seal on a UAZ Patriot SUV.
Steering knuckle leaking
- First, you need to place the car on a flat surface and jack up the part where the part needs to be replaced.
- After this you need to remove the wheel.
- The steering knuckle is being dismantled. To do this, perform the following steps:
- the brake disc is removed;
- the axle complete with hub, brake shield and hub coupling is dismantled;
- the axle shaft is removed;
- the tie rod end is disconnected from the steering knuckle;
- The five bolt connections are unscrewed and the steering knuckle is removed.
To summarize, it is important to note the need and importance of carrying out work to replace worn seals on the UAZ Patriot. If you do not carry out repair work and do not change worn parts, this may not cause the most favorable consequences, so it is important to periodically drive into the inspection hole and contemplate the structure of your SUV from below. Thus, with the help of periodic visual inspection, it is possible to prevent adverse consequences in 60% of cases, so monitor the technical condition of your car and carry out repair work on time.
The popular Russian SUV model UAZ Bukhanka is equipped with rear and front drive axles. Although they perform the same traction functions, they have some design differences.
The main feature of the driving mechanisms is that the front axle, in addition to the bridge beam with the differential, additionally has universal joints of equal speeds at its corners with a gearbox.
Bearing replacement
So, the hub is in your hands - all that remains is to remove the old element and install the new one. To do this, take a screwdriver in your hands and remove the inner ring of the hub. We also take the last element out. Please note that to dismantle the element you will have to remove the oil seal. It is disposable and cannot be reinstalled. At the next stage, remove the thrust washer of the hub seal and unscrew the inner bearing ring.
To press out the old element, you should use a puller. Gently squeeze the antennae of the inner and outer retaining ring and pull the parts out.
Correct installation is the key to a high resource
What should I do if, after replacement, the element fails again? And not after 30, but 3 thousand kilometers? It's all about incorrect installation. This is one of the common reasons why wheel bearings fail. If you install the element at the wrong angle (diagonally), the load on the clip will increase significantly. In this case, the part will collapse within the first thousand kilometers.