How to remove the steering wheel of a UAZ Patriot
We remove the steering wheel to replace it or to replace the contact ring of the horn or remove the steering shaft.
We prepare the car for the task and disconnect the negative terminal of the battery.
Set the steering wheel to the “straight” position
Pull back the horn button cover, overcoming the force of the latches
The horn switch cover is attached to the steering wheel using four clips located along the edges of the cover.
Remove the cover-key for turning on the sound signal
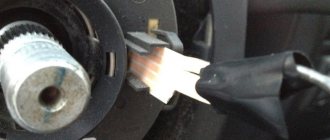
We move the protective covers and disconnect the wire terminals of the horn key from the slip ring connectors
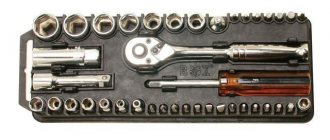
Use a 24mm socket wrench to loosen the steering wheel nut.
It is not necessary to completely unscrew the steering wheel fastening nut, so as not to injure yourself if it is abruptly disconnected from the shaft.
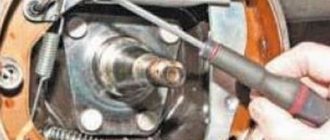
With sharp blows of the hands we knock the steering wheel off the shaft splines
Finally unscrew the steering wheel mounting nut.
We mark the position of the steering wheel relative to the shaft if the steering wheel is not removed for replacement
Removing the steering wheel
We inspect the working surface of the slip ring; if necessary, replace it by squeezing the two clamps securing the slip ring.
Install the steering wheel in reverse order
How to install braid
It is important to choose a braid that is suitable not only in diameter, but also in material. There are leather, sponge, and gel samples. Russian car enthusiasts prefer products with lacing or carbon inserts.
In order to install the braid, experienced owners recommend soaking it for half an hour in hot water. This method requires removing the steering wheel and moving it home or to the garage.
After getting wet, the braid increases by 5 cm in length and slightly in diameter. In its raw state, it is much easier to tighten, but still requires some skills from the car owner.
In addition to effort, it is necessary to ensure the uniform distribution of the pattern. The curvature is corrected immediately. In case of severe distortion, the braid is removed and put on again.
To avoid problems, experts recommend placing the steering wheel on the floor, standing on it with one foot and pulling the product along the diameter with both hands.
Before installing in a car, the wheel is dried for 2-3 days at room temperature.
The process of removing the steering wheel from a UAZ Patriot
Adjust the steering wheel according to straight-line movement.
Next, simply pull the horn button housing and disconnect the housing from the 4 clips holding it.
Remove the horn button from the car...
Disconnect the 2 wires going from the button to the steering wheel
Use a 24mm socket to loosen the nut holding the steering wheel.
Do not unscrew the nut completely, since first you need to tear the steering wheel out of place (from the splines), and then only unscrew the nut completely. The nut will hold the steering wheel when you break it off and will protect you from injury and the interior of the car from damage.
We pull the steering wheel off the splines until it starts to move along them. The nut will keep the steering wheel from being completely removed.
Then unscrew the nut and remove it. To then align the steering wheel (steering wheel) in accordance with the original position, mark its location relative to the splines
Next, the steering wheel can be removed from the car.
The steering wheel on the UAZ Patriot is installed in the reverse order. By tightening the locking nut, you can install the steering wheel in place. When reassembling, pay attention to the condition of the splines, as well as the condition of the slip rings, since if they do not meet the requirements for further operation, the steering wheel will have to be removed again.
Do-it-yourself damper installation: step-by-step instructions
The damper on the UAZ Patriot is installed according to the following plan. If you strictly adhere to it, the operation will definitely be successful.
- Prepare a corner 3-4 mm thick, drill a hole in it for the equipment and weld it, having previously calculated the place where the damper will be attached.
- Weld the same structure to the rod. Before this operation, make sure that the device does not limit the angle of rotation of the steering wheel.
- Make a preliminary fitting of the device for installation, then heat the corners by welding and bend them in the required direction to ensure alignment.
- Install the equipment and tighten with mounting nuts. It must be parallel and with matching axes.
The process of removing the steering wheel from a UAZ Patriot
Adjust the steering wheel according to straight-line movement.
Next, simply pull the horn button housing and disconnect the housing from the 4 clips holding it.
Remove the horn button from the car...
Disconnect the 2 wires going from the button to the steering wheel
Use a 24mm socket to loosen the nut holding the steering wheel.
Do not unscrew the nut completely, since first you need to tear the steering wheel out of place (from the splines), and then only unscrew the nut completely. The nut will hold the steering wheel when you break it off and will protect you from injury and the interior of the car from damage.
We pull the steering wheel off the splines until it starts to move along them. The nut will keep the steering wheel from being completely removed.
Then unscrew the nut and remove it. To then align the steering wheel (steering wheel) in accordance with the original position, mark its location relative to the splines
Next, the steering wheel can be removed from the car.
The steering wheel on the UAZ Patriot is installed in the reverse order. By tightening the locking nut, you can install the steering wheel in place. When reassembling, pay attention to the condition of the splines, as well as the condition of the slip rings, since if they do not meet the requirements for further operation, the steering wheel will have to be removed again.
Selecting steering fluid
The oil in the hydraulic power steering is the main element for the safe and comfortable movement of an SUV. The operating instructions indicate that the power steering fluid in the UAZ Patriot is changed once every two years or after the vehicle has reached the required mileage. Changing the oil depends on the driving style and intensity of use of the SUV.
You can fill your car with automatic transmission oil. All power steering fluids can be divided according to criteria such as color, type and composition. The recommended power steering oil is Mobil ATF 220, 2 liters.
Based on their composition, power steering oils are divided into mineral, semi-synthetic and synthetic. You cannot mix synthetic and mineral-based fluids with each other, since the types of additives in them are different.
To choose the right fluid for the power steering system, you should familiarize yourself with the manufacturer's recommendations. Often information about gur oil is indicated on the expansion tank or cap. That is why, replacing the power steering fluid on a UAZ Patriot is carried out in accordance with the instructions and recommendations of the automaker.
How to remove the steering wheel of a UAZ Patriot
We remove the steering wheel to replace it or to replace the horn contact ring or remove the steering shaft
We prepare the car for the task and disconnect the negative terminal of the battery
Set the steering wheel to the “straight” position
Pull back the horn button cover, overcoming the force of the latches
The horn switch cover is attached to the steering wheel using four clips located along the edges of the cover.
Remove the cover-key for turning on the sound signal
We move the protective covers and disconnect the wire terminals of the horn key from the slip ring connectors
Use a 24mm socket wrench to loosen the steering wheel nut.
It is not necessary to completely unscrew the steering wheel fastening nut, so as not to injure yourself if it is abruptly disconnected from the shaft.
With sharp blows of the hands we knock the steering wheel off the shaft splines
Finally unscrew the steering wheel mounting nut.
We mark the position of the steering wheel relative to the shaft if the steering wheel is not removed for replacement
Removing the steering wheel
Lada Granta horn and airbag not working after changing driveshaft
We insert the blocking plate through the hole in the steering wheel hub into the slot of the drum device in full
And remove the steering wheel by passing the wire and horn blocks through the hole in the steering wheel hub
We install the control wheel in reverse order, aligning the previously made marks and installing the new self-locking nut. The control wheel fastening nut has a torque of 32–51 Nm (3.2–5.5 kgf m).
If you need to install the steering wheel in a new position (for example, if the spokes are placed at an angle when the car is moving in a straight line), put the wheel on the shaft and secure it with a nut without putting it aside completely.
After driving straight a few meters, make sure it is in the correct position.
If necessary, move the steering wheel to the required number of splines and tighten the nut.
Installing the airbag is done in reverse order.
We connect the block of wires to the airbag connector, insert the lock into the block.
We connect the wire lugs to the terminals of the signal switch.
We install the cushion on the steering wheel so that the cushion clamps fit into the recess of the steering wheel, and the hooks of the cushion fit into the appropriate holes in the steering wheel.
Press on the pillow until the pillow hooks snap into place with the control wheel latches.
Let's consider removing the steering wheel with an airbag, since without an airbag, removing the steering wheel is not particularly difficult and is performed in the same way as on models 2108-2110.
To complete the job, you will need a special airbag remover and a new steering wheel nut.
If you don’t have a puller, you can make one from an old slotted screwdriver with a blade width of 5 mm; to do this, you need to make a small groove in the middle of the blade.
How to remove the steering wheel?
How to remove the steering wheel?
Post by Petrol » Sun Feb 19, 2012 10:48
Post by KOMIK » Sun Feb 19, 2012 10:51
Post by Petrol » Sun Feb 19, 2012 10:56
Suslik 2013 petrol Limited, mech. RK, Cooper Tires 245/75 R16 (ST Maxx, M+S stud.), Swan “4x4” 12000 lbs. Sleeping bag from Lapocruiser.
Post by KOMIK » Sun Feb 19, 2012 10:59
Post by Petrol » Sun Feb 19, 2012 11:04
Suslik 2013 petrol Limited, mech. RK, Cooper Tires 245/75 R16 (ST Maxx, M+S stud.), Swan “4x4” 12000 lbs. Sleeping bag from Lapocruiser.
Post by KOMIK » Sun Feb 19, 2012 11:08
Post by Petrol » Sun Feb 19, 2012 11:15
Post by KOMIK » Sun Feb 19, 2012 11:17
Post by Partisan » Sun Feb 19, 2012 12:36
There is no need to “hit” anywhere.
You remove the cover from the middle of the steering wheel, disconnect the contacts, and remove the cover.
Use a wrench to unscrew the nut.
You lower the steering wheel to the lower position and lock it with the lever.
Be sure to mark with a marker a line passing through the axis of the steering shaft and the metal base of the steering wheel housing (then you will put the steering wheel in place so that the line coincides - otherwise the steering wheel will be crooked).
You rest your back on the seat, grab the edges of the steering wheel (around 9 and 15 o’clock) and begin to pull it towards you, simultaneously rocking it from side to side.
After a while the steering wheel will come off.
PS When replacing a connector with contacts with a new one, there is a nuance. When you put the steering wheel back, be sure to check that the protrusion on the rotating part at the bottom of the steering wheel fits exactly into this groove:
Otherwise, the steering wheel body will push the connector lower and the contact will disappear (the signal will not work periodically).
“Don’t listen to what they say. Look what they are doing." (Folk wisdom).
Removing, disassembling and installing the steering wheel
The steering wheel is removed to be replaced if damaged, to replace the horn switch contact ring or the steering shaft.
You will need a 24mm socket socket.
1. Disconnect the wire from the negative terminal of the battery.
2. Set the steering wheel to a position that corresponds to the straight-line movement of the vehicle.
3. Overcoming the force of the clamps...
The horn activation key is attached to the steering wheel with four clamps located along the edges of the key.
4. ...remove the horn button...
5. ...slide the protective covers...
6. ...and disconnect the wire terminals of the horn switch from the slip ring connectors.
7. Loosen the steering wheel nut.
You can prevent the steering wheel from turning using the locking mechanism of the anti-theft device of the ignition switch. To do this, remove the key from the ignition switch and turn the steering wheel until the shaft is secured by the anti-theft device. After loosening the steering wheel nut, disable the anti-theft device by inserting the key into the ignition switch and return the steering wheel to the straight-ahead position.
Do not unscrew the nut completely, otherwise you may injure yourself when removing the steering wheel by hand if it abruptly detaches from the shaft.
Repair of steering components
Removing the steering gear
1. Disconnect the hoses from the steering mechanism (1) by unscrewing the fittings (2) and secure them so as to prevent complete leakage of oil from the hydraulic system or drain the oil into a clean container.
Removing the steering gear:
- steering gear;
- fittings;
- propeller shaft mounting bolt;
- universal joint fork;
- steering wat;
- steering gear mounting bolts;
- bipod;
- Tie Rod;
- screw
2. Unscrew the bolt (3) securing the propeller shaft, remove the fork (4) from the input shaft of the mechanism.
3. Undo the cotter pin and unscrew the nut (9) securing the bipod rod hinge pin to the bipod, and use a tool to press the pin out of the bipod hole (7).
4. Unscrew the bolts (6) securing the steering mechanism to the side member and remove the steering mechanism.
Adjusting the steering gear engagement
Adjusting the steering gear engagement is possible without removing the mechanism from the vehicle:
1. Undo the cotter pin and unscrew the nut (9) securing the bipod rod hinge pin to the bipod, and use a tool to press the pin out of the bipod hole (7).
2. Set the steering gear to the middle position.
3. By rocking the bipod, check for play in the engagement.
4. If play is detected, unscrew the nut (2) and, screwing in the screw (1), eliminate the gaps in the engagement that cause the play.
- adjusting screw;
- screw;
- steering;
- bipod shaft boot;
- steering bipod;
- spring washer;
- screw
5. Check the rotation torque of the steering input shaft. The rotation moment should be 0.2 -0.9 N m (0.02 - 0.09 kgf m). The torque takes on a greater value in the middle position of the mechanism, a smaller value closer to the extreme positions.
6. Tighten the nut (2).
7. Install the rod.
8. Tighten and cotter the nut securing the pin to the bipod.
Removing the steering driveshaft
1. Remove the bolt securing the propeller shaft to the input shaft of the steering mechanism and the bolt securing it to the intermediate shaft.
2. Remove the driveshaft.
Removing the steering wheel
Removing the steering wheel:
- horn switch;
- steering wheel nut
1. Remove the signal switch (1). To do this, gently pull it towards you.
How to remove the steering wheel of a UAZ Patriot
How to eliminate a knock in the steering column on a UAZ Patriot
Owners of the Ulyanovsk serial SUV called UAZ Patriot will need some modifications almost immediately after purchasing it. Even a new car from a car dealership can feel extraneous noise or knocking in the steering mechanism area. Of course, if the car is still under warranty, you should contact your dealer to have the problem resolved. But in all cases, the owner of a new SUV has the opportunity to visit such a center, so often all the faults have to be corrected on their own. In this article we will analyze the influence of the steering wheel on the UAZ Patriot SUV, which occurs mainly during a turn, as well as the process of eliminating it.
Common source of knocking
Need for adjustment
Adjustment of the UAZ Patriot steering gear is carried out in order to correct the functioning of the steering mechanism. The setup process does not involve any particular difficulties and can be done on your own at home.
In order to adjust the steering column, the design of the mechanism provides a special bolt with a locking nut. The adjustment process is carried out due to the fact that the bolt is screwed in to maximum tension, and then it is fixed in this position. After the adjustment process, you will notice that the steering wheel will turn a little tighter. If the adjustment is no longer possible, then the hydraulic booster must be replaced with a new one.
To adjust the gearbox on a UAZ Patriot SUV, you will need the following tool:
- pliers for loosening the nut;
- wrenches for “22” and “16”;
- tip type T-30 in the form of an asterisk;
- WD-40.
When all the necessary tools are ready, you can begin the work process.
Setup process
Let's take a closer look at the process of adjusting the power steering on the UAZ Patriot SUV.
- When starting work, it is important to install the front wheels of the UAZ Patriot SUV in a strictly straight direction.
- After this, you need to open the hood and find the steering column of the SUV.
- Before starting work, the surface of the structure should be cleaned of dirt.
- On the central part of the power steering housing there is an adjusting screw, with the help of which the adjustment process takes place. This screw looks like this:
Mechanism repair
Like many other cars, the UAZ Patriot also has some shortcomings in this mechanism. In particular, the steering column housing into which the bolt is screwed can be considered unfinished. During adjustment, SUV owners often encounter problems with thread integrity. Why is this happening?
The reasons for what is happening are hidden mainly in the use of low-quality metal for the production of the steering housing. While tightening the bolt, the thread integrity is damaged, which actually renders the steering column housing cover unusable. You can purchase it separately, but its cost will not be as small as it might seem at first glance. Therefore, we will briefly consider how to repair this device.
Causes of knocking
A knocking noise that occurs when wearing a helmet indicates a faulty mechanism, and if such symptoms are not resolved in time, then you may face big problems. about a knocking sound in the steering column , and they all unanimously declare that such a symptom can be eliminated by independently modifying the mechanism. But more on that later, and now we will find out the reasons why the steering column knocks when turning.
According to studies conducted by owners of UAZ Patriot SUVs, it was found that knocking in the column often occurs due to a malfunction of the steering mechanism. The gearbox consists of two hollow tubes connected by a spline joint. In addition, the cardan has its drawbacks, so its location is not yet the best. Why? If you open the hood and look at the area where the steering universal joint is located, you may find that the engine coolant reservoir is located above the unit and under the universal joint is the exhaust manifold. As a result, we can analyze the following negative impacts on this device:
Design Features
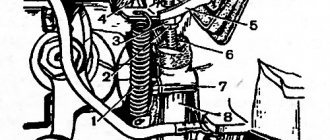
The support for the steering shaft of the UAZ Patriot SUV is a plastic ball with a hole, which ensures the absence of play and proper operation. There is nothing complicated in the design of this element, but it is only worth noting that such supports are old-style products. Their main disadvantage is that after a certain amount of mileage of the car, in particular several thousand, unpleasant squeaks and knocking occur. You can remove squeaks and knocking noises using a special lubricant, but you will need to carry out such lubrication procedures every week. After about 20-30 thousand kilometers, the ball wears out and the shaft runs out, which leads to malfunction of the steering mechanism. In the diagram below, the steering shaft support is designated number 13.
Since 2012, UAZ Patriot cars have been equipped with a new type of steering shaft support. What does this mean? This means that the support is no longer a simple plastic ball, but a special rubber seal, which is also popularly called a “plunger.” Such “plungers” were previously installed on Ulyanovsk-made SUVs produced in 2005-2006, but for some reason after that they were replaced with a Vaxoil ball. Below is a Waxoil ball or an old style support:
And here’s what the new type of support for the steering gear shaft of the UAZ Patriot SUV looks like.
After the failure of the old-style support, absolutely any owner of a UAZ Patriot SUV can install a product of a new model. Let's look at how to do this in more detail.
Replacing the support
The cost of a new product is not exorbitant and is about 300 rubles. The replacement process is also not labor-intensive, although it is necessary to know the replacement procedure. So, let's look at what it means to replace an old-style steering shaft support with a new one. Before carrying out work, it is recommended to turn off the power to the vehicle by disconnecting the minus terminal.
- Initially, you need to unscrew three screws inside the car that secure the panel plug. After this, the plug must be removed. The photo below shows the panel plug that needs to be removed.
- During dismantling, the block should be disconnected from the light control buttons.
- Under the panel you need to get to the steering cardan and unscrew the bolted connection with which the cardan is compressed. In this case, you will need to use two types of wrenches: “10” and “12”. After the tension on the cardan has been loosened, you need to get out of the car and open the hood.
- In the engine compartment, you need to move the antifreeze tank to the side,
in order to have access to the cardan structure, or more precisely, to its support. - Now you need to unscrew the 4 nuts that secure the ball.
- On the steering cardan you need to find a similar pinch bolt and unscrew it.
- The shaft can be dismantled from the interior, which is what needs to be done.
- In the engine compartment, the worn ball is replaced with a new “plunger”. All mounting holes match, so no modifications are needed.
- After this, the shaft is installed and secured using tightening bolts from the interior and under the hood.
- Now you can install the removed parts in the reverse order of removal and begin testing the installed device.
Everything is done very quickly and does not require any thought, the main thing is to be consistent. It is worth noting that after installing the rubber seal, you can feel how the steering of the car will change. It will be easier, more pleasant to operate and without the sensation of extraneous noises and squeaks. The service life of a plunger is about 50 thousand km, but this depends on the nature of driving the car.