Often the idea of repairing a lock comes after it no longer opens. There are several possible reasons:
- breakage of the cable sheath;
jamming of the cable in the braid;
If the cable breaks at the lever in the cabin, you can try to grab it with pliers and pull. If the cable is intact, but cannot be moved, you can try to hook it with pliers near the lever and pull or pull smoothly.
Other methods require access to the engine compartment. To do this, you need to raise the hood of the VAZ 2107 by 1-2 cm on the driver’s side and place a wooden block wrapped in a rag under it. A rag is needed so as not to damage the paint. The raised hood provides an overview of the lock, which is important when trying to open it. You should pull back (lift) the locked hood very carefully so as not to bend it.
Other opening methods require a hook made of stiff steel wire, which must withstand considerable force. If the cable breaks, you can try to pull it out with a hook from under the hood and pull it with pliers.
You can use a hook to hook the braided cable and pull it. This can be done through the gap between the body and the raised hood or through the air intake. A cloth must be used to protect the paint during this operation.
Another option is to hook and pull the “fungus” of the lock, to which the cable is attached.
The hood is an integral part of any car. On the VAZ 2107 it is locked using a mechanical lock and opened using a cable coming from the passenger compartment. Despite the simplicity of these parts, they fail over time. To carry out repairs, you need to know what sequence of actions will need to be performed.
Method for removing, repairing and replacing the hood lock of a VAZ 2107
You usually have to replace the 2107 hood latch when it is broken. But it is better to prevent this and make replacements or repairs at the first sign of a malfunction. A standard lock does not provide the proper level of protection for the engine compartment. Burglars can easily open it and disarm the alarm and start the car. Therefore, car owners often replace the standard hood lock with special ones that are burglary-resistant.
Required Tools
To remove and replace the lock, you must stock up on the following materials and tools:
- Lubrication.
- Marker.
- 10mm wrench.
- Pliers.
- Flathead screwdriver.
Removing, checking and installing the lock
To remove the lock, you must perform the following steps:
- Open the hood.
- Trace the outline of the lock with a marker (this will make subsequent adjustments easier after installation).
- Remove the lock cable clamps using pliers.
- Unbend the end of the cable and remove the fixing sleeve.
- Remove the cable from the lock.
- Using a 10 mm wrench, unscrew the two nuts securing the lock to the hood, remove them and the washers located under them.
- Remove the lock from the studs.
- If it is necessary to replace the cable, disconnect it from the handle of the hood opening lever and pull it out from the shell. It is possible to replace the cable and sheath included. The shell enters the interior through a sealing tube, which must first be removed.
- Install a new hood cable (with sheath).
- Check the functionality of the lock. Levers and latches should not be loose.
- If necessary, replace the lock spring.
- Lubricate the lock mechanism.
- Check the condition of the threads on the lock mounting studs, the geometry of the studs themselves and the condition of the hood metal in areas adjacent to the lock.
- If necessary, repair defects in the paintwork.
- Using the outline outlined by the marker, place the lock in place.
- Fix the lock cable and adjust the lock, ensuring easy and reliable closing/opening.
Note: when adjusting the lock, the fastening nuts must be securely tightened, otherwise difficulties may arise when opening.
Opening the hood lock of a VAZ 2107 in case of malfunction
Often the idea of repairing a lock comes after it no longer opens. There are several possible reasons:
- breakage of the cable sheath;
- jamming of the cable in the braid;
- cable break;
- lock breakdown.
If the cable breaks at the lever in the cabin, you can try to grab it with pliers and pull. If the cable is intact, but cannot be moved, you can try to hook it with pliers near the lever and pull or pull smoothly.
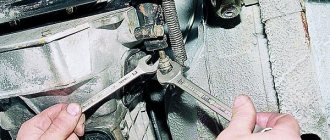
Other methods require access to the engine compartment. To do this, you need to raise the hood of the VAZ 2107 by 1-2 cm on the driver’s side and place a wooden block wrapped in a rag under it. A rag is needed so as not to damage the paint. The raised hood provides an overview of the lock, which is important when trying to open it. You should pull back (lift) the locked hood very carefully so as not to bend it.
Other opening methods require a hook made of stiff steel wire, which must withstand considerable force. If the cable breaks, you can try to pull it out with a hook from under the hood and pull it with pliers.
You can use a hook to hook the braided cable and pull it. This can be done through the gap between the body and the raised hood or through the air intake. A cloth must be used to protect the paint during this operation.
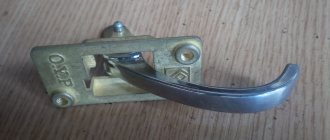
Another option is to hook and pull the “fungus” of the lock, to which the cable is attached.
semerkavaz.ru
How to open the hood if the cable is broken
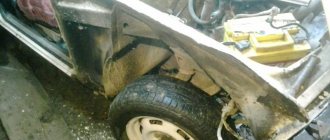
Perhaps the most unpleasant moment that can take the driver by surprise is a broken hood cable. This situation is quite difficult, but quite solvable. Below are the most common options that will help fix this problem:
- cable break near the lock drive handle. This type of breakdown is considered the most common and also the simplest. To eliminate such a breakdown, you need to use pliers to pull the flexible element and open the lock;
- if the cable comes off in a place other than near the lock or lever, you can try to remove it through the grille in the hood. Release the hook from the rigid wire, pass it through the grille and pull the lock drive with pliers, this is necessary in order to open the lock. To make this manipulation easier, you need to press the hood down in the area of the locking mechanism;
- The lock drive can be pulled into the free space between the body and the hood without using the air duct. It is necessary to lift the engine compartment lid as much as possible; you can use a wooden block as a handy aid; it will prevent the hood from returning to its place. To protect the paintwork and avoid damage, wrap a piece of wood in a rag. After removing the cable, you just need to pull it;
Using this hinge you can open the hood
Video about opening the hood with a broken cable
Repair of VAZ 2107 (Zhiguli): Adjusting the hood lock
- Repair manuals
- Repair manual for VAZ 2107 (Zhiguli) 1982+.
- Adjusting the hood latch
| Rice. 9–9. Hood lock: 1 — lock body; 2 - spring; 3 — ejector; 4 - hook; 5 — drive rod; 6 — drive handle |
If the lock does not lock the hood securely or unlocks with great force, adjust the position of the lock (Fig. 9–9).
With the hood open, outline the contours of the lock body 1, loosen the fastening nuts and, using the enlarged holes, move the lock body in the desired direction. Tighten the fastening nuts and check the operation of the lock.
Download information from the page
↓ Comments ↓
Please enable JavaScript to view the comments powered by Disqus.
1. Vehicle operation and maintenance
1.0 Operation and maintenance of the vehicle 1.1. Vehicle operation 1.2 Vehicle maintenance
2. General information
2.0 General data 2.1 Technical characteristics of vehicles 2.2 Controls and monitoring devices 2.3. Ventilation control and interior heating
3. Engine
3.0 Engine 3.1 Removal and installation of the engine 3.2 Disassembling the engine 3.3 Possible engine malfunctions, their causes and methods of elimination 3.4 Engine assembly 3.5 Bench tests of the engine 3.6 Checking the engine on a car 3.7. Cylinder block 3.8. Pistons and connecting rods 3.9. Crankshaft and flywheel 3.10. Cylinder head and valve mechanism 3.11. Camshaft and its drive 3.12. Cooling system 3.13. Lubrication system 3.14. Supply system
4. Transmission
4.0 Transmission 4.1. Clutch 4.2. Gearbox 4.3. Cardan transmission 4.4. Rear axle
5. Chassis
5.0 Chassis 5.1. Front suspension 5.2. Rear suspension 5.3. Shock absorbers
6. Steering
6.0 Steering 6.1. Inspection, check and adjustment of steering 6.2. Steering mechanism 6.3. Steering rods and ball joints 6.4. Swing arm bracket
7. Brakes
7.0 Brakes 7.1. Checking and adjusting the brakes 7.2 Possible malfunctions of the brakes, their causes and methods of elimination 7.3 Bracket for the clutch and brake pedals 7.4. Vacuum booster 7.5. Brake master cylinder 7.6. Front brakes 7.7. Rear brakes 7.8. Rear brake pressure regulator 7.9. Parking brake
8. Electrical equipment
8.0 Electrical equipment 8.1 Electrical equipment diagram 8.2. Battery 8.3. Generator 8.4. Starter 8.5. Ignition system 8.6. Lighting and light signaling 8.7. Sound signals 8.8. Windshield cleaner 8.9 Headlight cleaner 8.10. Heater electric motor 8.12. Control devices
9. Body
9.0 Body 9.1. Doors 9.2 Possible body malfunctions, their causes and methods of elimination 9.3. Hood, trunk lid, bumpers 9.4. Body glazing 9.5. Windshield and headlight glass washers 9.6. Instrument panel 9.7. Seats 9.8. Heater and ventilation of the body interior 9.9. Body frame repair 9.10. Paint and varnish coatings 9.11. Anti-corrosion protection of the body
10. Modification and equipment of VAZ-2107 cars
10.0 Modification and equipment of VAZ-2107 vehicles 10.1. Car VAZ-21072 10.2 Car VAZ-21074 10.3. Car VAZ-21073-40
11. Applications
11.0 Appendices 11.1 Appendix 1. Tightening torques for threaded connections* 11.2 Appendix 2. Tools for repair and maintenance* 11.3 Appendix 3. Used fuels and lubricants and operating fluids 11.4 Appendix 4. Basic data for adjustment and control 11.5 Scheme
automend.ru
VAZ 2107 | Adjusting the hood position
Adjusting the hood position
| The cable drive of both hood locks must have no play. The cable sheath must be completely in the lock guide. Otherwise, when acting on the hood drive, the cable in the guide may slip, which will make it impossible to open the locks. |
| If the adjusted hood moves relative to its position, unpainted areas are visible. |
Adjusting the hood drive
Adjusting the side position of the hood
1.Refer to the accompanying illustration.
| 2. If necessary, adjust the hood drive stroke using the adjusting screw (arrow in the accompanying illustration). |
| 3. Screw in the stop completely. |
Rear hood height adjustment
Front hood height adjustment
Adjusting the stop
| 4. Unscrew the locknut (1) and turn the lock pin with a screwdriver. | |
| 5. In this way, adjust the level position of the hood in relation to the wings. Pay attention to achieving a parallel gap in relation to the cladding. 6. Tighten the locknut. 7. Check that the locks are securely locked. Repeat the adjustment if necessary. | |
automn.ru
| 4. Measure the protrusion of the hood above the headlight lens. It should be A = 4 ± 1 mm. If not, adjust the headlight position. | |
| 5. Loosen the bolts (arrows in the accompanying illustration) and move the headlight forward or backward. Do not apply pressure to the headlight. If necessary, move the lower mounting bolts. | |
| 6. If the headlight has been misaligned, check its adjustment. | |
Removing and installing the hood of a VAZ 2107 car
To carry out the work of replacing the hood on a VAZ 2107 car, you will need an assistant.
Removing the hood from a VAZ 2107 car
1. We prepare the VAZ 2107 car for operations (see “Preparation of the VAZ 2107 car for maintenance and repair”).
2. Open the hood.
3. Using pliers, straighten the hood rod cotter pin.
4. Remove the cotter pin from the rod holding the hood in the open position.
5. Remove the washer and rubber bushing from the hood rod.
6. If we are not removing the hood for replacement, then use a 13 mm wrench to unscrew the four bolts securing both hood hinges to the upper cross member of the radiator frame, while an assistant holds the hood.
Note When replacing the hood on a VAZ 2107, unscrew the four bolts securing the hinges to the hood, since the new hood goes on sale without hinges.
7. Remove the hood by removing the rod from the slot in the hood bracket.
8. If necessary, remove the rod together with the rubber tube from the bracket on the upper cross member of the radiator frame.
Attention To prevent the development of corrosion, we recommend that before installing the hood, apply an anti-corrosion compound to the places where the hinges contact the upper cross member of the radiator frame.
Installing a hood on a VAZ 2107 car
1. Install the hood on a VAZ 2107 car in the reverse order, following the marks of the hinges on the body.
2. With the bolts loosened, we adjust the position of the hood due to the enlarged holes in the hinges. The gaps on three sides of the hood should be equal.
3. After adjusting the position of the hood, open the hood slightly and finally tighten the hinge bolts.
portalvaz.ru
Purpose and causes of malfunction
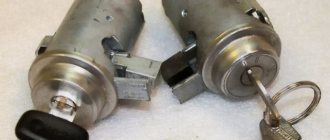
Hood lock cable for VAZ 2107
Hood locking mechanism diagram
The cable transmits the force applied by the driver from the hood release lever to the hood lock. Situations in which replacement is necessary are listed below.
- Over time, the cable began to move poorly inside the plastic jacket.
- Several threads of the cable broke, as a result of which it became longer and the force simply did not reach the hood lock.
- The hood latch is rusty, its parts have lost mobility, as a result, the driver is forced to pull the hood opening lever harder, which ultimately leads to a break.
Removing and replacing the hood of a VAZ-2107
Replacing the hood
EXECUTION ORDER
This work is best done with an assistant.
We remove the hood stop from the front panel bracket.
Using a 13mm wrench, unscrew the four screws securing the hood hinges to the front panel...
...and remove the hood. Having rearranged the hinges, the stop and the upper part of the radiator grille onto the new hood, we install it in reverse order along the remaining marks on the front panel, after which we adjust its position in the opening.
By loosening the screws securing the hinges to the front panel, we achieve uniform gaps on three sides of the hood. Carefully opening it, tighten the bolts and install the stop.
It is more convenient to adjust the hood with the hood latch removed
HdSxozARNdCZoZ0rmlIZmTSTN29TNdkrbraqebaqo3I5Ndk9etIUo3AwmLs6nl5wnl5SFlEwN2GVh4OUMDIuhRk4gDA4h3QSnlOuOBu0gBAypbefebaqebAsmLIQFlCsFlGwnlKxOB0rm2cWoDKrF JcZgBk2hJgZgBm4GJszhBarbraqebaqMdC0mj1QMb1ZNd90HjeZhBi4hBq0gZg4eR48F2SxoZ4=
avtolyubiteli.com
Gas struts for the hood on classics
Gas shock absorbers for the hood of the VAZ 2105 are one of those small but pleasant things that, to one degree or another, make the life of the car owner easier. Plus, this procedure can be performed by anyone who has ever held a wrench and a screwdriver in their hands and does not require any supernatural skills of a car mechanic.
Due to the fact that the hood on the 2105 opens in the other direction than on later models, it is somewhat difficult to install entire hinges with stops from Kalina, for example. If you decide to perform this procedure, you can buy a gas trunk strut from Niva, it will work perfectly.
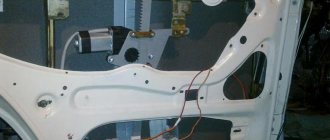
- Make two stop mounts - upper and lower. You can make them from a suitable metal corner, or bend a metal plate of the required size at an angle of 90 degrees. It should be about 4 cm long, and the width of both parts should be 2 cm. Three holes will need to be made in the corner - two for fastening to the body or hood and one for installing the gas stop. The diameter of the first two holes should be about 4 mm, the third - 8 mm.
- Place the brackets in place, and mark with a pencil or marker the places where you need to drill holes. The bracket can be secured with bolts or rivets. The second option will be more reliable. Before installing the gas stop, do not forget to unscrew the old hood stop, now you don't need it.
- Using nuts on the 8 hinge elements in the brackets, install the gas stop. Given that all the necessary parts and tools are at your fingertips, installation will take no more than 15 minutes.
Adjusting the hood latch is easy to do with your own hands
Let's take a closer look at the hood of our car. Has there been any strangeness in his behavior? Often we do not pay attention to such little things as the fact that the hood has become a little worse to close, more and more effort is required each time to open it, and a rattling noise has appeared (at first light and intermittent). After all, all this happens gradually, and therefore imperceptibly. We forget about such a simple matter as adjusting the hood latch.
Timely diagnosis is the key to safety
We notice a flat tire or a “sick” starter immediately and take urgent measures to eliminate the problem. And a tired hood lock, according to most car enthusiasts, “does not affect speed.” Indeed, it does not affect, but many are terribly annoyed by repeated clapping, nervously tugging at the handle in the hope that Sesame will finally open. And all this happens, as a rule, at the most inopportune moments. It seems like a small thing, but an irritated driver is a threat on the road, and for absolutely all road users.
Or a hood that opens of its own accord while driving... Even at low speed this can create serious problems.
Let’s not put off such a “trifle” as adjustment. Moreover, all operations can be performed independently, without resorting to the help of service station workers, and most importantly, completely free of charge!
And this happens sometimes!
In what cases will adjustment help?
Let's list the main malfunctions that you can fix yourself by just adjusting the car hood lock:
- The hood has become difficult to close; it requires repeated slamming and significant force to close it
- It has become problematic to open it (we pull and pull, but the reaction is zero)
- Doesn’t “bounce” when the cable is pulled; when closing, an extraneous knock of metal on metal is heard
- Rattling when the engine is running, in the pits.
Since it is almost impossible to describe all the models in one article, let’s take as an example a masterpiece of the domestic automobile industry - the VAZ car. Whatever they say, Lada cars roam the expanses of the former CIS more often than any foreign car. And, given their survivability, I think this will last for a long time... And based on the principle that this procedure, on almost all cars, comes down to similar actions (if you do not take into account the design features of the locks), you can derive a general adjustment formula. Let's start adjusting the locks, for example, for VAZ 2108, VAZ 2109, VAZ 21099.
Tools
To adjust we need:
19mm wrench.
Open-end or spanner wrench
Screwdriver, I usually use a "magic" set.
Screwdriver with replaceable bits
Oil for lubricating the lock (only liquid oil is suitable; “solidol”, “litol” and other similar lubricants are not suitable, since they harden at low temperatures, which makes the mechanism difficult to operate).
Machine oil
Desire, some free time, a head and two arms (preferably straight).
That's all we need to work
The adjustment process on the selected car model
The device of the hood lock VAZ 2108/2109/21099
To begin, open and secure the hood. Let's pay attention to the lock and try to understand the principle of its operation.
Hood lock device
The photo shows the main elements of the castle:
- Lock latch spring
- Lock-nut
- Latch
- Safety hook
- Safety hook handle.
From what we saw, it follows that after we pulled the opening handle in the cabin, the cable opens the latch, which releases the lock latch. Thanks to the latch spring, the hood “jumps” up, but it is still held half-open by the safety hook. And only by pressing the handle of the safety hook, we can fully open it and gain access to the engine compartment. Quite a reliable system. At first sight…
Adjustment, although not a very difficult operation, requires patience and accuracy. Sometimes you have to repeat the same jewelry movement many times until everything starts working as it should!
Vertical adjustment of the lock
If the hood does not want to close normally (you slam it, put pressure on it, but it still closes with difficulty, or does not lock in the closed position at all), or a rattling noise appears when driving on our perfectly smooth roads (sometimes it is noticeable even just when the engine), then adjustment in the vertical direction is necessary. Namely, adjusting the length of the lock latch.
To do this, use a 19 mm wrench to loosen the lock nut on the latch, holding the latch itself from turning with a flat-head screwdriver.
Latch length adjustment
If the hood is poorly or not at all fixed in the closed position, then you need to slightly increase the length of the latch, which we will achieve by unscrewing it with a screwdriver.
If the hood rattles, on the contrary, you need to shorten the latch by tightening it several turns inward. The required latch length is determined experimentally.
Got rid of the problem? Then tighten the locknut (don’t forget to hold the latch with a screwdriver), check it again and rejoice!
How to extend the life of the cable
In order to extend the service life of the cable as long as possible and there is no need to open the hood lock on the “seven”, it is necessary to carry out timely and high-quality maintenance of the structure. Key points:
- From time to time it is necessary to lubricate the lock; you can use silicone-based lubricants;
- do not forget to apply lubricant to the braiding of the locking mechanism drive;
- Using thin and dense wire, make a “understudy” for the cable. Attach it to the lock in the place where the main cable is attached, make a loop at the other end and leave it inside the air supply box. If the cable breaks, the hood can be opened simply by pulling the backup wire with some kind of hook.
If a cable or lock breaks or wears out, you can replace it yourself without resorting to outside help.
Source