When air gets into the cooling system of the internal combustion engine, then during its further operation such a malfunction can cause serious consequences. The safest thing is if there is overheating and this will cause the stove to simply warm up the interior slightly.
If you start the problem of airing the system, then other parts of the car system may break down. That is why you should know how to remove an air lock with your own hands. Even a novice motorist can cope with this task; in this article we will examine in detail the topic of airing the cooling system.
Main stove malfunctions
As we have already mentioned, the stove is connected to the internal combustion engine cooling system. Accordingly, heating problems may arise for the following reasons:
- Insufficient amount of coolant in the system.
- Clogging of radiator tubes.
- There are air pockets in the system. To eliminate them, you will need to unscrew the cap of the radiator or expansion tank and let the engine idle for a while.
There are a number of cooling system malfunctions that can also affect the performance of the VAZ-2109 heating system. We look at the most common ones.
The weak point of the heating system is the valve through which antifreeze enters the heater radiator. This unit may leak. In this case, it must be replaced with a new one.
Poor quality coolant causes damage to rubber pipes due to its aggressive chemical composition.
Check the condition of the pump, which is responsible for pumping antifreeze and circulating it in the cooling system.
Poor operation of the stove can be caused by incorrect operation of the electric motor that drives the heating system fan.
If you notice extraneous sounds in the operation of this motor, this is a signal for a number of problems:
- Possible overheating due to fuse failure.
- When operating at low speeds, warm air does not flow - the electric motor has failed or there has been a break in the electrical circuit of the heating system.
Check the condition of the heater core regularly. It can become clogged during operation, and this provokes an insufficient supply of antifreeze. To carry out preventive work, you need to dismantle this element and wash it. If the part cannot be cleaned, then it is better to buy a new one and replace it.
Important tips for prevention
To avoid cases where air gets into the system, you should always check the presence of antifreeze in the system and periodically add it. If the antifreeze level constantly drops and you are forced to constantly add it, then this indicates that the CO is not functioning properly. Carry out a thorough visual inspection; if you do not find any signs of antifreeze leakage, you should visit a service station to conduct a full CO diagnosis.
Dirty expansion barrel
The system should sometimes be cleaned of contaminants, as it can become clogged with various deposits, both from coolant and from corrosion. The fact is that even small air bubbles in the system can trigger the development of corrosive processes. To clean, you can fill in special liquids instead of antifreeze and drive the car for 5-6 hours, after which the cleaning liquid is drained and antifreeze is added.
Try to buy only the antifreeze recommended by the manufacturer. If you use an untested and unknown liquid, there is a high probability that this will negatively affect the performance of the entire cooling system.
Choice
When choosing a new radiator for the stove of your VAZ 2109, you should understand what exactly you want to achieve and what budget you have.
Today, consumers are offered two types of units to choose from.
Radiator type
Peculiarities
Aluminum
A relatively inexpensive radiator option, which is characterized by high thermal conductivity. However, such a device cannot be repaired, which is its main drawback.
But in practice, repairs are not carried out so often, so few people pay attention to this disadvantage
Copper
If necessary and a leak is detected, the copper radiator can be repaired - soldered. Thermal conductivity indicators are slightly higher when compared with aluminum analogues
But at the same time, the price is quite high - both for repairs and for the radiator itself
Aluminum unit
Due to unprofitability and high cost, most VAZ 2109 owners choose aluminum radiators. But it all depends on your personal decisions and preferences. When actively using a car in harsh winter conditions, a copper radiator is fully justified.
Copper unit
When parts need to be replaced
When is it necessary to replace the VAZ 2109 coolant and cooling system elements? The fluid must be changed regularly after a certain period of use. Parts are not changed periodically, but only after a breakdown. One of the causes of breakdowns is overheating due to a malfunction of some element in the cooling system. The following signs of engine overheating can be observed:
- the coolant temperature is higher than normal and can exceed 120ºС, this is indicated by a special sensor;
- there is a sharp drop in engine power;
- the sound of the engine changes, a ringing metallic knock appears;
- oil consumption increases;
- Coolant consumption increases significantly.
see also
Antifreeze in oil
- 14 0 22k
Oil in antifreeze
- 4 0 11k
Antifreeze reducing additives
- 7 1 12k
Antifreeze is boiling
- 38 1 45k
Why does antifreeze go away?
- 23 1 33k
The presence of air in the cooling system is fraught with problems for both the engine and other components of the car. In particular, overheating may occur or the stove will heat poorly. Therefore, it is useful for any motorist to know how to remove an air lock from the cooling system. This procedure is quite trivial, so even a beginner and inexperienced car enthusiast can do it. Due to its importance, we will talk about three methods of removing air. But first, let's talk about how to understand that air jams are occurring and the reasons for their occurrence.
Some features of the VAZ 2109 cooling system
- The VAZ 2109 CO is liquid, with a total volume of 7.8 liters, if you count it together with the stove. The type of system is closed, it is sealed. The operating pressure in the cooling system is maintained at about one atmosphere. Due to the increased pressure, the liquid in it boils at a higher temperature than at normal pressure. This significantly increases the service life of the CO itself, as well as the engine.
- Liquid circulation is carried out forcibly, that is, using a pump or pump. The CO “nine” is equipped with a centrifugal pump. Its body is made of aluminum. The pump mechanism operates from a timing belt drive. The rotation of the pump shaft is carried out on double-row ball bearings. Moreover, the role of the bearing cage is played by the pump roller; it does not have its own.
- The mechanism is filled with the appropriate lubricant (Litol) during manufacture. While it is functioning, it is not being maintained; such a possibility is not provided for by the design. If it breaks, it cannot be repaired, therefore, it is recommended to completely replace the pump if it breaks. In such systems, for greater reliability, they try to replace the pump when changing the timing belt.
- Since CO "nine" is liquid, this liquid needs to be replaced from time to time. The VAZ 2109 cooling system is undemanding in terms of antifreeze quality. However, the Antifreeze A 40 that was produced for such COs in the last century is no longer produced. What is produced under this brand, alas, does not comply with the GOST standards according to which this coolant was produced.
- Many auto mechanics do not recommend its use; from what is recommended by AvtoVAZ, it is quite possible to choose a replacement. As a last resort, purchase imported antifreeze with a composition that meets the requirements. But water cannot be used at all as antifreeze; it will leave a layer of scale on the walls of all pipelines of the system, and aluminum parts will undergo active corrosion.
- For coolant, working tO is +85O – +95OC. Additionally, at a temperature of about +99°C, the contacts in the fan relay close. The engine electric fan stops working when the relay sensor contacts open, this is +93°C. This means that, focusing only on the fact of turning the fan on and off, you can make a correct conclusion about the temperature in the system. Even with a failed (or missing) thermometer on the dashboard.
- The relay temperature sensor is installed in the cylinder head. There is a thermometer on the instrument panel that shows this temperature, signaling possible overheating. While the engine is running, liquid flows from the cooling jacket of the cylinder head and block to the radiator, where it picks up heat or to the thermostat.
- The cooling system of the VAZ 2109 has a small and large circulation circle, the separation occurs at the thermostat. Which is convenient, especially when you need to quickly warm up the engine at low air temperatures. The valve closes, liquid flows only through a small circuit. As the temperature rises, the thermostat valve allows coolant to flow into the large circle pipes.
- During engine operation, during combustion of the fuel mixture, temperatures reach 2,000°C and this happens intermittently. Poor performance of the cooling system not only leads to premature destruction of the cylinder-piston group due to thermal overload. The lubricant dries out and burns out, fuel costs increase with decreasing efficiency.
- Hypothermia leads to the accumulation of condensation, which washes away the lubricant (gasoline is a good solvent), enters the crankcase, mixes with the oil, diluting it. This is another reason to keep the CO in order, otherwise expensive engine repairs cannot be avoided.
- In addition to cooling the engine, CO heats the air in the radiator and cools the turbine (if there is a turbocharger), and also cools the oil and working fluid in the automatic transmission.
- For greater driving comfort, you should also do a little tuning of the system. You can increase the efficiency and reliability of operation by installing a pump that has an impeller with many blades. The fan is also desirable to be more powerful, six-bladed.
- It would be good if a manual fan start/stop system is installed, in addition to the relay, the sensor of which may fail. An additional fan on/off relay would also be useful; in city traffic jams, this will add peace of mind to the driver and reliability of the system.
Preparatory work before pumping thermal fluid
Before filling the heating system, it is necessary to carry out preparatory work.
Crimping
Pressure testing is a serious part of commissioning work, which is carried out before the first start-up of the system, as well as before each heating season. This is the name given to hydrodynamic testing of the system under conditions that are more complex than the subsequent actual load. This is a test for the strength of the pipeline, all connections and components, as well as entry and exit points into the building, underfloor heating systems, equipment and operability of boiler rooms.
The principles of implementation are regulated by SNiP:
- The temperature in the building must be above 0°C.
- The selection of testing pressure should not exceed the maximum values specified by the manufacturer.
- The crimping pressure value should exceed the working pressure by 50%.
- In private homes, pressure testing is on average in the range of 2-6 atm.
- Systems in old houses are checked with underestimated values; cast iron radiators also set a limit to the maximum value - no more than 6 atm.
- When selecting the optimal value of the crimping pressure, it is important to use technical documentation for pipes and equipment ; one should proceed from the permissible maximum for the weakest link in the system.
- A water test is carried out , even if antifreeze is poured into the system; pressure testing with a working solution is done in the second place.
Parameter control
Competent crimping is carried out only by a specialist who has the appropriate knowledge and experience. Checking and monitoring parameters requires special equipment.
Recommended settings:
- higher than workers , not lower than 0.6 MPa.
- Not new networks are checked at a pressure of 1.25 higher than working pressure, not lower than 0.2 MPa.
- in private houses up to three floors, heating operates at a pressure of no more than 2 atm.
- in multi-apartment five-story buildings 2-6 atm
- in buildings with more than 8 storeys - 7-10 atm.
These values are adjusted on site based on the condition of the system components.
In private houses, fittings, radiators, etc. are often in better condition than in apartment buildings.
According to the rules, in apartment buildings such work can be carried out once every 5-7 years.
Design of the VAZ 21099 carburetor engine cooling system
So, you started the cold engine. When fuel burns, it heats the engine cylinders and combustion chambers of the cylinder head. Both the head and the block are penetrated by a network of channels filled with coolant (TOSOL).
Coolant circulation is provided by pump 17 (“pump”), driven by a timing belt. The heated antifreeze is removed from the cylinder head through the outlet pipe 25, connected to it by a channel, and again enters the block through the pump. In this case, if the heater tap 21 is open, the liquid warms up (while cooling itself) the heater radiator 22. And so on in a circle called small.
As the coolant temperature increases, thermostat valve 29 opens and antifreeze starts to move through radiator 12 (in a large circle).
Since TOSOL significantly increases in volume when heated, it is necessary to compensate for the lack of space. For this purpose, there is expansion tank 1. If it were not in the system, then as a result of excess pressure, at a minimum, the heater or radiator pipes would be torn off the fittings.
The expansion tank cap valve 2 controls the pressure in the system, preventing both fluid loss and premature boiling.
If the liquid temperature rises to 99°C, the contacts of sensor 9 close and the electric radiator fan 15 turns on. Since 1998, sensors have been produced with reinforced contacts, so the fan is turned on without an additional relay in the mounting block.
To control the temperature, a temperature sensor 28 is screwed into the cylinder head, the signal from which is displayed on a pointer in the instrument panel.
To heat the carburetor, hose 23 is removed from the inlet pipe.
Types of coolant for filling into a heating circuit
Several types of coolants are used for heating systems.
Water
Cheap universal coolant:
- if you fill with distilled water, there will be no scale or sediment;
- does not change properties upon contact with internal surfaces;
- safe for people;
- can spin in the system almost endlessly.
Flaws:
- When it freezes, it expands and destroys pipes , so in cold climates you will have to buy antifreeze.
- Metal pipes begin to rust.
- When using tap water, a large amount of salts crystallize, so you will have to buy distilled water . If the water supply is flooded, it is recommended to regularly clean the main components and, if possible, pipes from salt deposits. The process is labor-intensive and requires special reagents.
Antifreeze
It is an aqueous solution of ethylene glycol or propylene glycol with additives.
Photo 1. Antifreeze for heating systems from the manufacturer Termagent. Withstands temperatures down to minus 30.
- antifreeze with a composition developed for this purpose is allowed for use in heating systems This liquid cannot be used anywhere else.
- Freezes at temperatures from -30° to 60°C.
- Antifreeze containing ethylene glycol is toxic.
- Coolant with propylene glycol, which is safe for humans, is expensive and requires replacement every 5 years.
- The new formulation offered on the market contains potassium acetate and formate. Suitable for areas with a temperate climate - freezes at temperatures below -5°C . In terms of cost, it is a more affordable option.
The correct choice of coolant requires careful attention and consideration of certain factors:
- Sometimes the boiler operating instructions indicate acceptable types of liquid and others cannot be used. Some foreign manufacturers exclude the use of antifreeze altogether - the warranty is void.
- The material from which the main components and pipes are made - the system must be made of chemically resistant pipes and components . Antifreeze is incompatible with galvanized iron because it changes properties upon contact.
- Certain types of compounds do not heat up well and give off heat ; if they are used, the system is designed with this in mind.
- The coolant must not contain toxic or toxic substances.
- The most effective fluid for the system has a low viscosity.
- Some types of coolant are intended exclusively for industrial use.
- The cost of the coolant and its permissible service life.
How to deal with cooling system malfunctions
Repair in most cases consists of replacing parts. We find the cause of the breakdown, and then replace the faulty part.
- Constant decrease in coolant level in the tank. If antifreeze is leaking, you need to check the cooling system pipes and thermostat, some of these parts are damaged, replace the faulty one with a new one.
- The temperature sensor near the cylinder block may have failed, check its contacts and reconnect. If that doesn't help, replace the sensor.
- Sometimes an air plug forms in the radiator, which prevents coolant from moving through the channels. How to remove air from the cooling system? Warm up the radiator and feel its body with a gloved hand. If it is cold in some places, it means there is a traffic jam. We will need the upper pipe (hose) that leads to the radiator. Fill the antifreeze tank full and turn on the engine. The pipe needs to be slightly bent, the air will gradually come out on its own. In order for the air lock in the cooling system to disappear, you will need to perform this procedure very carefully. The air will come out when antifreeze flows out of the pipe and the pipe itself heats up.
- If the problem is in the cylinder head gasket, you may not be able to detect the problem right away. The amount of coolant in the tank will gradually decrease, which is almost imperceptible. One of the signs of this malfunction will be the cloudy color of the oil, which occurs after the antifreeze enters the oil pan.
This type of problem can be repaired in the following way:
- find the carburetor from which the contacts and throttle cables should be disconnected;
- the choke cable is disconnected;
- the pipes are removed;
- the distributor is removed;
- unscrew the 3 bolt fastenings of the cylinder head distributor;
- the coolant is drained;
- remove everything that prevents you from getting to the gasket;
- the cover is removed after you unscrew the 2 nuts and the head;
- the old gasket is dismantled, then a new one is installed, after which it is reassembled in the reverse order.
These are the simplest options for dealing with malfunctions that lead to overheating of the VAZ 2109 engine. More complex repairs are best carried out at a service station. If you notice while driving that the coolant temperature has risen to 120ºC, the only way to cool the engine is to pull over to the side of the road and turn off the engine as soon as possible.
Air removal methods
If you observe on the dashboard that the operating temperature of the engine is constantly exceeded (100 degrees or more), follow a number of steps to identify the problem:
- examine the joints of the pipes, the water pump and the expansion tank for leaks;
- check the fluid level in the tank;
- make sure that the cabin heater is functioning properly;
- If the temperature sensor is installed outside the cylinder head, check the operation of the electric fan by closing the contacts.
Before bleeding the cooling system, it is necessary to eliminate all leaks, if any are found. A water pump seal that has lost its seal should be replaced (as a rule, together with the pump), hose clamps should be tightened, and so on. There is no point in removing an air lock from a leaking cooling system.
Checking the heater and fan sensor will help you more accurately determine the location of the air bubble. When the engine temperature reaches a critical threshold and the heater does not heat up, it means that the plug is in a small circulation circuit - in the stove itself or in the supply pipes. If the sensor does not turn on forced airflow in time, then it has entered an area where the movement of antifreeze has stopped - the bubble is in a large circuit.
Advice. Often, due to an air lock, the thermostat refuses to open the passage of antifreeze in a large circle because it does not “see” the temperature increase. Don't make a common mistake and don't rush to change the thermostat - first try to bleed the cooling system.
Method one - blowing
This simplest method requires caution from the car enthusiast, since it is performed on a fully warmed-up engine. The order of operations is as follows:
- If necessary, add fluid to the minimum level and warm up the power unit to operating temperature. Carefully unscrew the cap of the expansion tank.
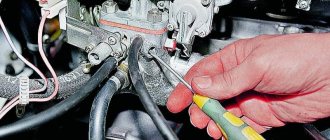
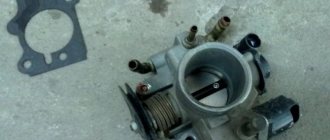
- Wear gloves and disconnect the thin coolant pipe at the highest point. For an engine with an injector, this is the throttle valve heating unit; on a carburetor engine, it is the intake manifold or the lower part of the carburetor itself.
- Wipe the reservoir neck thoroughly. Place a wide bowl under the removed hose and blow into the expansion tank. When clean antifreeze flows from the pipe, put it on the fitting and secure it with a clamp.
Attention! On a warm engine, unscrew the expansion tank cap slowly, allowing air to escape. If you remove it abruptly, hot antifreeze will splash out of the neck and burn your hands.
If your vehicle has a thermostatic main radiator cap, try removing the air lock through it. Open both plugs and blow into the neck of the expansion tank.
Method two - complete replacement
This option is suitable for all cases when it is not possible to detect and push a bubble out of pipelines. The point is to completely empty the system and fill it back with antifreeze, following all the rules. The disadvantage of the method is the difficulty of implementation in road conditions.
We recommend: Step-by-step instructions for removing bumpers from a VAZ 2113-2115
The procedure is performed in the following order:
- Drain the antifreeze into a wide basin, placing it alternately under the plug on the cylinder block and the main radiator.
- Replace all caps and tighten them.
- Loosen the clamp and remove the throttle body or carburetor heater pipe (the highest point of the system).
- Insert a funnel into the neck of the expansion tank and slowly pour coolant in a thin stream. Air will be removed through the removed hose.
- Monitor the moment when antifreeze runs out of the pipe and immediately put it on the fitting.
Before emptying, be sure to fully open the cabin heater tap.
When the throttle (or carburetor) heating hose is put on and secured with a clamp, add fluid to the container to the required level. Next, check the functionality of the cooling by completely warming up the engine until the thermostat opens and the electric fan turns on.
Method three - road
When faced with overheating of the power unit on the road, try to remove the airlock using this method:
- Having secured the car with the handbrake, lift the front part with a jack to a height of 0.3–0.4 m.
- Slowly unscrew the expansion tank cap, start the engine and turn on the cabin heater to maximum mode.
- Pour antifreeze into the tank in a thin stream until its level reaches the upper limit. Increase the crankshaft speed to 3000 rpm and wait until it warms up completely.
- Squeeze the lower hose leading to the radiator with your hand. The air should escape through the expansion tank. Use gloves or thick cloth to avoid getting burned.
The procedure ends when air stops coming out of the tank. Feel the remaining pipes - they should warm up. Make sure the stove produces a hot stream.
To avoid having to fuss with removing air pockets, always fill in antifreeze according to the instructions described in the previous section. This is the best way to force air out of the system. Fix leaks in a timely manner, do not drive with endless additions of coolant.
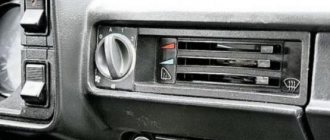
Heater diagram
The heater is mounted in the cabin under the dashboard using nuts on bolts that are welded to the air supply box. The air heated in the heater through channels (air ducts) enters the interior of the cabin. The air ducts are located at the bottom of the dashboard and have sealing gaskets.
If you plan to carry out repair and maintenance work, or replace failed components yourself, you definitely need to study the design of the stove and become familiar with the location of the components.
Based on the diagram below, we will introduce you to the design of the VAZ 2109 stove.
Scheme
| Item number | What is this |
| 1. | Bracket for fixing stove casings |
| 2. | Heater control damper |
| 3. | Left heater casing |
| 4. | Flap rod for heating the foot area |
| 5. | Radiator gasket |
| 6. | Radiator |
| 7. | Gasket sealing stove |
| 8. | Electric stove motor |
| 9. | Heater fan shrouds |
| 10. | Fan impeller |
| 11. | Heating damper |
| 12. | Air duct for heated windshield |
| 13. | Side nozzle duct |
| 14. | Side nozzle |
| 15. | Center nozzle flap |
| 16. | Pusher (blades); |
| 17. | Blade axis |
| 18. | The blade itself |
| 19. | Center nozzle closing lever |
| 20. | Heated windshield damper rod |
| 21. | Lever for changing air flow directions |
| 22. | Air heating control knob |
| 23. | Windshield air handle |
| 24. | Leg air handle |
| 25. | Bracket for control levers |
| 26. | Rod sheath fixation bracket |
| 27. | Stove valve control rod |
| 28. | Stove control damper rod |
| 29. | Heated footwell flap |
| 30. | Air control lever axis |
| 31. | Screw clamp |
| 32. | Stove valve |
| 33. | Heater valve body |
| 34. | Valve lever |
| 35. | Hoses connecting the faucet to the heater radiator |
| 36. | Internal ventilation duct |
| 37. | Heated windows for rear footwells |
| 38. | Stove tap |
| 39. | Window for heating the driver's foot area |
| 40. | B-pillar trim |
| 41. | Inner cavity of the central pillar |
| 42. | Exhaust ventilation duct |
| 43. | B-pillar trim |
| 44. | Hood deflector lining |
| 45. | Rubber valve |
| 46. | Deflector housing |
| 47. | Exhaust ventilation deflector |
| I | Heater |
| II | Stove operation diagrams |
| III | Stove tap |
| IV | Interior exhaust ventilation |
Having become acquainted with the components of the VAZ 2109 stove, let's find out in more detail how everything is arranged and functions here.
Device location
Let's get started:
First you need to drain the coolant into a special separate container. The liquid remaining in the radiator should be removed using a hose and funnel
Carefully remove the air ducts and, be sure to pay attention to possible misalignment of the holes that are located in the panel with the stove nozzles. If the misalignment exceeds 50%, you need to cut the interior heater. Next, having previously marked the connectors of the switches and light bulbs, remove the instrument panel
We disconnect the steering wheel, steering column trim and steering column switches. Next, we dismantle the heater: unscrew the 4 M10 nuts, disconnect the wire connector and all connectors on the heater body. Disconnect the radiator hoses and remove the heater valve cable latch. Next, carefully remove the heater, after unscrewing the two fan screws. Remove the radiator by unscrewing the three bolts. Be careful - there may still be coolant left here. Then make turbulators. These are special plastic spirals that increase the heat transfer of the radiator. “According to the rules,” they should be installed at the factory, but most often they are not. To make them yourself, you need to cut aluminum or copper plates, the width of which is 6 mm and the thickness is 1.5 mm. One side of such a plate should be clamped in a drill, and, at the same time, the other, using a vice, should be twisted into a spiral. Carefully inspect the bottom of the heater. Make sure there are no deformations, displacements, breaks or other defects. Then disassemble the stove by separating the body into two halves. To do this, use a screwdriver to open the latches and then unscrew the screw under the central nozzle. Remove the damper control levers. Carefully inspect the inside surface of the stove. If the foam has come loose, carefully glue it back, you can add strips of bitoplast. The housing should be made as airtight as possible. Adjust the center shutter. Before you begin assembling the heater, be sure to lubricate the places where the dampers are attached with a special grease. At the same time, when connecting the halves of the case, apply silicone or acrylic sealant to the connector. The heater should be assembled in the reverse order of disassembly. If there is deformation on the bottom wall, fill the gap with sealant. There should be no gaps between the stove body and the radiator. In the places where the housing is connected to the radiator, bitoplast should be glued. Next, you need to balance the fan impeller by winding wire around the blades. The wires must be routed through a special rubber plug located in the heater housing. Be sure to adjust the travel of the dampers. You need to be guided by the fact that the levers should always be clearly fixed in their extreme positions. Adjustment must be carried out by selecting the positions of the braid. Next, adjust the stove tap. You should choose a position in which the tap will not close completely. It is necessary to lubricate the hoses and radiator tubes with sealant before installing them. New clamps should be used. When the assembly is completed, you have filled in the coolant and warmed up the engine, you should tighten the clamps again. Before installing the instrument panel, you need to glue foam and bitoplast to the inlet holes of the nozzles.
Heater radiator VAZ 2109
With the onset of cold weather, almost all VAZ 2109 owners are faced with the problem of the stove not operating efficiently. There can be many reasons for this, but one of the main ones is failure of the stove radiator. Then, even at a normal coolant temperature of 90 degrees, barely warm air will enter the cabin, which will not be enough even to directly heat the windshield and side windows, not to mention creating a comfortable microclimate in the car interior. The heating device of the VAZ 2109 stove may fail or work with low productivity if there are air pockets. You can judge the presence of such a problem by the cold air coming from the cooling system deflectors when the tap is fully open. This problem can be solved in a fairly simple way: set the front wheels of the car on a hill, open the heater tap all the way and turn on the gas.
The detection of coolant in the cabin can only indicate one thing: the heater radiator has lost its tightness and needs to be replaced. You can make the replacement yourself, with your own hands, without once again resorting to the help of a specialist; just study the provided photos well and follow the recommendations:
- it is necessary to drain the coolant from the car’s cooling system, while the tap on the interior heater must be completely open;
- remove the instrument panel;
- on the right side of the stove there is a screw that is used to secure the rod clamp that regulates the windshield heating flap - it must be unscrewed;
- unscrew the three screws that are used to secure the heater radiator;
- remove the radiator from the heater housing;
- loosen the hose clamps and remove them from the heater radiator pipes;
- If necessary, we clean the device from dust, dirt, and foreign debris.
Installation is carried out in reverse order.
Very often, in order to reduce the noise of the heater fan, when tuning a car, it is changed to a more advanced model
By watching the video provided, you can understand the entire work process in more detail.
Method for removing a traffic jam
Drive onto a flat surface or inspection hole, squeeze the handbrake, turn on neutral; Using a jack, lift the front of the car about 35-45 cm from the surface;
Open the expansion tank cap
Be careful, as careless handling may result in burns;
Start the engine and stove radiator with the temperature set to maximum; Carefully begin adding antifreeze or antifreeze to the expansion tank to the maximum; Increase engine speed to 3000 rpm; Wait until the thermostat opens and begin to squeeze the lower pipe leading to the radiator with your hand. Be careful, carry out the procedure with gloves, following safety rules; Continue doing this until you are sure that the liquid coming out of the expansion tank is clean, without air bubbles; Check the entire lower part of the pipes with your hands, make sure they are hot; Start the stove heater with radiator
Check the supply of hot air flow into the car interior; Lower the car from the jack, secure it with boots for safety; Add the missing amount of refrigerant at a level above average. Never fill at the top level as this may cause expansion and overflow of the lid. Antifreeze particles will corrode the car's paintwork over time; If the airiness is severe, a repeat procedure may be necessary. See this for yourself.
{banner_content}
Second way
- Drive the car onto a flat surface or inspection hole, squeeze the handbrake, turn on neutral;
- We do not turn off the engine, but warm it up to a temperature of 90°C when the thermostat opens and the liquid begins to circulate in a large circle;
- Do not open the expansion tank cap;
- We turn off the engine;
- Loosen the clamp on the throttle body pipe and remove the pipe. Be very careful and attentive, as temperatures above 90°C can cause burns. Carry out work only with rubber gloves;
- Having removed the rubber hose, wait until all the air mixed with antifreeze or antifreeze comes out of it;
- We put the pipe back on, clamp the clamp;
- We start the engine and test the car. It is advisable to drive both on the highway and around the city at low speed to recheck the system in full.
REPLACING RADIATOR VAZ 2108, 2109, 21099
The radiator should be replaced if its seal is lost, because sealing is not always effective. Replacing the radiator should begin by draining the coolant. It is better to do this on a cooled engine. There is no need to drain all the liquid; we drain it directly from the radiator. It is more convenient to remove the radiator itself together with the electric fan, and then disconnect it.
We start by using the “8” key to unscrew the engine protection, if any, from the side of the radiator drain plug.
If there is no drain valve, but there is a valve, then in order to drain the coolant without losses, spills, etc., you need to unscrew it with the expansion tank cap closed. First, you need to equalize the pressure in the cooling system to atmospheric pressure by opening the reservoir cap.
We place a container under the drain where the coolant will be drained. With the lid closed...
unscrew the valve...
By slightly opening and closing the expansion tank cap, we adjust this pressure. Next, unscrew the screws securing the air filter housing:
and air hose clamp:
Unplug the mass air flow sensor connector and remove the air filter housing,
while opening access to that part of the radiator where the pipes and steam exhaust hose are located:
We begin removing the radiator. Using the “8” head, unscrew the two nuts securing the pressure plate...
... and remove it.
Having tilted the radiator towards the engine, loosen the clamps on the radiator inlet pipe and steam exhaust hose.
The symbols in the figure are as follows: 1. Steam hose 2. Inlet pipe 3. Inlet pipe clamp 4. Steam hose clamp
We also loosen the clamp of the outlet pipe located at the bottom of the radiator:
Disconnect the hoses and fan connector. We take out the radiator along with the fan and remove the fan. To do this, use the key “to 8”
unscrew the two nuts and two bolts securing the radiator.
We move the fan to the new radiator:
Let's put everything back together in reverse order. At the bottom, the radiator rests on two rubber pads,
which during assembly should fit into the holes of the cross member. We put the pipes on the radiator fittings and tighten the clamps. We screw on the radiator and air filter. Fill the coolant to the maximum. When filling, to reduce the formation of vapor locks inside the cooling system, it is necessary to remove the hose from the fitting of the throttle assembly:
How can you remove air from the system?
There are several simple and effective ways to remove air from the heating system of a VAZ-2109, which are also suitable for other cars.
There are three most popular methods; they are based on the principle: oxygen molecules are lighter than water molecules and, therefore, they accumulate at the top, where they are removed.
It is important to fully open the heater valve to maximum air temperature before starting work.
- The first method is universal for cars in which you can unhook the hose, which heats up the throttle assembly or carburetor. These steps can be done on most VAZ cars.
Here the carburetor is the highest point of the engine cooling system. Therefore, this place is most suitable for removing air.
- Remove both protective covers and anything that prevents access to the heater.
- Unscrew the heating hose clamp and remove it from the fitting.
- Unscrew the cap of the expansion tank and pump air into it until coolant flows out of the throttle body or pipe.
- The moment liquid appears from the hose or fitting, quickly put the hose back in place and screw everything back as it was.
The above-described manipulations will allow you to get rid of the airlock by 99%.
- The second method is implemented by removing the pipes that heat the throttle assembly. It is a little similar to the one described above, but it does not require blowing out the tank.
- Similar to the first method, you need to remove the protective covers and warm up the engine to operating temperature and turn it off.
- Leave the cap on the expansion tank, but remove the hose from the fitting.
- When the cooling starts, put all the pipes in their places and put everything back together.
- One attempt may not be enough and the procedure may not give a positive result; it may need to be repeated a second time.
Important! Remember self-safety measures. The coolant in the circuit may be under pressure and its temperature may be above 85 degrees. If it gets on your skin, it may cause a burn. Try to protect your hands using at least improvised methods. For example, wear cloth gloves with rubber gloves on top.
- The third method is the simplest; it does not require disassembling the system. But unfortunately, this method is not as effective as the previous 2.
- Drive the car uphill so that the top is raised and the radiator cap is the highest point.
- Remove the cap from the expansion tank and radiator.
- Turn on the ignition and warm up the engine to operating temperature.
- Antifreeze will gradually enter the system. It will be necessary to add it from time to time to maintain the desired level.
- To increase coolant flow, increase engine speed. In this case, the antifreeze level may drop sharply and should be added urgently. The procedure should be continued until bubbles from the return line stop appearing.
A hot stream from the stove air ducts is a sign that the air has disappeared.
Copper or aluminum radiator, which is better?
If such a cooling system is functioning correctly, then there is no cause for concern. Typically, a breakdown of the cooling system is accompanied by a bunch of problems, the most serious of which is engine overheating. The correct choice of a high-quality cooling radiator will help neutralize such troubles.
VAZ 21093 heater radiator
A good radiator is a device that provides the cooling system with normal operation and lasts a relatively long time. The most common cause of radiator failure is considered to be loss of tightness. As a result, corrosion and radiator leakage may occur.
For this reason, it is important to consider what material was used to make the radiator
The dirtier the radiator, the worse it copes with its functions. It is recommended to clean the radiator in early June. You can do this yourself or in a car wash. So, which material is better: aluminum or copper? There is no clear answer to this question, but you can consider the nuances of each option:
- An aluminum radiator has the main advantage that it is lightweight and low in cost. Despite this, the device has lower thermal conductivity and is more susceptible to corrosion. Thus, it is worth noting that the disadvantages are more significant than the advantages.
- A copper radiator is characterized by greater durability, it is resistant to corrosion, durable and provides good heat conductivity, in other words, it has high efficiency.
This will reduce the risk of an air lock.
If you adhere to the rules of car operation, you can significantly reduce the risk of an air lock in the car. These recommendations look like this:
- compliance with the requirements of the service book for undergoing technical maintenance;
- checking the coolant level at least once a month;
- Fill only with recommended, high-quality coolant. Very often, if low-quality coolant is used, the system becomes airy.
Bottom line
It's time to take stock. The cooling system in every car plays a major role in providing the necessary cooling and maintaining the desired temperature of the internal combustion engine, and is also responsible for heating the interior. If you carry out scheduled maintenance on time and monitor the coolant level, then problems with the engine will not arise. After all, if airing in the system is not noticed and eliminated in time, this can lead to serious problems, in some cases to a major overhaul of the internal combustion engine.
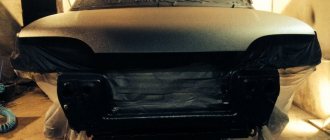
What causes damage to the body of the “nine”
There is an opinion that Soviet cars are equipped with an “indestructible” body. It is impossible to say this one hundred percent, but it is also wrong to refute such a statement. Indeed, the body of the VAZ 2109, the diagram of which is presented in the article, is made to perfection, but over time, any quality will come to an end.
VAZ 2109 body geometry
Almost all car bodies older than 5-7 years need repair. And there is nothing surprising about this. The living conditions of recent years, the huge amount of harmful substances, the general deterioration of the environment - all this cannot have a positive effect. Difficult, almost extreme, modern operating conditions also cause a lot of harm.
As a result, the state of the metal surface becomes deplorable, the internal combustion engine and parts are sent for disassembly, and instead of a worn-out but close-to-the-heart car, a new car takes its place. All this can be avoided if you know the features of the body layout, understand the intricacies and carry out preventive maintenance in a timely manner.