How to make noise in the fifth door on a Skoda A5
Continuing the topic of soundproofing the Skoda, I’m posting a photo report on removing the cricket in the fifth door.
The backstory is this: the cricket appeared last winter, when they installed number frames at the service. I didn’t touch it, it didn’t really bother me. Now, having free time, I decided to make some noise. There is nothing complicated in the process itself. The main thing is to pay attention to a couple of little things, everything else is simple.
For those who don’t understand the photos, just below is a video on how to remove the trunk trim.
Open the trunk. The first thing we do: under the door closing handle there is a screw securing the upholstery, unscrew it with a Torx -T20 key. Here is a nuance, we unscrew it so that the self-tapping screw unscrews and remains hanging on the handle.
Don't unscrew it all the way! So that later, when installing the casing in place, you DO NOT forget to screw in the inner handle. And so that when installing the handle itself, you don’t end up having to remove the trim again and put and screw the handle into place.
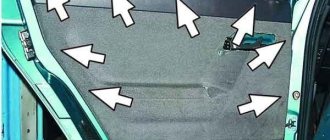
Then, we grab the trim with our hands, closer to the lock and gently pull it towards ourselves, you can pry it off with a screwdriver. We remove the casing starting from the lock, using our hands or a screwdriver to unclip the clips. Pull first in those places indicated by the red arrows. Then click off the middle, green arrows.
And finally, the bottom, yellow arrows, pull and at the same time pull the trim to the bottom, why down, when you remove it you will understand everything yourself.
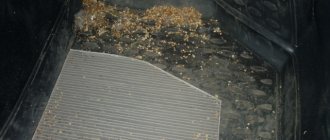
Next, we glue this noise-reducing material with vibroplast, glue it through the holes, and then seal the holes themselves.
We seal the casing with bitoplast, it can be completely covered for aesthetics, but in this case I don’t see much point.
When installing the trim in place, it is better to start from the middle of the glass and snap the clips into place.
Result:
1. No cricket; 2. The fifth door has become noticeably heavier; 3. There is no rattle when closing; 4. No effort required when closing;
The fifth door creaks - Skoda A5
Is there any way to treat the squeaking noise? This is especially noticeable when you slowly roll over small holes.
How to remove the trunk lid trim of Skoda Octavia A5
Dismantling the trunk lid trim on the Skoda Octavia A5 may be necessary when carrying out insulation work or sound-absorbing treatment of the body. In addition, there are often under the casing that can only be removed by removing the casing. Wiring harnesses may vibrate and make unpleasant noises when driving over bumps. This operation will also be necessary if you need to repair the rear door wiper drive. We will figure out how to remove the trunk trim on a Skoda Octavia A5 together.
Removing the trunk lid trim of the Octavia A5. Materials and consumables
For those who have never dealt with dismantling door panels, ceilings and interior trim, the work may seem complicated. In fact, knowing the location of the clamps, removing the trunk trim on the Octavia A5 is quite simple
Structurally, the trunk lid trim is made of two parts, upper and lower. Each of them is fixed to the metal profile of the cover using several types of latching pistons. Plastic caps are considered disposable, but if disassembled carefully, they can be saved and reused. Just in case, here are the catalog numbers of the fasteners, which are always available in stores:
- 4A0 867 276 A, piston for fastening the upper part of the casing, 2 pcs.;
- 3B9 867 289 — piston for fastening the lower part of the casing, 2 pcs.;
- 4B0 867 276 A — rivets for fastening the lower part of the casing, 10 pcs.
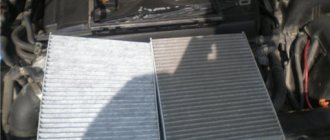
It is also advisable to have a branded disassembly wedge 3409 for work, but it can be replaced with improvised means, or, in extreme cases, made independently from hard plastic. This gadget will come in handy more than once. The photo shows the dimensions of the original VAG 3409 wedge.
Original VAG mounting wedge
Wedge dimensions
Knowing the numbers of clips and holders, you can easily buy them in any online store and from officials; all clips are standard for VAG cars.
Removing and installing trunk trim
The semi-soft pile upholstery of the luggage compartment consists of three parts: left, right and floor mat. The left and right clocks and trims are secured to the body with pistons and holders. The floor mat covering the spare wheel well is not secured in any way.
1. Lift the luggage compartment shelf and remove it from its support. 2. Disconnect the top clamps (cords).
3. Remove the luggage compartment shelf of the car.
4. Use a screwdriver to pry up the spacer pins and remove the two plastic pistons securing the upholstery to the luggage compartment shelf support.
5. Move the upholstery away from the car body. 6. Squeeze the latch and disconnect the wiring harness block from the luggage compartment lamp.
7. Remove the right side of the upholstery from the luggage compartment. 8. Remove the left side of the upholstery in the same way.
9. To remove the luggage compartment floor mat, lift it up and remove it from the luggage compartment.
How to remove the trunk trim on an Octavia A5
The work is not too difficult, the main thing is to follow the order of actions and try to save the clips.
The upper part of the trunk trim is removed in the following way:
- Unscrew screws 1 and 2.
- Remove panel supports 4.
- Using a mounting wedge, release the panel first on the sides (arrow A), then in the center, along arrow B.
- Remove the top part of the panel.
Before installation, we also orient clips 3 to the position required for fixation. After installation, we check the tight fit of the panels to the trunk door, and if necessary, additionally tap the fixation points. Good luck to everyone and quiet in the salon!
Dismantling sequence
Step-by-step instructions on how to remove the door trim from the Skoda Octavia A5 and other models:
- Use a key with a head diameter of 10 to separate the terminal mass from the battery cylinder.
- Use a T20 screwdriver to tighten the screw that secures the internal handles; use it to remove the upholstery on the right and left doors, do not break out the fasteners.
- Remove the safety nut cap that secures the windshield wiper at the rear. It is recommended to work slowly with a key.
- Remove the trim, the cable deck from the glass cleaner, drill out the rivets with a drill, and dismantle the wiper.
- Remove all latches and door card stoppers from the outside, separate the drive lock cables.
- Use a replaceable head or wrench to remove the linings, unscrew the nuts and bolts, having previously separated the working rod from the lock toggle switch.
- Disassemble the additional brake signal by separating the block connected to the cable from the heating elements on the rear window.
- Remove 4 bolts from the body.
- Dismantle the seal, remove the lock limiter handle, the nuts on the bolts, and the limiter. Work must be carried out through a special opening inside.
It is better to replace old and heavily worn parts with new ones, so as not to remove the casing again in the near future.
Sequence of actions for the front (driver's) door
In the Skoda Octavia Tour and other models, removal of the rear and front door trim is carried out in approximately the same way. The driver's license works as follows:
- First, remove the built-in speaker; it is better to use a special spatula for this.
- Using a T20 nozzle, remove 4 self-tapping screws and disconnect the wiring.
- Using the T30 nozzle, dismantle the handles, linings, and remove a pair of self-tapping screws: one will be on the side of the casing, and the second will be directly under the plug.
- Carefully remove the casing from the pistons.
Working with the trunk lid
The trim on the trunk lid of the Skoda Octavia is removed to improve the sound insulation and insulation of the body. Sometimes crickets start under the material, which also requires disassembly, since they cannot be removed by other means.
- Unscrew the support screw using Torx20 and the handrail.
- Starting from the lock, separate the working panel from the housing on the rear door.
- Detach the panel using a mounting wedge and use it to unclip the clips near the rear window.
- On the top part, unscrew a couple of screws, remove the panel supports, and the top part of the panel itself.
- Orient the clips to the optimal position for fixation.
- Check the tightness of contact of the panels with the trunk door, and if necessary, tap the fixation areas.
Removing the fifth door trim (trunk) — Skoda Octavia, l., year on DRIVE2
Each of them is fixed to the metal profile of the cover using several types of latching pistons. Plastic caps are considered disposable, but if disassembled carefully, they can be saved and reused.
How to make noise in the fifth door on a Skoda A5
Just in case, here are the catalog numbers of the fasteners, which are always available in stores: Also, for work, it is advisable to have a branded disassembly wedge; you can replace it with improvised means, or, in extreme cases, make it yourself from hard plastic. This gadget will not come in handy yet.
The photo shows the dimensions of the original VAG wedge. The original VAG mounting wedge. The dimensions of the wedge. Knowing the numbers of clips and holders, you can easily buy them in any online store and from officials; all clips are standard for VAG cars.
Skoda Octavia TSI1.8 manual transmission › Logbook › Repair of trunk lock
Good afternoon everyone, a month after the purchase, the light in the trunk began to turn on less and less often, in the winter evening it became very sad to look into the dark trunk, after googling I came to the conclusion that either a new lock or restore the existing one, but... I have to travel out of town to work, then the question of putting it on hold and not locking it in the event of an unsuccessful opening of the lock has disappeared. I started looking for a used one with non-working mikriki, people here are greedy and unnecessary things, trying to shove them at the cost of a used one with working mikrikami, but thanks to “pixel817” to this person, he gave it away completely free of charge, only paid for the shipping, ordered mikriki from China of 2 types , some with a presser foot, others without. Progress. 1. Drilled the rivets with a 4.2 drill in the center (It is advisable to try to drill in the middle so that the seat with the body is not damaged, because in the future I used the same rivet) 2. With a drill, it seems 8 or 9, I drilled the rivets from both ends I pryed it open with a screwdriver and pulled out the core 3. I unsoldered the mic (the mic was intact, I rang it, it worked, but at the very beginning, it didn’t connect any further, probably the contact group was worn out). The Mikrik stands up tightly; there is no need to glue it with anything; it is held on only by the soldered contacts; we bend the contacts and solder them. I installed it with a blue boot and a red one, it also fits, but its contacts are flat, you can see in the photo and you need to insert a pressure tab into them; it can be removed from the ones that are standing, and cut off the side pins 4. On one side of the body, we deepen the hole a little so that the nut 5 is recessed. Then we assemble in reverse order. 7. We tighten it with an M4 screw with a countersunk head, I put flat washers on both sides; we grind off the rest of the screw using sandpaper (I didn’t have one; I had to use a file) and to be sure, I uncorked the screw and nut in 3 places so that it wouldn’t come loose
It fit into the black lock casing without any problems, it has been working properly for 4 months
There is a 2nd lock with 2 micriks at the end index “D” if there is interest I can restore it and send it at a price I think we’ll agree