Opel Astra H manual
You will need: a flat blade screwdriver and a TORX T25 wrench. 1. Disconnect the wire from the negative terminal of the battery.
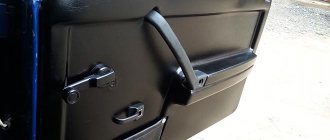
2. Using a special tool, press out the locking spring of the window lifter handle...
4….and then the handle support washer.
This is what a special tool for removing the rear door window handle looks like.
5. Carefully inspect the rear door window handle retaining spring. Replace the retaining spring if it is broken or deformed.
6. Use a screwdriver to pry up the decorative trim of the door handle...
7….and, overcoming the resistance of the plastic clips, remove the cover.
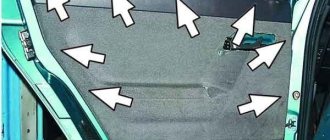
8. Remove the two screws securing the trim to the door panel.
9. Using a screwdriver...
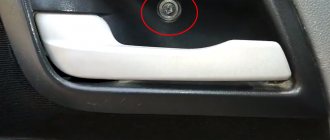
10….remove the decorative trim on the screw securing the trim to the door panel…
11….and remove the screw.
12. Remove the bottom screw securing the trim to the rear door panel.
13. Overcoming the resistance of the pistons, disconnect the bottom and sides of the upholstery from the door panel.
14. Lift the panel up, moving the upper part of the upholstery out of the holders on the inner door panel, and move the upholstery to the side.
This is where the holders for the upper part of the door trim are located.
15. Disconnect the rod end from the lever of the inner door lock handle.
This is how the plastic door trim pistons are located.
If the pistons are damaged, replace them with new ones.
16. Peel off the moisture-proof film from the door panel. 17. Install the rear door trim and all removed parts in the reverse order of removal.
4….and then the handle support washer.
How to remove the trim?
To repair you will need several items.
- Flathead screwdriver.
- T-20 key.
- Insulating tape.
- Scissors.
- Clips.
With these things, working on the door will take a relatively short period of time. It is recommended not to skip the steps of the instructions, plus adhere to the advice.
With these things, working on the door will take a relatively short period of time. It is recommended not to skip the steps of the instructions, plus adhere to the advice.
How to remove the rear door trim on an Opel Astra J
This is how the plastic door trim pistons are placed. Auto-closing doors of Opel Astra H If the pistons are damaged, replace them with new ones.
Using the same method, remove the upper door trim holder from the hole in the door panel. Peel off the moisture-proof film from the door panel. Install the front door trim and all removed parts in the reverse order of removal. Carefully remove the door handle trim, prying it from the top and bottom, trying not to scratch it; it snaps off tightly. Yura Christhild Just got rid of this problem yesterday.
One rear left door did not open for two weeks. And on this same door the window regulator failed, the handle did not work from the inside or from the outside either.
#8 WoronTs
- Regular visitors
- Posts: 3
- Car: Opel Astra G
- @Mention
Post edited by WoronTs: 01 February 2015 – 22:17
- Top
- Answer
- Quote
As soon as I got behind the wheel, I realized that at heart I am a Bertolet pilot.
What tools are needed to dismantle the casing?
It is necessary to remove the cladding when necessary:
- Correct the driver's and rear doors.
- Install additional sound insulation for the interior, since the factory assembly does not provide a good indicator.
- Repair the locking mechanisms of door handles and glass lifters.
To dismantle the door card you will need a minimum of tools; removal is carried out in the garage, the work time is no more than 15 minutes. Required tools:
- Phillips screwdriver or T25 key;
- flat blade screwdriver;
- clip cutter or wooden wedge.
Before removing the Opel Astra door trim, you must disconnect the negative terminal from the battery.
How to remove the door trim on an Opel Astra H
Oynatyshty baskar elementerin corset
Slot machines
- Zhariyalandy 2014 20 There.
- ufo-ts.ru LED car tuning and more. Detailed video manual for removing door trim.
- Automatic calculator
Instead of writing your offended comments, I would have taken the tool long ago and removed everything without any problems. Hands, yes, everyone grows biologically from the same place, the question is the desire to contribute not only hands, but also brains, which, purely theoretically, everyone also has))) I don’t see the point in continuing this dialogue. Good luck in mastering such a complex procedure)))
Features of disassembling rear and front doors
Removing the front and rear door trim is the same in the order of unscrewing the screws and removing the decorative trims.
For the driver's door, you may need to additionally disconnect the power window connector and remove the speaker if it is built into the door card.
The procedure for removing the speaker:
- Pull out the protective mesh.
- Remove the four screws securing the speaker.
- Disconnect the power supply terminals.
Remove Opel door trim
The car door serves for wind and noise insulation while driving, comfort for the driver and passengers. It is important to ensure that the door elements fit snugly against each other and do not wobble.
During routine repairs, it may be necessary to remove the door trim on your Opel. This will be useful when repairing or replacing power windows, locking mechanisms, and installing sound insulation. Also, the casing should be replaced if it has become faulty or has lost its presentable appearance. Repair will be required for the following types of damage:
- abrasions and greasy material;
- stains and drips;
- the presence of scratches and tears on the fabric and leather parts of the part;
- burnt areas (this also includes damage from cigarette ash;:
- creases (material replacement is necessary, even if there is no visible damage to the material yet. Fabric and leather quickly diverge along sharp corners at the bend site);
- cracks in the skin, breakages and defects in plastic parts.
It is convenient to carry out all such repair procedures at a service center - myopel.by specialists will help with diagnostics and troubleshooting. But if you want to save money, or the faults are minor, you can carry out the repairs yourself. To do this, it is important to strictly follow the algorithm of actions recommended by the manufacturer.
It is convenient to carry out all such repair procedures at a service center - myopel.by specialists will help with diagnostics and troubleshooting. But if you want to save money, or the faults are minor, you can carry out the repairs yourself. To do this, it is important to strictly follow the algorithm of actions recommended by the manufacturer.
Is it necessary to do this?
Let's take it in order:
- Noise – loud extraneous sounds and vibrations emitted by the engine, transmission, muffler, suspension; In addition, all the variety of street sounds can be heard from outside the car into the cabin.
- Noise insulation - protection of the car interior from external sounds and from noise emitted by units; in winter it serves as good thermal insulation, which is important
- Noise - in addition to minor troubles - interference with communication and listening to music, causes nervous irritation, rapid fatigue, reduces reflexes (for a driver behind the wheel this is life-threatening)
- Prolonged exposure to high noise conditions also causes vasoconstriction, which causes increased blood pressure and headaches.
- The stress on the heart due to vasoconstriction can cause angina over time and even a heart attack.
- In addition, buying a luxury car, but enjoying the roar instead of music, is unpleasant for anyone
- There are few options: order complete sound insulation in a salon or at a service station, if the price suits you
- Or save money and do it yourself
- You should not use linoleum or building materials; it is better to purchase specialized ones, they are guaranteed non-toxic and have higher noise and vibration absorption rates
- Vibration absorber - bitumen or mastic material that absorbs vibrations, converting energy from vibrations into heat (Vibroplast, Bimast)
- Sound reflector - a material that reflects all sounds in the opposite direction, effective when processing the hood, engine shield and external processing of the car (Splen)
- Sound absorber is a porous material, when passing through which noise and sounds subside and are absorbed (Accent, Isoton)
- Padding (anti-creaking) material – helps eliminate squeaks from trim and decorative panels, as well as dashboard elements (see Soundproofing a car’s dashboard is always necessary)
Dismantling procedure
Especially for Astra modifications, the repair kit contains a key for releasing the locking spring from the window lifter handle. If such a tool is not available, experienced craftsmen use steel wire with a hook at the end to quickly disassemble the handle without breaking the locking latch. Removing the door trim step by step:
- Release the locking spring in the window lifter handle and remove the handle.
- Remove the handle support washer.
- Using a flat-head screwdriver, pry off the decorative trim of the door handle.
- Remove the cover, overcoming the resistance of the clamping clamps. To do this, lift the part and move it to the side.
- Unscrew the two screws located under the trim.
- Remove the decorative trim on the door panel by prying the plate with a screwdriver and unscrewing the screw.
- Unscrew the bottom screw securing the trim to the door panel.
- Slide a wooden wedge under the bottom edge of the cladding. Carefully unfasten the perimeter clips.
- Lift the casing up and remove the card from the grooves in the internal holders located along the top edge of the casing.
- Disconnect the rod end from the inner lock handle mechanism.
Installing the door card is carried out in the reverse order.
Related Posts
The first step is to open the door, remove the armrest trim and the window lift buttons. Removing the dashboard, removing the trim of the Opel Astra H interior panels.
Removing the door trim on an Opel Astra J begins by removing the decorative plug located in the door lock release handle. Therefore, the problem arose - how and with what to remove the door trim? We open the connector of the door opener lock, to do this we pull it and pull out the free end of the cable. Removing the door trim on an Opel Astra J.
Video: how to remove the rear door trim of the Opel Astra g
I don’t know how to remove the trim on the Opel Astra G Caravan, or rather, on the driver’s side, I can’t remove the door closing handle. Removing the door cards of the Opel Astra H. Disassembling the instrument panel of the Opel Astra H.
Opel Astra H cabin filter replacement. Rear speakers in Opel Astra.
How to remove the door trim of an Opel Astra g
Opel Astra Club forum. First, you need to pry off the door trim from below, then, once the lower clips are disconnected, move on to the upper ones. The main thing is not to forget to disconnect the connectors and remove the cable from the opening handle. Sound insulation of the Opel Astra J. The brand new Astra was booked into our Auto-Loker technical center for complete sound insulation of the interior and arrived exactly on time. How to remove the rear door trim of an Opel Astra H.
How to remove the door handle from Opel. Separate the top edge of the panel from the door and remove the latter from the door frame. If necessary, the glued insulating plastic membrane can be peeled off from the door - proceed with extreme caution, try not to tear the membrane. Installation is in the reverse order.
How to remove the door trim on an Opel Astra H
Replace broken plastic clips. If you removed the membrane, make sure it is securely glued in place.
On models with power windows, use a screwdriver to carefully pry the switch for controlling the operation of the electric drive from the trim and disconnect the electrical wiring from the switch.
Aibhlinn I'm going to buy an aster, is it worth it Igor Acey, make sure that the assembly is German Denis Kwashaun Igor, where can you get a German Artem Guus Year of operation, no problems.
Except for the creaking noise in the front door panels, it's annoying. Nikolay Masum Germans are a hatchback and a station wagon. Denis Kwashaun I took the station wagon, they said it was assembled in England Vitaly Frode The car is fierce.
I'm very glad I bought it. Kirill Abilana Artem, the same garbage, especially on uneven surfaces, as if there was some kind of crunch, I can’t understand why Kirill Abilana After a year of operation, apparently due to crappy roads, either the piston broke off or who knows what, but in the ceiling lining near the feet -signal, a creaking appears, it’s wildly annoying. Then you seem to stick it up harder, it stops, after a while, due to vibration, it falls out again and the creaking again Garik Amitzah I have operating experience, N and J.
In my opinion, N is better, and J is just minor annoying troubles. Vladimir Yankel I’ve owned J for 8 months, well, what can I say? I used to have a Kia Pro Ciid 1.6 handle, so it drove fine, and if you push it, it eats 9.8 maximum, and the Jaster stsuko eats 10, in the city, and if they try to dump it, then 12, 6 and in terms of overclocking it loses to everyone. In general, for me, the Koreans would be better off if they had the opportunity to sell it already, but there is a loan for another 2 years Taras Honemoana I took j in September
What can be done after removing the door card
Drivers rarely tune the closed trim of the Opel Astra. The standard door card is made of high-quality plastic, its texture reminiscent of shagreen or smooth leather. There is a large selection of colors: gray, black, blue, brown. In most cases, disassembling the side panel is necessary to install new sound insulation.
To carry out the skimmer correctly, it is necessary to peel off the moisture-proof film from the door panel and carry out a complex of anti-corrosion treatment for the internal door pockets.
Source
